Live Data Cloud Networking
The Live Data Cloud feature makes it possible to expose your private OAS instances to external clients and networks via a dedicated OAS hosting instance. You can think of this like a data proxy that sits within a public facing network, such as a DMZ, and routes data from your private OAS instances to external clients. This allows you to make your data available outside of your private networks without exposing your internal network and OAS instances.
The architecture of this feature ensures that your private OAS instance servers do not need a fixed IP address. Each private OAS instance will automatically register themselves with the hosting instance using a unique well-known alias. All your external clients need to know is the domain or IP address of the hosting instance, the alias of the internal server they want to talk to and the Tag path where the data is stored.

With the Live Data Cloud feature you can also pipe data between disparate private networks via a central hosting instance acting as a data gateway. As long as each private network can see the network where the hosting instance is stored and they know the alias of the private instance they want to read data from, the hosting instance will handle the data routing.
Licensing
The Live Data Cloud feature is provided as part of the Distributed Network Architecture feature, which must be enabled in your license on the private OAS instances. In the Configure OAS license screen this is displayed as Networking Enabled.

The OAS hosting instance does not need a license and you can have as many hosting instances as you need. Clients can read Tag data from multiple difference hosting instances.
Security
The credentials that you use to access an OAS instance using Configure OAS or any of the APIs and SDKs also apply to the Live Data Cloud architecture. When you connect to a private instance via the hosting instance, you will need to provide the same credentials that you would if you were connecting to the private instance directly. The same security features apply and you can restrict the allowed operations using a security group configuration.
The connection between the client, the hosting instance and the private instance is encrypted and compressed.
Live Data Cloud Configuration
Every Live Data Cloud architecture needs at least one OAS private instance and one OAS hosting instance. The private instance can be installed in a private network, but it must be able to see the hosting instance network. The hosting instance network can be a private network or a public network as long as it is reachable from the private network and from any networks where the clients will be connecting from.
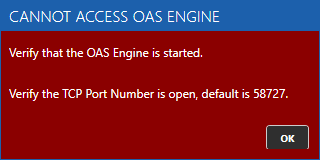
The OAS instances will use port 58727 as the primary secure communication channel. If this port is not available, it will attempt to connect on port 58737. Please ensure that these ports are permitted through any firewalls that may be present.
Configure the Hosting Instance
On the hosting instance server install the OAS platform. You can use an on-prem server, a virtual machine or a public hosted service provider.
The Live Data Cloud hosting service is now active.
By default, any private instance can now register themselves with the hosting instance. If you would like to limit which instances are allowed to register themselves with the Live Data Cloud hosting instance, see the Restricting Live Data Cloud Registration section below.
Configure the Private Instance
This section assumes that you have one or more private OAS instances already installed and running. You will need the hostname or IP address of the hosting instance you wish to connect to.
- Use the Configure OAS application to connect to your private instance.
- Select the Configure > Live Data Cloud menu to open the Live Data Cloud screen.
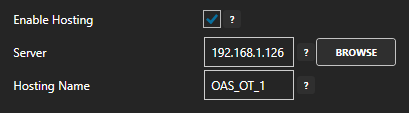
- Tick the Enable Hosting checkbox.
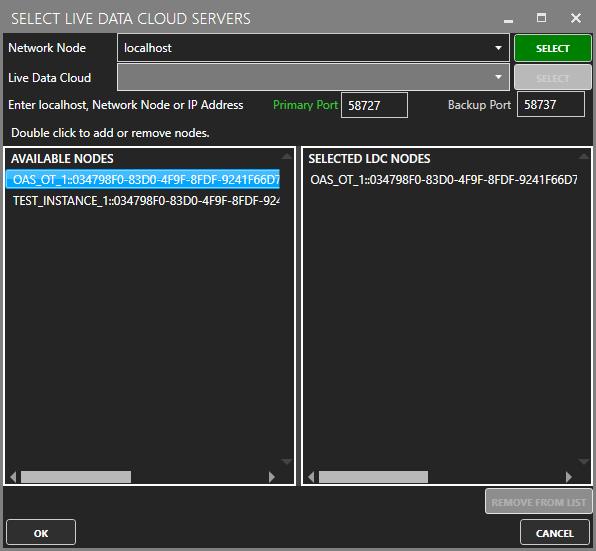
- Click on the Browse button to bring up the Network Node Editor window.
- Enter the IP or hostname of the hosting instance in the Network Node text field and click on the Add button.
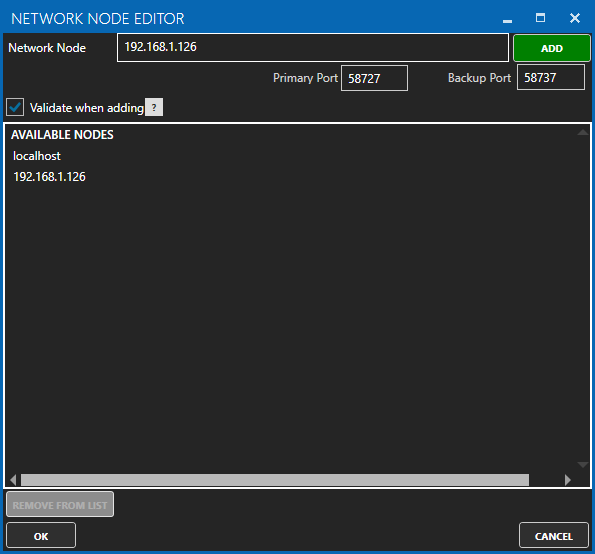
This will attempt to communicate with the remote instance to validate the connection. If the connection is not successful you will see an error message.
If you want to skip the validation you can untick Validate when adding checkbox. Select the node and click OK.
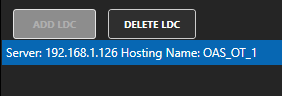
- Provide a Hosting Name, which is an alias that you will use to access Tag data on this instance. For example: OAS_OT_1
- Click on the Add LDC button to add this configuration.

- Save your configuration using the Save button.
Your Live Data Cloud configuration is now active.
Restricting Live Data Cloud Registration
By default, any OAS instance that can reach the hosting instance network will be able to register with the hosting instance.
You can make this more restrictive by configuring the allowed Live Data Cloud instances on the hosting instance.
- Use the Configure OAS application to connect to your hosting instance.
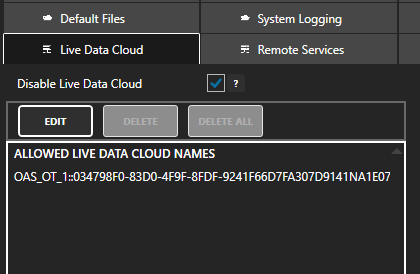
- Select the Configure > Options menu to open the Options screen.
- Select the Live Data Cloud tab.
- Tick the Disable Live Data Cloud checkbox.
- Click on the Edit button.
- You will see a list of instances in the Available Nodes list. Double click on the node that you wish to allow. It will appear on the right hand side list box.
- Click the OK button.
- Your allowed list should now contain the allowed node alias.
- Click on Apply Changes to save the configuration.
Connecting to an Instance using Live Data Cloud
To connect to a private instance from an external network you will need to know the hosting instance IP address or host name and it must be accessible from your network.
You can connect to a private instance using any of the connection methods such as Configure OAS, REST API, .NET Data Connector or OAS products that can reference remote tags such as UIEngine, HMI, trend or alarm components, calculations, data logging, recipes, data route, OPC UA client and Excel.
This section provides examples of each type of connection as the method might differ slightly for each case.
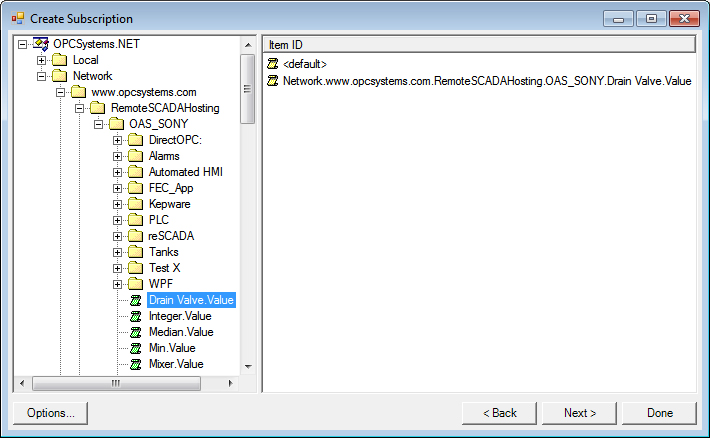
Remote Tag Access
You can access Tag data remotely by specifying the Tag name the remote tag notation. In the following example, you are connecting to the 111.122.133.144 IP address, which represents the hosting instance, followed by the RemoteSCADAHosting key word, followed by the private instance hosting name (alias), followed by the Tag path of the Tag you want to read.
\\111.222.333.444\RemoteSCADAHosting.OAS_OT_1.Tag1.ValueYou can use this notation in the following OAS products and features:
- UIEngine
- WPF HMI .NET
- WinForm HMI .NET
- Cross-Platform HMI
- Trend .NET
- .NET Data Connector
- OPC UA Client
- Microsoft Excel
- Data Historian
- Recipe
- Calculation Tags
- Data Route Target Tags
- Web HMI remote OAS Tags
- Web Trend remote OAS Tags
Web Tag Access
This method allows you to read and write Tag data on private instances via the Live Data Cloud hosting instance. It applies to JavaScript applications that use the OAS client libraries for communicating with an OAS engine. In your client code specify the IP Address, Network Node Name, or registered domain name of the hosting instance using the serverURL configuration property.
serverURL: 'http://111.122.133.144:58725'
You can then specify the Tag paths using the RemoteSCADAHosting key word, followed by the private instance hosting name (alias), followed by the Tag path.
RemoteSCADAHosting.OAS_OT_1.Tag1.Value
Web Tag access is applicable for the following:
Alarm Logging and Notification Access
An external OAS instance can be configured to perform Alarm Logging and Alarm Notifications by using the Nodes filer provided by these features. Normally, when a local instance is configured for alarm logging or alarm notifications, the Network Nodes filter is set to localhost. However, you can also log and notify based on alarm data sourced from private instances via your Live Data Cloud hosting instance.
Using the Configure OAS application, connect to a local OAS instance where you want to configure alarm notifications or logging.
In the Nodes tab of the Alarm Logging or Alarm Notification screen, click on the Edit button.
Provide the IP or host name of the Live Data Cloud hosting server and click SELECT. In the Live Data Cloud drop-down list, select the private instance hosting name (alias) and click the second ADD button. You will see the node added to the list. Click OK to accept this change. The network node will be listed with the following notation:
RemoteSCADAHosting.111.122.133.144.RemoteSCADAHost.OAS_OT_1Configure the remaining parts of the Alarm Logging or Alarm Notification settings and then add and save your configuration. The instance you just configured will now listen to alarms coming from the private instance but routed via the Live Data Cloud hosting instance.
This method is applicable for the following:
Web Alarm Access
This method allows you to read alarm information from private instances via the Live Data Cloud hosting instance. It applies to JavaScript applications that use the OAS client libraries for communicating with an OAS engine. In your client code specify the IP Address, Network Node Name, or registered domain name of the hosting instance using the serverURL configuration property.
serverURL: 'http://111.122.133.144:58725'
You can then specify the network nodes using the RemoteSCADAHosting key word, followed by the hosting instance IP or hostname, followed by RemoteSCADAHosting key word, followed by hosting name (alias).
networknodes:[
    "RemoteSCADAHosting.111.122.133.144.RemoteSCADAHost.OAS_OT_1"
]
Web Alarm access is applicable for the following:
OPC UA and OPC DA Client Access
The OAS Engine has the Open Automation Software OPC UA Server included. Connect to server url opc.tcp://localhost:58728 if OPC UA Client is on same PC, or opc.tcp://<NetworkNode or IP Address>:58728.
opc.tcp://192.168.0.1:58728'
Use Remote Tag Access syntax listed above for Live Data Cloud networking. The OPC UA Client will be able to browse for RemoteSCADAHosting under Local or Network as a folder to browse to remote OAS Tags.
When providing Tag access to remote third party Classic OPC Clients install OAS setup on each OPC Client PC to install the OPCSystems.NET OPC Server. You can use a Custom installation to install only OPCClient.NET if you prefer not to install everything on the OPC Client PC.
Modify the file NetworkNodes.txt with Notepad or other text editor to add the IP Addresses, Network Nodes Name, or registered domain names that have the OAS server tags running. The file will be in C:\Program Files\Open Automation Software\OAS\.
You can then browse for the Tag name and property (most common is Value) directly in the OPC Client in the Network folder to return the following to the OPC Client as and OPC Item.
Network.111.122.133.144.RemoteSCADAHosting.OAS_OT_1.Tag1.Value
OPCSystems.NET OPC Server access is applicable for the following
- OPC Client Connector
.NET Configuration Access
The OASConfig component provides free access to all configuration settings of a service including Tags, Data Logging, Alarm Logging, Alarm Notification, Security, etc.
Each method of the OASConfig component has an optional NetworkNode parameter and RemoteSCADAHosting parameter. When you specify these parameters it will perform the configuration access to the remote service specified by IP address, network node name, or registered domain name through the Live Data Cloud server to the Live Data Cloud data server.
VB Example:
ResultString = OASConfig1.TagCSVImport(CSVStrings, "111.122.133.144", ErrorString, "OAS_OT_1")
C# Example:
ResultString = OASConfig1.TagCSVImport(CSVStrings, "111.122.133.144", ErrorString, "OAS_OT_1");
.NET Configuration access is applicable for the following
- OASConfig component (free to use)
Web Configuration Access
View the REST API documentation on how to access configuration information via web interface.