How to View OPC Server Data in a Web Browser

Open Automation Software Tags can be defined to connect to Classic OPC Data Access 2.xx and 3.0 Servers with the built in OPC Interface. Once you have connected to your OPC Server Data, you can use our Web HMI tools to visualize your data in a Web Browser. The Web HMI web interface is based on standard technologies including Javascript, jQuery, JSON, HTML and CSS. This tutorial walks you though downloading and installing OAS, configuring an OPC Server driver, configuring tags and building a Web Application for your data.
Step 1. Download and Install the Open Automation Software and Start the OAS Service
If you have not already done so, you will need to download and install the OAS platform. Fully functional trial versions of the software are available for Windows, Windows IoT Core, Linux, Raspberry Pi and Docker on our downloads page.
On Windows run the downloaded Setup.exe file to install one or more of the Open Automation Software features. Select the default Typical installation if you are not sure what features to use or the Custom installation if you want to save disk space on the target system. When prompted agree to the End User License Agreement to continue the installation.
For more detailed instructions and video tutorials, visit the installation guide for your system:
Windows Installation | Linux Installation | Raspberry Pi Installation | Dockers Installation
The OAS Service Control application will appear when the installation finishes on Windows. Use this application to start the 3 Services. Run the Configure OAS application on Windows and select Configure-Tags; if the first time running, the AdminCreate utility will run to create an Administrator login as shown in Step 1 of Getting Started – Security.
Step 2. Configure OPC Server Tags
OAS provides multiple ways to add and define tags:
- Manually add and define Tags using the Configure OAS application. …learn more…
- CSV Import and Export …learn more…
- Programatically …learn more…
- One Click Allen Bradley …learn more…
- One Click OPC …learn more…
To add a Tag manually:
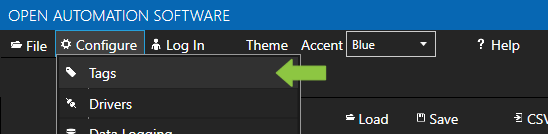
- In the OAS Configure Application, select Configure >> Tags from the top menu.
- Select localhost or the remote service you wish to modify with the Select button to the right of the Network Node list.

- Click on the Add Tag button located at the top of the Tag browser on the left portion of the screen.

- A dialog box will appear. Enter a name for your new tag and click ok.
- A configuration screen will appear for your new tag. Select OPC in the Data Source dropdown box.

- Use the Browse button to the right of the OPC Item to browse OPC Servers for the desired OPC Item.

- Select Local, the desired OPC Server, branch within the OPC Server, and OPC Item and click OK.

- Specify the desired OPC Update Rate for the Tag.
- Click Apply Changes at the bottom right of the window.
To add Tags with One Click OPC:
- In the OAS Configure Application, select Configure >> Tags from the top menu.
- Select localhost or the remote service you wish to modify with the Select button to the right of the Network Node list.
- To begin the One Click OPC process select the Group you would like to import to in the Tag configuration. If you want to import to the Root Level, select the Tags Group at the top of the tree.
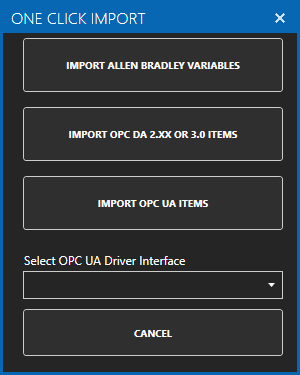
Then select the One Click Import button on the top menu bar.

- Click on the Import OPC DA 2.XX or 3.0 Items Button in the pop up window.
- Use the One Click OPC Wizard to browse for a branch as a starting position within an OPC Server or just select the OPC Server name itself to add all items from the selected OPC Server. For the best networking design select OPC Servers from Local even if you are configuring a remote OAS Service.
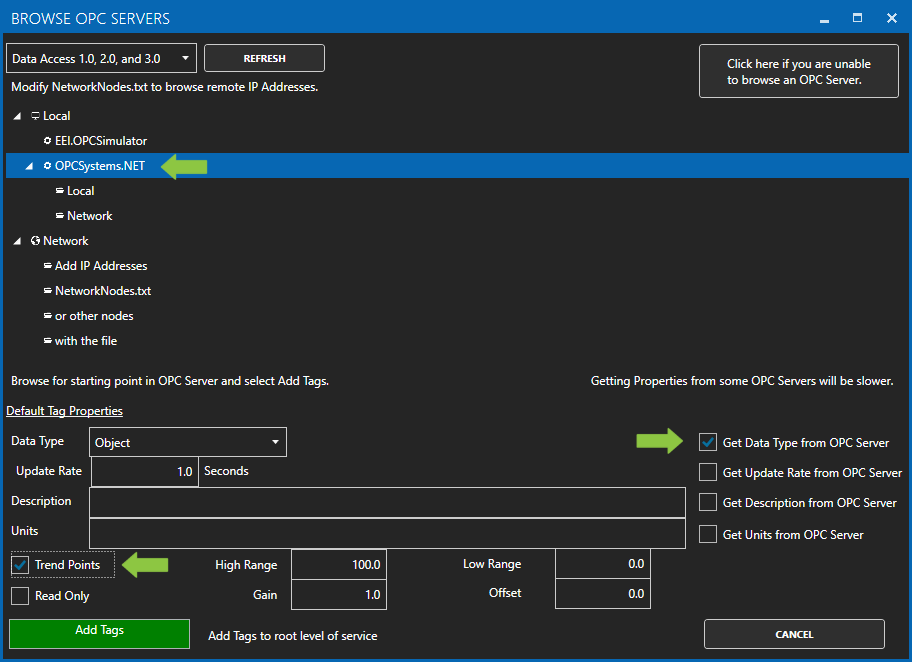
- Select to enable the options to Get Data Type from OPC Server and optionally the Descriptions. Additionally if you want to specify to Trend all of the points select Trend Points.
- Click Add Tags and it will automatically add all of the OPC Items from the OPC Server Branch you have selected and all of the sub Branches beneath it.
- Select the Save button on the toolbar at the top.
For more detailed instructions on Configuring OPC Server Tags, visit our Getting Started OPC tutorial or the One Click OPC tutorial or watch the video tutorial below:
Step 3. View in Web Browser
Configure Web Services on OAS
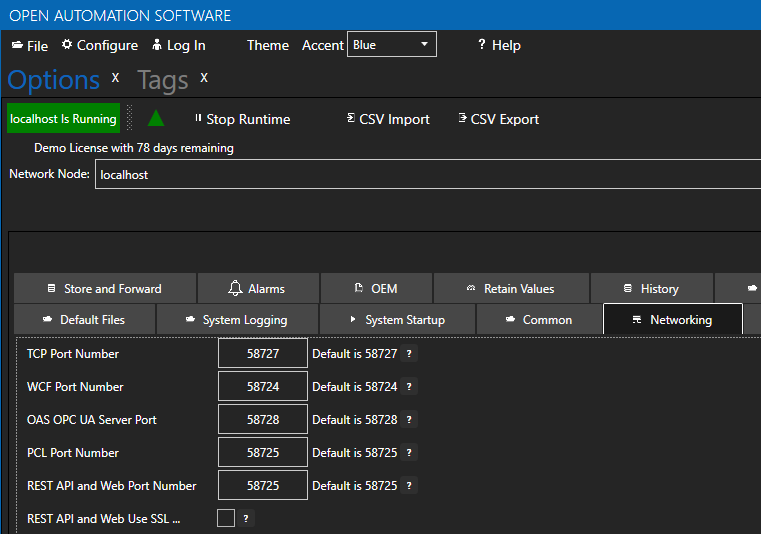
Open the OAS Configuration application and select Configure > Options, then select the network node (localhost if working on the local machine) and click Select. Under the Networking tab, locate the field for REST API/WebHMI Port Number. The default is 58725 but can be changed. If you are accessing the server from a remote client, you will also need to make sure your machine and/or company firewalls allow TCP traffic on the selected port. If you are using SSL we suggest using a different port number such as 58726 to avoid port conflicts. You can find more detailed information in our knowledge base article Configuring OAS Web Services.
OAS Web interfaces are provided for use by both experienced developers and novice users. Use the Web HMI Dashboard to first test the interface to your live data. If you are experienced with HTML and CSS see Code for Developers section after the following HMI Dashboard no code solution.
HMI Dashboard – No Code
View the following video demonstrating the Web HMI Dashboard.
- 00:00 – Introduction
- 00:08 – What’s Web HMI Dashboard
- 00:20 – Features of a WEB HMI Dashboard
- 00:23 – Secure Login
- 00:31 – Modular Design
- 00:37 – Configurable
- 00:44 – Customizable
- 00:49 – Lightweight
- 01:05 – Demo
- 01:33 – Alarm Dashboard
- 01:39 – Trend Dashboard
- 01:55 – Add a Dashboard
- 02:04 – Add a Module
- 02:59 – Built-in Modules
- 03:04 – Numeric Tag Module Configuration
- 03:59 – Add another numeric tag module / rewrite module
- 04:53 – Boolean Tag Module
- 05:00 – Boolean Tag Configuration
- 05:56 – Display Multiple Tags with real time values
- 06:04 – Tag Data Module Configuration
- 07:09 – Alarms Module
- 07:17 – Alarms Module Configuration
- 08:21 – Trends Module
- 08:28 – Configuration
- 10:28 – Custom Module
- 10:34 – Configuration
- 11:16 – Demo Module
- 11:43 – Getting Started
- 11:47 – Application Set up
- 12:00 – Open Service Control
- 12:58 – Open OAS Configuration App
- 13:20 – Static Files
- 13:35 – Configuration
- 14:46 – Removing a Module
- 16:25 – Deploying to IIS
- 18:41 – Conclusion
Open a browser to the Web HMI Dashboard at the following address:
http(s)://<server>:<port>/app/home
For example, if you are on the same machine as the OAS Service installation, you are not using SSL, and you are using the default port, the URL will be:
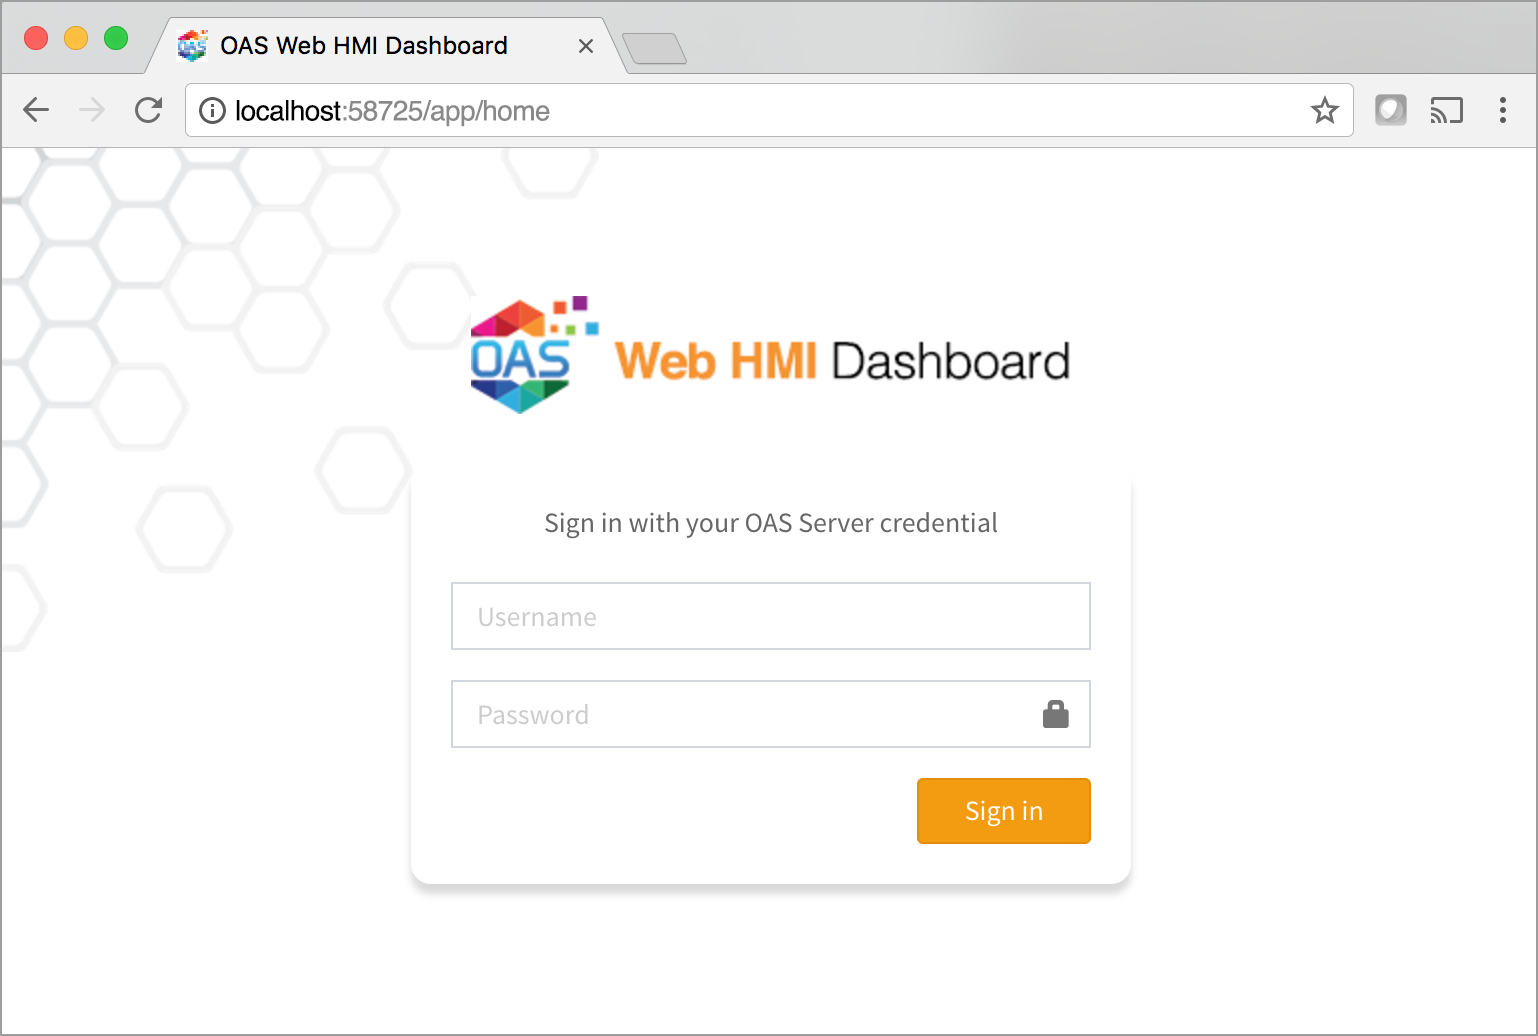
http://localhost:58725/app/home
Once presented with the Web HMI Dashboard login screen, enter in an OAS server credential, or leave blank to use the default server credential and click “Sign In“.
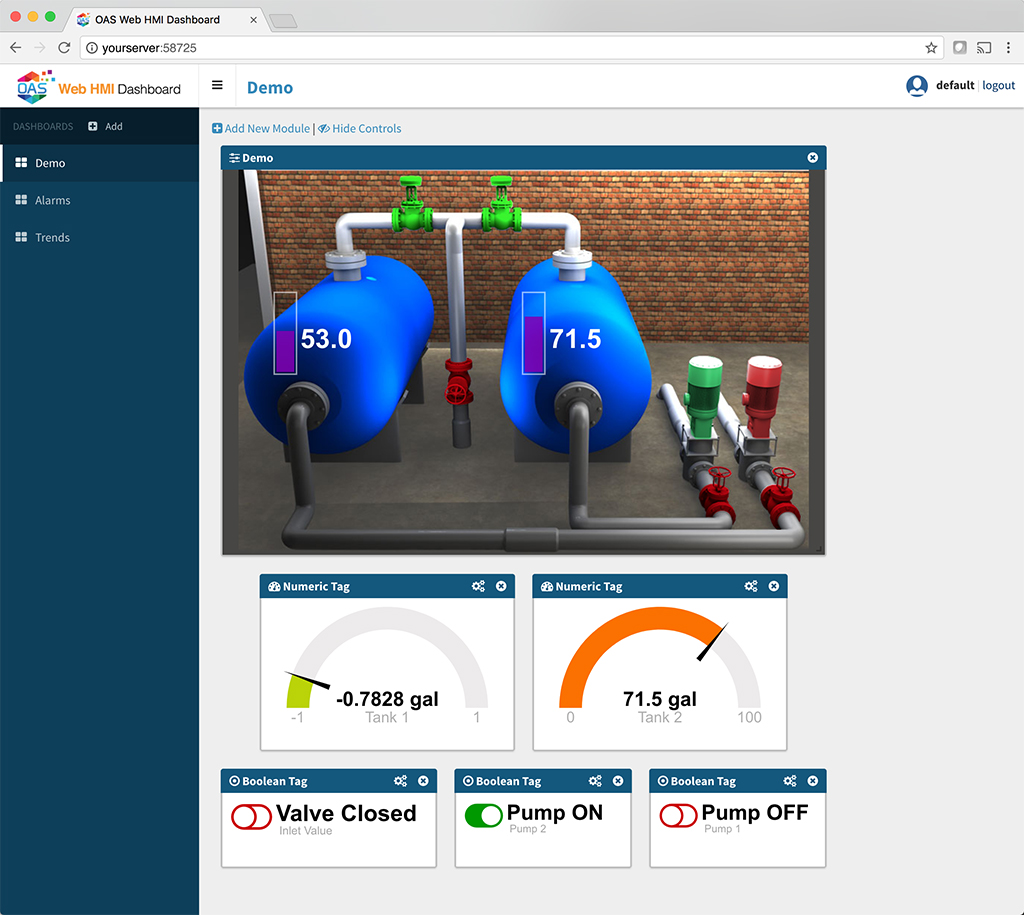
Upon successfully logging in, you will be presented with your personalized Web HMI Dashboard. If the application is in Demo Mode, you will be provided with some demo dashboards and you will see live data flowing into each module. All modifications to your dashboard will be saved within your login and remembered for your next session.
Additional Configuration Settings
By default, the Web HMI Dashboard will run in Demo Mode which will do the following:
- All logins no matter the credentials, will be allowed to log into the application and be provided individual dashboard settings
- New logins will be pre-populated with demo dashboards
To alter any application configurations, locate the Web HMI Dashboard directory located in the installation directory for Open Automation Software. This is typically in C:\Program Files\Open Automation Software\OAS. The Dashboard directory is labeled “www“.
Within this directory, look in the “js” directory and locate the file app_config.js. This is a JSON file containing application settings.
oas_url : optional hard-coded URL of the OAS server location. Omit this setting and the application will assume the server:port used to connect to the app
show_login_url : <true | false> determines if the OAS url can be supplied by the user in the login screen to point the application to a specific OAS service
session_timeout : <integer> number of minutes of inactivity before the user session is ended and the login screen is displayed
demo_mode : <true | false> enables or disables demo mode
demo_dashboards : a JSON representation of the demo dashboards pre-populated for new users in demo_mode
Code for Developers
Create a Project Directory and Copy External Libraries
Create a project directory. (Example C:\myWebHMI). Then copy the following files from your OAS installation directory (Likely: C:\Program Files\Open Automation Software\OAS\HTML_HMI) into the appropriate directories:
- js/lib/jquery-1.8.3.min.js
- js/lib/json2.js
- js/opc-lib-min.js
- css/opc-style.css
You can use any version of jQuery as long as it is v1.8 or greater, and the json2 library is only necessary for older browsers such as IE 8.
Enter Basic HTML Code
Open/create a new text document and add the following minimum code:
<!DOCTYPE html>
     <head>
          <script type="text/javascript" src="js/opc-lib-min.js"></script>
          <script type="text/javascript" src="js/lib/json2.js"></script>
          <link rel="stylesheet" stype="text/css" href="css/opc-style.css"/>
          <script type="text/javascript">
               OPC_config = { token:'7e61b230-481d-4551-b24b-ba9046e3d8f2',
               serverURL: 'http://localhost:58725' };
          </script>
     </head>
     <body>
     </body>
</html>
Change the serverURL in the script tag above to the IP Address, Network Node Name, or registered domain name of the Linux or Windows devices where the OAS Engine is located.
HTML to Display Tag Data
In the body add the following code to display the Ramp tag value, Pump tag value and a button to toggle the Pump Tag:
<div>Ramp Value = <label id="txt1" opc-tag-txt='{"tag":"Ramp.Value","config":{"formats":{"bad_q":"?????","float":"0.0"}}}' ></label></div>
<div>Pump Value = <label id="txt2" opc-tag-txt='{"tag":"Pump.Value","config":{"formats":{"bad_q":"?????"}}}' ></label></div>
<div><button id="tog2" opc-tag-set='{"tag":"Pump.Value","config":{"evt":"click","set":"toggle","set_src":""}}'>Toggle Pump</button></div>
If a tag is in a group, preface it with the group name in your markup. For example: BuildingA.Pump.Value. If the tag is located on a different system than the serverURL or you want to host data from multiple OAS Engines use the Remote Tag Access syntax. You can learn more about that here: Getting Started – Networking.
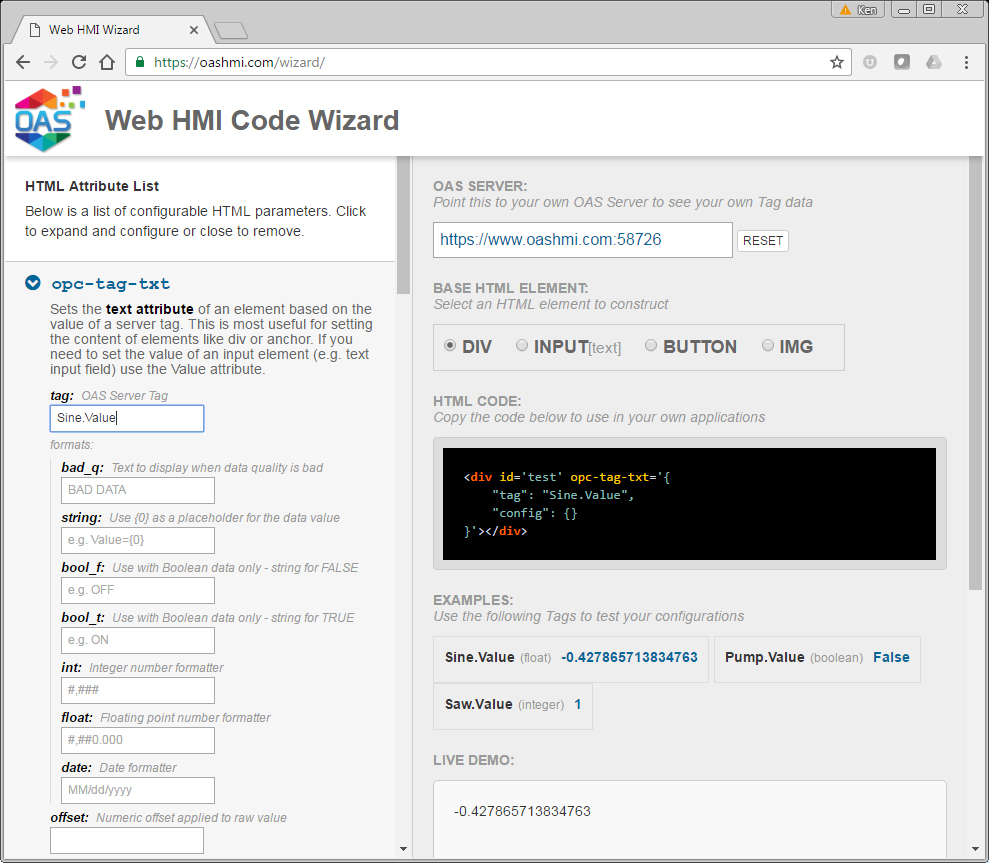
OAS Web HMI Wizard
If you are not super comfortable with HTML, you can use our Web HMI Wizard to help you create the markup to display your tag data. There is a tutorial about it here: Web HMI Wizard Tutorial.
Save your file. Deploy your application to any web server. This can be IIS on Windows, or any HTTP server on Linux, and even cloud hosting services. To see the results open a browser to the location of your HTML file.
Your final code should look like this:
<!DOCTYPE html>
     <head>
          <script type="text/javascript" src="js/opc-lib-min.js"></script>
          <script type="text/javascript" src="js/lib/json2.js"></script>
          <link rel="stylesheet" stype="text/css" href="css/opc-style.css"/>
          <script type="text/javascript">
               OPC_config = { token:'7e61b230-481d-4551-b24b-ba9046e3d8f2',
               serverURL: 'http://localhost:58725' };
          </script>
     </head>
     <body>
          <div>Ramp Value = <label id="txt1" opc-tag-txt='{"tag":"Ramp.Value","config":{"formats":{"bad_q":"?????","float":"0.0"}}}' ></label></div>
          <div>Pump Value = <label id="txt2" opc-tag-txt='{"tag":"Pump.Value","config":{"formats":{"bad_q":"?????"}}}' ></label></div>
          <div><button id="tog2" opc-tag-set='{"tag":"Pump.Value","config":{"evt":"click","set":"toggle","set_src":""}}'>Toggle Pump</button></div>
     </body>
</html>
Also see: