OAS in Docker Containers
The OAS Platform is capable of running in Docker containers on both Windows and Linux, with only a slight variation in configuration. In this article we will walk through the necessary steps for basic containerization, but using these principles you can build your own images and configure them for your particular needs.

- 00:00 – Introduction
- 00:15 – Container Installation
- 00:34 – Application Stack
- 00:48 – Steps for running docker
- 01:32 – Create a Docker Image
- 04:04 – Set of Instructions
- 05:10 – Commands
- 05:45 – Run your Container
- 10:26 – Configure the License Host
- 14:19 – Remaining Steps
- 18:06 – Configure Licensing
- 18:55 – More Information
Prerequisites
The OAS Platform was designed to be a high performance IoT Gateway, Data Logging engine, data visualization server, and more. To benefit from these features, whether the server is running as a stand alone or in a container, be sure to consider the following:
- Docker experience – this document assumes some familiarity with containerization concepts, specifically with Docker, and is not intended to be a tutorial on Docker or containers in general. To learn more about Docker, see the following: Docker-What is a Container?
- Networking – the server must be able to reach external resources, and if being accessed by any of the OAS SDKs for visualization or programmatic configuration, the server must be accessible from external sources. This is easily accomplished by exposing the necessary ports. Port 58727 is the default port used for TCP communications when using .NET SDKs and the OAS Configuration application. Port 58725 is the default port used for Web Visualization tools as well as the REST API. Running stand alone, you are free to change these ports as needed. However, when running in a container, these default ports should not be changed (more on this later).
- Memory and CPU – when running multiple instances of the OAS Platform in containers, expect memory and CPU utilization to increase as a result. The amount of each needed entirely depends on your individual configurations, such as how many Tags are being used in each container, data logging, alarming, etc. Be sure to size your deployment platform only after testing with your intended configurations to determine the footprint. You can refer to the following for suggested CPU and RAM hardware requirements based on Tags and features to be implemented: OAS Recommended Hardware
Containerization Options
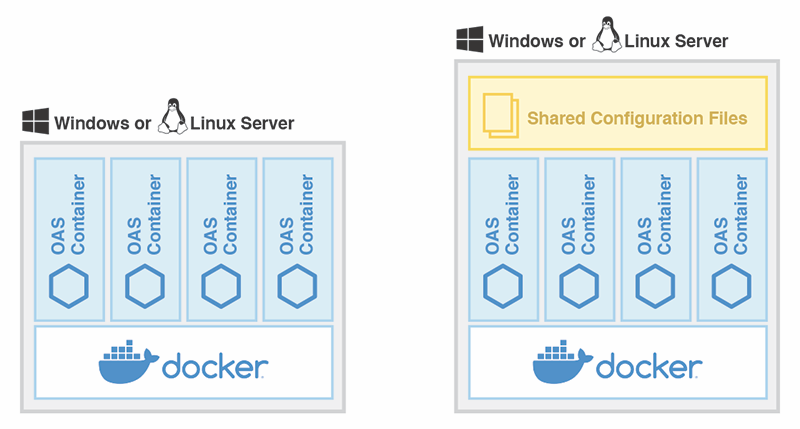
Docker containers can be configured to run completely independently or they can run utilizing shared resources on the Host server. OAS supports both scenarios, allowing you to utilize self-contained configuration files or shared configuration files on a Host using mapped volumes. This allows for generic containers to be spun up with identical configurations, or simply to allow the management of configurations external to a container.
Installing an OAS Image
All Docker versions of the OAS Platform are available on Docker Hub and can be pulled into your local machine with a single command. This makes installation and upgrading extremely convenient. You can browse all OAS images at hub.docker.com/u/oasiot. Once you have chosen the image you would like to use, matching the OS/architecture (e.g. Linux/x64 or Windows/AMD64) execute the pull command, which is provided on the page for each image. For example, the pull command for Linux/x64 is:
docker pull oasiot/oas-linuxThis will download the latest version of the image. So, if OAS releases a new version, simply re-run the pull command and you can always be up-to-date. If you would like to pull a specific version, you can use the version tag in the pull command. For example, pulling version 15.00.042 would use:
docker pull oasiot/oas-linux:15.00.042Using a version tag in your workflow will allow you to keep your installations uniform and predictable.
Running your new container
To run an instance of this image in a container, execute the following command. This will spin up an instance and display the console output in the terminal window. The container can be stopped by hitting CTRL-C. By default, the docker runtime will provide a randomized unique name for the container.
docker run -it oasiot/oas-linuxThe container will now be running, and will be assigned an IP address only accessible from the host machine. If you want to map the container’s ports to ports on the host, allowing the container to be reached from external systems, you can use the -p or -P flags in the docker run command. For example this will map the host’s port 58727 to the container’s port 58727, so you can then reach the container from the host’s IP address on port 58727, allowing you use the OAS Configuration application remotely to connect into the container:
docker run -it -p 58727:58727 oasiot/oas-linuxTo allow the Docker engine to assign random port mapping, you can use the following command. After doing this, just inspect the running container to see which ports have been assigned:
docker run -itP oasiot/oas-linuxOptional: Creating your own Image
Before any application can be run as a Docker container, it has to be bundled in an image. The process of creating an image involves the creation of a Dockerfile with configuration options, and calling docker build against the file. Whether the target platform for running the container is Linux or Windows, the process is the same, with some slight variations on the contents of the Dockerfile. For more information on Dockerfiles and their syntax, see the online documentation.
To containerize the OAS Platform we will take the following steps:
- Ensure that Docker is installed properly on the target platform
- Download and extract the OAS Platform distribution for Linux or Windows .NET Core depending on the chosen platform
- Copy the contents to the target server in a directory, e.g. /oas-docker/oas-linux, /oas-docker/oas-win
- Within the /oas-docker directory, create a text file called Dockerfile with the following contents. If you are familiar with crafting Dockerfiles, you can modify these settings to your preferences, as long as the default ports in the EXPOSE commands are not changed.
Linux Dockerfile
FROM mcr.microsoft.com/dotnet/runtime:6.0
EXPOSE 58725
EXPOSE 58727
EXPOSE 58728
EXPOSE 1338
EXPOSE 8338
EXPOSE 502
COPY /oas-linux/ /oas/
RUN chmod +x /oas/OASEngine
ENTRYPOINT ["./oas/OASEngine"]
Windows .NET Core Dockerfile
FROM mcr.microsoft.com/windows/nanoserver:1803
EXPOSE 58725
EXPOSE 58727
EXPOSE 58728
EXPOSE 1338
EXPOSE 8338
EXPOSE 502
COPY ./oas-win/ ./oas/
USER "NT Authority\System"
ENTRYPOINT ["/oas/OASEngine.exe"]
As you see, the Windows Dockerfile differs from the Linux version. The FROM entry references the nanoserver tag which is a bare bones Windows runtime host. The same ports are mapped in the EXPOSE lines. The COPY command copies the contents of the oas-win directory to the container’s oas directory. You’ll note the addition of the USER command, which specifies that the context the OAS Platform should run on is the System account with elevated privileges. This is required. Lastly, the ENTRYPOINT is modified to call the OASEngine.exe executable. Also, see the section below titled Windows Containers as you may run wither Linux or Windows applications in containers on the Windows platform.
- Build the OAS container image with the following command. This creates and registers a reusable image that can be spun up as multiple side-by-side containers:
docker build --tag oas .- The OAS Platform allows you to customize which ports are used for configuration communications as well as for access with SDKs, the REST API, and WebHMI products. When using OAS within a container, it is important to use the defaults of 58727 for TCP communications and 58725 for HTTP calls. These can be mapped to fixed host ports within the Dockerfile, or mapped dynamically during the execution of “docker run”. The OAS LicenseHost relies on the default underlying ports to allow for license activation, but you may still map these to customized ports if you want to access the containers via localhost.
Options for running a container
Providing a custom name
If you run a Docker container with the previous command, the Docker runtime will assign a random name for that instance. You can provide a custom name for the container to more easily identify the container. This must be a unique name on the server since no two containers can have the same name. This example runs the container, giving it the name “oas_production”:
docker run -it --name oas_production oasMapping a host volume
In some cases, you may want several running OAS container instances to share the same configuration files so that when they spin up, they pick up the same settings. To do this, we’ll follow these steps:
- Move the ConfigFiles directory to a location on the host machine
- Build the docker image
- Run the image using the -v host_dir:container_dir option to create a virtual directory in the container mapped to the host
docker run -v /OASConfigs:/oas/ConfigFiles --name oas1 oas- Mapping host directories can also be useful if you are logging data to a SQLite database, as they are file-system based and you would not want data lost when you spin down a container.
- You can map multiple volumes for such a configuration, combined with the command above:
docker run -v /OASConfigs:/oas/ConfigFiles -v /SQLiteData:/oas/SQLiteData --name oas1 oasThen, in your SQLite logging configuration, you would use /oas/SQLiteData as the path for the database.
Licensing
A stand-alone installation of the OAS Platform is licensed directly my using the OAS Configuration application. You select Configure > License, select the machine (typically localhost if working on the current machine) and are presented with a unique License Code for the machine. This is sent to OAS and you will then be provided an encoded License Key that will activate the features you have purchased.
Running the OAS Platform in containers, licensing is handled slightly differently. On the container host machine, you install and run the License Host application, which communicates with all running containers to activate product features, and recognizes new containers as they spin up. When purchasing a license from OAS, you will select product features to enable along with a number of tags, and if deploying OAS within containers, you also select the maximum number of containers you will be running on the host.
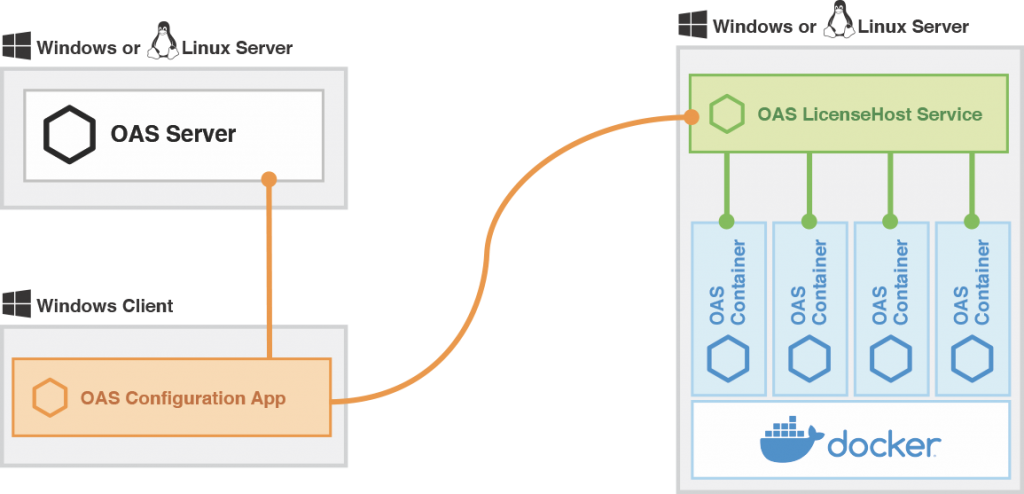
Containers acquire their license from the LicenseHost installed on the host
Installing the License Host
Linux
On a Linux system, the installation and execution of the License Host is similar to installing the OAS Platform itself. From the product downloads page, locate the License Host for Linux and download the ZIP archive. Unzip this file and move the contents to your preferred location, then execute the following command on the Linux server to make the application executable:
sudo chmod +x LicenseHostYou can now run the LicenseHost application directly with the ./LicenseHost command, or configure it to be started with the system when it boots up. You can follow the directions for setting up an application as a daemon on Linux from Step 3 of our online documentation, replacing the name and path of the OASEngine with that of the LicenseHost, where applicable.
Windows
On Windows, the LicenseHost installer registers it as a Windows Service. Download and install the License Host and start the service either manually in the Windows Services control panel, or using the OAS License Host application from the Start menu, which acts as a service control for just the License Host. The service is named “OAS License Host” if you choose to start it manually
Managing Licenses with the License Host
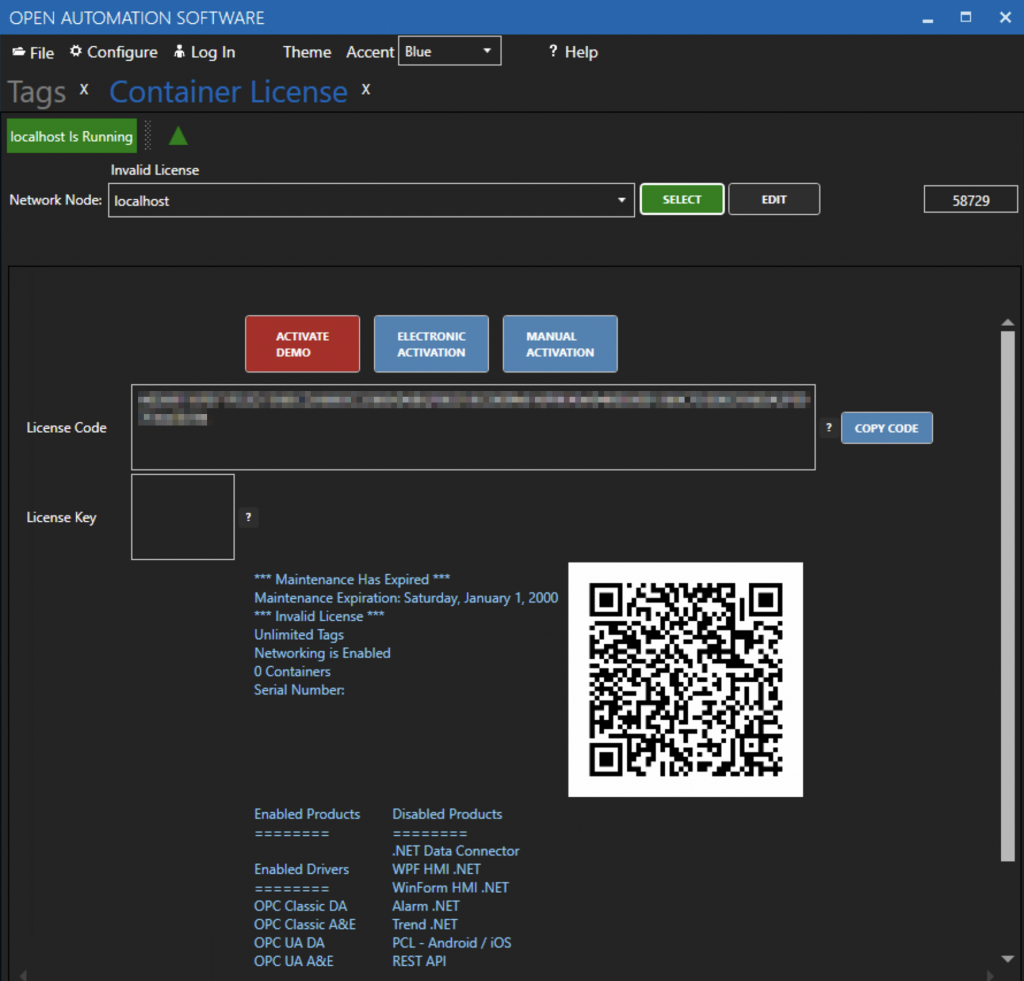
After starting the License Host on the container host server, you can connect to it from the OAS Configuration Application to apply or modify a license for that server. Select Configure > Container License from the main dropdown menu and enter the IPAddress of the host server.
Note that the LicenseHost will communicate on port 58729 so the host machine must allow TCP communications on that port so adjust your firewall rules accordingly. If you choose to change this port, locate the appsettings.json file in the distribution of the LicenseHost application and change the port number within it. You can also use this file to secure the License Host by adding a username/password combination.
Configuring the license on the container host is identical to configuring a license on a stand alone installation of the OAS Platform. Your License Code is used to acquire a License Key from OAS Support, and the key contains information about the product features to enable along with the maximum number of containers it will support.
For more information on licensing an OAS server, see the following Knowledge Base article: OAS License Activation
Testing your installation
Once your containerized OAS installation is running, you can connect to the individual containers with the OAS Configuration application and inspect Tags or any other feature. You will need to connect using the container’s assigned IP address, found by inspecting the Host Docker service. If you have not mapped the custom ports to the defaults of 58725 and 58727, you can use these directly with the containers’ IPAddress. If you have mapped ports, you can use the host’s IP address (or localhost on the host itself) with the custom ports.
Considerations for Windows Containers
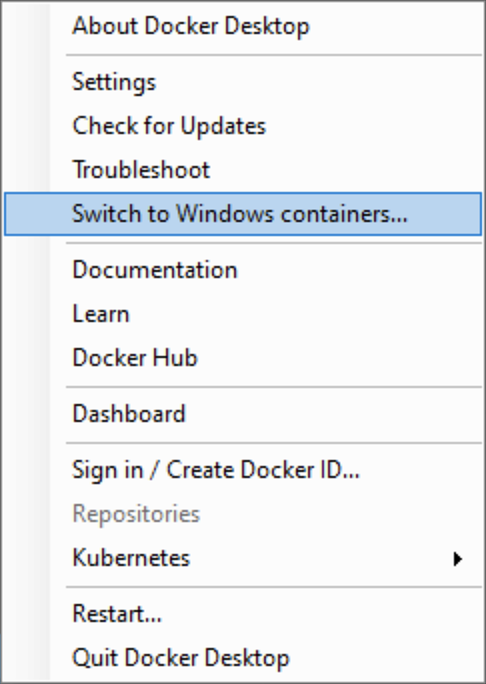
Assuming you are running Docker Desktop on Windows, you first need to make sure to switch to “Windows Containers”. By default, Docker Desktop assumes you will be using Linux containers with Hyper-V. To make the switch, you can go to the Docker Desktop tool and select “Switch to Windows containers…”
Alternatively, you can use the following Windows PowerShell script to switch:
& $Env:ProgramFiles\Docker\Docker\DockerCli.exe -SwitchDaemon .NOTE: Switching to Windows containers requires a minimum of Windows 10 Pro or Windows Server. Windows Home is not supported.