How to Access MTConnect Data from a C# or VB .NET Application

Open Automation Software Tags can be defined to connect to MTConnect Servers with the built in MTConnect Driver Interface. The OASData component is used for real time and historical data access against a local or remote OAS instance and can be used with .NET 5, .NET Core 2.0 or greater, .NET Framework 4.61 or greater, Xamarin.iOS 10.14, Xamarin.Android 8.0, and UWP 1.0.0.16299. This tutorial walks you though downloading and installing OAS, configuring an MTConnect driver, configuring tags and reading and writing to them with the .Net Data Connector. This page shows code examples in C# but VB works as well.
Step 1. Download and Install the Open Automation Software and Start the OAS Service
If you have not already done so, you will need to download and install the OAS platform. Fully functional trial versions of the software are available for Windows, Windows IoT Core, Linux, Raspberry Pi and Docker on our downloads page.
On Windows run the downloaded Setup.exe file to install one or more of the Open Automation Software features. Select the default Typical installation if you are not sure what features to use or the Custom installation if you want to save disk space on the target system. When prompted agree to the End User License Agreement to continue the installation.
For more detailed instructions and video tutorials, visit the installation guide for your system:
Windows Installation | Linux Installation | Raspberry Pi Installation | Dockers Installation
The OAS Service Control application will appear when the installation finishes on Windows. Use this application to start the 3 Services. Run the Configure OAS application on Windows and select Configure-Tags; if the first time running, the AdminCreate utility will run to create an Administrator login as shown in Step 1 of Getting Started – Security.
Step 2. Configure Your MTConnect Data Source
- First, you will need to open the Configure OAS application from the program group Open Automation Software.
- Select Configure >> License from the top menu and verify that MTConnect is one of the available Drivers in the lower left of the form. The demo license will have this by default. If you do not see MTConnect available, contact support@openautomationsoftware.com to update your license.
- Select Configure >> Drivers from the top menu.

- Select localhost or the remote service you wish to modify with the Select button to the right of the Network Node list.

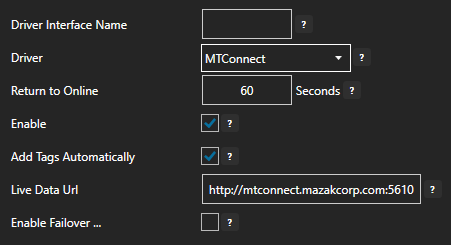
- The Configure Drivers Screen will appear. Select MTConnect from the Driver dropdown box.

- Enter a meaningful Driver Interface Name that you will refer to this physical connection when defining Tags with a MTConnect Data Source.
- Leave Enable and Add Tags Automatically enabled.
- Specify the Live Data Url for the MTConnect stream.
- Click the Add Driver button above the Driver list in the left pane to add the Driver Interface as an available selection when defining Tags in the next step.
For more detailed instructions on configuring your MTConnect data source, click here to see our Getting Started MTConnect tutorial or watch the video tutorial below:
Step 3. Configure Your Tags
OAS provides multiple ways to add and define tags:
- Manually add and define Tags using the Configure OAS application. …learn more…
- CSV Import and Export …learn more…
- Programatically …learn more…
- One Click Allen Bradley …learn more…
- One Click OPC …learn more…
To add a Tag manually:
- In the OAS Configure Application, select Configure >> Tags from the top menu.

- Select localhost or the remote service you wish to modify with the Select button to the right of the Network Node list.

- Click on the Add Tag button located at the top of the Tag browser on the left portion of the screen.

- A dialog box will appear. Enter a name for your new tag and click ok.
- A configuration screen will appear for your new tag. Select your data source type in in the Data Source dropdown box.

- Specify the correct data type in the Data Type dropdown box.
- Click Apply Changes at the bottom right of the window.
For more detailed instructions on configuring your tags, click here to see our Getting Started Tags tutorial.
Step 4. Access Your Data from a C# or VB .NET Application
The .NET Standard 2.0 OASData assembly is used to provide read and write access to OAS tag variables and can target .NET 5, .NET 6, .NET 7, .NET Core 2.o or greater, .NET Framework 4.61 or greater, Xamarin.iOS 10.14, Xamarin.Android 8.0, and UWP 1.0.0.16299.
Start a new Visual Studio Project or Open Your Existing One
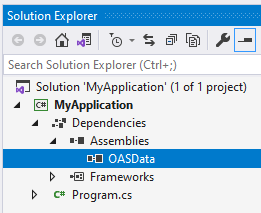
Microsoft Visual Studio 2015+ is recommended. For developing cross-platform .NET Standard or .NET Core solutions, Visual Studio 2019+ is recommended. For developing Android and/or iOS solutions, be sure to include Xamarin extensions to Visual Studio. After creating a new Visual Studio project, add a reference to the OASData assembly and all its dependencies, found in the OAS installation directory. This is typically:
C:\Program Files\Open Automation Software\OAS\Controls\NetStanard\OASData\OASData.dll

Create an instance of the OASData.Data class
static OASData.Data oasd = new OASData.Data();Your application typically does not need more than one instance of the OASData.Data class. So, this can be created when your application starts.
Read Tags Asynchronously
oasd.ValuesChangedAll += OASDValuesChangedAll;
private void OASDValuesChangedAll(string[] Tags, object[] Values, bool[] Qualities, DateTime[] TimeStamps);

oasd.AddTags(new string[] {
"Sine.Value",
"Random.Value",
"Ramp.Value"
});
Values are returned in the ValuesChangedAll event anytime values change in a tag variable. AddTags adds tags for subscription.
Read Tags Synchronously
Values = oasd.SyncReadTags(Tags, ref Errors, 10000);
- This call returns an object array with the values for each tag variable.
- Tags is a string array of tag names and variables to read.
- Errors is an integer array returning: 0 if the tag variable quality is good 1 if the quality is bad 2 if the value could not be returned within the timeout specified.
- Timeout is specified in milliseconds to wait for the call to return.
Write Tags Asynchronously
oasd.WriteTags(OASTags, OASValues);
With this call, if the tags data source is defined to a device, for example: Modbus; Siemens; Allen Bradley MQTT; OPC UA, or application writes to .Value will be written to the source defined.
Examples: Modbus, Siemens, AB, OPC UA, MQTT
- Tags is a string array of tag names and variables.
- Values is an object array containing the values to write to each tag.
- TimeStamps array can optionally be provided to set the time of the value if the Data Source of the Tag is Value.
Write Tags Synchronously
Errors = oasd.SyncWriteTags(Tags, Values);
- Tags is a string array of tag names and variables.
- Values is an object array containing the values to write to each tag.
- Errors is an Integer array that returns: 0 when successful; 1 when OAS Engine is not reachable; 2 when the Tags array size is not equal to the Values array.
Networking
Tag names can include an IP Address, network node name, or registered domain name if the application is deployed remote from the OAS Engine.
Basic Networking Example:
\\192.168.0.1\TagName.Value
Live Data Cloud Networking Example:
\\www.opcweb.com\RemoteSCADAHosting.MyLDCNode.TagName.Value
For more information, see Getting Started with OASData and IIoT Example Service Code or watch the video below:


