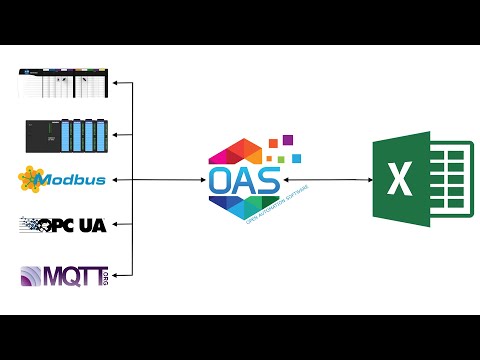
Getting Started – Excel
Follow the steps below for a simple setup for read and write functions in Microsoft Excel or view the following video.
- 00:00 – Introduction
- 00:08 – Setting OAS Connector
- 00:15 – Excel Configuration
- 02:14 – OAS Excel Tag Browser configuration
- 02:57 – Excel Formulas
- 03:50 – Excel ThrottleInterval
- 04:57 – Tag Browser
- 05:12 – How to write to a tag from Excel
- 06:19 – Tags Configuration
- 06:46 – Security Enable
- 07:30 – Deploy Excel
- 07:57 – Further Questions
These steps can be followed after downloading and installing OAS from the Support-Downloads page.
Step 1
Add the OASExcel Add-In to the operating systems Excel Add-Ins. You will only need to do this once on the operating system where the Excel Workbooks will be used.
You will first need to download the OASExcel Add-Ins from here: Download the Excel Add-Ins.
Right click on the zip file that you have downloaded. Check the Unblock checkbox for security as shown below. Click Apply.
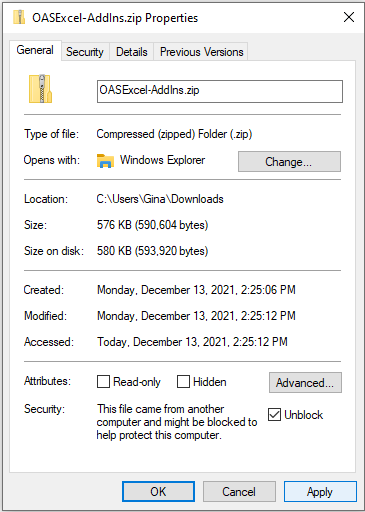
Unzip and place the files in any directory you choose except for the OAS installation directory.
Start Microsoft Excel. and open an existing Workbook or new Workbook.
Select File-Options to open the Excel Options window.
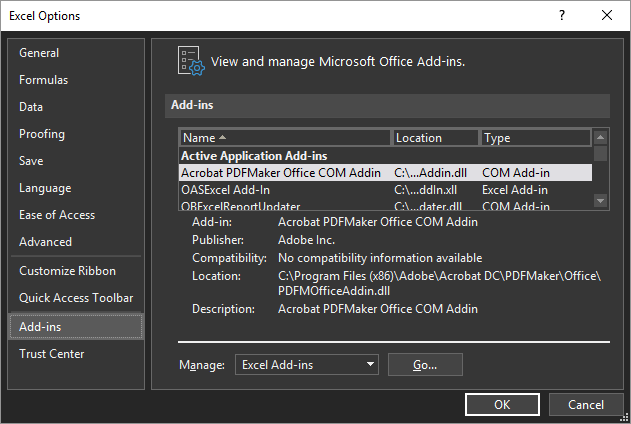
Select Add-ins in the lower left and then the Go… button to the right of Manage Excel Add-ins.
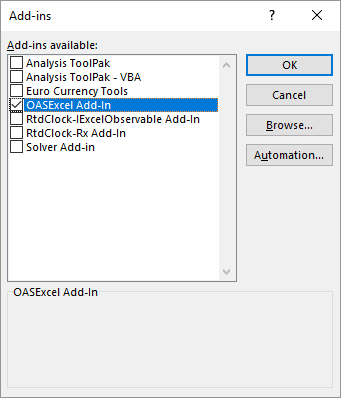
Select the Browse button and browse to the directory where you have placed the files to select OASExcel-AddIn.xll for 32 bit version of Excel or OASExcel-AddIn64.xll for 64 bit version of Excel and click OK.
You may need to: change some setting in your Trust Center configuration if you are having issues.
- Choose Options from the File menu. Choose Trust Center from the left menu, then click the Trust Center Settings button. Uncheck the top box for Require Application Add-ins to be signed by the Trusted Publisher.
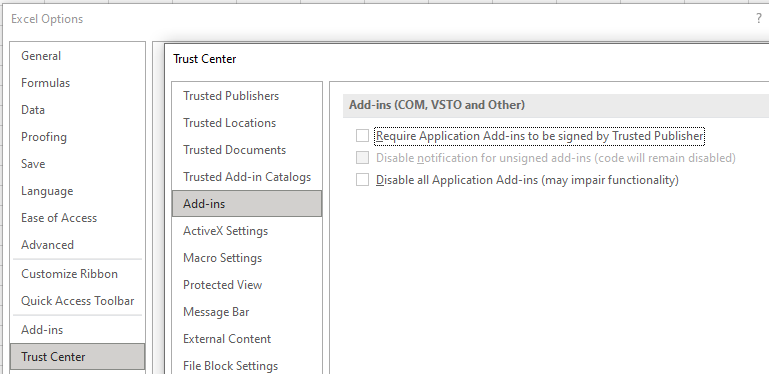
- Choose Trusted Locations from the left menu of the popup. Click the Add New Location button. Enter C:\Program Files\Open Automation Software\OAS\ and also check the box for Subfolders of this location are also trusted. Click Ok three times to exit popup.
Note: If you are uncertain which version of Excel you are running select File-Account and select the button labeled About Excel and you see either 32-bit or 64-bit at the top. Also if the OASExcel formulas do not appear in the next steps you most likely need to select the alternative xll file.
You are now ready to use the OASExcel formulas to read and write tag values to any local or remote OAS Engine with a license of OAS Excel.
The Excel ThrottleInterval by default runs at 2 seconds in Excel. We recommend to change this default ThrottleInterval.
Copied from https://news.cqg.com/blogs/2011/04/adjusting-rtd-interval-throttle-microsoft-excel
- In Excel, go to the Visual Basic Editor by pressing ALT + F11.
- On the Immediate Window at the bottom of the display, type this code:
Application.RTD.ThrottleInterval=0
(Note: If the Immediate Window is not open, press CTRL + G to display the window.) - Make sure your cursor is on the line that you just typed and then press ENTER.
- To verify that it is set correctly, type this line of code on the Immediate Window:
? Application.RTD.ThrottleInterval - Make sure your cursor is at the end of this line and then press ENTER. The window should display 0; then you know that your throttle interval is set correctly.
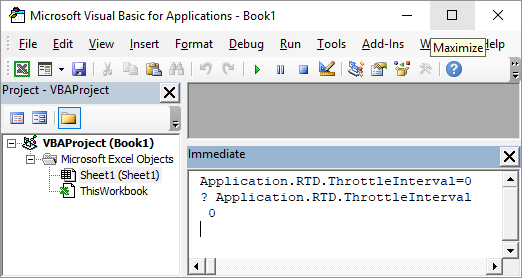
With the ThrottleInterval now set to 0 you will be able to achieve 30 millisecond updates from the OAS Engine. You will only need to perform this once on the operating system.
Step 2
Use the OAS Excel Tag browse application to define read formulas to local and remote OAS Tags.
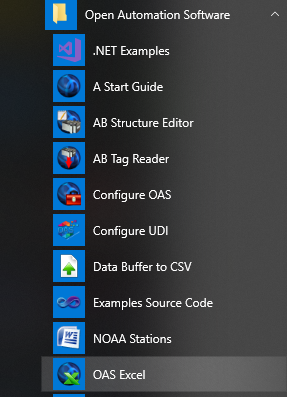
Start the OAS Excel tag browse application from the program group Open Automation Software.
Select your Network Node in the Browse Tags window. Then use the Tags Tree to select desired Tag and Variable.
If the Workbook will be deployed to a remote computer or the OAS Engine resides on another computer enter the IP Address, registered domain name, or network node name of the remote OAS Engine where the tag resides to read or write to and click on Select. If self hosting OAS using Live Data Cloud networking select the Live Data Cloud node as well.
Value is the most commonly used Variable. See Tag Variables for a complete list of all variables possible.
Local Tag
myGroup.myTag.Value
\\192.168.0.1\myGroup.myTag.Value
Live Data Cloud Networking from local OAS Engine
RemoteSCADAHosting.myLiveDataCloudNode.myGroup.myTag.Value
Live Data Cloud Networking though remote OAS Engine
\\192.168.0.1\RemoteSCADAHosting.myLiveDataCloudNode.myGroup.myTag.Value
If on the same computer leave Network Node as localhost and click on Select.
A list of tags from the remote service will appear.
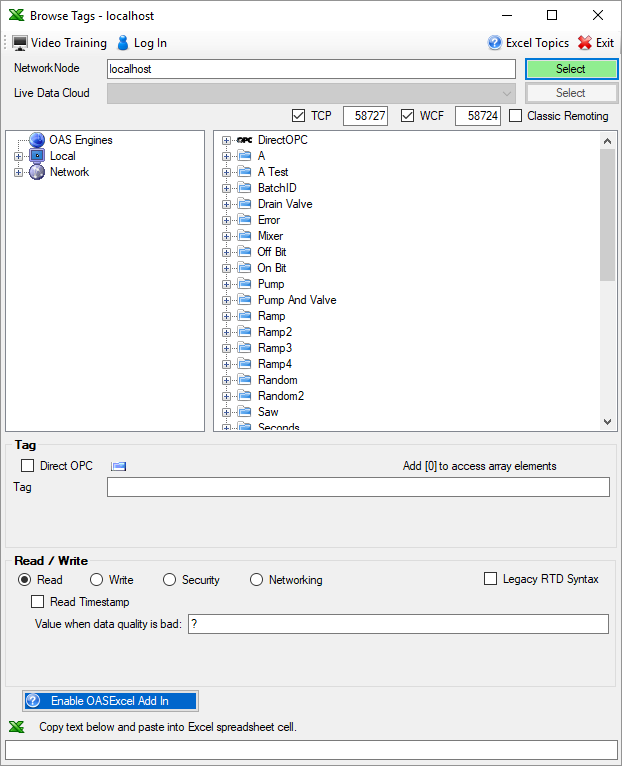
Select a tag you want to read or write to from the tag list. In this example we will use OASRead function to read a tag Value.
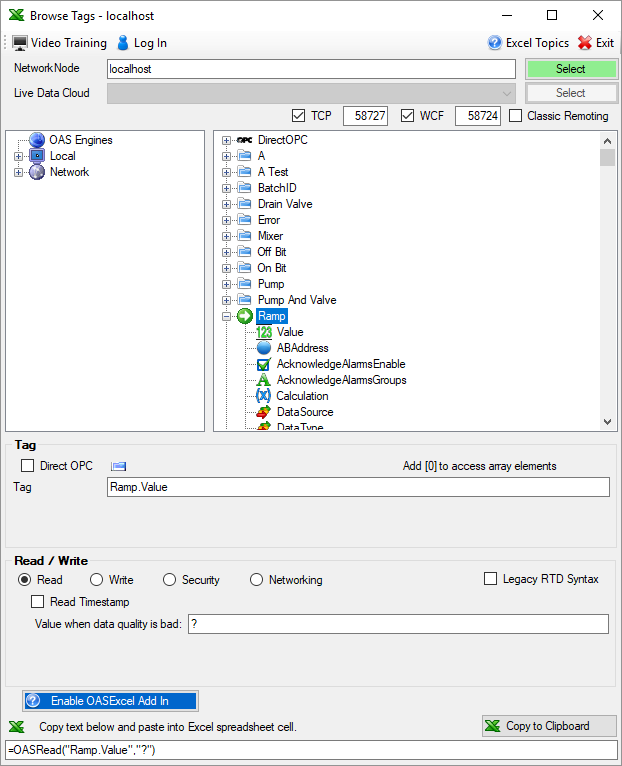
Notice that the formula =OASRead(“Ramp.Value”,”?”) appears at the bottom of the window.
Copy this formula and paste into a Cell in Excel to read a value continuously from the local or remote OAS Engine.

The value will appear if the local or remote tag has good quality.
Use Ramp2 tag as a simulated value that changes every 100 milliseconds or any other tag you like that is changing faster than 1 second to check the ThrottleInterval.
=OASRead(“Ramp2.Value”,”?”)
Step 3
Optionally write to OAS Tags from Excel.
If you want to write to an OAS Tag go back to the OAS Excel Tag browse application and select the local or remote tag you want to write to and select the Write radio button. Enter either a fixed value in the Value to write field or enter a Cell location in the Data source cell location field. In this example we will write the value from cell A1 to the tag Write Float.Value.
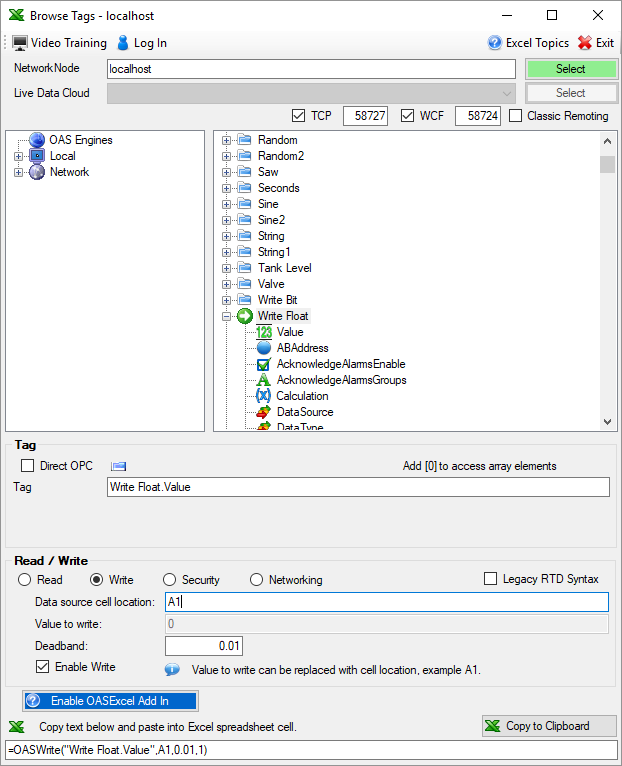
Note: You can specify a deadband value that will disable the write if the value read back is within the range specified. This is useful when writing to single or double float values within a controller. You can also use the last parameter of the OASWrite formula to enable or disable the write entirely. This is useful to have all of the values preset in the workbook before writing the values to a controller, OPC Server, or other data source.
Copy the formula and paste into a Cell in Excel. In this example it will be place in Cell B2.
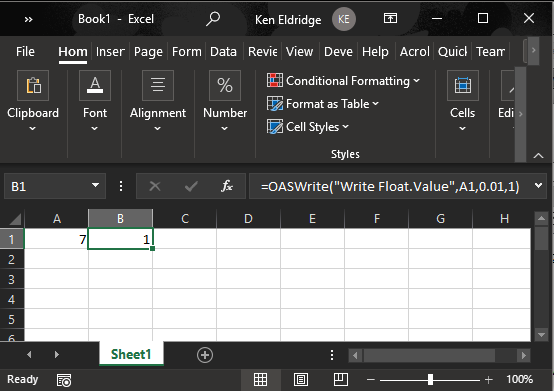
The OASWrite function automatically reads the OAS Tag value to determine if there is success in writing the value with full confirmation coming back from the Data Source of the Tag.
Following are the return values from the OASWrite function.
0 – Disabled
1 – Equal
2 – Value is being written
3 – Bad quality
4 – Cannot type cast value
5 – Unknown value to type cast
If the source value matches the value to be written a return value will be 1.
Step 4
Implement security login
If the service you are connected to has Security enabled for reading or writing to tags you can specify the Security option in the OAS Excel tag browser and specify the User Name and Password for the Log In option.
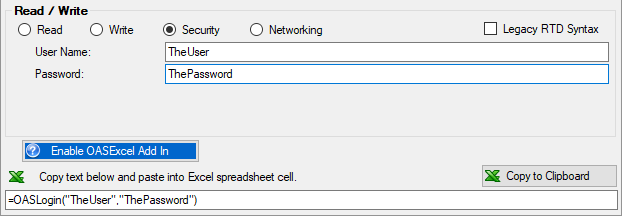
=OASLogin(“TheUser”,”ThePassword”)
The User Name and Password can come from other cells that can be made hidden in the Excel Workbook if you like. In the following example the username and password would come from cells B10 and B11.
=OASLogin(B10,B11)
Step 5
Save the Excel Workbook. Open anytime in the future and the read and write functions will perform.
Step 6
If you plan to run the Workbook on a different PC than the OAS Service include the Network Node Name, IP Address, or registered Internet domain name in the tag path.
Tag:
\\www.opcsystems.com\Ramp.Value
Formula:
=OASRead(“\\www.opcsystems.com\Ramp.Value”,”?”)
To run the Workbook remotely you will need to repeat the steps to copy the files from the OAS Excel Add-In download Step 1 above to register the OASExcel-AddIn on that PC.
You only need a license of OAS Excel Connector on the data source PC where the OAS Service is running so you can run the Excel Workbooks remotely with an OAS Network License.