Getting Started – Data Logging
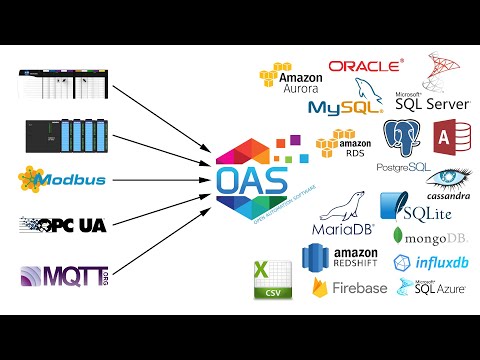
You can log any Tag or DirectOPC item value from Open Automation Software to CSV files and the database engines SQL Server, Oracle, Access, PostgreSQL, Cassandra, MongoDB, MariaDB, SQLite, InfluxDB, Amazon Aurora, Amazon RDS, Google Firebase, and MySQL.
You can view the Getting Started with Data Logging Video to familiarize yourself with the following steps to setup data logging.
- 00:00 – Introduction
- 01:30 – Getting Started
- 03:00 – Continuous Logging
- 04:15 – SQL Server
- 06:25 – Save Changes
- 07:00 – Continuous Narrow Logging
- 09:30 – Event Driven
- 11:20 – Handshake Confirmation
- 12:45 – High Speed Logging
- 15:00 – Log to Stored Procedure
- 15:25 – Triggers
- 16:30 – Event Narrow Logging
- 18:00 – Timestamps
- 20:30 – Snapshot Logging
- 21:45 – Specific Time of Day Logging
- 22:50 – Data Change Row Logging
- 25:15 – Data Change Narrow Logging
- 26:45 – Networking
- 31:55 – Store and Forward
- 37:30 – Disable Store and Forward
- 40:15 – Update Records
- 40:50 – Dynamic Server, Database, and Table
- 41:10 – Automatic Deletion
- 41:40 – CSV File Logging
- 45:30 – Programmatic Interface
- 46:45 – CSV Export / Import
- 48:20 – One Click Automation
- 52:20 – Transaction Logging
- 54:25 – System Errors
- 56:00 – Contact Us
- 56:50 – Read Database Data
Step 1

Start Configure OAS application if it is not already running.
Step 2
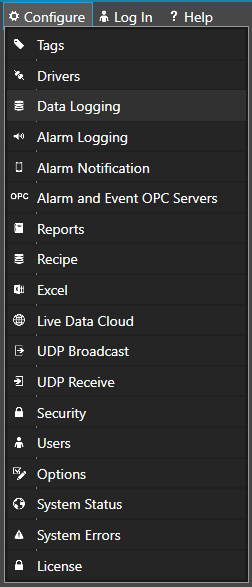
Select Configure – Data Logging.
Step 3
Select the Local OAS Service by selecting the Select button.
![]()
Step 4
Enter the Logging Group Name of Simulation in the field in the upper right.
![]()
Check Logging Active in the Common Properties Tab.
![]()
Step 5
Determine your table format and type of logging you wish to implement and set the Logging Type.
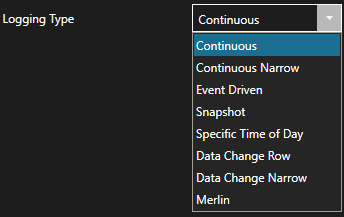
- Continuous: Log data in a wide table format at a specific rate.
- Continuous Narrow: Log data in a narrow table format at a specific rate.
- Event Driven: Log data in a wide table format when a Boolean or Integer Tag changes.
- Snapshot: Log cached data in a wide table format when a Boolean Tag changes. The cached data is collected prior to the event and only logged when the event occurs.
- Specific Time Of Day: Log data in a wide table format at a specific time of day.
- Data Change Row: Log data in a wide table format when any of the tag values change.
- Data Change Narrow: Log data in a narrow table format when the tag value changes.
- Merlin: Not applicable, only used for one of our OEM customers.
Wide Table Format: Specify a specific column to map the tags to log to.
Narrow Table Format: Log all tag values into 3 fields, Tag Name, Value, and Timetamp. This type is more difficult to query directly and is not supported by trend history.
We use the default Logging Type of Continuous at a 1 second rate in this example.
Step 6
Select the Tags Tab.
![]()
Step 7
Select the Add Field button.

Step 8
Select your Network Node in the Browse Tags window. Then use the Tags Tree to select the Ramp.Value.
Value is the most commonly used Variable. See Tag Variables for a complete list of all variables possible.
Local Tag
myGroup.myTag.Value
\\192.168.0.1\myGroup.myTag.Value
Live Data Cloud Networking from local OAS Engine
RemoteSCADAHosting.myLiveDataCloudNode.myGroup.myTag.Value
Live Data Cloud Networking though remote OAS Engine
\\192.168.0.1\RemoteSCADAHosting.myLiveDataCloudNode.myGroup.myTag.Value
The following is an example of accessing an element of an array as a read only variable.
myGroup.myTag.Value[0]
Adding Multiple Tags
To add multiple tags from a tag group select the group and click ADD ALL TAGS FROM to add all tags in one step. Leave the group field blank located to the right of ADD ALL TAGS FROM to add all of the tags in a service.
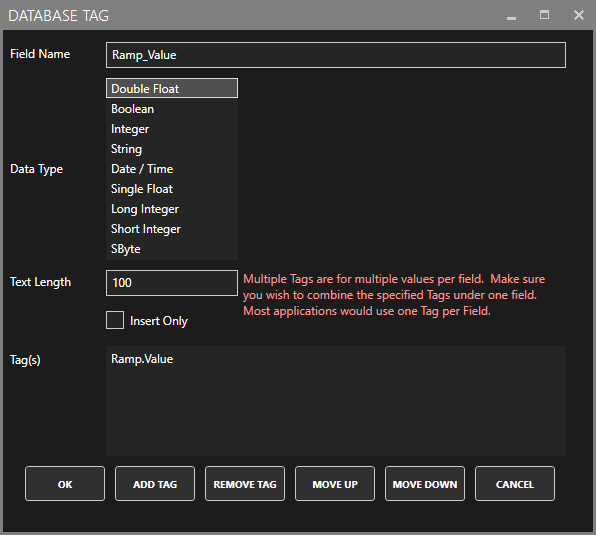
Click OK.
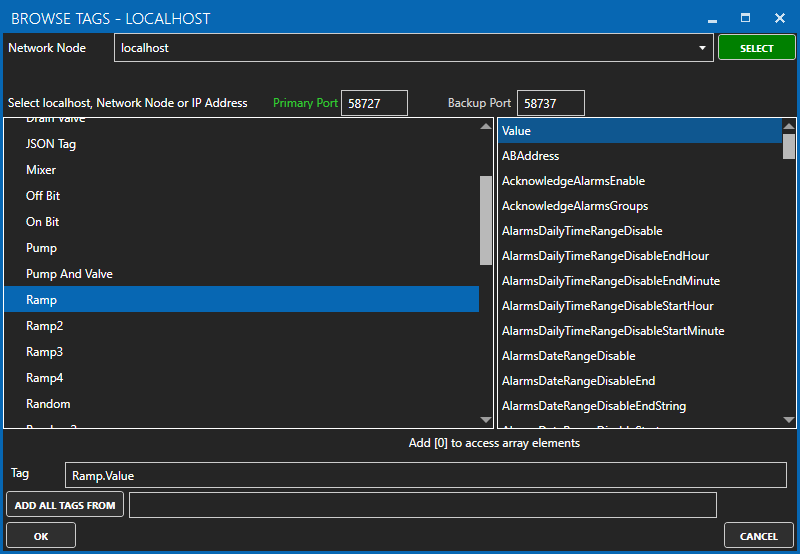
Confirm that you have the correct information in the Database Tag window that pops up. Click Ok.
Step 9
Repeat steps 7 and 8 for the Tag Parameter Random.Value.
Repeat steps 7 and 8 for the Tag Parameter Sine.Value.

Step 10
Select the Database Tab.
![]()
Step 11
Logging to SQL Server or SQL Server Express
Use the following configuration for SQL Server and SQL Server Express. The Database and Table will automatically be created for you.

The Server name may need to be adjusted from localhost to the proper Server name of the SQL Server engine you wish to log to. This Server name can be found when first bringing up the Connect dialog of the SQL Server Management Studio.
Also the login method can be with Windows Authentication or SQL Server mode. Contact your database administrator if you are unsure of what login type to use.
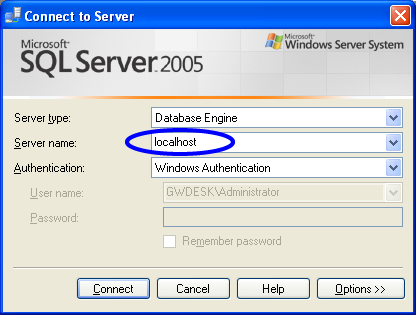
You can download a free version of SQL Server Express from www.microsoft.com.
Logging to Microsoft Azure
Use the SQL Server Provider and view the following guide to setup Microsoft Azure:
/knowledge-base/windows-azure-setup/
Logging to Oracle
If you are using Oracle you must first create the database. All other steps are the same as SQL Server except the provider should be set to Oracle. Oracle does not create the database so you will have create the database manually.
If you wish to use a name from TNSNAMES.ORA file refer to the Frequently Asked Questions in this Data Logging topic as OAS uses OracleManagedDataAccess assembly.
Logging to mySQL
All steps are the same as using SQL Server except the provider should be set to mySQL.
For maximum throughput set the following in C:\ProgramData\MySQL\MySQL Server 8.0.
max_allowed_packet=1G
Logging to MongoDB
All steps are the same as using SQL Server except the provider should be set to MongoDB.
Logging to PostgreSQL
All steps are the same as using SQL Server except the provider should be set to PostgresSQL.
Logging to Cassandra
All steps are the same as using SQL Server except the provider should be set to Cassandra.
Logging to MariaDB
All steps are the same as using SQL Server except the provider should be set to MariaDB.
Logging to SQLite
All steps are the same as using SQL Server except the provider should be set to SQLite and the File Path property should be set to the directory and file name for the file.
Logging to InfluxDB
All steps are the same as using SQL Server except the provider should be set to InfluxDB and you can adjust the Indexed Fields property if more than DateAndTime tag is required.
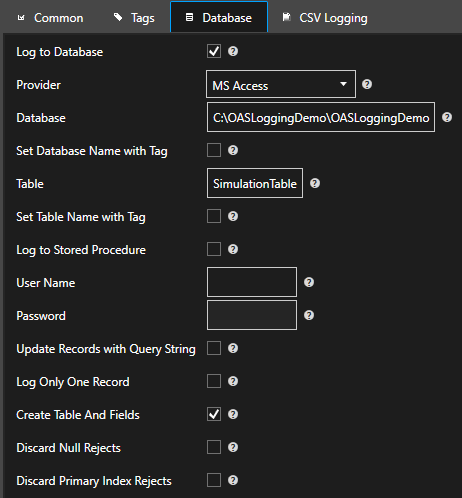
Logging to Microsoft Access
If you prefer to use Microsoft Access instead of SQL Server use the following configuration for Microsoft Access. The Database and Table will be automatically created for you. Make sure to create the directory C:\OASLoggingDemo\ on your C drive or specify a different Database path that will exist. When logging to MS Access 2007 or later use the extension .acccdb. Versions older than 2007 use the classic .mdb extension. This will switch the OAS data logging engine to use the correct provider.
Logging to Comma Separated Variable Files
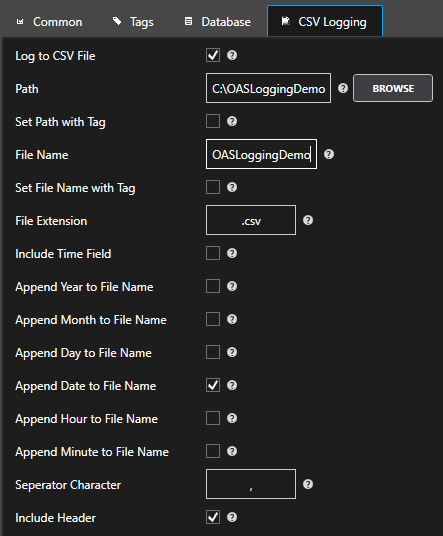
Use the following configuration for CSV text logging.
Make sure to create the directory OASLogging Demo on your C drive or specify a different Database path that will exist.
Step 12
Select the Add Group button in the left pane to add the Data Logging group.
![]()
Step 13
Select the Save button on the toolbar at the top.

Step 14
Save the file DemoLogging.DataLog.
Step 15
Go to Configure-Options and set the default Data Logging Configuration file to the file you just saved.
Step 16
Important: Enable Data Buffer To Disk under Configure-Options-Data Buffering on all data source Tag servers and data logging servers to retain data on a network failure or database engine failure.
After completing the above steps you can view the data in your database or CSV file.
For more detailed information on each data logging parameter view the Data Logging section in this help file or simply select the property in the Configure OAS application and hit the F1 key or select the ? near the property.