Getting Started OPTO Driver
Open Automation Software Tags can be defined to connect directly to OPTO controllers with the built in OPTO Driver Interfaces which support communications over Ethernet. The following steps can be used to setup direct communications with OPTO controllers.
The following steps can be used to setup direct communications with OPTO controllers.
Step 1
 Start Configure OAS application from the program group Open Automation Software.
Step 2
Select Configure-License and verify that OPTO is one of the available Drivers in the lower left of the form. If you do not OPTO driver update your Open Automation Software to the latest version.
![]()
Note: You will need to be running Open Automation Software Version 10.0.0.2 or greater to support direct OPTO communications. You can download the latest version from our Open Automation Software Download page.
Step 3
Select Configure-Drivers.
Step 4
Select localhost or the remote service you wish to modify with the Select button to the right of the Network Node list.
![]()
Note: Optionally select the Live Data Cloud node if you are hosting Siemens data over the Internet with a standard Internet connection.
Step 5
Enter a meaningful Driver Interface Name that you will refer to this physical connection when defining Tags with an OPTO Data Source.
Define the properties for the desired physical connection.
Note: You may need to Set Default Network Adapter for Driver Interfaces of the operating system.
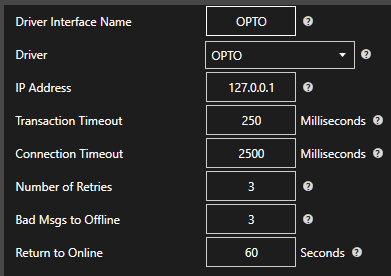
Note: Set the Driver to OPTO.
Optionally define a secondary failover controller if the primary controller fails with the property Enable Failover.
If both the primary and secondary controllers are offline the Return to Online settings determines the retry frequency.
View Driver Interface Failover for more information and and video demonstrating communications failover.
Step 6
Select the Add button in the lower part of the form to add the Driver Interface as an available selection when defining Tags in the next step.
![]()
Note: If you need to define several Driver Interfaces you can use the CSV Export and CSV Import on the toolbar in the upper right together with Microsoft Excel.
Step 7
Select Configure-Tags.
Select localhost or the remote service you wish to modify with the Select button to the right of the Network Node list.
![]()
Note: Optionally select the Live Data Cloud node if you are hosting Modbus data over the Internet with a standard Internet connection.
Step 8
Select to Add a Tag.
Note: You can also add organizational Groups as many levels deep as you prefer and add tags to groups. To do this first add a Group to the Tags Group at root level, then right click on the Group in the right window to add additional Groups or Tags.

Step 9
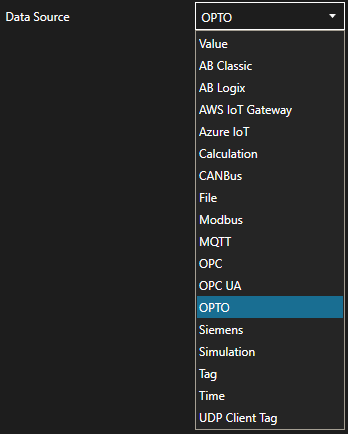
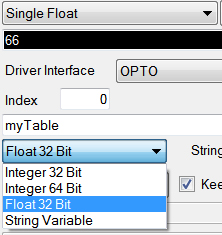
Change the Data Source Tag property to OPTO.
Step 10
Select the correct Driver Interface from the Driver Interface pull down list.

Step 11
Specify the desired Polling Rate for the Tag.
Specify the Table Name and Index or Variable Name to read and write to.
Note: It is most effcient to use Tables for communications as the entire table can be obtained in one call, while each invidual Variable requires an individual call.
Specify the OPTO Data Type and the Tag Data Type.
Step 12
To define multiple tags use the CSV Export and CSV Import on the toolbar in the upper right together with Microsoft Excel.
Note: You can also programmatically define Tags using the free to use OPC Systems component as demonstrated in the Form FormConfigureCSV in the WinForm Example Code application that installs with Open Automation Software in the Program Group Open Automation Software. This component can be used in any .NET application includes Web Services, Windows Services, WPF Applications, and ASP.NET or .NET MVC Web Applications.
Step 13
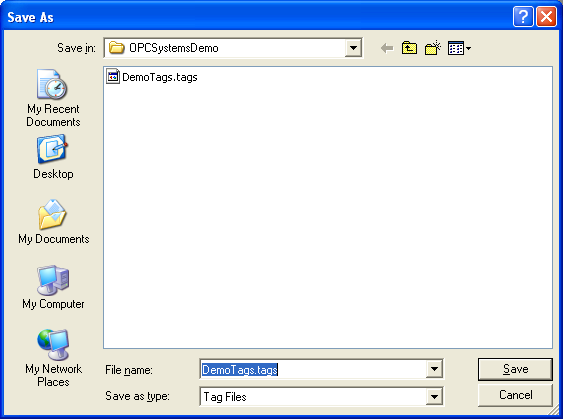
Select the Save button on the toolbar at the top.
![]()
Step 14
Create a directory on the local C: drive with the name OPCSystemsDemo.
Save the file DemoTags.tags in the directory C:OPCSystemsDemo.
Step 15
Under Configure – Options set the Default Tag Configuration File so when the computer restarts the tag file will automatically be loaded.