
Getting Started with Kafka
This page takes a Kafka cluster from nothing to a working consumer and a working producer. It uses a local test cluster so that every step can be run on one machine; a hosted cluster differs only in its Bootstrap Servers and Security Protocol.
Info
Kafka is a licensed option. Open Configure OAS and check that Kafka appears in the licensed drivers list. OAS 18.0.0.4 or later is required.
Create a Kafka test cluster using Docker
In this step you will create a local Kafka cluster. To simplify the deployment you will need to have Docker installed including the docker-compose utility. This method allows you to create a cluster very quickly for testing purposes and remove it again when you are done.
Create a new folder such as Kafka and inside the folder create a new
docker-compose.ymlfile with the following definition.services: zookeeper: image: confluentinc/cp-zookeeper:latest container_name: zookeeper ports: - "2181:2181" environment: ZOOKEEPER_CLIENT_PORT: 2181 ZOOKEEPER_TICK_TIME: 2000 kafka: image: confluentinc/cp-kafka:latest container_name: kafka ports: - "9092:9092" environment: KAFKA_BROKER_ID: 1 KAFKA_ZOOKEEPER_CONNECT: zookeeper:2181 KAFKA_ADVERTISED_LISTENERS: PLAINTEXT://localhost:9092 KAFKA_LISTENER_SECURITY_PROTOCOL_MAP: PLAINTEXT:PLAINTEXT KAFKA_OFFSETS_TOPIC_REPLICATION_FACTOR: 1Open a command line or bash terminal in the Kafka folder and use the following command to start a new container. This will download the image and all its dependencies and may take a few minutes.
docker-compose up -dCreate a new topic called temperature using the following command.
docker exec kafka kafka-topics --create --topic temperature --bootstrap-server localhost:9092 --partitions 1 --replication-factor 1
Info
Once you are done testing, you can stop and remove the containers that you created by using the following command:
docker-compose down
Configure Kafka Consumer
In the following steps you will create and configure a Kafka Connector connecting to a local Kafka cluster on port 9092. This connector will act as a Consumer where Tags can subscribe to a topic in the cluster.
Select Drivers in the sidebar.
Click + Add, enter a meaningful Driver Interface Name to give this driver interface instance a unique name (for example Kafka Consumer), and click Create. Once created, the driver interface name should appear in the list of drivers.
Ensure the following parameters are configured:
- Driver: Kafka
- Bootstrap Servers: localhost:9092
- Security Protocol: Plaintext
- Client Id: oas-kafka
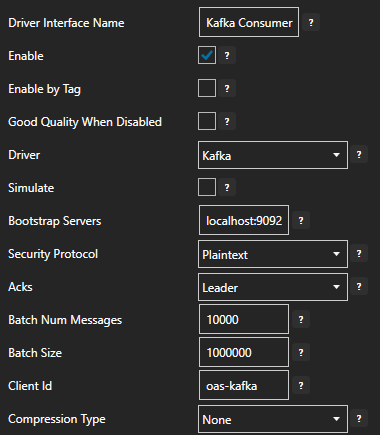
The app flags the Bootstrap Servers field because it is still the default
localhost:9092. That is the address of the local test cluster you created, so leave it as it is. Change it if your broker is on another host or port.Turn on Enable and click on the Apply changes button. The driver interface is not active until it is enabled and the changes are applied.
Assign Kafka as Tag Data Source
You will now set the Tag's data source to the Kafka driver interface that you created previously.
Select the Tag that will source data from a Kafka data source.
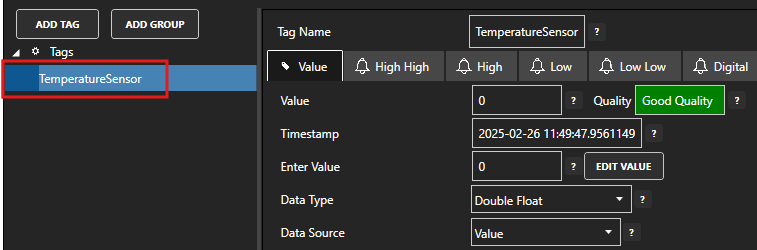
Set the Data Source to Kafka.
Set the Select Driver Interface drop-down to the Kafka Consumer interface created previously.
Set the Topic to temperature. This is the topic that you created previously when setting up the local Kafka cluster.
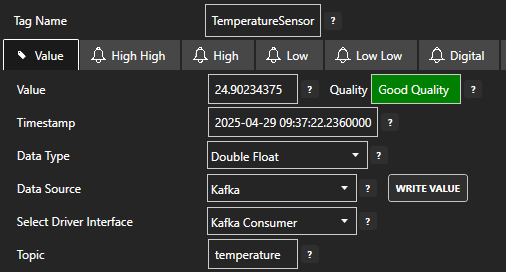
Click on the Apply changes button to apply the changes.
To publish a data value from your Kafka cluster, you can use the following command.
docker exec -i kafka kafka-console-producer --topic temperature --bootstrap-server localhost:9092You can now type in any data such as a numeric value and it will be published to the temperature topic.
Check that the quality status is Good and the Tag value is as expected.

Configure Kafka Producer
In the following steps you will create and configure a second Kafka Connector connecting to the same cluster. This connector will act as a Producer where Tags are published to a topic in the cluster.
Select Drivers in the sidebar.
Click + Add, enter a meaningful Driver Interface Name to give this driver interface instance a unique name (for example Kafka Producer), and click Create. Once created, the driver interface name should appear in the list of drivers.
Ensure the following parameters are configured:
- Driver: Kafka
- Bootstrap Servers: localhost:9092
- Security Protocol: Plaintext
- Client Id: oas-kafka-producer
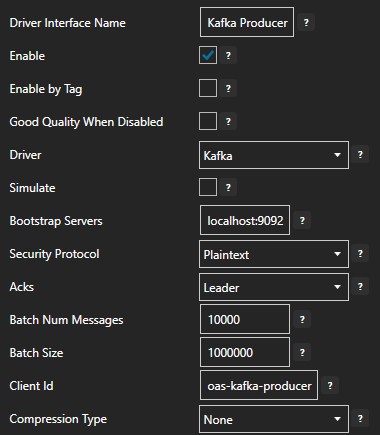
Turn on Enable and click on the Apply changes button. The driver interface is not active until it is enabled and the changes are applied.
Publish Selected Tags in Kafka Producer
In this step you will select the Tags that you want to publish to the Kafka cluster.
In the Drivers screen, select the Kafka driver instance that you created in the previous section (for example Kafka Producer).
Make sure the Publish Selected Tags toggle is turned on.

In the Tags To Publish table click on the Add button.
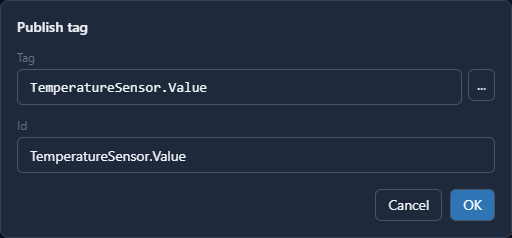
The Publish tag window will appear. Click on the … button to browse for a Tag, select the Tag you want to add in the left hand panel and then ensure the Value property is selected, and click on the Use this tag button.
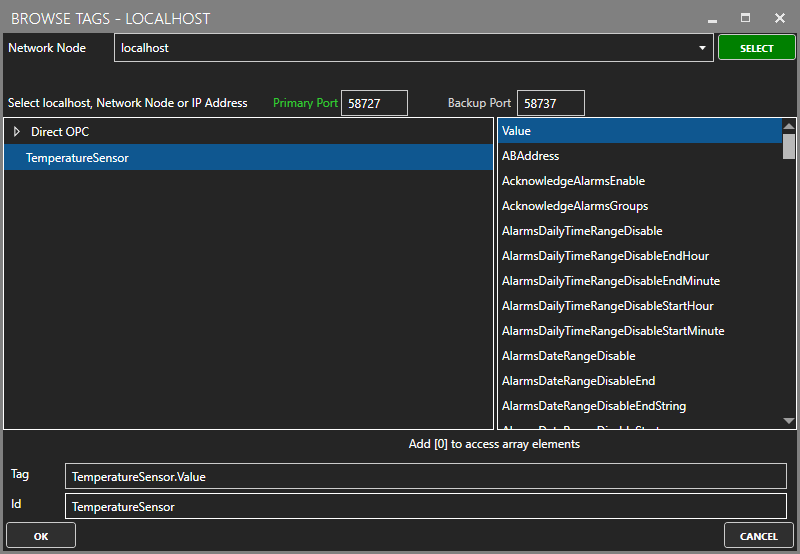
Back in the Publish tag window the Id defaults to the full Tag path (e.g. TemperatureSensor.Value). If you want to set your own property name, you can change the Id field to your own custom value. Click on the OK button.
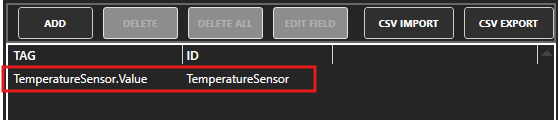
The Tag has now been added to the list. You can add other Tags by repeating steps 3 to 5.
Click on the Apply changes button.
Verify Messages are Published to Kafka Cluster
In this step you will confirm that OAS is successfully publishing your selected Tags to the Kafka cluster.
Run the following command in a terminal or command line window to start listening for new messages on the oas_tags topic which is the default topic for the Publish Selected Tags configuration.
docker exec kafka kafka-console-consumer --topic oas_tags --bootstrap-server localhost:9092Info
You may receive a warning message, because the oas_tags topic doesn't exist yet. You can safely ignore this as it will be created automatically.
Any changes to your TemperatureSensor tag value should be published within 10 seconds to the terminal window.
{
    "values": [
        {
            "id": "TemperatureSensor",
            "value": 24.902344,
            "quality": true,
            "timestamp": "2025-05-20T09:23:41.332Z"
        }
    ]
}
To stop listening for new messages press the Ctrl-C shortcut combination on your keyboard.
Save the configuration
Apply changes updates the running configuration; it does not write it to disk. Click Save to write the tag configuration file, and set it as the default under Options so that it loads again when the service restarts.
Where next
- Config Reference - every parameter on the driver.
- Kafka How-To guides - logging, transferring and routing Kafka data.