How to Install OAS in Linux
This article covers how to install OAS in Linux.
The instructions in this guide make use of the Ubuntu Linux systemd service to start the OAS Engine executable as a service. This is one of multiple methods of installation and running a system service.
If you are looking for instructions on how to update the OAS Linux version see the How To Manually Update OAS in Linux guide.
In this guide you will:
- Download and extract the OAS Engine linux release compressed in a Zip archive.
- Create a service user that is able to run the OAS Engine, but does not have
rootpermissions or the ability to login to the operating system. It is up to you to understand and manage the permissions of this user. - Create a
systemdservice which will start when the system is started.
OAS does not provide technical support for Linux operating system issues and user management.
You can find a list of operating systems where the OAS Engine has been tested on the OAS System Requirements page.
See it in action
Talk to an OAS engineer about your specific configuration and see it in action
1 - Download OAS
In this section you will download the OAS platform for Linux and extract it.
Download the Linux version of OAS for the platform that is relevant to you.
Fully functional trial versions of the software are available for Windows, Windows IoT Core, Linux, Raspberry Pi and Docker on our downloads page.
Change directory into your user's home directory. For example:
cd /home/ubuntuExtract the
oas-linux.zipfile to the current directory. This will create a new folder calledoas-linux.unzip oas-linux.zipTips
To unzip a
zipfile you might need to install the unzip utilities. In a Debain based Linux system you can do this using the following command:sudo apt-get install unzipMove the
oas-linuxfolder to the/opt/oas/oas-enginefolder where the OAS Engine binaries will be located.sudo mkdir -p /opt/oas/oas-engine sudo mv oas-linux/* /opt/oas/oas-engine/Clean up the
oas-linuxfolder that was downloaded.rm -rf oas-linux
2 - Create OAS Service User and Set Permissions
You will now create a new user called oas under which the OAS Engine will run. This user will not have root access and you will not be able to use it to login to Ubuntu. In other words, it has no login and no password. It only exists for running the OAS Engine and limiting the its permissions.
Create a new user called
oasand add the user to a new group also calledoas.sudo useradd --system --no-create-home --shell /usr/sbin/nologin --comment "OAS Engine Service" --user-group oasThis command ensure that
oas:- Is a system user
- Is added to the
oasuser group - Has no home directory
- Cannot login to the operating system
- Has no password
Set the permissions of the OAS Engine installation directory so that the
oasuser and group owns theoas-enginefolder and files.sudo chown -R oas:oas /opt/oas sudo find /opt/oas/oas-engine -type d -exec chmod 755 {} \; sudo find /opt/oas/oas-engine -type f -exec chmod 644 {} \; sudo chmod +x /opt/oas/oas-engine/OASEngineGive the
oasuser permission to start or stop the OAS Engine service to allow the OAS Update process to perform updates via the Configure OAS application.sudo sh -c 'echo "oas ALL=(root) NOPASSWD: /usr/bin/systemctl stop oas-engine.service, /usr/bin/systemctl start oas-engine.service, /usr/bin/systemctl restart oas-engine.service" > /etc/sudoers.d/oas-engine' sudo chmod 440 /etc/sudoers.d/oas-engineCreate a folder and set permissions for the OAS Engine service log output.
sudo mkdir -p /var/log/oas
sudo chown -R oas:oas /var/log/oas
3 - Create OAS Engine Service
You will now set up a system service called oas-engine to run the OAS Engine as a service. You will also enable it to start automatically on reboot.
Create a
systemdservice definition.This will be written to
/etc/systemd/system/oas-engine.service.The service definition provides a number of configuration details:
- It tells the
systemddaemon where to find the OAS Engine service - It waits until networking services are available
- It defines the user and group under which the OAS Engine should run
- It ensures restart on failure and retry logic
- It improves security hardening by limiting certain system resources
sudo tee /etc/systemd/system/oas-engine.service >/dev/null << 'EOF' [Unit] Description=Open Automation Software (OAS) Engine After=network-online.target Wants=network-online.target [Service] User=oas Group=oas WorkingDirectory=/opt/oas/oas-engine ExecStart=/opt/oas/oas-engine/OASEngine # Use SIGINT to tell the OAS engine to stop KillSignal=SIGINT KillMode=process # Wait 3 mins for the OAS engine to stop TimeoutStopSec=3min # Raise file descriptor limit LimitNOFILE=65535 # Log output destination StandardOutput=journal StandardError=journal [Install] WantedBy=multi-user.target EOF- It tells the
Reload the daemon and enable the OAS Engine service.
sudo systemctl daemon-reload
sudo systemctl enable --now oas-engine
Check that the service is running.
sudo systemctl status oas-engine
Other Administrative Tasks
Manually stop the OAS Engine
sudo systemctl stop oas-engineManually start the OAS Engine
sudo systemctl start oas-engineCheck OAS Engine service log output
sudo journalctl -u oas-engine -f
4 - Create Admin Account
When you want to start using OAS for the first time you will need to create a set of admin account credentials using the AdminCreate utility. This is the account that gives you full access to login to the OAS Engine node using the Configure OAS configuration tool.
By default, only the oas user and the root user will be able to run the AdminCreate application. You should not give any other user the ability to run the AdminCreate utility.
Ensure that the
AdminCreateutility permissions are restricted.sudo chmod 750 /opt/oas/oas-engine/AdminCreateRun the
AdminCreateutility using theoasuser to create a new account.Typically you would set the username to
admin, but you can user whatever username and password you choose.sudo -u oas /opt/oas/oas-engine/AdminCreateYou will be prompted for a username and then a password.
Clear the screen.
clear
Tips
This is an optional step.
For even higher security you can delete the following files and prevent ANY user from being able to create or update the admin account for OAS. However, if account recovery is needed then these files would have to be restored.
- AdminCreate
- AdminCreate.dll
5 - Next Steps
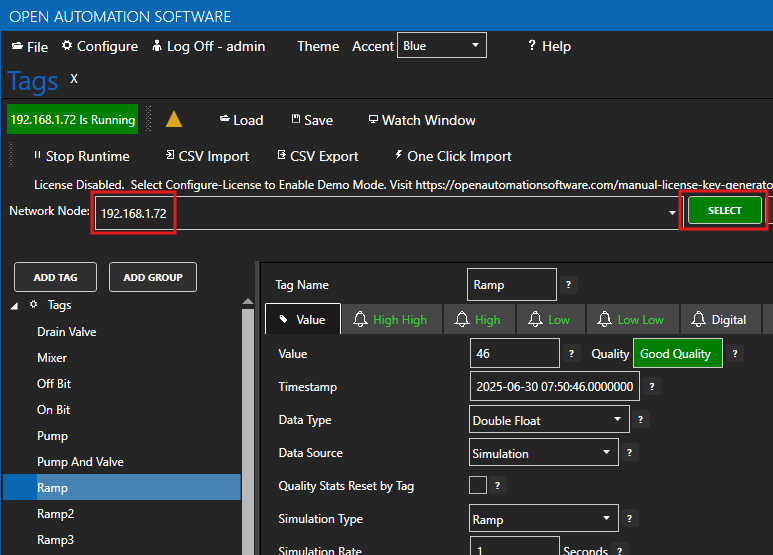
Now that you've successfully started the OAS Engine for Linux you can try connecting to it using the Configure OAS application from your favorite desktop environment.
In the Configure OAS application simply set the Network Node to the Linux OAS Engine server IP address or host name when logging in or selecting a node.
Ready to get started?
Talk to an OAS engineer about your specific configuration and see it in action