How to Log AWS IoT Core Data to MySQL
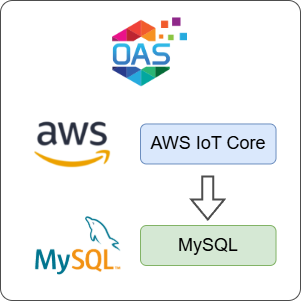
Open Automation Software can be configured to connect to AWS IoT Core using the AWS IoT Gateway connector and log the data to a MySQL database. This guide walks you through downloading and installing OAS, configuring an AWS IoT Core subscriber, configuring tags and logging them to a MySQL database.
For this guide on how to log AWS IoT Core data to MySQL you will need:
- An AWS account with access to the AWS IoT Core console
- A MySQL database and user account with permission to create tables, procedures, indexes and read and write data
See it in action
Talk to an OAS engineer about your specific configuration and see it in action
1 - Download and Install OAS
If you have not already done so, you will need to download and install the OAS platform.
Fully functional trial versions of the software are available for Windows, Windows IoT Core, Linux, Raspberry Pi and Docker on our downloads page.
On Windows, run the downloaded setup.exe file to install the Open Automation Software platform. For a default installation, Agree to the End User License Agreement and then click the Next button on each of the installation steps until it has completed.
If you'd like to customize your installation or learn more, use the following instructions:
The OAS Service Control application will appear when the installation finishes on Windows.
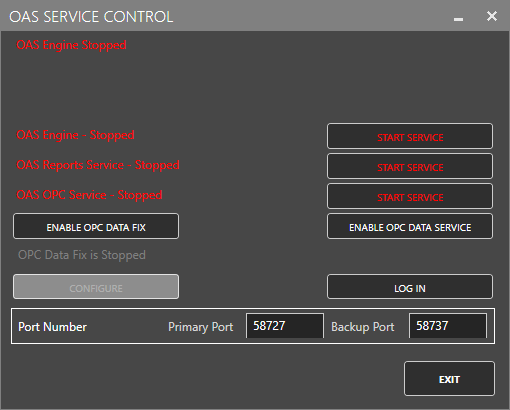
Click on each START SERVICE button to start each of the three OAS services.
2 - Configure OAS
Configure OAS is the main application used to configure local and remote OAS instances.
![]()
From your operating system start menu, open the Configure OAS application.
Select the Configure > Tags screen.
Important
If this is the first time you have installed OAS, the AdminCreate utility will run when you select a screen in the Configure menu. This will ask you to create a username and password for the admin user. This user will have full permissions in the OAS platform.
For further information see Getting Started - Security.
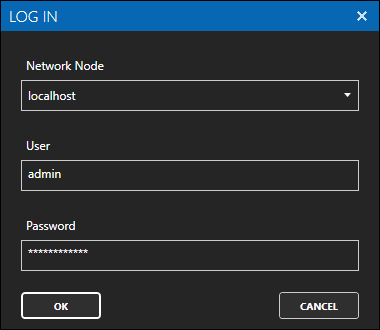
If this is the first time you are logging in, you will see the AdminCreate utility. Follow the prompts to set up your admin account. Otherwise, select the Log In menu button and provide the Network Node, username and password.

Info
In this guide you will use the Configure OAS application to configure the local Network Node which by default is localhost.
If you have installed OAS on a remote instance you can also connect to the remote instance by setting the relevant IP address or host name in the Network Node field.
3 - Create Subscriber Thing in AWS IoT Core
In this step you will create a Thing in the AWS IoT Core service and the required certificate and policies for subscribing to messages sent by AWS IoT Core. This represents your connection and security settings between AWS IoT Core and OAS.
Login to the AWS Console and select the AWS IoT service.
Under the Manage and All Devices menu select Things.
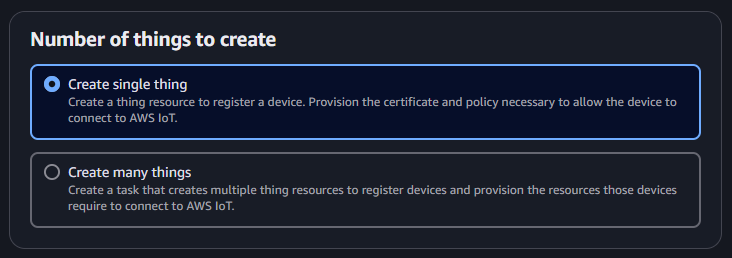
Click on the Create things button to start the create new things wizard.
Select Create single thing and click on the Next button.
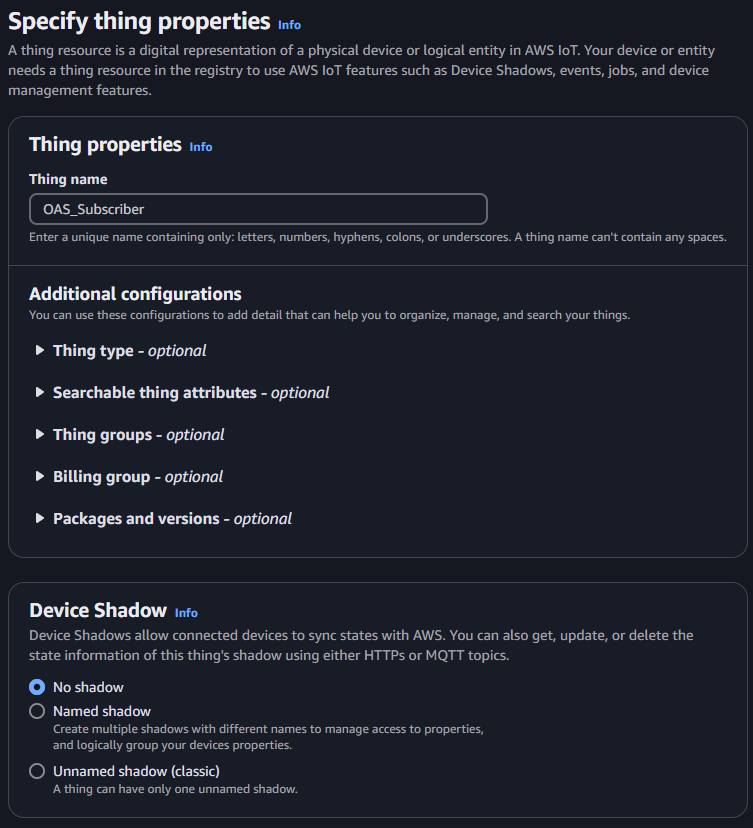
Set the Thing name to OAS_Subscriber and click on the Next button.
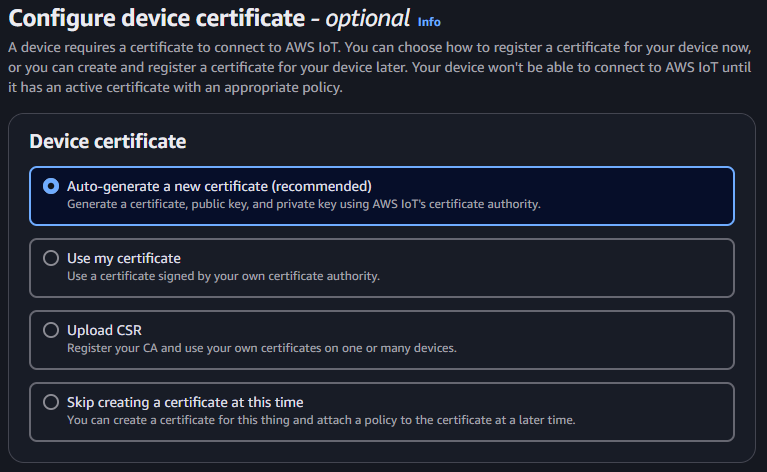
Leave the default option to generate device certificate automatically and click on the Next button.
Select the Create policy button. This will open a new browser tab or window.
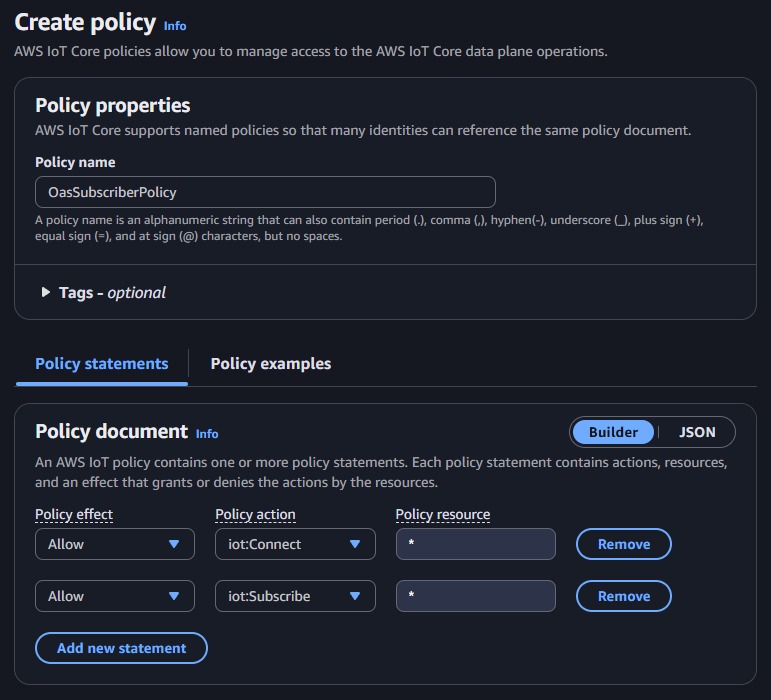
Set the Policy name to OASSubscriberPolicy. The policy will need to allow the iot:Connect and iot:Subscribe actions. For the purpose of this guide the policy will allow all resources using the * wildcard.
Important
For security best practices in production systems you should always restrict your policy to the client ID and AWS resource name (ARN) that represents your region, account and topic paths.
Go back to the create thing wizard and select the OASSubscriberPolicy. Click on the Create thing button.
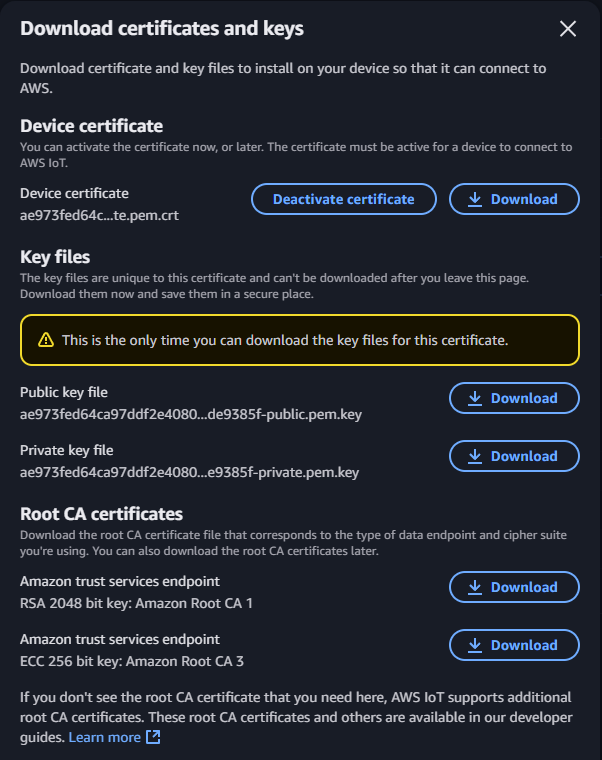
You will see a window relating to certificates. Download the device certificate, the public key file, the private key file and one of the Root CA certificates. You should keep these files in a folder with limited permissions. You'll need them when configuring the AWS IoT Core subscriber in the OAS platform.
4 - Configure AWS IoT Core Subscriber
In the following steps you will create and configure an AWS IoT Core Subscriber for subscribing to tag values.
To determine the AWS IoT Core endpoint you will need to login to the AWS console and select the AWS IoT service. Select the Domain configurations menu.
If you don't already have a domain name use the Create domain configuration button to create one. You will need to take a note of the Domain name property, which represents your AWS IoT Core broker endpoint.
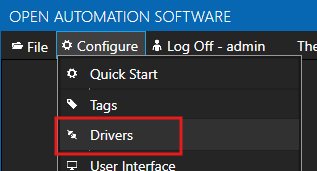
In the Configure OAS application, select Configure > Drivers from the top menu.
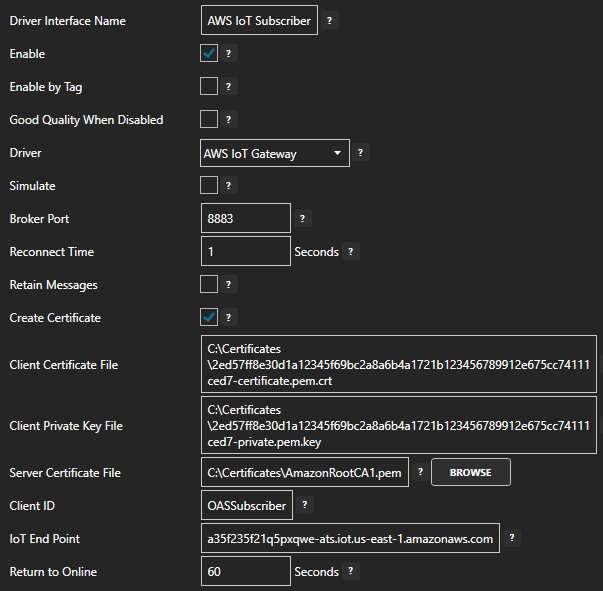
Enter a meaningful Driver Interface Name to give this driver interface instance a unique name (for example AWS IoT Subscriber).
Ensure the following parameters are configured:
- Driver: AWS IoT Gateway
- BrokerPort: 8883
- Create Certificate: Select this if running Windows
- Client Certificate File: The device certificate pem.crt file from the previous section
- Client Certificate Key File: The private pem.key file from the previous section
- Server Certificate File: The Root CA pem file from the previous section
- Client ID: OASSubscriber
- IoT End Point: This is your AWS Iot Core endpoint from step 2 above
Info
If you are using Linux, you can generate a PFX certificate using OpenSSL.
openssl pkcs12 -export \
    -out oas-connection-certificate.pfx \
    -inkey 2ed57ff8e30d1a12345f69bc2a8a6b4a1721b123456789912e675cc74111ced7-private.pem.key \
    -in 2ed57ff8e30d1a12345f69bc2a8a6b4a1721b123456789912e675cc74111ced7-certificate.pem.crt \
    -certfile AmazonRootCA1.pem
You can then use the generated certificate and password in your AWS IoT Gateway driver configuration:

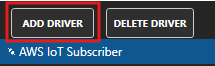
Click the ADD DRIVER button on the left hand side to add this driver configuration. Once added, the driver interface name should appear in the list of drivers.
5 - Add Data Source Tag
In this section you will create a Tag to represent your data point in the field (for example a temperature sensor). This can then be transferred your desired destination.
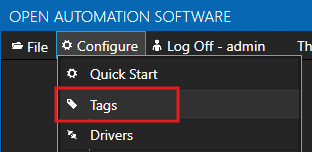
Select Configure > Tags from the top menu.
If you want to add a Tag to the root Tags group make sure the Tags node is selected in the tag list and click on the ADD TAG button.
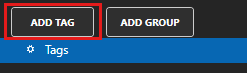
If you want to add a Tag to a Tag Group, select the Tag Group first and then click on the ADD TAG button.
You can also add Tag Groups by using the ADD GROUP button.
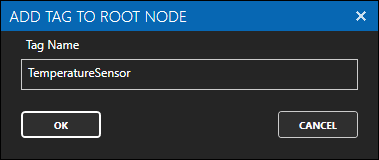
Provide a Tag Name such as TemperatureSensor and click the OK button.
6 - Assign AWS IoT Gateway as Tag Data Source
You will now set the Tag's data source to the AWS IoT Subscriber interface that you created previously.
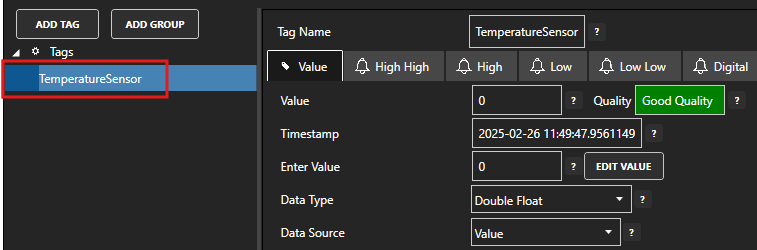
Select the Tag that will source data from the AWS IoT Core data source.
Set the following properties:
- Data Source: AWS IoT Gateway
- Select Driver Interface: AWS IoT Subscriber
- Topic: oas/temperature
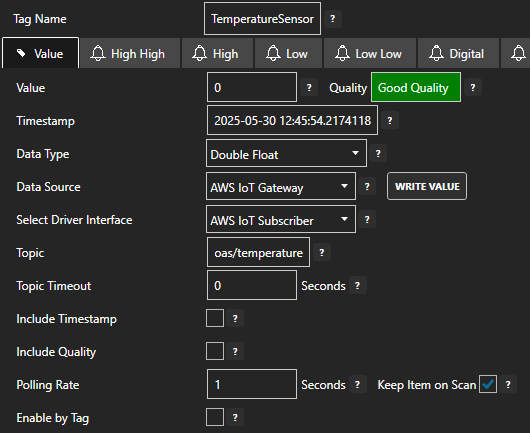
Click on the Apply Changes button to apply the changes.
Login to the AWS Console and select the AWS IoT service.
Under the Test menu select MQTT test client and then select the Publish to a topic tab.
In the Topic name specify oas/temperature.
In the Message payload enter a value and then click on the Publish button.
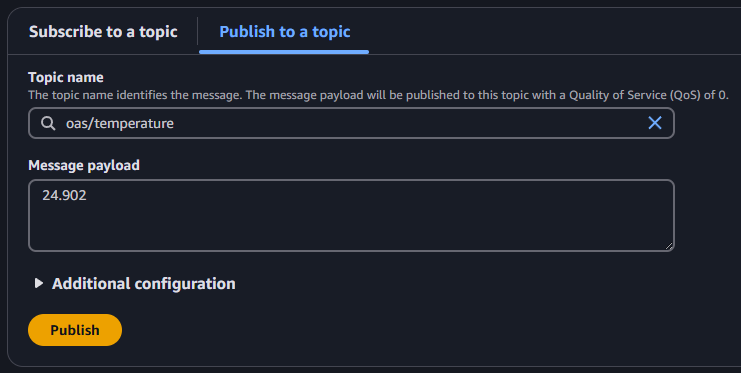
Check that the quality status is Good Quality and you can see the value.

7 - Configure Data Logging
You will now configure data logging to a local MySQL database.
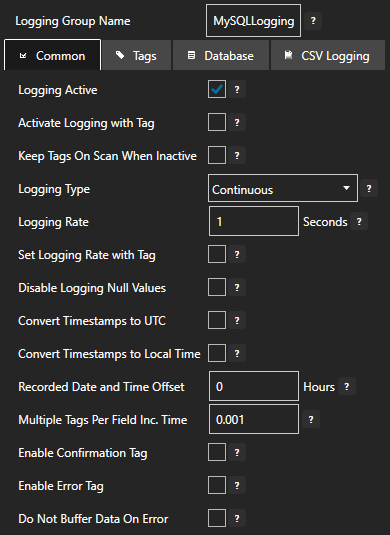
Select Configure > Data Logging from the top menu.

Enter a meaningful Logging Group Name to give this data logging group a unique name. A data logging group is simply a data logging configuration for a set of Tags.
On the Common tab leave all the default values. This will create a configuration that uses Continuous logging with a 1 second Logging Rate. This simply means, log data at a rate of 1 second.
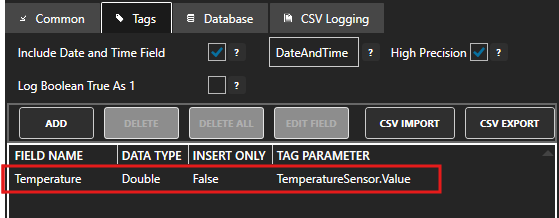
On the Tags tab you will add all of the Tags that you want to log. Each Tag will be a field (column) in the database. Click on the ADD button to bring up the Tag Browser.
Select the Tag you want to add in the left hand panel and then ensure the Value property is selected and then click on the OK button.

Tips
Each Tag has dozens of properties that are available for you to access. The Value property is the most commonly used property as it presents the Tag's current value. This is what we want to log to the database.
The Database Tag window will appear. This is where you set the database field name (column name) and the database data type that will be used. The most common types will be Double Float, Boolean, Integer and String.
Let's set the field name to Temperature. Now click on the OK button.
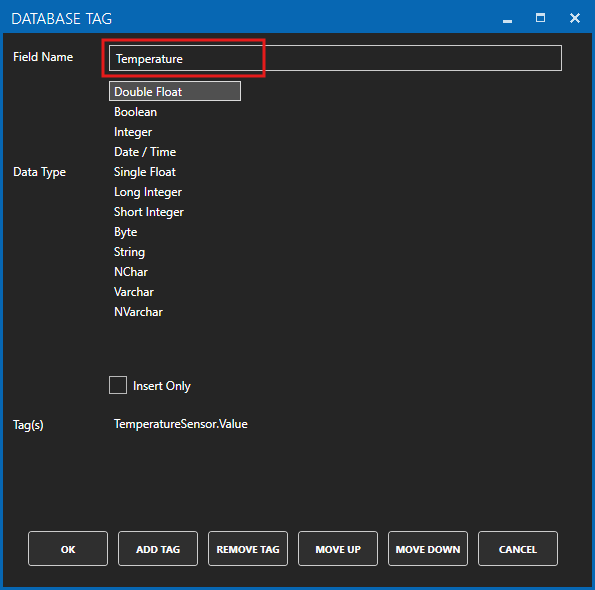
The Tag will appear in the list of Tags to be logged.
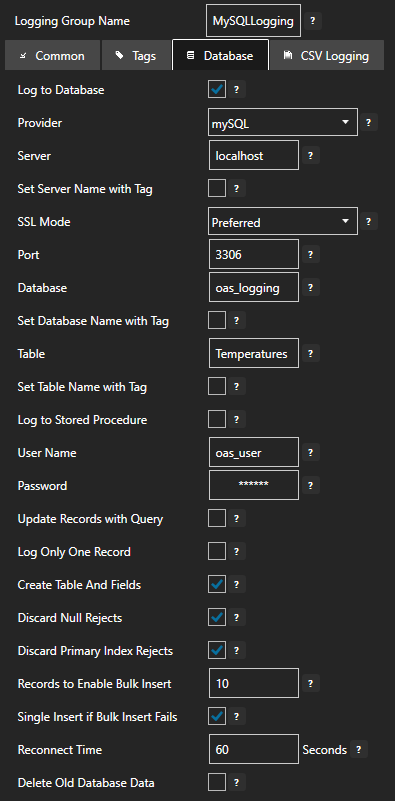
On the Database tab you will configure the database type and connection parameters:
- Tick the Log to Database checkbox to enable logging to a database
- Set Provider to mySQL
- Set Server to localhost
- Set Database to oas_logging
- Set Table to a table name such as Temperatures
- Set User Name to a user with permissions to manage the oas_logging database
- Set Password to the user password you defined in the Step 6 section
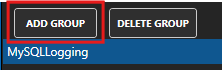
Click on the ADD GROUP button to add the data logging group. Once added, the data logging group name should appear in the list of logging groups.
Your database logging group is now active.
8 - Save Changes
Once you have successfully configured your OAS instances, make sure you save your configuration.
On each configuration page, click on the Save button.
If this is the first time you are saving the configuration, or if you are changing the name of the configuration file, OAS will ask you if you want to change the default configuration file.
If you select Yes then OAS will make this configuration file the default and if the OAS service is restarted then this file will be loaded on start-up.
If you select No then OAS will still save your configuration file, but it will not be the default file that is loaded on start-up.

Important
Each configuration screen has an independent configuration file except for the Tags and Drivers configurations, which share the same configuration file. It is still important to click on the Save button whenever you make any changes.
For more information see: Save and Load Configuration
Info
- On Windows the configuration files are stored in C:\ProgramData\OpenAutomationSoftware\ConfigFiles.
- On Linux the configuration files are stored in the ConfigFiles subfolder of the OAS installation path.
Ready to get started?
Talk to an OAS engineer about your specific configuration and see it in action