How to Install OAS in Docker Container on Windows Host
The aim of this guide is to run a Linux OAS engine in a Docker Container on a Windows host using the WSL2 subsystem.
You will create and run a Docker Compose file that contains a service definition for OAS and the necessary volumes to persist data. The data volumes ensure that your configuration data survives container restarts, server restarts and version updates.
To complete this guide you will need:
- Docker engine or Docker Desktop installed on a Windows host and the WSL2 subsystem
- The OAS License Host installed, see:
1 - Create Docker Compose definition
In this section you will create a Docker Compose definition to define your OAS service and any associated networking and storage configuration.
You will use the oasiot/oas-linux image in this guide, but you can adjust this based on your own requirements if you are using an arm CPU for example. You will find the images on the Open Automation Software Docker Hub.
Create a new file called
docker-compose.yml.Open the file in your favorite code editor and put in the following:
services:
    oas:
        image: oasiot/oas-linux:latest  # the OAS image with the 'latest' version tag
        container_name: oas             # the name of the container
        volumes:
            - oas-logs:/oas/Log
            - oas-config:/oas/ConfigFiles
            - oas-opcua:/oas/OPCUA
            - oas-sf:/oas/StoreAndForward
            - oas-uiengine:/oas/webapps/uiengine/media
        ports:
            - "1883:1883"   # MQTT Broker
            - "58725:58725" # REST API / UIEngine
            - "58727:58727" # Primary Port
            - "58737:58737" # Backup Port
            - "58728:58728" # OPC UA

volumes:
    oas-logs:
    oas-config:
    oas-opcua:
    oas-sf:
    oas-uiengine:
You can adjust the
container_nameand theportsas required.Tips
The
oasiot/oas-linux:latestimage represents the latest published version, which means if you restart your containers it will always download the latest version. It is recommended to fix your OAS version in order to avoid unexpected version upgrades. You can find each image has a set of tags - for example on the OAS Linux Tags page you'll find all the tags.An example
imagedefinition using the version tag is as follows:oasiot/oas-linux:20.00.0131Save the file.
2 - Start OAS using Docker Compose
Now that you have a Docker Compose file defined you can start your OAS container (or multiple containers if you defined more than one instance).
Open a terminal window and go to the folder where your
docker-compose.ymlfile is located.Run the following command to start your Docker container:
docker compose up -d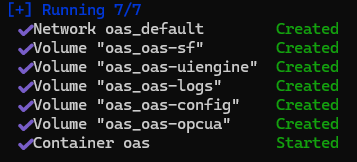
3 - Create Admin Username and Password
When you first start OAS there in no default administrator username or password defined. In this section you will create the initial admin username and password.
In your terminal application run the following command.
docker exec -it oas /oas/AdminCreateProvide a username such as
adminand a password.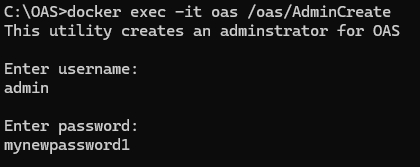
Tips
When you create a new administrator user using the method described above, OAS will create a new
OAS.Securityfile in the/oas/ConfigFilesfolder. For production deployments, instead of creating this file manually for each container, you can take a copy of this file and then include it in your own custom Docker image for deployment. For added security, you can also remove theAdminCreateapplication from your image to prevent any unauthorized password resets.
4 - Configure OAS Container License
OAS instances that run inside containers need to be licensed using the OAS License Host. If you have not yet installed the OAS License Host service please see one of the following guides:
If you are running the license host on same machine as the Docker Engine then your containers will be detected automatically and you can skip this section.
If you are running the license host on a different machine, you can manually configure the container's IP address on the license host server. In order for the license host to be able to communicate with your OAS instance it will need to have port 58727 open.
Login to the host machine that is running the OAS License Host service.
Locate the folder where the OAS License Host service is installed and, if it doesn't already exist, create a new file called
containers.csv.In Windows it will be in:
C:\Program Files\Open Automation Software\License HostIn Linux it will be in:
/home/oas/oas-linux-license-hostIn the
containers.csvfile you will need to add a header and then pairs of OAS container IP addresses and OAS ports (default58727).For example, if your OAS container has an IP address of
192.168.1.200and the default port, then your CSV file will be as follows:ip address,port 192.168.1.200,58727You can add additional rows to include more containers.
Restart the OAS License Host.
In Windows you can restart the service using the OAS Service Control application.
In Linux you can use the command
systemctl --user restart oas-license-host.
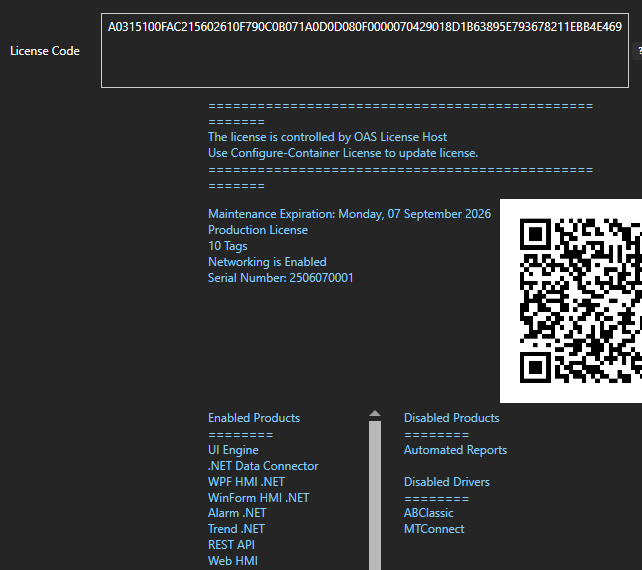
5 - Verify OAS Container License
You can now confirm that the OAS container has been detected by verifying the license screen of the License Host and the OAS Container using the Configure OAS application.
Open the Configure OAS application on a host that can access both the License Host and the container running OAS.
Open the Configure > Container License screen and set the Network Node to the IP address of the License Host service. You can then confirm how many containers are running.

Open the Configure > License screen and set the Network Node to the IP address of the container running OAS. It should display a valid license and a message
The license is controlled by OAS License Host.