The OAS .NET products provide Human Machine Interface .NET controls and real-time data communications components for Windows Presentation Foundation (WPF) and WinForm applications.
HMI applications can be developed using Microsoft Visual Studio 2010 (or later), Xamarin or Microsoft Blend.
WPF HMIAdd visualization to a C#, or Visual Basic.NET application using WPF
Winform HMI Add visualization to a C#, or Visual Basic.NET application using WinForm
.NET Trend Add real-time trending for WinForm and WPF applications and historical trending when combined with the product feature OAS Data Log
.NET Alarm View real-time and historical alarms for WinForm and WPF applications
OAS communicates with HTML-based applications using JSON over HTTP/S. Creating applications is straightforward – code a custom interface then add OAS Javascript libraries and OAS specific code.
Web HMI – create user interfaces to display and interact with real time server data, enabling a whole range of applications on any device with a web browser.
Web Trend – add real time animated charting to display server tag values on any device with a web browser.
Web Alarm – retrieve and interact with real time and historical alarms from the server.
API Access
OAS provides the following API access for integrating with custom clients and for full programmatic access to live and historical data:
REST API – The OAS REST API exposes functionality for reading and writing real-time and historical Tag Data, Trend Data, and Alarms. Additionally, the API can be used for managing OAS Server configurations.
HTTP API – Make HTTP calls using JSON data structures
Open Automation Software Tags can be defined to connect directly to devices using the CANBus standard using OAS built in CANBus Driver Interfaces.
The following steps can be used to setup direct communications with controllers using the CANBus standard.
Step 1
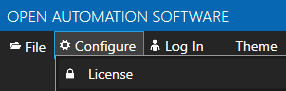
Start Configure OAS application from the program group Open Automation Software.
Step 2
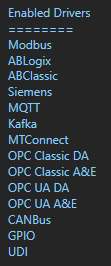
Select Configure-License and verify that CANBus is one of the available Drivers in the lower left of the form. If you do not CANBus driver available contact support@oasiot.com to update your license.
Note: You will need to be running Open Automation Software Version 8.0.0.10 or greater to support direct CANBus communications. You can download the latest version here.
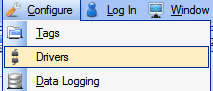
Step 3
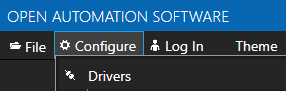
Select Configure-Drivers.
Step 4
Select localhost or the remote service you wish to modify with the Select button to the right of the Network Node list.
Note: Optionally select the Live Data Cloud node if you are hosting CANBus data over the Internet with a standard Internet connection.
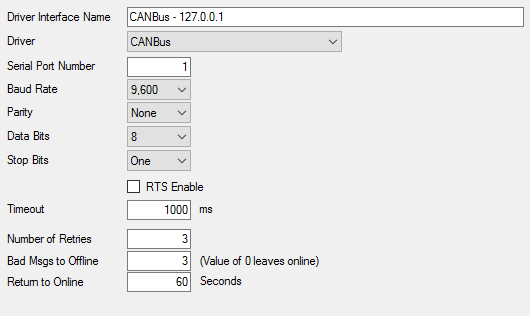
Step 5
Enter a meaningful Driver Interface Name that you will refer to this physical connection when defining Tags with a CANBus Data Source.
Define the properties for the desired physical connection.
Select the Add button in the lower part of the form to add the Driver Interface as an available selection when defining Tags in the next step.
Note: If you need to define several Driver Interfaces you can use the CSV Export and CSV Import on the toolbar in the upper right together with Microsoft Excel.
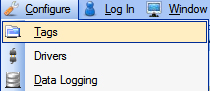
Step 7
Select Configure-Tags.
Select localhost or the remote service you wish to modify with the Select button to the right of the Network Node list.
Note: Optionally select the Live Data Cloud node if you are hosting Modbus data over the Internet with a standard Internet connection.
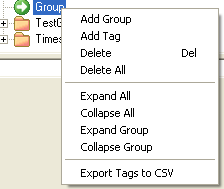
Note: You can also add organizational Groups as many levels deep as you prefer and add tags to groups. To do this first add a Group to the root level, then right click on the Group in the right window to add additional Groups or Tags.
Step 9
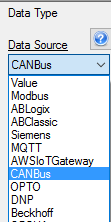
Change the Data Source Tag property to CANBus.
Step 10
Select the correct Driver Interface from the Driver Interface pull down list.
Step 11
Specify the desired Polling Rate for the Tag.
Specify the Address of the variable to read and write to.
Step 12
To define multiple tags use the CSV Export and CSV Import on the toolbar in the upper right together with Microsoft Excel.
Note: You can also programmatically define Tags using the free to use OPC Systems component as demonstrated in the Form FormConfigureCSV in the WinForm Example Code application that installs with Open Automation Software in the Program Group Open Automation Software. This component can be used in any .NET application includes Web Services, Windows Services, WPF Applications, and ASP.NET or .NET MVC Web Applications.
Step 13
Select the Save button on the toolbar at the top.
Step 14
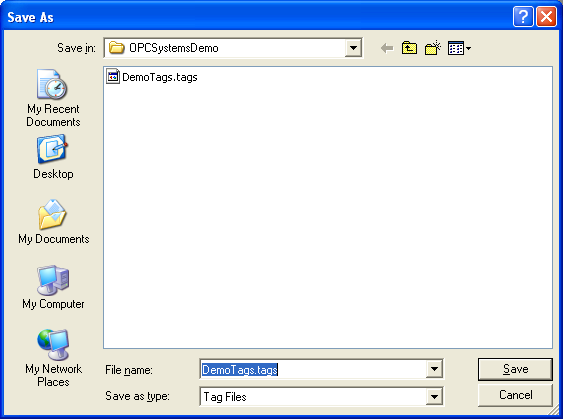
Create a directory on the local C: drive with the name OPCSystemsDemo.
Save the file DemoTags.tags in the directory C:OPCSystemsDemo.
Step 15
Under Configure – Options set the Default Tag Configuration File so when the computer restarts the tag file will automatically be loaded.
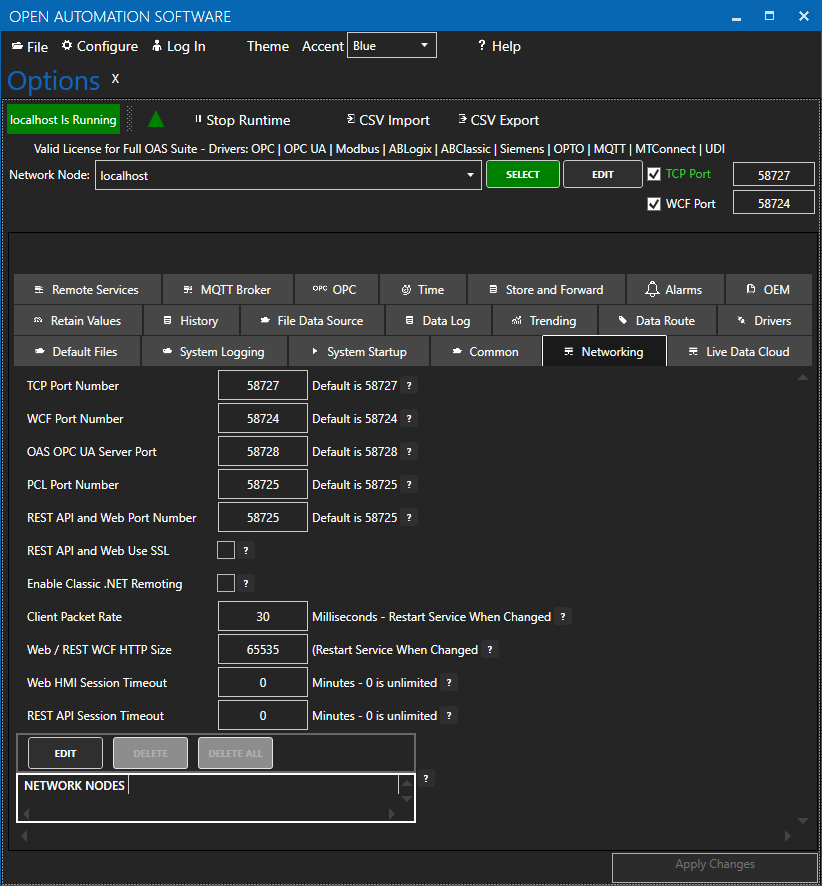
To use the OAS REST API you must make sure that the OAS HTTP service is listening on the correct port. This is done within the OAS Configuration application.
Open the OAS Configuration application and select Configure > Options, then select the network node (localhost if working on the local machine) and click Select.
Under the Networking tab, locate the field for REST API/WebHMI Port Number. The default is 58725 but can be changed. If you are accessing the server from a remote client, you will also need to make sure your machine and/or company firewalls allow TCP traffic on the selected port.
Using SSL with REST API is fully supported. Read more about Configuring OAS to use SSL for Web and REST API products.
NOTE: Making any changes to the port numbers in this section of the configuration app will temporarily restart server processes and may cause a brief interruption in data processing.
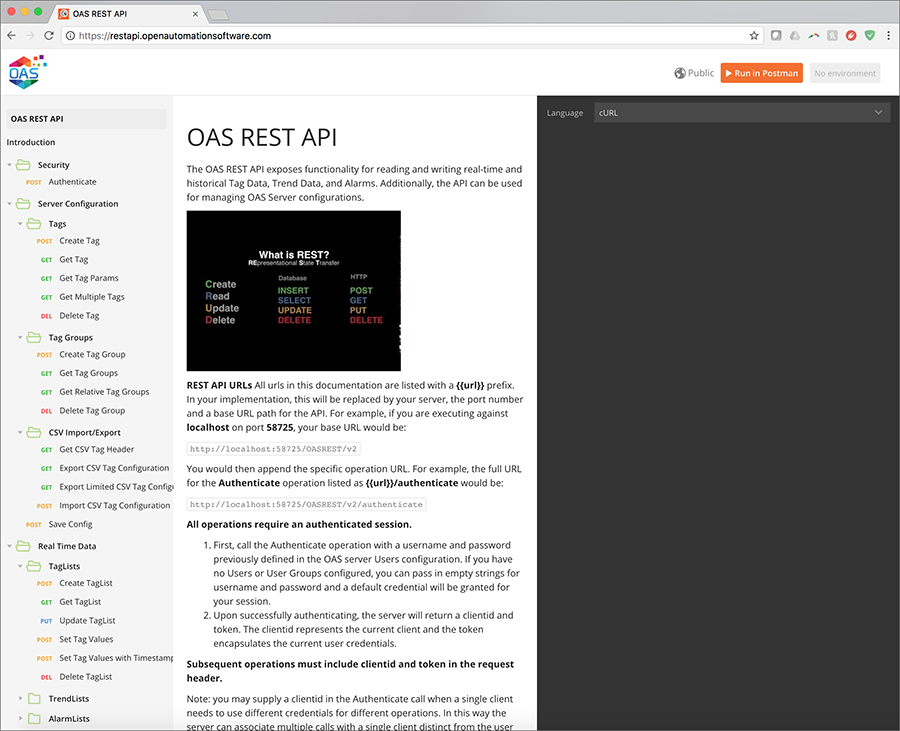
This documentation illustrates all of the operations available to any REST API client and can be tested using the Postman application client. In the upper right corner of the documentation, you will see a button to Run in Postman, which will install the API documentation into the Postman client for direct execution against any OAS server. Additionally, the documentation can be configured to display code samples in multiple languages including cURL, jQuery, and NodeJS. Feel free to browse the documentation at any time and to refer back to it while developing your applications.
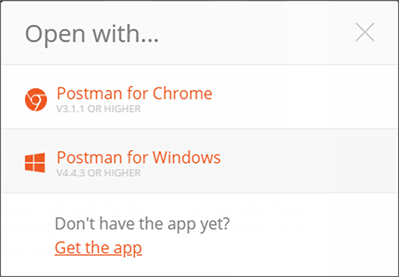
Clicking Run in Postman will pop up a dialog box to import the REST API into an existing installation of Postman, or you can choose to install the app for the first time. Postman is available for Windows and Mac desktops as well as in a Chrome extension.
Step 3
Test your API installation
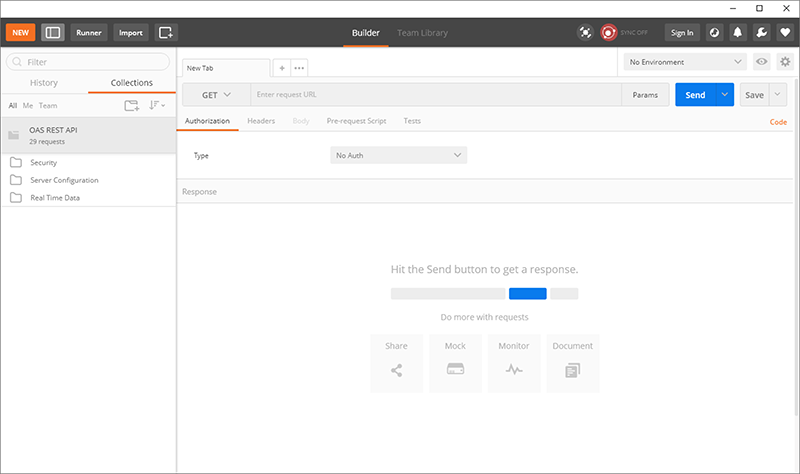
Once installed and the API has been downloaded into the app, you will see the following interface, with all operations on the left, organized identically to the online documentation:
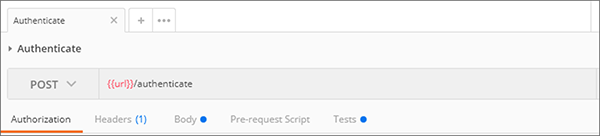
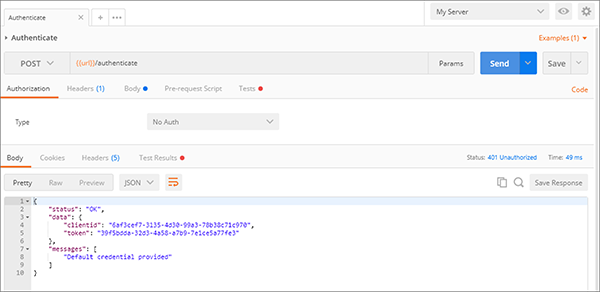
The first operation to execute is the Authenticate call, which will generate a REST API session and returns a clientid and token to be used in all subsequent calls to the OAS server.
In the list of operations, expand and select Authenticate and you will see the following on the right side of the app:
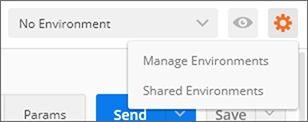
This shows that the Authenticate operation is executed as an HTTP POST against the /authenticate URL appended to the base {{url}}. This base URL is defined in your Environment here. Select Manage Environments to add new fields:
Add your server to the Environments list
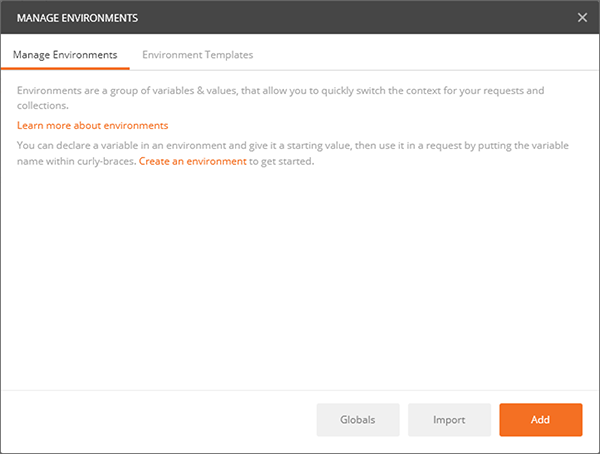
Click ADD to create a new Environment which will hold environment variables:
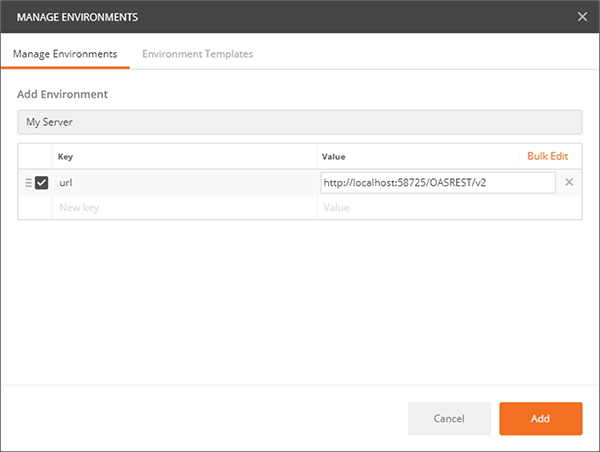
Add a name for your environment, then add a key of url with a value of http://localhost:58725/OASREST/v2 and click ADD to create the new environment. You can also use your OAS server’s IP address instead of localhost, if you are connecting to it from a remote workstation.
Next, return to execute the the Authenticate operation.
Now under the Environments dropdown, select your new Environment. You should see the {{url}} turn orange, indicating that the environment variable is being used.
You can now click SEND to execute the post against your server. If successful, you should see a response body similar to the one below, containing the clientid and token fields.
You can then use these fields in the header of all other operations using the Postman app to test your server.
Step 4
Accessing Tag Values
Once authenticated, you are now able to use the clientid and token in HTTP headers to make calls to configure Tags, access real time and historical Tag data, and even real time and historical Alarm and Trend data. When referencing Tags in any call, you it is assumed that you are accessing them on the OAS server being called in the REST API. However, you can also access remote Tags on any OAS server networked with the target server. Read more about the proper syntax for accessing Tags and Tag Variables.
Remote Access
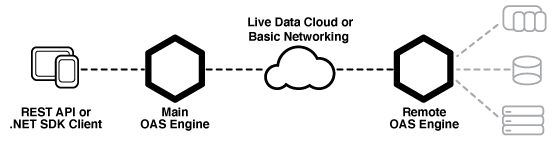
OAS servers can communicate with each other and pass along tag data. This allows for distributed network load as well as placing OAS servers behind firewalls so they cannot be accessed directly. This allows you to securely issue REST API calls against one server and read/write data within a remote OAS server that cannot be reached directly from the REST API client. This same concept applies whether you are calling the OAS REST API or using the .NET Data Connector for programmatic Tag access and configuration.
Main OAS Engine : the server handling the REST API calls
Remote OAS Engine : the server housing the tag data or configuration you would like to access
REST API URL
Set the url to OAS Engine that the REST API will be hosted from. This is the URL to the Main OAS Engine whether you are accessing tag data on the Main OAS Engine or on a Remote OAS Engine.
Localhost URL : will only work when accessing the Main OAS Engine on the same machine as the client.
http://localhost:58725/OASREST/v2
Explicit URL : use the IP Address or domain name of the Main OAS Engine, allowing you to access it from a remote client. This will also work on the same machine and is the best option for code flexibility.
http://192.168.0.1:58725/OASREST/v2
Tag Access
Main OAS Engine Tag – accessing tag data on the Main OAS Engine only requires referencing the tag path.
{
    "tags": [
      {"path":"TagName.Value"}
    ]
}
Remote OAS Engine Tag – To monitor real time data from Remote OAS Engines reference the tag path in the form \\<Remote OAS address>\<Tag Path>. Note in the example below that backslash characters are escaped within strings, changing \ to \\ and \\ to \\\\.
Live Data Cloud Networking – Dynamic IP Once you have registered named Live Data Cloud nodes on an OAS server, you can reference them in the form RemoteSCADAHosting.<Node Name>.<Tag Path>.
To execute REST API Tag Configuration calls against Remote OAS Engines, you can use the networknode parameter to reference a static IP or domain name, or the ldc parameter to reference a Live Data Cloud node name. The example below demonstrates calls to the CSV Tag configuration calls using each of these methods.
Basic Networking – Static IP or domain name
http://192.168.0.1:58725/OASREST/v2/csvtags?columns=Tag,Value - Data Type,Value - Value,Last Column&networknode=192.168.0.2
Live Data Cloud Networking – Dynamic IP
http://192.168.0.1:58725/OASREST/v2/csvtags?columns=Tag,Value - Data Type,Value - Value,Last Column&ldc=LiveDataCloudNode01
Remote Security
Because your authentication call is always against the Main OAS Engine, that same credential will be passed to any networked OAS Engine when referencing remote Tags. So it is critical to make sure the same credential (username/password) exists on all networked OAS Engines and has been granted the appropriate access level for the command being executed.
Open Automation Software Tags can be defined to connect to OPC UA Servers with the built in OPC UA Driver Interface.
View the following video to see how to connect to an OPC UA Server.
The following steps can be used to setup communications with OPC UA Servers.
Step 1 – Check OPC UA License
Start Configure OAS application from the program group Open Automation Software.
Select Configure-License and verify that OPC UA is one of the available Drivers in the lower left of the window. If you do not see OPC UA available contact support@oasiot.com to update your license.
NOTE: To configure remote OAS Engines enter the IP Address or node name in the Network Node field and click on Select.
NOTE: You will need to be running Open Automation Software Version 10.0.0.12 or greater to support OPC UA communications. You can download the latest version from our Open Automation Software Download page.
Step 2 – Configure OPC UA Driver
Select Configure-Drivers.
Enter a meaningful Driver Interface Name that you will refer to this physical connection when defining Tags with an OPC UA Data Source.
Set the Driver type to OPC UA.
Define the Server Url property to the endpoint of the OPC UA server to connect to.
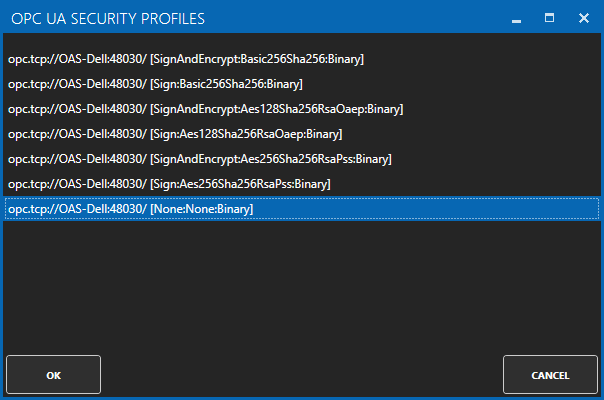
Use the BROWSE button of the Security Profile to select one of the security profiles. Use None:None:Binary for the fastest interface.
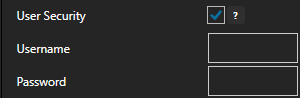
If the server requires user authentication enable the property User Security to define the Username and Password.
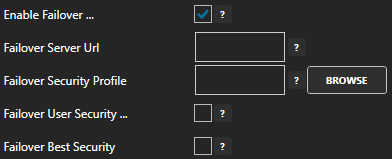
Optionally define a secondary failover server if the primary server fails with the property Enable Failover.
If both the primary and secondary servers are offline the Return to Online settings determines the retry frequency.
View Driver Interface Failover for more information and and video demonstrating communications failover.
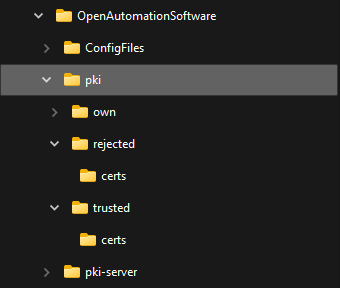
NOTE: The certificate path is C:\ProgramData\OpenAutomationSoftware\pki on Windows and /ConfigFiles/pki/ on Linux. You may need to move the server’s certificate from the rejected\certs folder to the trusted\certs folder.
Select the Add Driver button in the upper left of the window to add the Driver Interface as an available selection when defining Tags in the next step.
Note: If you need to define several Driver Interfaces you can use the CSV Export and CSV Import on the toolbar together with Microsoft Excel.
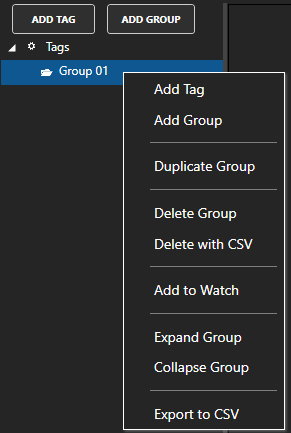
NOTE: You can add organizational Groups as many levels deep as you prefer and add tags to groups. To do this first add a Group to the root level, then right click on the Group in the right window to add additional Groups or Tags.
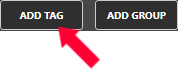
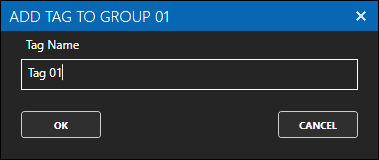
Select Add Tag to add a tag to the group selected.
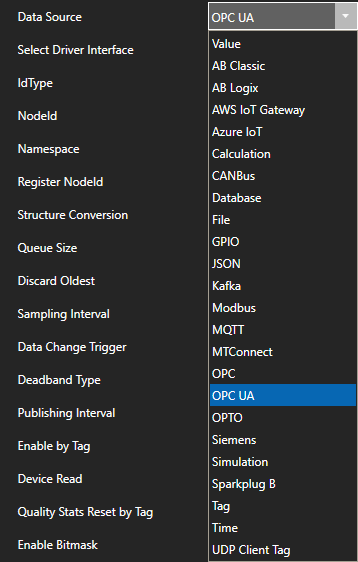
Change the Data Source property to OPC UA.
If you have more than one OPC UA Server defined in the Driver Interfaces select the desired Driver Interface.
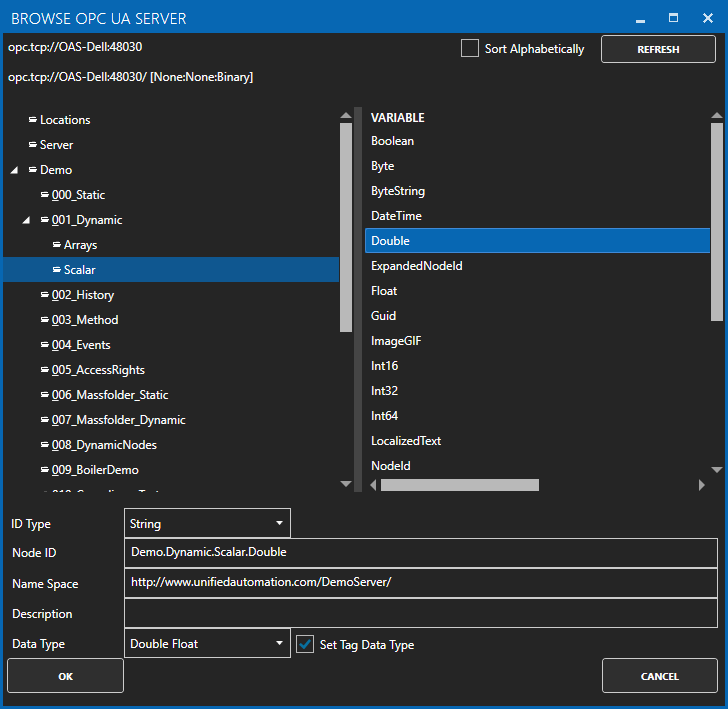
Use the BROWSE button next to the NodeId to browse for a node in the OPC UA server.
Select OK to assign the IdType, NodeId, Namespace, and Data Type.
Specify the desired Publishing Interval for the Tag.
Select Apply Changes and verify the Value and data quality is good.
Check that the data quality of the tag is Good Quality and the value from the OPC UA server is returned.
NOTE: If you are unable to connect to the OPC UA Server due to a certificate security error go to C:\ProgramData\OpenAutomationSoftware\pki\ on Windows or the pki sub-directory where the OAS Engine is located on Linux and copy the files in the rejected\certs directory to trusted\certs.
To define multiple tags use one of the following optional methods.
Use One Click OPC UA to automatically create tags from all OPC UA Nodes from a selected OPC Server or branch within an OPC Server. Then selectively delete the groups and tags that are not required.
Use CSV Export and CSV Import on the toolbar in the upper right together with Microsoft Excel to add or modify tags.
Programmatically define Tags using the free to use OASConfig component with the SetTagProperties method.
Programmatically define Tags with the OAS REST API.
Step 4 – Save OPC UA Tags and Drivers
Select the Save button on the toolbar at the top.
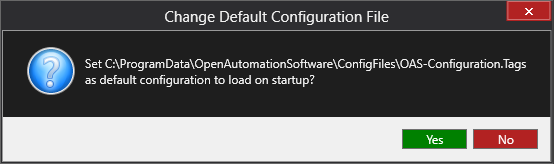
Enter a file name to be saved in C:\ProgramData\OpenAutomationSoftware\ConfigFiles directory on Windows or ConfigFiles subdirectory on Linux.
When prompted to set the file as the default configuration to load on startup select Yes.
NOTE: The tags and and drivers are both saved into one file.
As outlined on the Getting Started – Networking page, OAS has two main ports used by OAS Engine to OAS Engine and OAS Engine to client communications, depending on whether the client is using TCP connectivity or web-based connectivity using HTTP. For OAS Engine to OAS Engine communication, and when using the OAS Configure tool, there is also a third port, which is the backup port number in case there is a problem with the primary port number.
There is one additional port for the OAS OPC UA server.
For legacy support for Windows Communication Framework (WCF) port [58724] and Classic .NET (remoting) port [58723] are not currently support in the latest version of OAS.
The default TCP port number for .NET applications, Microsoft Excel, OPCSystems.NET OPC Server, the OAS Configuration tool and service to service communications is 58727. The default web port for web applications and the REST API (which includes UIEngine) is 58725.
Changing these ports is not generally required, however if you have specific networking needs then you can follow the relevant instructions below to adjust these port numbers.
OAS Engine – Listening and Client Ports
There are two types of ports that can be configured in each OAS Engine – listening port numbers and client port number.
The listening port numbers are the ports on which an OAS Engine (let’s call it the local engine) listens for connections as shown on the left hand side in the above diagram. These ports are used when another OAS Engine (let’s call it the remote engine) or a client connects to the local engine. When clients connect to an OAS Engine their purpose is to read and write tag data, but why would a remote engine need to connect to a local OAS Engine?
The answer to this question is Basic Networking and Live Data Cloud. Whenever any remote engine (e.g. Instance2 below) references a tag path that points to the local engine (e.g. Instance1 below), then the remote engine will establish a connection to the local engine and poll the tag value for the given tag path. These kinds of remote tag references can appear wherever you are referencing a tag using a tag path. This could be in a Tag Data Source, in a Data Logging configuration, in a Data Route or even if a client connects to a remote engine with a read or write request that references a tag on the local engine.
If the listening port is changed on the local engine, this port number also needs to be correctly configured on all of the clients and the remote engines that want to connect to the local engine. This is called the client port number. In a standard configuration the listening port on the local engine and the client port on the remote engine will be the same (58727) and therefore don’t need to be changed, but if you change the listening port on a local engine, you also have to change the client port configuration on the remote engine or use remote tag paths that also include the port number.
In short, you can think of it this way from the point of view of the OAS Engine: The listening port is configured to the port number where I want other engines and clients to connect to read data from my tags or write data to my tags. The client port is configured to the port number I need to connect to when I want to read tag data from or write tag data to another engine. This is an example of a remote tag path that also specifies the port number:
\\192.168.10.1:58777\MyTag.Value
The OAS Engine where the remote tag path is specified will be the one to initiate the connection. If two OAS Engines contain tag paths to each other’s tags then this will result in two TCP connections – one in each direction.
Currently, each OAS Engine can only be configured to listen on one port (ignoring the backup port) and connect to one default client port. This means you can still access remote tags on different OAS Engines, but they will all need to use the same listening port or you will need to specify both the IP and port number in your tag path. Generally, if you have more than one OAS Engine in your solution, you will use the default ports on each engine.
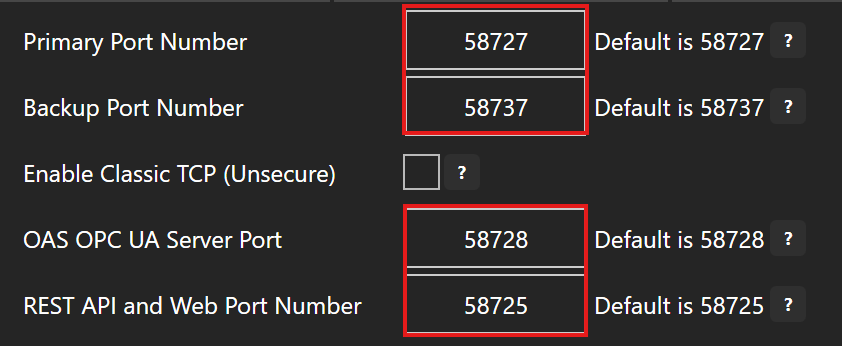
Configure Listening Ports
To configure the listening port numbers, open the OAS Configure application and go to the Configure > Options screen and select the Networking tab.
Here you can adjust the following parameters:
Primary Port Number
Backup Port Number
OAS OPC UA Server Port
REST API and Web Port Number
Classic TCP
The Classic TCP packet support is disabled by default. You can enable it in the OAS Configure application on the Networking tab of the Configure > Options screen. To enable it make sure the “Enable classic TCP (Unsecure)” check box is ticked. The Classic TCP port number is set by the Primary Port Number and Backup Port Number properties.
Classic WCF Port
The Classic WCF port 58724 is no longer supported in the current version of OAS.
Classic .NET Remoting
The Classic .NET Remoting port 58723 is no longer supported in the current version of OAS.
Configure Client Ports
To configure the client port numbers open the OAS Configure application and go to the Configure > Options screen and select the Remote Services tab.
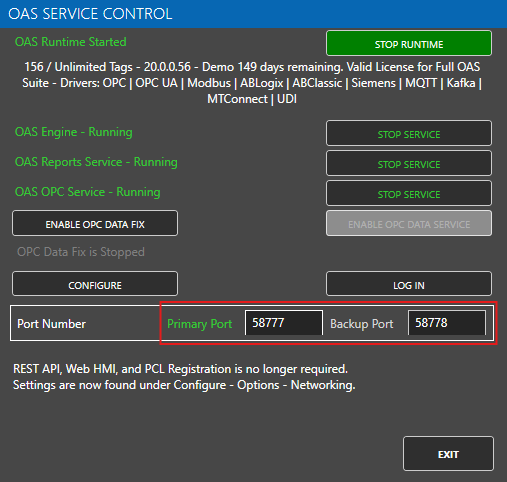
OAS Service Control Tool
The OAS Service control tool is used to view the status of your OAS services and runtime, and to start or stop the OAS services. If you adjust your OAS Engine listening port numbers you will also need to adjust the port numbers in this tool if you want to use it to view the runtime status and the license details. Even if these ports are not correctly set you will still be able to start and stop the services as these are managed directly through Windows services and not an OAS connection.
The image below shows an example where the primary port is now 58777 and the backup port is now 58778.
Technically only one of the two ports needs to be correctly set and a green text color will indicate which port is being used, but it is best to make sure both ports are correctly set. In the image above, the Primary Port 58777 is currently being used by the OAS Service Control tool. The main purpose of the backup port is to allow you to recover the OAS connection in case the primary port is no longer available, has been blocked or has become unresponsive.
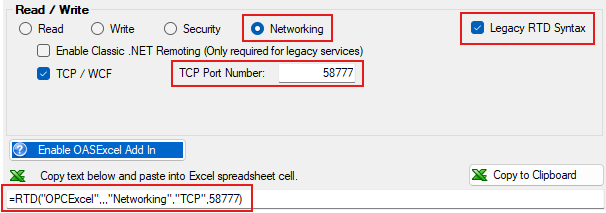
OAS Configure Tool
The OAS Configure tool is the main Windows GUI based OAS configuration tool and can be used to connect to local and remote OAS instances. The Network Node and the Primary and Backup Port settings can be configured on each of the configuration screens along the top of the view.
In the following example, the OAS Configure tool is being used to connect to a local OAS Engine instance using a Primary Port 58777 and a Backup Port 58737. The “Primary Port” text is green as it indicates that this is the port number that OAS is currently using to communicate with the OAS Engine. The red color indicates that the configured port is not the default port.
If you are using the OAS Configure tool to connect to different OAS instances on different servers and one or more engines is not using the default port numbers, you will have to adjust these port numbers each time you connect to a different engine. Again, if possible, it is more convenient if all engines can use the same port numbers.
Microsoft Excel
Microsoft Excel can be used together with the OAS Excel feature to read and write OAS tag data. If you only specify the tag page, the OASRead function will use localhost and port 58727 as the default connection parameters. However, you can override this by specifying a full tag page with the IP or host name as well as the port number to connect to. In the following example, the tag is being read from localhost but using port number 58777.
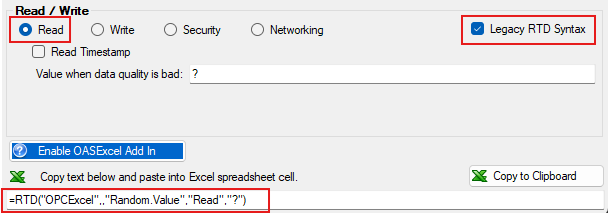
You can also use the legacy RTD method to read and write OAS tag data. This method is supported on OAS version 17 or lower. To use this method you will need to specify a cell in Excel that uses the “Networking” parameter and also the “Read” parameter for reading.
You can examine these methods using the OAS Excel Tag Browsing tool. You find this tool in the Windows Start Menu or in the OAS Configure tool by going to the Configure > Excel menu.
Once you have copied this formula into Excel you can then also generate a Read operation.
WinForm HMI .NET
There are two ways in which you can configure the port number when using OAS controls in your Windows Forms applications. The first method is to add the OPCControlsNetworkNodes component to your Form and set the TCPPortNumber parameter to the desired port number. The second method is to use the remote tag path syntax to specify the OAS Engine IP or hostname and port number. Let’s look at this in more detail.
Using OPCControlsNetworkNodes
When you use this method it will apply to all OAS controls added to your Form. If you only need to override a few controls you can use the remote tag syntax shown in the next section.
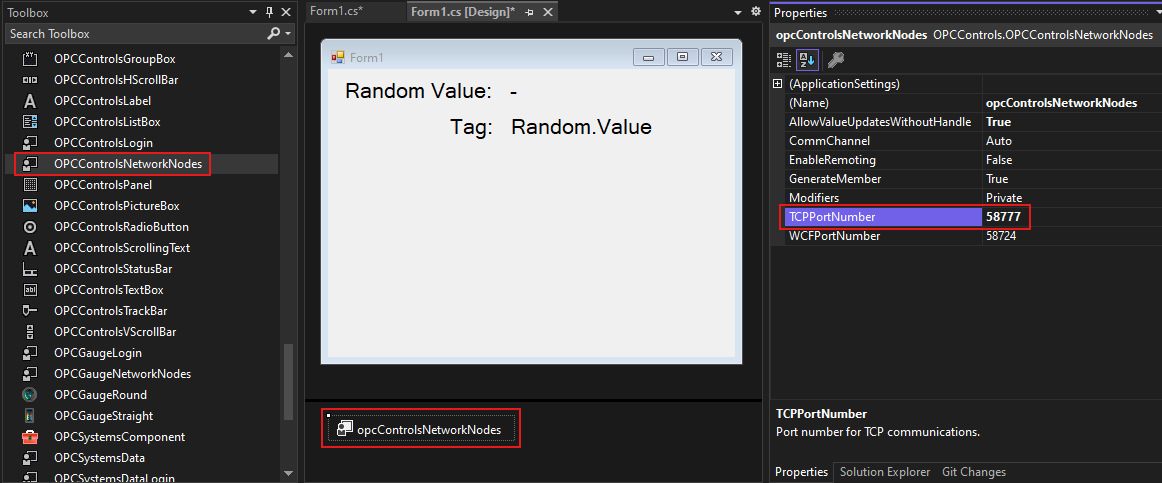
In your Windows Forms project you will have your main Form design shown. Open up the Toolbox panel and then find and drag the OPCControlsNetworkNodes component onto the Form.
You will see this component appear in the panel below the form. Click on it.
In the Properties panel you can now adjust the TCPPortNumber parameter.
To programmatically adjust this port number, you can reference the opcControlsNetworkNodes instance that was created.
public Form1()
{
    InitializeComponent();

    opcControlsNetworkNodes.TCPPortNumber = 58777;
}
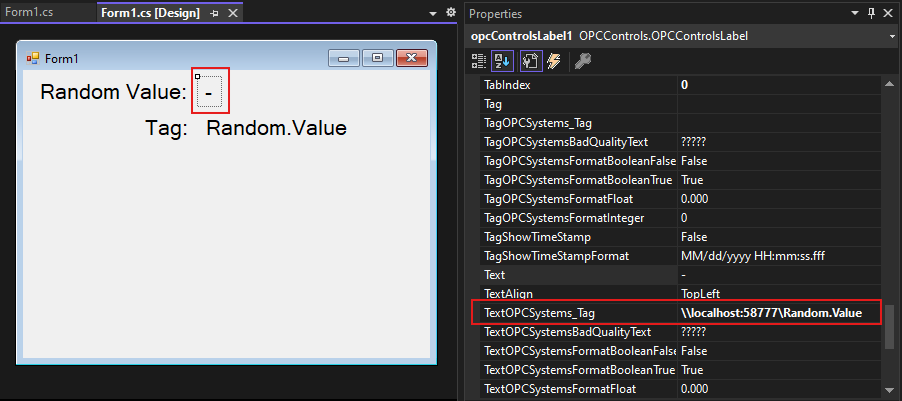
Using Remote Tag Path
If you need to override a specific Tag in a control you can use the remote tag path syntax.
Select the control where you want to set the Tag value. Let’s say an OPCControlsLabel.
If you want to make the Text property update based on a tag value you can set this to a remote tag path.
\\localhost:58777\Random.Value
WPF HMI .NET
There are two ways in which you can configure the port number when using OAS controls in your WPF applications. The first method is to create an instance of the OPCWPFNetworkNodes component in your MainWindow and set the TCPPortNumber parameter to the desired port number. The second method is to use the remote tag path syntax to specify the OAS Engine IP or hostname and port number. Let’s look at this in more detail.
Using OPCWPFNetworkNodes
When you use this method it will apply to all OAS controls added to your Window. If you only need to override a few controls you can use the remote tag syntax shown in the next section.
Open the source code of your MainWindow class.
In the constructor add the following code.
private readonly OPCWPFDashboard.OPCWPFNetworkNodes _oasNetworkNodes;

public MainWindow()
{
    InitializeComponent();

    _oasNetworkNodes = new OPCWPFDashboard.OPCWPFNetworkNodes();
    _oasNetworkNodes.TCPPortNumber = 58777;
}
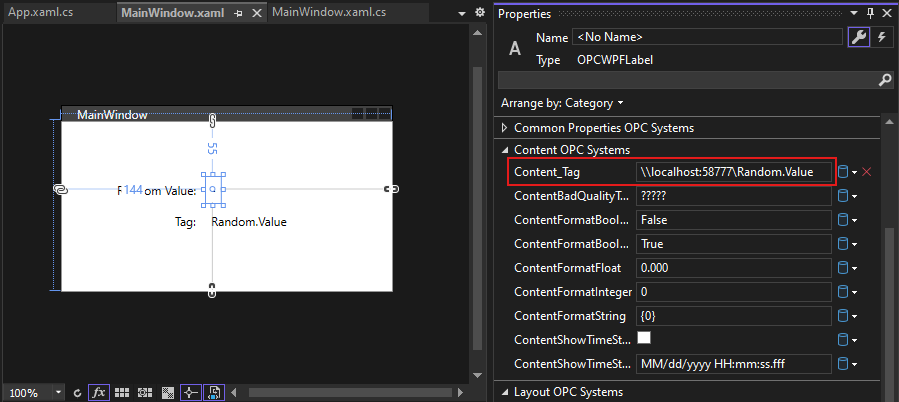
Using Remote Tag Path
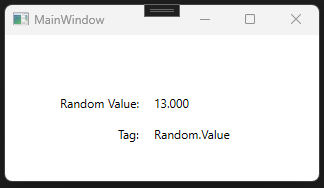
If you need to override a specific Tag in a control you can use the remote tag path syntax.
Select the control where you want to set the Tag value. Let’s say an OPCWPFLabel.
If you want to make the Content property update based on a tag value you can set the Content_Tag property to a remote tag path.
\\localhost:58777\Random.Value
The end result is we get the value updating from the Random.Value tag on port 58777.
.NET Data Connector: OPCSystemsDataConnector.OPCSystemsDataNetworkNodes.TCPPortNumber
Trend .NET: OPCTrendControl.TCPPortNumber
Alarm .NET: OPCAlarmControl.TCPPortNumber
OPCSystems.NET OPC Server: Modify the file DANSrv.exe.config with Notepad to change <add key=”TCPPortNumber” value=”58727″/>
The One Way Networking feature provides communications of tag values from the local server and remote server within the same DMZ to receiving servers through communication networks that only allow one direction through a communication diode. The receiving server need to have a fixed IP address. The data source servers can be fixed or dynamic.
Each data source server can broadcast to multiple receiving servers. Each receiving service can receive values from multiple data source servers.
The Network Forwarding feature makes it possible for client devices to reach data servers live data through multiple redirect servers, as many as you like, to bridge multiple networks together end to end. If the data servers do not need a fixed IP address it can be used in combination with the Live Data Cloud feature.
In order to use Network Forwarding you just need to install Open Automation Software on each redirect server. If you plan to use different TCP port numbers through the forwarding use Configure-Options-Networking to set the source TCP Port Number and Configure-Options-Remote Services to set the client TCP Port Number.
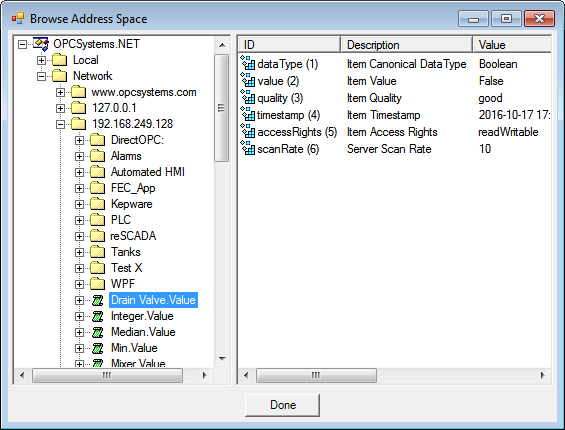
.NET Tag Access
Using the Tag Browse dialog from any .NET, Excel, or service client enter the IP Address, Network Node Name, or registered domain name in the Network Node field and click on Select.
Then using the Forwarding button define as many redirect servers as you like, each one having Open Automation Software installed and running.
You can optionally specify a Live Data Cloud data server as well if that is the final data server. Of leave the Live Data Cloud data server blank if it has a fixed IP address.
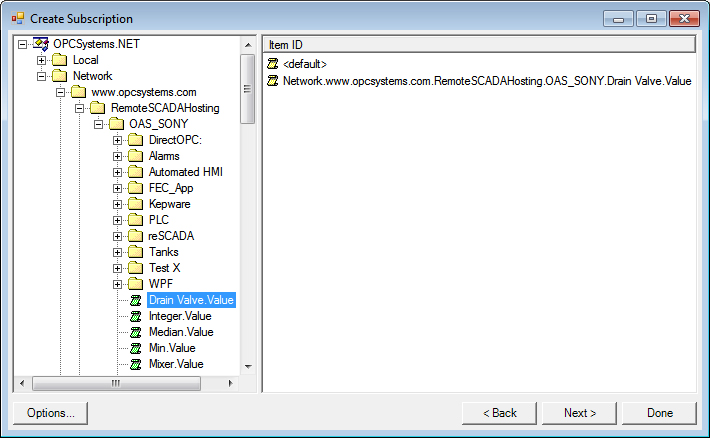
You can then browse for the Tag name and property (most common is Value) to return the following.
In the following example 192.168.249.128 is the first redirect server that forwards communications onto www.opcsystems.com, and then finally the Live Data Cloud server OAS_SONY.
In the following example 192.168.249.128 is the first redirect server that forwards communications onto www.opcsystems.com were the tag resides.
Without a Live Data Cloud Node
\\192.168.249.128\RemoteSCADAHosting.www<dot>opcsystems.com<dot>com_SUBNODE_LIVE DATA CLOUD NOT USED.TagName.Value
There is additional syntax to note when using Network Forwarding.
The network nodes following RemoteSCADAHosting use <dot> in replace of any period. For example and IP address would be represented as 192<dot>168<dot>0<dot>1 instead of 192.168.0.1
All redirect servers are separated by _SUBNODE_
The last server must either be a Live Data Cloud data server or the words LIVE DATA CLOUD NOT USED.
Note: If you are using Calculation Tags, Data Logging, or other service to service communications where the Live Data Cloud server is performing data functions on remote data from data servers you do not need to specify the first server IP address.
RemoteSCADAHosting.www<dot>opcsystems.com<dot>com_SUBNODE_LIVE DATA CLOUD NOT USED.TagName.Value
.NET Tag access is applicable for the following
WPF HMI .NET
WinForm HMI .NET
Cross-Platform HMI
Trend .NET
.NET Data Connector
PCL iOS and Android HMI
Microsoft Excel
Data Logging
Recipe
Calculation Tags
Tunnel Target Tags
Web Tag Access
In the web page specify the IP Address, Network Node Name, or registered domain name that has the HTML HMI registered over your desired port in the serverURL config property.
serverURL: 'http://www.192.168.249.128.com:58725'
Specify the tag names in the HTML code as RemoteSCADAHosting tags without the first network node portion as the Live Data Cloud server is already reached through the serverURL.
RemoteSCADAHosting.www<dot>opcsystems.com<dot>com_SUBNODE_LIVE DATA CLOUD NOT USED.TagName.Value
The web browser can be run locally or remotely, it will communicate to the server specified in the serverURL as a relative path for the tag values.
Web Tag access is applicable for the following
Web HMI
Web Trend
HTTP API for Tag data
HTTP API for Trend data
.NET Alarm Access
Using the Network Node Browse dialog from Alarm Logging, Alarm Notification, or Alarm .NET control enter the IP Address, Network Node Name, or registered domain name in the Network Node field and click on Select.
Then using the Forwarding button define as many redirect servers as you like, each one having Open Automation Software installed and running.
You can specify multiple network nodes in the AlarmNetworkNodes.
\\192.168.249.128\RemoteSCADAHosting.www<dot>opcsystems.com<dot>com_SUBNODE_LIVE DATA CLOUD NOT USED
.NET Alarm access is applicable for the following
Alarm .NET
Alarm Logging
Alarm Notification
Web Alarm Access
In the web page specify the IP Address, Network Node Name, or registered domain name that has the HTML HMI registered over your desired port in the serverURL config property.
serverURL: 'http:// 192.168.249.128:58725'
In the alarm_bindings specify the networkNodes property with RemoteSCADAHosting.
RemoteSCADAHosting.www<dot>opcsystems.com<dot>com_SUBNODE_LIVE DATA CLOUD NOT USED
Web Alarm access is applicable for the following
Web Alarm
HTTP API for Alarm data
OPCSystems.NET OPC Server Access
When providing Tag access to remote third party OPC Clients install OAS setup on each OPC Client PC to install the OPCSystems.NET OPC Server. You can use a Custom installation to install only OPCClient.NET if you prefer not to install everything on the OPC Client PC.
Modify the file NetworkNodes.txt with Notepad or other text editor to add the IP Addresses, Network Nodes Name, or registered domain names that have the OAS server tags running. The file will be in C:\Program Files\Open Automation Software\OAS\.
You can then browse for the Tag name and property (most common is Value) directly in the OPC Client in the Network folder to return the following to the OPC Client as and OPC Item.
OPCSystems.NET OPC Server access is applicable for the following
OPC Client Connector
.NET Configuration Access
The OPCSystems component provides free access to all configuration settings of a service including Tags, Data Logging, Alarm Logging, Alarm Notification, Security, etc.
Each method of the OPCSystems component has an optional NetworkNode parameter and RemoteSCADAHosting parameter. When you specify these parameters it will perform the configuration access to the remote service specified by IP address, network node name, or registered domain name through the Live Data Cloud server to the Live Data Cloud data server.
ResultString = OPCSystemsComponent1.TagCSVImport(CSVStrings, "192.168.249.128", ErrorString, "RemoteSCADAHosting.www<dot>opcsystems.com<dot>com_SUBNODE_LIVE DATA CLOUD NOT USED")
ResultString = OPCSystemsComponent1.TagCSVImport(CSVStrings, "192.168.249.128", ErrorString, "RemoteSCADAHosting.www<dot>opcsystems.com<dot>com_SUBNODE_LIVE DATA CLOUD NOT USED");
.NET Configuration access is applicable for the following
OPCSystems .NET component (free to use)
Web Configuration Access
View the REST API documentation on how to access configuration information via web interface.
The Live Data Cloud feature makes it possible to expose your private OAS instances to external clients and networks via a dedicated OAS hosting instance. You can think of this like a data proxy that sits within a public facing network, such as a DMZ, and routes data from your private OAS instances to external clients. This allows you to make your data available outside of your private networks without exposing your internal network and OAS instances.
The architecture of this feature ensures that your private OAS instance servers do not need a fixed IP address. Each private OAS instance will automatically register themselves with the hosting instance using a unique well-known alias. All your external clients need to know is the domain or IP address of the hosting instance, the alias of the internal server they want to talk to and the Tag path where the data is stored.
With the Live Data Cloud feature you can also pipe data between disparate private networks via a central hosting instance acting as a data gateway. As long as each private network can see the network where the hosting instance is stored and they know the alias of the private instance they want to read data from, the hosting instance will handle the data routing.
Licensing
The Live Data Cloud feature is provided as part of the Distributed Network Architecture feature, which must be enabled in your license on the private OAS instances. In the Configure OAS license screen this is displayed as Networking Enabled.
The OAS hosting instance does not need a license and you can have as many hosting instances as you need. Clients can read Tag data from multiple difference hosting instances.
Security
The credentials that you use to access an OAS instance using Configure OAS or any of the APIs and SDKs also apply to the Live Data Cloud architecture. When you connect to a private instance via the hosting instance, you will need to provide the same credentials that you would if you were connecting to the private instance directly. The same security features apply and you can restrict the allowed operations using a security group configuration.
The connection between the client, the hosting instance and the private instance is encrypted and compressed.
Live Data Cloud Configuration
Every Live Data Cloud architecture needs at least one OAS private instance and one OAS hosting instance. The private instance can be installed in a private network, but it must be able to see the hosting instance network. The hosting instance network can be a private network or a public network as long as it is reachable from the private network and from any networks where the clients will be connecting from.
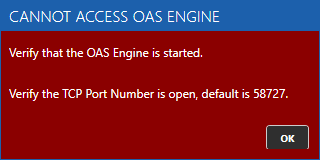
The OAS instances will use port 58727 as the primary secure communication channel. If this port is not available, it will attempt to connect on port 58737. Please ensure that these ports are permitted through any firewalls that may be present.
Configure the Hosting Instance
On the hosting instance server install the OAS platform. You can use an on-prem server, a virtual machine or a public hosted service provider.
The Live Data Cloud hosting service is now active.
By default, any private instance can now register themselves with the hosting instance. If you would like to limit which instances are allowed to register themselves with the Live Data Cloud hosting instance, see the Restricting Live Data Cloud Registration section below.
Configure the Private Instance
This section assumes that you have one or more private OAS instances already installed and running. You will need the hostname or IP address of the hosting instance you wish to connect to.
Use the Configure OAS application to connect to your private instance.
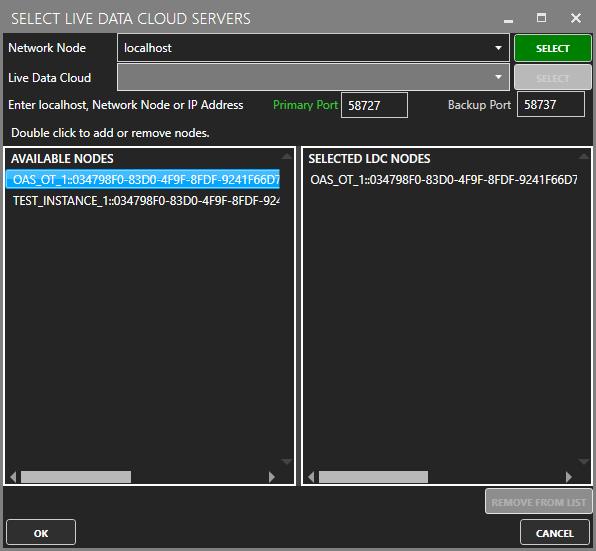
Select the Configure > Live Data Cloud menu to open the Live Data Cloud screen.
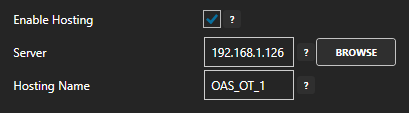
Tick the Enable Hosting checkbox.
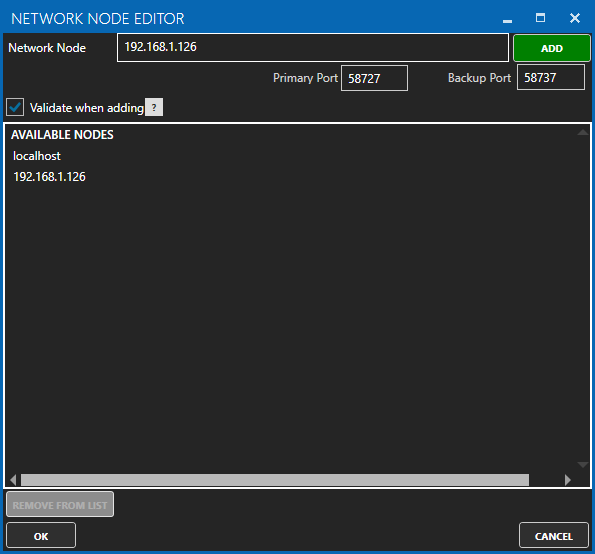
Click on the Browse button to bring up the Network Node Editor window.
Enter the IP or hostname of the hosting instance in the Network Node text field and click on the Add button.
This will attempt to communicate with the remote instance to validate the connection. If the connection is not successful you will see an error message.
If you want to skip the validation you can untick Validate when adding checkbox. Select the node and click OK.
Provide a Hosting Name, which is an alias that you will use to access Tag data on this instance. For example: OAS_OT_1
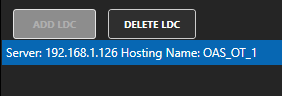
Click on the Add LDC button to add this configuration.
Save your configuration using the Save button.
Your Live Data Cloud configuration is now active.
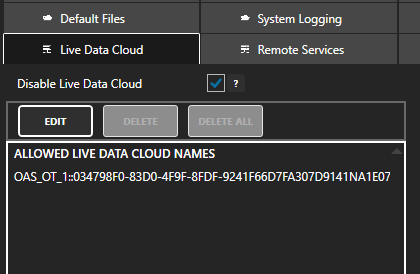
Restricting Live Data Cloud Registration
By default, any OAS instance that can reach the hosting instance network will be able to register with the hosting instance.
You can make this more restrictive by configuring the allowed Live Data Cloud instances on the hosting instance.
Use the Configure OAS application to connect to your hosting instance.
Select the Configure > Options menu to open the Options screen.
Select the Live Data Cloud tab.
Tick the Disable Live Data Cloud checkbox.
Click on the Edit button.
You will see a list of instances in the Available Nodes list. Double click on the node that you wish to allow. It will appear on the right hand side list box.
Click the OK button.
Your allowed list should now contain the allowed node alias.
Click on Apply Changes to save the configuration.
Connecting to an Instance using Live Data Cloud
To connect to a private instance from an external network you will need to know the hosting instance IP address or host name and it must be accessible from your network.
You can connect to a private instance using any of the connection methods such as Configure OAS, REST API, .NET Data Connector or OAS products that can reference remote tags such as UIEngine, HMI, trend or alarm components, calculations, data logging, recipes, data route, OPC UA client and Excel.
This section provides examples of each type of connection as the method might differ slightly for each case.
Remote Tag Access
You can access Tag data remotely by specifying the Tag name the remote tag notation. In the following example, you are connecting to the 111.122.133.144 IP address, which represents the hosting instance, followed by the RemoteSCADAHosting key word, followed by the private instance hosting name (alias), followed by the Tag path of the Tag you want to read.
This method allows you to read and write Tag data on private instances via the Live Data Cloud hosting instance. It applies to JavaScript applications that use the OAS client libraries for communicating with an OAS engine. In your client code specify the IP Address, Network Node Name, or registered domain name of the hosting instance using the serverURL configuration property.
serverURL: 'http://111.122.133.144:58725'
You can then specify the Tag paths using the RemoteSCADAHosting key word, followed by the private instance hosting name (alias), followed by the Tag path.
An external OAS instance can be configured to perform Alarm Logging and Alarm Notifications by using the Nodes filer provided by these features. Normally, when a local instance is configured for alarm logging or alarm notifications, the Network Nodes filter is set to localhost. However, you can also log and notify based on alarm data sourced from private instances via your Live Data Cloud hosting instance.
Using the Configure OAS application, connect to a local OAS instance where you want to configure alarm notifications or logging.
In the Nodes tab of the Alarm Logging or Alarm Notification screen, click on the Edit button.
Provide the IP or host name of the Live Data Cloud hosting server and click SELECT. In the Live Data Cloud drop-down list, select the private instance hosting name (alias) and click the second ADD button. You will see the node added to the list. Click OK to accept this change. The network node will be listed with the following notation:
Configure the remaining parts of the Alarm Logging or Alarm Notification settings and then add and save your configuration. The instance you just configured will now listen to alarms coming from the private instance but routed via the Live Data Cloud hosting instance.
This method allows you to read alarm information from private instances via the Live Data Cloud hosting instance. It applies to JavaScript applications that use the OAS client libraries for communicating with an OAS engine. In your client code specify the IP Address, Network Node Name, or registered domain name of the hosting instance using the serverURL configuration property.
serverURL: 'http://111.122.133.144:58725'
You can then specify the network nodes using the RemoteSCADAHosting key word, followed by the hosting instance IP or hostname, followed by RemoteSCADAHosting key word, followed by hosting name (alias).
The OAS Engine has the Open Automation Software OPC UA Server included. Connect to server url opc.tcp://localhost:58728 if OPC UA Client is on same PC, or opc.tcp://<NetworkNode or IP Address>:58728.
opc.tcp://192.168.0.1:58728'
Use Remote Tag Access syntax listed above for Live Data Cloud networking. The OPC UA Client will be able to browse for RemoteSCADAHosting under Local or Network as a folder to browse to remote OAS Tags.
When providing Tag access to remote third party Classic OPC Clients install OAS setup on each OPC Client PC to install the OPCSystems.NET OPC Server. You can use a Custom installation to install only OPCClient.NET if you prefer not to install everything on the OPC Client PC.
Modify the file NetworkNodes.txt with Notepad or other text editor to add the IP Addresses, Network Nodes Name, or registered domain names that have the OAS server tags running. The file will be in C:\Program Files\Open Automation Software\OAS\.
You can then browse for the Tag name and property (most common is Value) directly in the OPC Client in the Network folder to return the following to the OPC Client as and OPC Item.
OPCSystems.NET OPC Server access is applicable for the following
OPC Client Connector
.NET Configuration Access
The OASConfig component provides free access to all configuration settings of a service including Tags, Data Logging, Alarm Logging, Alarm Notification, Security, etc.
Each method of the OASConfig component has an optional NetworkNode parameter and RemoteSCADAHosting parameter. When you specify these parameters it will perform the configuration access to the remote service specified by IP address, network node name, or registered domain name through the Live Data Cloud server to the Live Data Cloud data server.
Basic Networking is at the core of every OAS Engine instance and OAS component based client. It provides the networking foundations and connectivity that allows you to create different types of network architectures and move your data in a secure, efficient and reliable manner between different hosts and across private and public network boundaries.
In this guide we will explore the different use cases for Basic Networking including remote configuration, remote tag access and we’ll explore a few different example architectures that can be implemented using the networking functionality of OAS.
👉 For standard configuration, information about ports and licensing see the Getting Started – Networking 🔗 page.
Remote Tag Access
Using the Tag Browse dialog from any .NET, Excel, or service client enter the IP Address, Network Node Name, or registered domain name in the Network Node field and click on Select.
You can then browse for the Tag name and Variable (most common is Value). See Tag Variables for a complete list of all variables possible.
In the web page set the serverURL to the IP Address, Network Node Name, or registered domain name of the Linux or Windows devices where the OAS Engine located.
serverURL: 'http://192.168.0.1:58725'
Specify the tag names in the HTML code as local tags. The web browser can be run locally or remotely, it will communicate to the server specified in the serverURL as a relative path for the tag values. In this example the tags would be running on the same server as 192.168.0.1.
TagName.Value
If the tag is located on a different system than the serverURL or you want to host data from multiple OAS Engines use the Remote Tag Access syntax.
Using the Network Node Browse dialog from Alarm Logging, Alarm Notification, or Alarm .NET control enter the IP Address, Network Node Name, or registered domain name in the Network Node field and click on Select.
You can specify multiple network nodes in the AlarmNetworkNodes.
In the web page specify the IP Address, Network Node Name, or registered domain name that has the HTML HMI registered over your desired port in the serverURL config property.
serverURL: 'http://192.168.0.1:58725'
To host remote OAS alarms from different nodes than the serverURL specify the NetworkNodes: property in the Alarm Bindings.
The OAS Engine has the Open Automation Software OPC UA Server included. Connect to server url opc.tcp://localhost:58728 if OPC UA Client is on same PC, or opc.tcp://<NetworkNode or IP Address>:58728.
opc.tcp://192.168.0.1:58725'
Use Remote Tag Access syntax listed above for Basic networking. The OPC UA Client will be able to browse for Network as a folder to browse to remote OAS Tags.
When providing Tag access to remote third party Classic OPC Clients install OAS setup on each OPC Client PC to install the OPCSystems.NET OPC Server. You can use a Custom installation to install only OPCClient.NET if you prefer not to install everything on the OPC Client PC.
Modify the file NetworkNodes.txt with Notepad or other text editor to add the IP Addresses, Network Nodes Name, or registered domain names that have the OAS server tags running. The file will be in C:\Program Files\Open Automation Software\OAS\.
You can then browse for the Tag name and property (most common is Value) directly in the OPC Client in the Network folder to return the following to the OPC Client as and OPC Item.
Network.192.168.0.1.TagName.Value
OPCSystems.NET OPC Server access is applicable for the following
OPC Client Connector
.NET Configuration Access
The OASConfig component provides free access to all configuration settings of a service including Tags, Data Logging, Alarm Logging, Alarm Notification, Security, etc.
Each method of the OASConfig component has an optional NetworkNode parameter. When you specify this parameter it will perform the configuration access to the remote service specified by IP address, network node name, or registered domain name.
 Start Configure OAS application from the program group Open Automation Software.