Use the following steps to activate a data source server with a Live Data Cloud server.
Note: You do not need to enable the following Live Data Cloud feature if your data source servers have fixed IP addresses and are directly accessible from all client systems. This Live Data Cloud feature is typically used to connect client devices to data servers that do not have a direct communication on their own or the data servers have a dynamic IP address without a network node name.
After completing the following steps for each data source server you want to host data from view Live Data Cloud Networking on how to setup each client to access data through a Live Data Cloud server to a data source server.
Step 1
Start Configure OAS application.
Step 2
From the data source service select Configure-Live Data Cloud.
Step 3
Select the Local OAS Service by selecting the Select button or the Local node in the service tree to the left.
Step 4
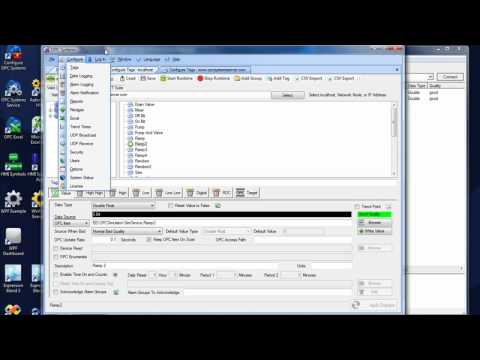
Click the CheckBox to Enable Hosting and enter the IP address, network node name, or registered domain name of the central Live Data Cloud server in the Server field.
Enter a unique Hosting Name for the data source server. Each data source server should have a unique name that is connected to the Live Data Cloud server.
Enter each receiving client IP Address and Port Number and select Add.
Step 5
Select the Save button on the toolbar at the top.
Step 6
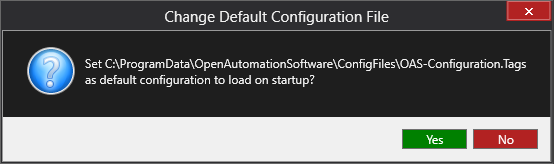
Save the file myDataCloudConfig.RemoteSCADAHosting in the directory of your choice.
You can specify for this configuration to load automatically when the Service starts using Configure-Options to specify this default Remote SCADA Hosting file.
Step 7
In the Live Data Cloud server it is possible to restrict which data source services can connect through it. On the Live Data Cloud server go to Configure-Options-Networking. If you have enabled the CheckBox Disable Live Data Cloud found there use the Add button in the lower right to add the newly assigned data source server.
View Live Data Cloud Networking on how to setup each client to access data through a Live Data Cloud server to a data source server.
As outlined on the Networking Overview page, the Unidirectional Network Gateway can be used to pass data from one OAS engine to another in a way that ensures data can only flow from the source to the destination and never the other way around. Normally, when an OAS engine uses Basic Networking or Live Data Cloud, one OAS engine can both read and write remote tags on another OAS engine. This type of communication is often used with remote data logging and Data Route. Whilst it is possible to use permissions to prevent reading and witing tags, this level of isolation is not sufficient for some use cases. The Unidirectional Network Gateway aims to solve this problem using a lower level isolation approach.
The Unidirectional Network Gateway is in fact also known as UDP Broadcast and UDP Receive, because it makes use of UDP – User Datagram Protocol – to create unidirectional data streams. By using UDP instead of TCP, the data can be sent from the source engine to a destination engine UDP port, which ensures data can only flow from the source to the destination OAS engine and not the other way around.
In the source OAS engine, you will specify the destination IP or host and port number on the UDP Broadcast screen. One destination OAS engine on the other hand, you will specify a port on which to listen for tag changes. These two port numbers must match. The following diagram shows an example:
The feature is included for free in all OAS systems.
See the following video for more practical information.
The feature supports broadcasting data from any tag variable from a the local server or remote servers within a local network to unlimited number of receiving servers. Each receiving server can be setup to receive data from multiple broadcast servers providing many to many data transfer.
Use the following steps to setup servers to broadcast data and receiving services to update local and remote tag variables from the broadcasting nodes.
The receiving nodes need to have a fixed IP address, registered domain name, or network node name. The broadcasting nodes do not need to have a fixed IP address.
Step 1
Start Configure OAS application.
Step 2
From the data source service select Configure-UDP Broadcast.
Step 3
Select the Local OAS Service by selecting the Select button next to the Network Node drop down.
Step 4
Click the Checkbox to Enable UDP Broadcast and enter the Broadcast Rate which is the rate all values from this service will be broadcast to the receiving clients.
Click on Apply Changes.
Click the Add Button and enter each receiving client IP Address and Port Number in the popup window and click OK.
Step 5
Choose to send all tag values from the local service on each broadcast or uncheck the property Send All Local Tags to define a list of tags from the local system, remote systems, and all variables.
By defining which tags to broadcast has the following benefits over Send All Local Tags.
Reduced network packet size on the broadcast if the number of tags sent is less then the number of local tags.
Can broadcast any Tag Variable, not just the Value.
Can broadcast tag values from other remote nodes within the DMZ.
Step 6
Select the Save button on the toolbar at the top.
Step 7
Save the file myUDPBroadcastServer.UDPBroadcast in the directory of your choice.
You can specify for this configuration to load automatically when the Service starts using Configure-Options to specify this default UDP Broadcast file.
Step 8
From the receiving service select Configure-UDP Receive.
Step 9
Select the Local OAS Service by selecting the Select button next to the Network Node drop down.
Step 10
Click the CheckBox to Enable UDP Receive and enter the desired watchdog rate. The watchdog rate is the amount of time it will wait before setting the receiving tags quality to bad without receiving a broadcast.
Click on Apply Changes.
Click the Add Button to add a Port Number to listen on and select OK. You can enter multiple receiving port numbers.
Step 11
Select the Save button on the toolbar at the top.
Step 12
Save the file myUDPBroadcastClient.UDPReceive in the directory of your choice.
You can specify for this configuration to load automatically when the Service starts using Configure-Options to specify this default UDP Receive file.
Step 13
In the receiving node select Configure-Tags. Add Tag’s with the Data Source of UDPClientTag and enter the Tag name of the broadcasting node you want to receive the value from.
Keep in mind you may not be able to browse for the tag name from the broadcast node, so you may have to manually enter it or use Tag CSV Import or programmatic tag setup using .NET or REST API to setup multiple tags.
The Tag defined must match the broadcast tag name defined in Step 5.
Examples:
Ramp.Value
Ramp.HighAlarmActive
\\192.168.0.1\Ramp.Value
Save the Tag Configuration file and specify it to load automatically under Configure-Options-Default Files.
Web HMI Dashboard with no coding required for live and historical visualization, trending, and alarming. Persist user sessions with user login. Extend project code to your own custom visualization.
00:00 – Introduction
00:08 – What’s Web HMI Dashboard
00:20 – Features of a WEB HMI Dashboard
00:23 – Secure Login
00:31 – Modular Design
00:37 – Configurable
00:44 – Customizable
00:49 – Lightweight
01:05 – Demo
01:33 – Alarm Dashboard
01:39 – Trend Dashboard
01:55 – Add a Dashboard
02:04 – Add a Module
02:59 – Built-in Modules
03:04 – Numeric Tag Module Configuration
03:59 – Add another numeric tag module / rewrite module
04:53 – Boolean Tag Module
05:00 – Boolean Tag Configuration
05:56 – Display Multiple Tags with real time values
06:04 – Tag Data Module Configuration
07:09 – Alarms Module
07:17 – Alarms Module Configuration
08:21 – Trends Module
08:28 – Configuration
10:28 – Custom Module
10:34 – Configuration
11:16 – Demo Module
11:43 – Getting Started
11:47 – Application Set up
12:00 – Open Service Control
12:58 – Open OAS Configuration App
13:20 – Static Files
13:35 – Configuration
14:46 – Removing a Module
16:25 – Deploying to IIS
18:41 – Conclusion
Web Alarm
Demonstration of HTML5 Web Alarm window for live and historical alarms.
How do I check what changes are available in different versions of Open Automation Software?
You can view what version you are currently running using the Configure application and select Help-Versions. On that dialog there is a button to take to the following to check current versions.
Visit: Open Automation Software Version History
Can I install Open Automation Software in silent mode?
Yes, run the following Setup.exe /s /v"/qn".
Should I develop a WPF, WinForm, or HTML5 client application?
All support communications over the Internet, so networking is not a deciding factor.
Windows HMI is a good choice if:
The customer is not experienced in creating WPF applications but has strong knowledge in building Windows Forms applications and the application is not graphics intensive.
The application is for mainly displaying values.
The customer wants to use Open Automation Software Controls in an existing Windows Forms Application.
The customer wants to write a service to read and write data to Open Automation Software.
The customer application will be running on Windows 2000 Professional.
WPF HMI is a good choice if:
The customer has no preference and he want to use graphics.
The customer would like Lamps, Switches, Shapes, Gauges, Pie Charts, Bar Charts, PID Controls or story boards built into the control library.
The customer wants to be using the latest technology.
The customer’s application is graphic centered as opposed to mainly a data display.
The customer wants to automatically scale his application to the monitor size.
The customer wants the ability to Scale, Rotate or Skew object in the application.
Web HMI is a good choice if:
If you plan to run the application on a smart phone or non widows operating system.
I have a problem uninstalling Open Automation Software due to a missing MSI.
I am prompted to install the .NET Framework 3.5 during installation?
The .NET Framework 3.5 needs to be enabled.
a) Press “Windows Logo” + “R” keys on the keyboard.
b) Type “appwiz.cpl” in the “Run” command box and press “ENTER”.
c) In the “Programs and Features” window, click on the link “Turn Windows features on or off”.
d) Check if the “.NET Framework 3.5 (includes .NET 2.0 and 3.0)” option is available in it.
e) If yes, then enable it and then click on “OK”.
f) Follow the on-screen instructions to complete the installation and restart the computer, if prompted.
Licencing
Windows Service
When do I need to use the OPC Data Fix?
Only when the OPC Server(s) you are connecting to do not run as a Windows Service and cannot be accessed from the SYSTEM account due to DCOM security.
What account are the OAS Services run under?
By default the SYSTEM account, but you can change the Service LogOn using the Service Control Manager.
Can I access a bit of an Integer value of an Open Automation Software Tag?
Yes, set the Data Type of the Open Automation Software Tag to Signed Byte, Unsigned Byte, Short Integer, Unsigned Short Integer, Integer, Unsigned Integer, Long, or Unsigned Long. When browsing for a Tag in a client application Bit00 up to Bit63 will be available selection immediately under the Value property.
myTag.Bit00 is an example of providing read and write access to bit 0 of an integer value.
A CSV Export and Import does not work when running on a system with Regional Language settings use a comma as a decimal holder.
Because the OAS Service runs under the SYSTEM Account it is not using the Regional Language settings. In some operating systems when you change the Regional Language the SYSTEM account is not updated. To correct this go to Region and Language under Control Panel, and select the Administrative tab.
Select Copy settings and select the option to Copy your current settings to: Welcome screen and system accounts and select OK.
Restart the OAS Services or restart the operating system.
The CSV export and import will now use your decimal separator selected for the operating system.
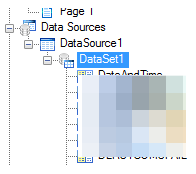
We have accumulative value and we want to take Delta for this accumulative value at end of each hour. For example value at start of the hour is 100 and at the end of the hour it is 150, so Delta is 50 for this specific hour. How we can use calculation tag option to achieve it?
First create a String Tag called DateTime with the Data Source of DateTimeString.
Next create a Double Tag called InitialValue with the Data Source of Calculation and the following Calculation.
IF(SUBSTR([DateTime.Value],STRLEN([DateTime.Value])-5,5) = “00:00”,[SourceTag.Value],[InitialValue.Value])
Then you have a second Double Calculation Tag called TheDifference with the following Calculation.
[SourceTag.Value]-[InitialValue.Value]
A third Calculation Tag called LastHour can be used to hold the last hour’s result.
IF(SUBSTR([DateTime.Value],STRLEN([DateTime.Value])-5,5) = “59:59”,[TheDifference.Value],[LastHour.Value])
I want to create a Calculation that gives a result of a sum over 15 minutes and then resets to 0.
Create a Calculation Tag with the following Calculation.
AVG(IF(MOD([SumCalcs.TotalSeconds.Value],900)=0,-987654321,[SumCalcs.Input.Value]),900)*MOD([SumCalcs.TotalSeconds.Value],900)
How to display hours, minutes, and seconds as a string from Time On of a Tag.
Select the OAS Service that you desire to import a CSV file to the Tag configuration and click the CSV Import button on the top menu to import a Comma Separated Variable file.
Use the Export CSV feature to generate a CSV file. You can then use Microsoft Excel or other CSV compatible application to add or modify Tags. Only the Tag name is the required field.
You can select to include or exclude all other fields. Only those fields that are found in the header will be used to update the properties of the Tags. If a Tag already exists it will be updated. If the Tag does not exist it will be created. Existing Tags that are not specified in the CSV file will not be updated or deleted.
The same tag parameter structure can be used to programmatically define tags with the TagCSVImport method on the free to use OASConfig and OPCSystems components. This is demonstrated in .NET Server Configuration-CSV Import and Export example.
Export CSV
Select the OAS Service that you desire to extract the Tag configuration from and select click the CSV Export button to generate a Comma Separated Variable file.
You can then use Microsoft Excel or other CSV compatible application to add or modify Tags. Use the Import CSV feature to then import the modified CSV file.
If you wish to just export a particular Tag Group, right click on the Tag Group and select Export to CSV.
Data Logging
MS Access Error microsoft.ace.oledb.12.0 provider is not registered
Download and install the Microsoft Data Access Components 2.8.
I receive a System Error when trying to log or access an Oracle database
OAS version 12.00.0043 now uses OracleManagedDataAccess assembly. If you are using an older version of OAS we recommend to update to the latest version. If you have upgraded from a previous version and using TNSNAMES.ORA name in the Database file please see the FAQ on TNSNAMES.ORA.
Data Logging System Error occurs with database engine error null values not allow.
The cause of this error is one or more of the database table columns has been modified to not allow null values. OAS creates the columns in the table to allow null values so when the data quality is bad for a tag value a null value will be inserted into the table. The only column that should be set to not allow null values is the DateAndTime column. There are 2 solutions to this error:
Please review the columns in each table with the SQL Server Management Studio. If they have been changed to not allow null values change them back to allow null values.
Go to each logging group and enable the property Discard Null Rejects under the Database tab. Keep in mind that with this property enabled the records to be logged that contain null values will be discarded and not logged.
Security Login Error occurs with Open or Create routines
View the Database Security Login topic on how to setup security logins and access writes to create, open, and read and write to the database.
Data is not logged to the database engine
View the Data Logging Errors troubleshooting guide for a complete list of error causes and solutions.
View the source of the problem under Configure-System Errors.
The complete history of errors can be viewed under C:\Program Files\Open Automation Software\OAS\Log or the path that is set under Configure-Options-System Logging.
Enable Log Data Logging Transactions under Configure-Options-System Logging to see the details of each transaction and error returned from the database engine.
CSV Logging to a Remote Mapped Drive
Either enable the SYSTEM account to have read and write access to the mapped drive and directory, or set the OAS Engine Service LogOn to a user account that would have access to the remote mapped drive using these steps in setting the OAS Engine Service LogOn.
Logging to MS Access on a Remote Mapped Drive
Either enable the SYSTEM account to have read and write access to the mapped drive and directory, or set the OAS Reports Service LogOn to a user account that would have read and write access to the remote mapped drive.
Error reports LogIn failure to database engine when trying to open connection
View the following video on how to setup security in the database engine:
The database engine language is different than the Regional Language settings of the Data Logging and / Alarm Logging Service. Data Logging updates, Alarm Logging updates, trend history, and / alarm history is not working due to invalid date format.
Go to Configure-Options-History and Enable History Date Format.
Examples:
yyyy-MM-dd HH:mm:ss
MM/dd/yyyy HH:mm:ss
I need to log to an Oracle database engine using the TNSNAMES.ORA file.
OAS version 12.00.0043 now uses OracleManagedDataAccess assembly which does not support TNSNAMES.ORA. You can set the entire path from the TNSNAMES.ORA file in the Database field of the data logging, alarm logging, or recipe group directly.
Use the following as the Database name:
(DESCRIPTION=(ADDRESS_LIST=(ADDRESS=(PROTOCOL=TCP)(HOST=MyHost)(PORT=MyPort)))(CONNECT_DATA=(SERVER=DEDICATED)(SERVICE_NAME=MyOracleSID)))
As example for a system with a computer name GWDESK and the Oracle database name OPCDb:
(DESCRIPTION=(ADDRESS_LIST=(ADDRESS=(PROTOCOL=TCP)(HOST=GWDESK)(PORT = 1521)))(CONNECT_DATA=(SERVER= DEDICATED)(SERVICE_NAME=OPCDb)))
How much memory on the hard disk is taken up when logging to SQL Server?
The following should be used as an aid in sizing database requirements.
The method used is to store 100 Tags each, of a few common data types for one hour at a 1 second continuous interval to separate tables. SQL Server 2005 Express was used to gather this information.
As always your final results may vary.
In SQL Server you can set the Database property under Options for Recovery model to Simple to reduce disk usage.
Boolean Data type table size
Rows: 3598
Reserved: 200 KB
Data: 152 KB
Index Size: 16 KB
Unused: 32 KB
Double data type table size
Rows: 3598
Reserved: 3272 KB
Data: 3200 KB
Index Size: 16 KB
Unused: 56 KB
Integer data type table size
Rows: 3598
Reserved: 1672 KB
Data: 1600 KB
Index Size: 16 KB
Unused: 56 KB
String data type table size (100 char / tag)
Rows: 3589
Reserved: 84752 KB
Data: 84552 KB
Index Size: 144 KB
Unused: 56 KB
Which database engine is most efficient with OPCDatabase.NET?
SQL Server provides the ability to log multiple records in one call, so using SQL Server on a local or remote server is the best choice.
Which database engine uses the least amount of disk space when logging values?
CSV files without a database are the smallest usage.
SQL Server and mySQL are very comparable.
Oracle uses approximately 4 times the disk space as SQL Server and mySQL.
In SQL Server you can set the Database property under Options for Recovery model to Simple to reduce disk usage.
Setup SQL Server for authentication with UAC which was introduced on Windows Vista.
Security Login Error occurs with Open or Create routines.
View the Database Security Login topic on how to setup security logins and access writes to create, open, and read and write to the database.
The database engine language is different than the Regional Language settings of the Data Logging and / Alarm Logging Service. Data Logging updates, Alarm Logging updates, trend history, and / alarm history is not working due to invalid date format.
Go to Configure-Options-History and Enable History Date Format.
Examples:
yyyy-MM-dd HH:mm:ss
MM/dd/yyyy HH:mm:ss
Alarm Notification
How to escalate an alarm notification if not acknowledged within a specified time
Create a new Boolean Tag with the tag name EscalateAlarm.
Enable the Digital Alarm limit in this new Tag with a Time Delay of ? Seconds.
Under the Tags tab of an existing or new Alarm Notification group the property “Set Tag When Alarm Active and Not Acknowledged” to a Boolean Tag with the Data Source of Value.
EscalateAlarm.AlarmStatusDigital can then be used to enable a second Alarm Notification monitoring the same alarms of the first Alarm Notification group with the Activate with Tag property in the second Alarm Notification Group.
Note: Under Configure-Options-Alarms uncheck “Update Alarm Status Immediately Without Alarm Time Delay”.
This will then enable the second alarm notification group when the alarms monitored in the first group.
I am using GMAIL as the sending address.
Create an App Password for the Google Account. Use this as the password for authentication.
I want to send a text message without the need for a Twillio account.
If the cell phone provider can provide an email address to receive texts setup to send an email.
To send a text message to someone on AT&T in the To Address, just enter the 10 digit phone number @txt.att.net. Example 5555551234@txt.att.net.
When I use multiple DataSets in the same report it only returns data from the first DataSet.
Use and RDL Report type.
I am using GMAIL as the sending address.
Create an App Password for the Google Account. Use this as the password for authentication.
Report queries are running very slow from the database.
Make sure the date and time span or Query String is defined to return a subset of data instead of all of the data.
You can also reindex the database in SQL Server to run faster.
Reorganizing and Rebuilding Indexes
https://msdn.microsoft.com/en-us/library/ms189858.aspx
Create Report for mySQL and other database engines without OLE-DB Provider
In order to use MySQL you will need to have the MySQL Connector/ODBC driver installed on the system where the OAS Engine is running.
If it is not currently installed you can download from here: https://downloads.mysql.com/archives/c-odbc/
In order to use the ODBC Administrator you may also need to install the Visual C++ Redistributable for Visual Studio x86.
In MySQL create a separate user from root. You will uses this user in the string below.
ServerIPAddress=xxx.xxx.xxx.xxx
DataBaseName=The database name of interest inside mySQL
MYSQLUserName = The MySQL username provided above
MYSQLUserNamePassword = The Password to the database for the username provided
No spaces between elements.
Database = DatatBaseName
Table = a table within the database.
Dataset should now show table elements.
If my Recipe is not working how can I find the solution?
Go to Configure-Options-System Logging. Enable the Recipe Transaction Log and the details of each recipe execution will be logged within the file.
How can I return aggregate results of the last 24 hours of a database table?
Set the field names to use your desired aggregate functions. Example: AVG(myField), MIN(myField), MAX(myField), and SUM(myField).
In the Query String property enter the following:
WHERE DateAndTime <= CURRENT_TIMESTAMP AND DateAndTime > DATEADD(hh,-24,CURRENT_TIMESTAMP)
How do I log in my client application with a user name and password?
For each application type there is either a login programmatic method or user interface dialog to log in the application.
Configure OAS application: Use the LogIn from the menu.
WPF application: Use the OPCWPFDashboard.OPCWPFLogIn component with the LogIn method.
(Only need to do this once for the entire application)
WinForm application: Use the OPCControls.OPCControlsLogIn component with the LogIn method.
(Only need to do this once for the entire application)
OPCTrend control in WPF or WinForm application: Use the LogIn method.
(Need to do this for each trend control)
OPCAlarm control in WPF or WinForm application: Use the LogIn method.
(Need to do this for each trend control)
Excel: Use the security login RTD formula generated with the OAS Excel Wizard application.
(Only need to do this once for the entire Workbook)
HTML5 Web application: Use the authentication token see the Authentication topic in the Web HMI Programming Reference-HTML5 section.
How can I backup the configured options on my system?
Backup the file OAS.options from C:\ProgramData\OpenAutomationSoftware\ConfigFiles.
All default configuration files would be specified under Configure-Options.
How can I move the configured options from one system to another?
Copy the file OAS.options from C:\ProgramData\OpenAutomationSoftware\ConfigFiles\ to the new system in the same directory C:Program Files and restart the OAS Services on the new computer.
All default file paths will be located under Configure-Options and they should be copied to the same directory structure of the new system.
How can I prevent the options from being modified by unauthorized users?
Setup Security and select which Options you want users to be able to modify in the Default group and for each Security Group.
Do I need to use the Live Data Cloud for communications over the Internet?
No, you can use the standard networking in Open Automation Software if the data source has a fixed IP Address or domain name registered with the Internet. The Live Data Cloud is best when the data source IP Address is dynamic or you are just using a standard Internet connection.
Do I need to use UDP Broadcast to send data across a network of the Internet?
No, you only need to use UDP Broadcast on networks that have a communication diode that only allow one way communications.
Can UDP Broadcast be used to send data to multiple remote services?
Yes.
Do I need to have all of the source tags defined in the remote receiving services?
No, set the Data Source in the receiving node to UDP Client. View the video in the Videos-UDP Broadcast section.
Bad Data Quality in .NET Application.
Below are some possible reasons your .NET application is not able to read OAS tag values.
Data Source Quality
Use Configure-Tags to verify that the data quality of the source tags is "Good Quality".
Security
The Default security group on either the local or remote OAS Engine may have Disable All Tags from Reading checked under the Read Tags Tab. See Restrict Tag Access of Security setup to see how read, write, and browse access can be restricted.
View how to Implement User Credentials in Client Applications to provide log in method for each user in the .NET application.
Network
.NET applications can be defined to communicate to remote OAS Engines. See Network Communications Troubleshooting to verify that port 58727 is allowing both incoming and outgoing traffic through your firewall.
Tag Path
The full tag path would include the full tag name including its parent groups and the variable of the Tag.
MyGroup.MyTag.Value
Tag names are case sensitive and the current value of a tag would be .Value as the most common variable.
If the tag is from a remote OAS Engine see Basic Networking for standard remote tag syntax or Live Data Cloud Networking if the OAS Engine system has a dynamic IP address.
\\192.168.0.1\TagName.Value
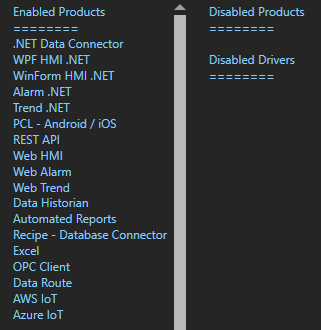
License
Use Configure-License to verify that a product feature .NET Data Connector, WinForm HMI, or WPF HMI is enabled on the data source system where the tags are located.
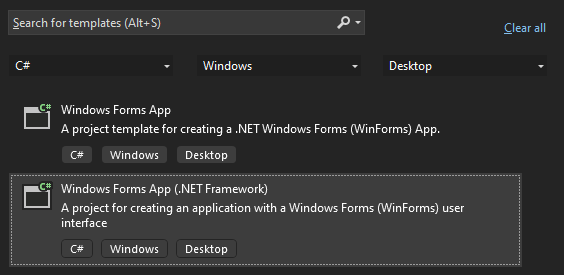
Target Framework for WPF and WinForm Applications
The project type for WinForm and WPF applications should be set to include (.NET Framework) and target .NET Framework 4.6.1 or greater.
See the correct project type for WinForm above that is listed as Windows Forms App (.NET Framework) while Windows Forms App would not be the correct project type.
Assembly References
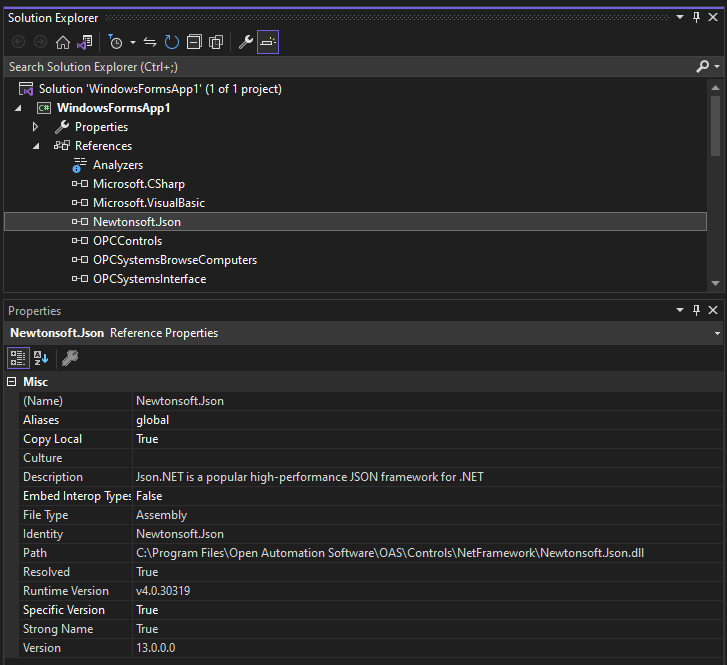
Visual Studio on some operating systems will assign a legacy assembly to the project causing an incompatibility due to an older version of the reference assembly. A common assembly that can be incorrect is Newtonsoft.Json that has been registered in the GAC by another software product.
Select Newtonsoft.Json under the Project References to verify the correct path and version as 13.0.0.0.
If the Path does not reference the OAS installation directory remove the reference and select to Add Reference and browse for dll from the respective directory for the specific product feature. For .NET Framework applications include the .dlls located in C:\Program Files\Open Automation Software\OAS\Controls\NetFramework\. The Target Framework set for the VS project must be .NET Framework 4.6.1 or greater. For .NET Standard supporting the following targets include the. dlls located in C:\Program Files\Open Automation Software\OAS\Controls\NetStandard\.
See a list of locations for the correct type in the troubleshooting type After updating to OAS Version 17 the project no longer compiles for a list of correct project reference paths for each type of Visual Studio Project.
.NET Assembly is Blocked
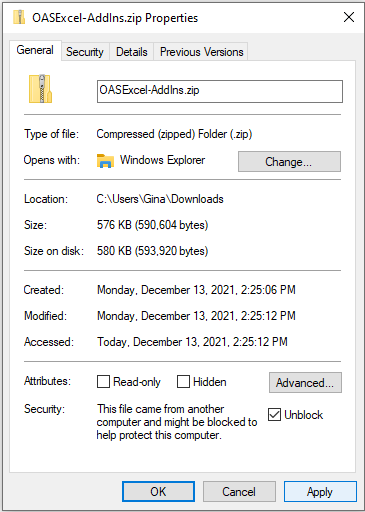
If you have copied an application or project to another computer you may need to Unblock one or more the .dll files.
Right click on the .dll file that you have downloaded. Check the Unblock checkbox for security as shown in the example below, then click Apply or OK.
Legacy .NET Application with OAS Version 17
If the OAS .NET assemblies are from OAS version 16 or less contact support@oasiot.com for compatibility instructions.
After updating to OAS Version 17 the project no longer compiles
All dependent .dlls are located in the relative subdirectory of the Controls directory of the OAS installation directory, typically C:\Program Files\Open Automation Software\OAS\Controls\.
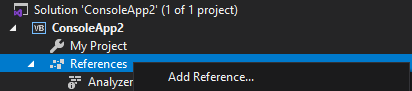
To add a reference to a Visual Studio project right click on References in the Solution Explorer.
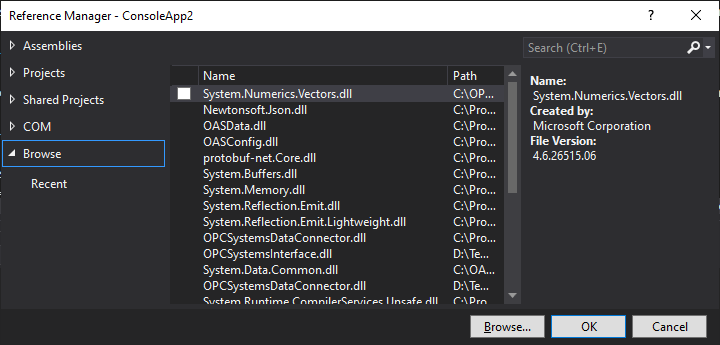
Select Browse to browse the directory for each application feature.
Include all .dlls files in the respective directory for the specific product feature.
For .NET Framework applications include the .dlls located in C:\Program Files\Open Automation Software\OAS\Controls\NetFramework\.
The Target Framework set for the VS project must be .NET Framework 4.6.1 or greater.
For .NET Standard supporting the following targets include the. dlls located in C:\Program Files\Open Automation Software\OAS\Controls\NetStandard\.
Can WinForm applications be deployed to remote systems for Internet communications?
Yes, applications communicate using WCF over a standard TCP port which is adjustable. The default port number is 58724.
View the Networking – LAN, WAN, and Internet Videos on how to implement standard communications over the Internet and also the Live Data Cloud networking on how to host your own data without a fixed IP address or registered domain name.
The .NET controls do not appear in the Toolbox after selecting to add them to the Toolbox.
If you right click Toolbox and Choose to Add Items and select the OPCControls components, yet they do not appear in the Toolbox you may have installed Visual Studio after Open Automation Software. If so uninstall Open Automation Software and reinstall it. It will then register correctly with Visual Studio for adding the controls.
After updating Open Automation Software with the incremental update the project no longer compiles or the application no longer works.
Make sure to Unblock the dlls before copying to C:\Program Files\Open Automation Software\OAS\Controls\NetFramework\.
To Unblock the files copy to a trusted location for your system, Desktop works well, then right click on the file and select Properties to select Unblock. Then copy from your Desktop to the correct directory in C:\Program Files\Open Automation Software\OAS\Controls\.
.
What assemblies do I need to deploy with my application?
Include the following in References as Local Copy:
OPCControls.dll
OPCSystemsInterface.dll
WPF Properties Edit Ellipses Missing in VS 2022
Visual Studio 2022 design time properties no longer support custom property editors for WPF applications. Use Visual Studio 2019 to develop WPF applications.
The free Community Edition of Visual Studio 2019 can be download from https://visualstudio.microsoft.com/vs/older-downloads/.
WinForm applications are still well supported in Visual Studio 2022.
Bad Data Quality in .NET Application.
Below are some possible reasons your .NET application is not able to read OAS tag values.
Data Source Quality
Use Configure-Tags to verify that the data quality of the source tags is "Good Quality".
Security
The Default security group on either the local or remote OAS Engine may have Disable All Tags from Reading checked under the Read Tags Tab. See Restrict Tag Access of Security setup to see how read, write, and browse access can be restricted.
View how to Implement User Credentials in Client Applications to provide log in method for each user in the .NET application.
Network
.NET applications can be defined to communicate to remote OAS Engines. See Network Communications Troubleshooting to verify that port 58727 is allowing both incoming and outgoing traffic through your firewall.
Tag Path
The full tag path would include the full tag name including its parent groups and the variable of the Tag.
MyGroup.MyTag.Value
Tag names are case sensitive and the current value of a tag would be .Value as the most common variable.
If the tag is from a remote OAS Engine see Basic Networking for standard remote tag syntax or Live Data Cloud Networking if the OAS Engine system has a dynamic IP address.
\\192.168.0.1\TagName.Value
License
Use Configure-License to verify that a product feature .NET Data Connector, WinForm HMI, or WPF HMI is enabled on the data source system where the tags are located.
Target Framework for WPF and WinForm Applications
The project type for WinForm and WPF applications should be set to include (.NET Framework) and target .NET Framework 4.6.1 or greater.
See the correct project type for WinForm above that is listed as Windows Forms App (.NET Framework) while Windows Forms App would not be the correct project type.
Assembly References
Visual Studio on some operating systems will assign a legacy assembly to the project causing an incompatibility due to an older version of the reference assembly. A common assembly that can be incorrect is Newtonsoft.Json that has been registered in the GAC by another software product.
Select Newtonsoft.Json under the Project References to verify the correct path and version as 13.0.0.0.
If the Path does not reference the OAS installation directory remove the reference and select to Add Reference and browse for dll from the respective directory for the specific product feature. For .NET Framework applications include the .dlls located in C:\Program Files\Open Automation Software\OAS\Controls\NetFramework\. The Target Framework set for the VS project must be .NET Framework 4.6.1 or greater. For .NET Standard supporting the following targets include the. dlls located in C:\Program Files\Open Automation Software\OAS\Controls\NetStandard\.
See a list of locations for the correct type in the troubleshooting type After updating to OAS Version 17 the project no longer compiles for a list of correct project reference paths for each type of Visual Studio Project.
.NET Assembly is Blocked
If you have copied an application or project to another computer you may need to Unblock one or more the .dll files.
Right click on the .dll file that you have downloaded. Check the Unblock checkbox for security as shown in the example below, then click Apply or OK.
Legacy .NET Application with OAS Version 17
If the OAS .NET assemblies are from OAS version 16 or less contact support@oasiot.com for compatibility instructions.
After updating to OAS Version 17 the project no longer compiles
All dependent .dlls are located in the relative subdirectory of the Controls directory of the OAS installation directory, typically C:\Program Files\Open Automation Software\OAS\Controls\.
To add a reference to a Visual Studio project right click on References in the Solution Explorer.
Select Browse to browse the directory for each application feature.
Include all .dlls files in the respective directory for the specific product feature.
For .NET Framework applications include the .dlls located in C:\Program Files\Open Automation Software\OAS\Controls\NetFramework\.
The Target Framework set for the VS project must be .NET Framework 4.6.1 or greater.
For .NET Standard supporting the following targets include the. dlls located in C:\Program Files\Open Automation Software\OAS\Controls\NetStandard\.
How do I programmatically add pens to a trend window?
The following two (2) examples are for WinForm and WPF applications on how to add pens to a trend window during runtime programmatically.
WinForm:
Dim NewPen As OPCTrendControl.ClassPen
Dim NewPens As OPCTrendControl.ClassPen()
ReDim NewPens(2)
If NetworkPath = """" Then
NewPen = New OPCTrendControl.ClassPen(NetworkPath + ""Ramp.Value"", ""localhost"")
Else
NewPen = New OPCTrendControl.ClassPen(NetworkPath + ""Ramp.Value"", NetworkNode)
End If
NewPen.LineBorderColor = Color.Blue
NewPen.LineFillColor = Color.Blue
NewPen.Description = "Ramp"
NewPen.LineStyle = OPCTrendControl.ClassPen.LineStyleTypes.Ellipsoid
NewPens(0) = NewPen
If NetworkPath = "" Then
NewPen = New OPCTrendControl.ClassPen(NetworkPath + ""Sine.Value"", ""localhost"")
Else
NewPen = New OPCTrendControl.ClassPen(NetworkPath + ""Sine.Value"", NetworkNode)
End If
NewPen.LineBorderColor = Color.Red
NewPen.LineFillColor = Color.Red
NewPen.Description = "Sine"
NewPen.YAxisRangeHigh = 1
NewPen.YAxisRangeLow = -1
NewPen.LineStyle = OPCTrendControl.ClassPen.LineStyleTypes.Tube
NewPens(1) = NewPen
If NetworkPath = "" Then
NewPen = New OPCTrendControl.ClassPen(NetworkPath + ""Random.Value"", ""localhost"")
Else
NewPen = New OPCTrendControl.ClassPen(NetworkPath + ""Random.Value"", NetworkNode)
End If
NewPen.LineBorderColor = Color.Green
NewPen.LineFillColor = Color.Green
NewPen.Description = "Random"
NewPen.MarkerFillColor = Color.Green
NewPen.MarkerStyle = OPCTrendControl.ClassPen.MarkerStyleTypes.Sphere
NewPen.MarkerSize = 20
NewPens(2) = NewPen
frmTrend.OpcTrendControl1.Pens = NewPens
WPF:
VB
Dim Pens As New OPCWPFDashboard.PensList
Dim NewPen As New OPCTrendControl.ClassPen
'Add Ramp Pen
NewPen = New OPCTrendControl.ClassPen("Ramp.Value", "localhost")
NewPen.Units = ""MGD""
NewPen.YAxisRangeHigh = 2
NewPen.LineStyle = OPCTrendControl.ClassPen.LineStyleTypes.Line
NewPen.Description = "Ramp Value"
Pens.Add(NewPen)
'Add Random
NewPen = New OPCTrendControl.ClassPen("Random.Value", "localhost")
NewPen.Units = "NTU"
NewPen.Description = "Random Pen"
Pens.Add(NewPen)
OPCWPFTrend1.Pens = Pens
C#
OPCWPFDashboard.PensList Pens = new OPCWPFDashboard.PensList();
OPCTrendControl.ClassPen NewPen = new OPCTrendControl.ClassPen();
//Add Ramp Pen
NewPen = new OPCTrendControl.ClassPen("Ramp.Value", "localhost");
NewPen.Units = "MGD";
NewPen.YAxisRangeHigh = 2;
NewPen.LineStyle = OPCTrendControl.ClassPen.LineStyleTypes.Line;
NewPen.Description = "Ramp Value";
Pens.Add(NewPen);
//Add Random
NewPen = new OPCTrendControl.ClassPen("Random.Value", "localhost");
NewPen.Units = "NTU";
NewPen.Description = "Random Pen";
Pens.Add(NewPen);
OPCWPFTrend1.Pens = Pens
The database engine language is different than the Regional Language settings of the Data Logging and / Alarm Logging Service. Data Logging updates, Alarm Logging updates, trend history, and / alarm history is not working due to invalid date format.
Go to Configure-Options-History and Enable History Date Format. Examples: yyyy-MM-dd HH:mm:ss MM/dd/yyyy HH:mm:ss
After updating Open Automation Software with the incremental update the project no longer compiles or the application no longer works.
Make sure to Unblock the dlls before copying to C:\Program Files\Open Automation Software\OAS\Controls\NetFramework\.
To Unblock the files copy to a trusted location for your system, Desktop works well, then right click on the file and select Properties to select Unblock. Then copy from your Desktop to the correct directory in C:\Program Files\Open Automation Software\OAS\Controls\.
I want to add annotations to the trend window.
Create a StringTag with the Trend Point property enabled. Add the String Tag to the Trend Window as a new Pen. In one of the other existing pens where you want the annotation to appear on set the property Pen.LabelAnnotationTag to the String Tag. Set the Data Logging Group to the String Tag to a String field you will be updating directly from your application.
I would like to show multiple Y Axis on the trend window.
Set YAxis-ScaleMode to one of the Stacked chart types. Set each Pen’s StackedChartNumber to the desired stacked chart to display the pen.
Does OPCTrend.NET support OPC HDA?
No, OPCTrend.NET is a client/server architecture that does not require DCOM and the communications uses the built in networking to the .NET Framework. This makes it possible for trend clients to view real-time data and historical data with OPCDatabase.NET from anywhere in the world over the Internet.
The OAS Service can bring in data values from Data Access OPC Servers, Data Access OPC Clients, databases like SQL Server, Oracle, Access, and mySQL, Microsoft Excel, and .NET applications (web, WinForm, WCF, WPF, and Windows Services).
The values can then be cached for unlimited trend clients and logged to databases with OPCDatabase.NET. Trend clients can be running on both Windows Operating systems and non Windows Operating systems like smart phones and the iPads.
Visit the Trend .Net Product page for more information and to run a live example.
Trend history is running very slow from the database.
Make sure the date and time span is defined to return a subset of data instead of all of the data. You can also reindex the database in SQL Server to run faster. Reorganizing and Rebuilding Indexes https://msdn.microsoft.com/en-us/library/ms189858.aspx
How do I programmatically get realtime and historical trend data?
Use the GetTrendDataTable method to return a DataTable object with all trend values.
What assemblies do I need to deploy with my application?
Include the following in References as Local Copy:
Nevron.Chart.dll
Nevron.Chart.WinForm.dll
Nevron.GraphicsGL.dll
Nevron.Presentation.dll
Nevron.System.dll
OPCSystemsInterface.dll
OPCTrendControl.dll
WPF Properties Edit Ellipses Missing in VS 2022
Visual Studio 2022 design time properties no longer support custom property editors for WPF applications. Use Visual Studio 2019 to develop WPF applications.
The free Community Edition of Visual Studio 2019 can be download from https://visualstudio.microsoft.com/vs/older-downloads/.
WinForm applications are still well supported in Visual Studio 2022.
Bad Data Quality in .NET Application.
Below are some possible reasons your .NET application is not able to read OAS tag values.
Data Source Quality
Use Configure-Tags to verify that the data quality of the source tags is "Good Quality".
Security
The Default security group on either the local or remote OAS Engine may have Disable All Tags from Reading checked under the Read Tags Tab. See Restrict Tag Access of Security setup to see how read, write, and browse access can be restricted.
View how to Implement User Credentials in Client Applications to provide log in method for each user in the .NET application.
Network
.NET applications can be defined to communicate to remote OAS Engines. See Network Communications Troubleshooting to verify that port 58727 is allowing both incoming and outgoing traffic through your firewall.
Tag Path
The full tag path would include the full tag name including its parent groups and the variable of the Tag.
MyGroup.MyTag.Value
Tag names are case sensitive and the current value of a tag would be .Value as the most common variable.
If the tag is from a remote OAS Engine see Basic Networking for standard remote tag syntax or Live Data Cloud Networking if the OAS Engine system has a dynamic IP address.
\\192.168.0.1\TagName.Value
License
Use Configure-License to verify that a product feature .NET Data Connector, WinForm HMI, or WPF HMI is enabled on the data source system where the tags are located.
Target Framework for WPF and WinForm Applications
The project type for WinForm and WPF applications should be set to include (.NET Framework) and target .NET Framework 4.6.1 or greater.
See the correct project type for WinForm above that is listed as Windows Forms App (.NET Framework) while Windows Forms App would not be the correct project type.
Assembly References
Visual Studio on some operating systems will assign a legacy assembly to the project causing an incompatibility due to an older version of the reference assembly. A common assembly that can be incorrect is Newtonsoft.Json that has been registered in the GAC by another software product.
Select Newtonsoft.Json under the Project References to verify the correct path and version as 13.0.0.0.
If the Path does not reference the OAS installation directory remove the reference and select to Add Reference and browse for dll from the respective directory for the specific product feature. For .NET Framework applications include the .dlls located in C:\Program Files\Open Automation Software\OAS\Controls\NetFramework\. The Target Framework set for the VS project must be .NET Framework 4.6.1 or greater. For .NET Standard supporting the following targets include the. dlls located in C:\Program Files\Open Automation Software\OAS\Controls\NetStandard\.
See a list of locations for the correct type in the troubleshooting type After updating to OAS Version 17 the project no longer compiles for a list of correct project reference paths for each type of Visual Studio Project.
.NET Assembly is Blocked
If you have copied an application or project to another computer you may need to Unblock one or more the .dll files.
Right click on the .dll file that you have downloaded. Check the Unblock checkbox for security as shown in the example below, then click Apply or OK.
Legacy .NET Application with OAS Version 17
If the OAS .NET assemblies are from OAS version 16 or less contact support@oasiot.com for compatibility instructions.
After updating to OAS Version 17 the project no longer compiles
All dependent .dlls are located in the relative subdirectory of the Controls directory of the OAS installation directory, typically C:\Program Files\Open Automation Software\OAS\Controls\.
To add a reference to a Visual Studio project right click on References in the Solution Explorer.
Select Browse to browse the directory for each application feature.
Include all .dlls files in the respective directory for the specific product feature.
For .NET Framework applications include the .dlls located in C:\Program Files\Open Automation Software\OAS\Controls\NetFramework\.
The Target Framework set for the VS project must be .NET Framework 4.6.1 or greater.
For .NET Standard supporting the following targets include the. dlls located in C:\Program Files\Open Automation Software\OAS\Controls\NetStandard\.
The database engine language is different than the Regional Language settings of the Data Logging and / Alarm Logging Service. Data Logging updates, Alarm Logging updates, trend history, and / alarm history is not working due to invalid date format.
Go to Configure-Options-History and Enable History Date Format.
Examples:
yyyy-MM-dd HH:mm:ss
MM/dd/yyyy HH:mm:ss
After updating Open Automation Software with the incremental update the project no longer compiles or the application no longer works.
Make sure to Unblock the dlls before copying to C:\Program Files\Open Automation Software\OAS\Controls\NetFramework\.
To Unblock the files copy to a trusted location for your system, Desktop works well, then right click on the file and select Properties to select Unblock. Then copy from your Desktop to the correct directory in C:\Program Files\Open Automation Software\OAS\Controls\.
Does OPCAlarm.NET support OPC Alarm & Events specification?
Yes, go to Configure-OPC Alarm and Event Servers using the Configure OAS application to define each A&E OPC Server to subscribe to.
How do I programmatically get realtime and historical alarms?
Use the GetAlarmDataTable method to return a DataTable object with all alarms and the values for each property of an alarm.
What assemblies do I need to deploy with my application?
Include the following in References as Local Copy:
C1.Win.C1FlexGrid2.dll
OPCAlarmControl.dll
OPCSystemsInterface.dll
Bad Data Quality in .NET Application.
Below are some possible reasons your .NET application is not able to read OAS tag values.
Data Source Quality
Use Configure-Tags to verify that the data quality of the source tags is "Good Quality".
Security
The Default security group on either the local or remote OAS Engine may have Disable All Tags from Reading checked under the Read Tags Tab. See Restrict Tag Access of Security setup to see how read, write, and browse access can be restricted.
View how to Implement User Credentials in Client Applications to provide log in method for each user in the .NET application.
Network
.NET applications can be defined to communicate to remote OAS Engines. See Network Communications Troubleshooting to verify that port 58727 is allowing both incoming and outgoing traffic through your firewall.
Tag Path
The full tag path would include the full tag name including its parent groups and the variable of the Tag.
MyGroup.MyTag.Value
Tag names are case sensitive and the current value of a tag would be .Value as the most common variable.
If the tag is from a remote OAS Engine see Basic Networking for standard remote tag syntax or Live Data Cloud Networking if the OAS Engine system has a dynamic IP address.
\\192.168.0.1\TagName.Value
License
Use Configure-License to verify that a product feature .NET Data Connector, WinForm HMI, or WPF HMI is enabled on the data source system where the tags are located.
Target Framework for WPF and WinForm Applications
The project type for WinForm and WPF applications should be set to include (.NET Framework) and target .NET Framework 4.6.1 or greater.
See the correct project type for WinForm above that is listed as Windows Forms App (.NET Framework) while Windows Forms App would not be the correct project type.
Assembly References
Visual Studio on some operating systems will assign a legacy assembly to the project causing an incompatibility due to an older version of the reference assembly. A common assembly that can be incorrect is Newtonsoft.Json that has been registered in the GAC by another software product.
Select Newtonsoft.Json under the Project References to verify the correct path and version as 13.0.0.0.
If the Path does not reference the OAS installation directory remove the reference and select to Add Reference and browse for dll from the respective directory for the specific product feature. For .NET Framework applications include the .dlls located in C:\Program Files\Open Automation Software\OAS\Controls\NetFramework\. The Target Framework set for the VS project must be .NET Framework 4.6.1 or greater. For .NET Standard supporting the following targets include the. dlls located in C:\Program Files\Open Automation Software\OAS\Controls\NetStandard\.
See a list of locations for the correct type in the troubleshooting type After updating to OAS Version 17 the project no longer compiles for a list of correct project reference paths for each type of Visual Studio Project.
.NET Assembly is Blocked
If you have copied an application or project to another computer you may need to Unblock one or more the .dll files.
Right click on the .dll file that you have downloaded. Check the Unblock checkbox for security as shown in the example below, then click Apply or OK.
Legacy .NET Application with OAS Version 17
If the OAS .NET assemblies are from OAS version 16 or less contact support@oasiot.com for compatibility instructions.
After updating to OAS Version 17 the project no longer compiles
All dependent .dlls are located in the relative subdirectory of the Controls directory of the OAS installation directory, typically C:\Program Files\Open Automation Software\OAS\Controls\.
To add a reference to a Visual Studio project right click on References in the Solution Explorer.
Select Browse to browse the directory for each application feature.
Include all .dlls files in the respective directory for the specific product feature.
For .NET Framework applications include the .dlls located in C:\Program Files\Open Automation Software\OAS\Controls\NetFramework\.
The Target Framework set for the VS project must be .NET Framework 4.6.1 or greater.
For .NET Standard supporting the following targets include the. dlls located in C:\Program Files\Open Automation Software\OAS\Controls\NetStandard\.
Yes, refer to the OAS Example Service Code for working code examples if both C# and Visual Basic.
What assemblies do I need to deploy with my application?
Include OASData.dll as Local Copy reference to target the following.
.NET 5
.NET Core 2.o or greater
.NET Framework 4.61 or greater
Xamarin.iOS 10.14 or greater
Xamarin.Android 8.0 or greater
UWP 1.0.0.16299 or greater
For .NET Framework 4.6 or less include OPCSystemsDataConnector.dll.
How do I show different images from multiple states?
Create 5 tags of the Data Type Boolean and set the Data Source to Calculation. Then in the calculation field you would add the logic to convert the integer value to a Boolean state. For example, if you wanted to set a Calculation to True when an integer tag equals 3, it would look like this:
[SomeIntegerTag.Value] = 3
Then after setting up the 5 Boolean tags you set them up in a group in the oas-tag-src attribute of the image tag in HTML:
<div id='test' oas-tag-src='{
"type": "group",
"all_f": "DefaultImageUrl",
"bad_q": "BadDataQualityUrl",
"group": [
{
"tag": "SomeTag01.Value",
"config": "SomeImageUrl01"
},
{
"tag": "SomeTag02.Value",
"config": "SomeImageUrl02"
},
{
"tag": "SomeTag03.Value",
"config": "SomeImageUrl03"
},
{
"tag": "SomeTag04.Value",
"config": "SomeImageUrl04"
},
{
"tag": "SomeTag05.Value",
"config": "SomeImageUrl05"
}
]
}'></div>
As long as the 5 states are mutually exclusive and only one can be true at a time, your image will switch to the associated image in the group section of the attribute. If none are true, it will default to the all_f URL, and if any tag in the group has bad data quality, the image will switch to the URLin the bad_q section.
For more information on Calculation Tags and how to use them, see the following:
We have customers updating over 100 elements on screen every second, but to get such rapid sub-second updates is not always realistic in a web browser.
Network requests can take 50-500ms (or more) even on local networks, depending on the networking hardware and configuration. Then the web browser needs to process the incoming data and update elements based on your own javascript or the Web HMI markup rules.
There are too many variables so any performance metrics are impossible to supply. We suggest experimentation within your own web application code and networking environment to determine your performance benchmarks.
Does Web HMI support SSL?
Using SSL with Web HMI is fully supported. You must first install an SSL Certificate on your server for the domain name(s) that you intend to use, for example “https://hmi.myserver.com:58726”. Once the certificate is installed properly on the server, check Use SSL and select the installed certificate from the dropdown menu. For detailed instructions, please see read: Configuring OAS Web Services. Purchasing and installing an SSL certificate is outside of the scope of the OAS product. For more information on Windows and Certificates, see the following article.
What is a good HTML editor other than Notepad?
You can use any editor you are familiar. Notepad++ has a lot of options for representing HTML elements as well as editor functions and more...it's also nice and clean:
https://notepad-plus-plus.org/
When there is a large number of Tags specified on one page I do not receive any data.
We have a HTML5 project with and one of the requirements is to be able to click on an alarm in the alarm control and move to a specific page based on the alarm. Is that possible or would the alarm control need to be modified?
In the alarmbinding, add the following config field:
rowClickCallback : yourFunction
The callback passes one argument that represents the data in the row that was clicked. You could then parse the data, which is just an array of all the fields in the alarm.
Can you access data over the Internet in a local Excel Spreadsheet?
Yes, for both reading and writing. View the following networking video on how to network to remote data services:
Easy Networking
How to network all products to central service using a fixed IP Address or registered domain name for the Internet.
Can you protect remote data from being accessed from unauthorized use?
Yes, refer to the following Security video on how to setup user security. With the Excel Workbook use the OAS Excel Wizard with the Security option to add a security login function. This is shown in Step 12 of the Excel - Getting Started section.
Security Setup
How to setup security for Open Automation Software in the service and in client applications.
Do I need a license for each remote Excel Workbook?
No, Open Automation Software is server based licensing and all licensing is enabled as the service to allow local and remote access for the number of concurrent licensed users activated.
I am running Microsoft Excel 2010, and I cannot get my data into the Excel Workbook.
Use the OAS Excel Wizard found under the program group Open Automation Software.
The following article describes RTD formulas in general:
https://support.microsoft.com/en-us/kb/289150
OPCSystems.NET OPC Server is not listed after installation
Please enable .NET Framework 3.5 in the operating system and then reinstall OAS.
How to run OPCSystems.NET OPC Server as a Windows Service
Step 1 – Unregister server.
Using the Windows Command Prompt running As Administrator go to the directory C:\Program Files\Open Automation Software\OAS\ and type DANSrv.exe /Unregserver.
Step 2 – Register to run as a Windows Service
Using the Windows Command Prompt running As Administrator go to the directory C:\Program Files\Open Automation Software\OAS\ and type DANSrv.exe /Service /AutoStart.
Step 3 – Verify OPC Server is Registered
Using the Service Control Manager the Windows Service
OPCSystems.NET DA Server should be listed to run in Automatic Startup
Type. You can select to manually start the server or restart the
operating system and the server will start automatically.
When browsing for Network Nodes in the OPCSystems.NET OPC Server from a 3rd party OPC Client how can I get an IP Address or specific Node Name to show up?
Modify the file NetworkNodes.txt in the directory C:\Program Files\Open Automation Software\OAS\ with Notepad or a text editor.
When browsing the OPCSystems.NET OPC Server from a 3rd party OPC Client for OPCSystems.NET Tags I only get the Value parameters. How can access the rest of the properties when browsing?
Modify the file DANSrv.exe.config in the directory C:\Program Files\Open Automation Software\OAS\ with Notepad or a text editor.
Set the property ValueOnlyBrowsing to False.
<add key=""ValueOnlyBrowsing"" value=""False""/>
How can I change the WCF Port Number that communicates to OAS Services?
Note: WCF is now a legacy communication transport for OAS. The default communications no longer uses WCF and is more secure and faster on port 58727. You can modify both WCF and TCP ports under Configure-Options-Networking.
To adjust the port for the OPCSystems.NET OPC Server modify the file DANSrv.exe.config in the directory C:\Program Files\Open Automation Software\OAS\ with Notepad or a text editor.
Set the properties TCPPortNumber and WCFPortNumber to the desired TCP port number. The default is 58727.
View the following video on how to adjust WCF port number in the realtime service and all client applications:
How can I access a legacy OAS Service on a different node that is older than version 5.0.0.0?
Note: Remoting is a legacy format of communications and it is recommended to update to the latest version of OAS for the most secure transport.
For the OPCSystem.NET OPC Server modify the file DANSrv.exe.config in the directory C:\Program Files\Open Automation Software\OAS] with Notepad or a text editor.
Set the property EnableRemoting to True.
<add key=""EnableRemoting"" value=""True""/>
How can I set the UserName and Password the OPCSystems.NET OPC Server uses to communicate with the OAS Services when security is enabled on those services?
Modify the file DANSrv.exe.config in the directory C:\Program Files\Open Automation Software\OAS\ with Notepad or a text editor.
Set the properties UserName and Password to the desired login authentication.
How can I define IP Addresses when browsing for network nodes?
Use the Configure-Options-Networking in the Configure OAS application to define a list of IP addresses in the Network Nodes field as shown in Networking OPC Data.
How can I change the default WCF Port Number to use in the OAS Service and Client applications?
Go to Configure-Options Networking and set the WCF Port Number.
View the following video for adjusting the client applications and how to adjust WCF port number in the realtime service and all client applications:
How can I host my OAS Service on the Internet without a fixed IP Address or registered domain name?
Use the Live Data Cloud feature that is free to use.
How to host data from any Windows PC with a standard Internet connection. No fixed IP Address or registered domain name required.
Do I need to make a web application in order to access data over the Internet?
No, all Open Automation Software client applications and services support Internet communications in Open Automation Software by default. You can deploy them as Smart Clients.
When trying to connect to a local or remote OAS Service an error occurs and access is denied.
View the Remove OAS Service Access section is this file.
When I select localhost I receive an error
Try 127.0.0.1. If it works you can correct your hosts file where is shows localhost.
Data packet size is limited on Windows XP and Windows Server 2003 for UDP Broadcasts
If you setup a large number of tags to be transferred via UDP Broadcast sent from or received on XP or Windows Server 2003 and the data is not transferred, but is with a small number of tags download and install the following Hotfix.
https://support.microsoft.com/en-us/kb/824838
After authentication, how long can I use the token and clientid?
The security token and client id granted to the caller after authentication represent a REST API session. As long as the server remains active (not rebooted), and the credentials are continually used, the session will not expire. If there is no activity on the session after 30 minutes, the session will expire and a 401 Unauthorized response will be returned for all operations. This idle timeout can be configured on the server using the OAS Configuration app. Go to Configure > Options, select your OAS server (usually localhost when configuring the current machine) and then go to the Networking tab. Here you can set the REST API Session Timeout in minutes.
Can I run the Trend and Alarm Dashboard application on remote PCs?
Yes, you can choose a custom install of Open Automation Software and just install the Trend and Alarm Dashboard.
For trend Pens include the network node name, IP Address, or registered domain name in the Tag path.
For alarms set the AlarmNetworkNodes property to include the service where the alarms are hosted.
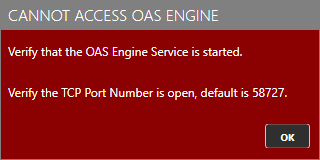
The OAS Service must be started to be accessed by a local or remote OPC client component or application. Use the OAS Service Control application to Start the Service.
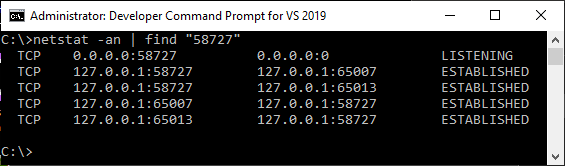
If you are using a Firewall make sure to open up TCP port 58727 for both inbound and outbound traffic. You can find what port number is used under Configure-Options-Networking in the service, 58727 is the current default port number.
You can check if the TCP port is open using the Windows Command Prompt with the following command on the same computer as the OAS Service.
netstat -an | find “58727”
If the service is not started or the port is not open then the command will just return without any results.
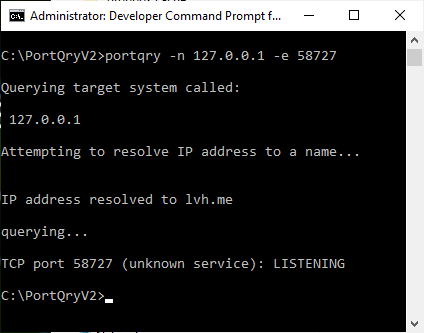
To check a remote computer port use PortQry from Microsoft.
Run PortQryV2.exe to extract to desired directory.
Use the Windows Command Prompt from the PortQryV2 directory with the following command. Replace 127.0.0.1 with the IP address of the remote system where the OAS Engine is running.
portqry -n 127.0.0.1 -e 58727
If this test fails check the network connection to the remote system and open the TCP port for incoming and outbound traffic in the firewall and antivirus software.
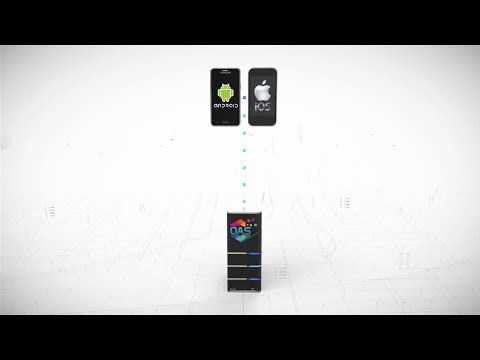
View the following video for a quick introduction to the developing native interfaces for iOS and Android applications.
PCL HMI
Create iOS and Android Native Apps for live data read and write access.
PCL for iOS and Android Applications
NOTE: The OASPCL assembly still ships with the OAS Platform installation for legacy support, but we have now made the OASData and OASConfig assemblies compatible with Xamarin projects. More information on how to use these assemblies can be found here:
The video below details how to develop native apps for iOS and Android using the PCL component. Using the OASData and OASConfig components follow the same method. Just replace the OASPCL with the OASData for reading and writing real time tag data, and OASConfig for configuring OAS servers.
How to create HMI applications for live data for iOS and Android applications.
NOTE: The OASPCL assembly still ships with the OAS Platform installation for legacy support, but we have now made the OASData and OASConfig assemblies compatible with Xamarin projects. More information on how to use these assemblies can be found here:
An active subscription to the Apple Developer Program for iOS distribution via the App Store
An active Google Developer account for Android deployment via the Google Play Store
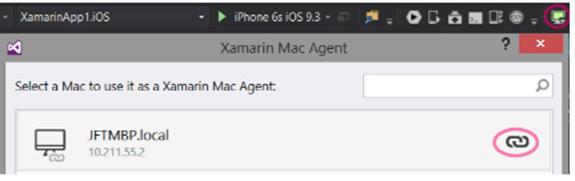
*Note: when developing for iOS with Visual Studio for Windows, you will need to have access to a Mac on your network that has XCode installed. Debugging and execution on the iOS Simulator actually runs on the connected Mac and not on the PC hosting Visual Studio.
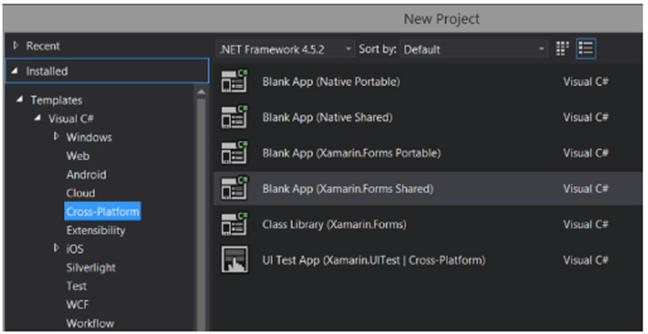
Create a new project in Visual Studio. If Xamarin is installed properly, this will be under Templates > Visual C# > Cross-Platform.
Select the project type of Blank App (Xamarin.Forms Shared). This will create a single shared application code base, and individual projects for each deployment target, including Android, iOS, Windows Universal Platform, Windows Phone and Windows.
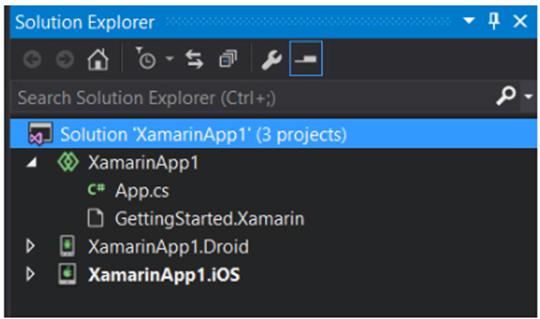
For this project we’ll only be using the Android and iOS projects, so once the solution is created, remove all other project targets so you’re left with just the shared app code and the projects for the the desired targets.
After clearing out the extra projects, your solution should look like this:
You need to add references to the following files in every individual deployment target project. So in this case, you need to add these references to both the iOS and Android projects.
OASData.dll
OASConfig.dll
These assemblies are the .NET Core Open Automation Software components for reading and writing Tag data and for configuring OAS Platform settings.
Step 4 – Code: add component instances
Update shared source code in the App.cs file. This will house all of the application code and will be shared by both iOS and Android projects to make it easier to maintain code for multiple devices.
First, add in a reference to the OASPCL namespace, along with application-level variables.
using System;
using System.Collections.Generic;
using System.Linq;
using System.Text;
using OASData;
using OASConfig;
using Xamarin.Forms;
namespace XamarinApp1
{
public class App : Application
{
OASConfig opc = new OASConfig();
OASData opcd = new OASData();
string server = "10.211.55.3"; // your machine IP
bool bPumpSet = false;
bool bPumpVal = false;
Label lblSine = new Label {
Text = "Loading...",
HorizontalTextAlignment = TextAlignment.Center
};
Label lblPump = new Label {
Text = "Loading...",
HorizontalTextAlignment = TextAlignment.Center
};
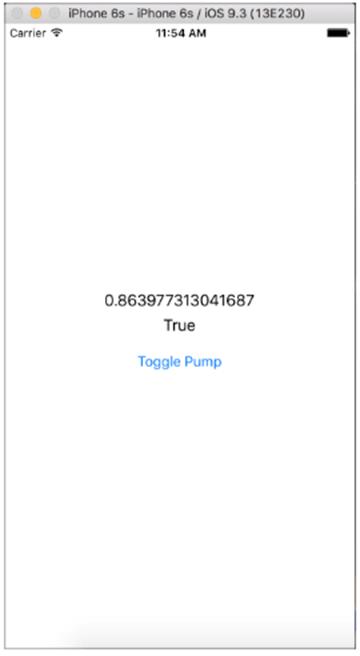
Button btnPump = new Button {
Text = "Toggle Pump"
};
The OASConfig component is used to configure OAS Server and tag settings, and is not used in this example, but the OASData component is.
This is used to monitor tags, fire events when values change on the server, and also to update values on the server. These are the local variables used:
Server – A string that holds a reference to the IP address of your OAS server where we will be reading and writing data. This may be the localhost of the machine with Visual Studio, but the compiled mobile apps may not be running locally, so localhost or 127.0.0.1 may not work. This needs to be the IP address on the network for your OAS server.
bPumpSet – A boolean flag that determines if we have gotten values from the server for the Pump.Value tag so we know when it’s safe to allow updates.
PumpVal – A boolean to hold the current value for the Pump.Value tag.
lblSine – A Xamarin Forms label to display the value of the Sine.Value tag
lblPump – A Xamarin Forms lable to display the value of the Pump.Value tag
btnPump – A Xamarin Forms button used to toggle the value of Pump.Value
Step 5 – Code: handle events
Now we’ll add some code to monitor server tags and handle updates when values change. The AddTag method adds a tag to the list of tags to monitor. You can also use the AddTags method to add more than one at a time.
The ValuesChangedAll event is fired every time the server values have changed for any tag being monitored. This event will be passed a list of tags, values, data qualities, and timestamps for each update. If values have not changed for some tags, they will not be included in the arrays passed to the event.
protected override void OnStart ()
{
// set up tags
opcd.AddTag(string.Format(@"\\{0}\Sine.Value", server));
opcd.AddTag(string.Format(@"\\{0}\Pump.Value", server));
// set up event handler
opcd.ValuesChangedAll += Opcd_ValuesChangedAll;
}
private void Opcd_ValuesChangedAll(string[] Tags, object[] Values, bool[] Qualities, DateTime[] TimeStamps)
{
// iterate thru received values and update display
Device.BeginInvokeOnMainThread(() => {
int idx = 0;
foreach (string t in Tags)
{
if (t.Contains("Sine.Value") && Values[idx] != null)
{
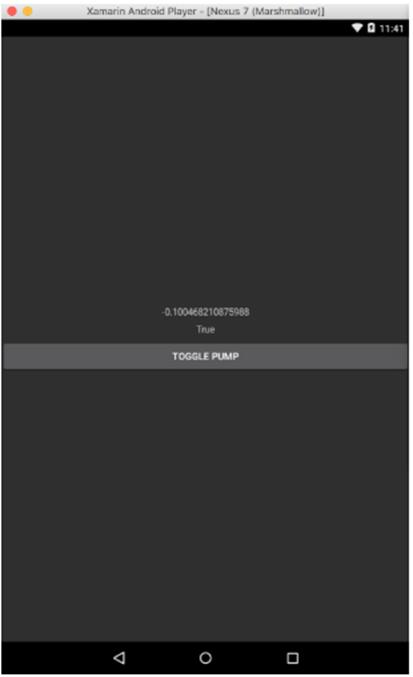
lblSine.Text = Values[idx].ToString();
}
if (t.Contains("Pump.Value") && Values[idx] != null)
{
bPumpSet = true;
bPumpVal = (bool)Values[idx];
lblPump.Text = bPumpVal.ToString();
}
idx++;
}
});
}
In the event handler, we will iterate through the list of tags and update labels when their respective values have changed.
Note: We must execute UI updates within a Lambda (a C# anonymous function) tied to the Device.BeginInvokeOnMainThread. This hands over the execution to the main UI thread. If this is not done, crashes or unexpected results could occur.
Step 6 – Code: update screen
The last bit of code will be to handle the clicking of a button and triggering an update on the server when that happens. First we’ll update the App constructor to include the new labels and button in the layout. Then we add a Clicked handler to the button.
public App ()
{
   // The root page of your application
   MainPage = new ContentPage {
       Content = new StackLayout {
       VerticalOptions = LayoutOptions.Center,
           Children = {
               lblSine,
               lblPump,
               btnPump
           }
       }
   };
   btnPump.Clicked += BtnPump_Clicked;
}

private void BtnPump_Clicked(object sender, EventArgs e)
{
   // change pump value here
   if (bPumpSet)
   {
   Device.BeginInvokeOnMainThread(() => {
       opcd.SyncWriteTags(new string[] {
           string.Format(@"\\{0}\Pump.Value", server) },
           new object[] { !bPumpVal });
       });
   }
}
We use the SyncWriteTags method to send up a list of tag/value pairs. In this case we’re just sending up the Pump.Value tag and the inverse of the current value to effectively toggle it.
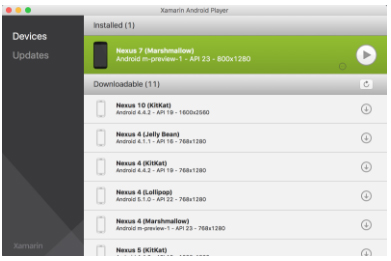
Step 7 – Building and testing for Android
Start by running the Xamarin Android Player. If you do not have this installed, you can download it here. You’ll then need to download and install device images that the Player will use. For this example, we chose the Nexus 7 with Marshmallow build of the Android OS.
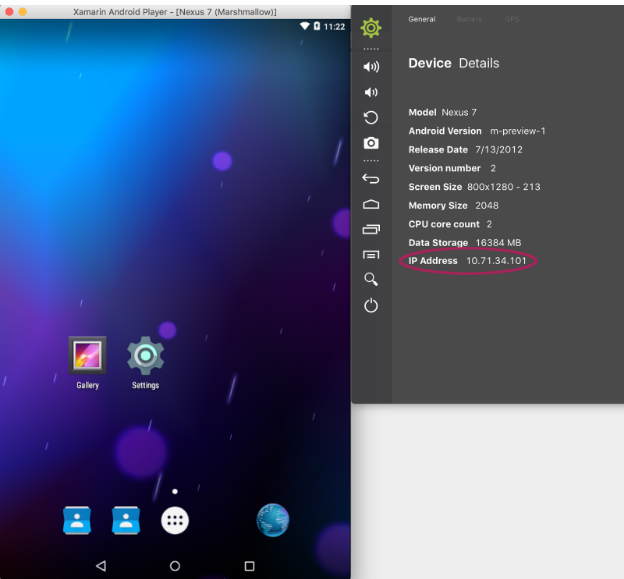
Once you’ve downloaded the device image you can start it up by hitting the Play button. This will run the device emulator. After the device has started, you can then click on the gear icon to get details. The important field is the IP address. We’ll use this to connect Visual Studio for debugging.
Now, you can go back to Visual Studio, select the Android Project, to be sure we’ll be debugging that one and not the iOS version. Select Debug to ensure we are in Debug and not Release mode. Then go to the set of icons in the toolbar and select Open Android Adb Command Prompt:
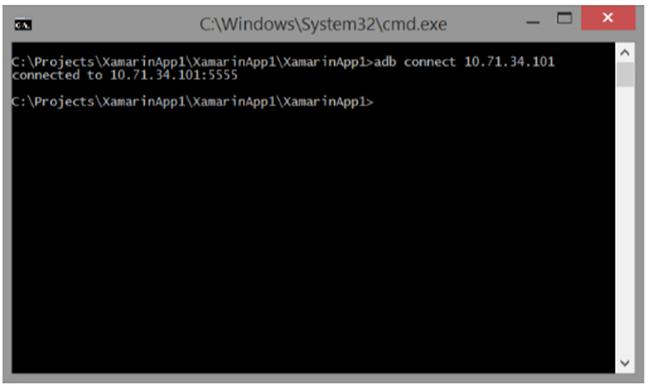
When the command prompt opens, enter the following command:
adb connect 10.71.34.101
Replace the IP above with the IP of your Android device.
You should see a successful connection. You’re now ready to debug the project.
In the Visual Studio toolbar, make sure your Android Device is selected as the target and then select Start Debugging. The project will build and then be deployed to the device.
Note: If you get an error related to missing “provisioning profiles”, this is common. To fix it, select the iOS project, then be sure to select the iPhoneSimulator as the target. Then return to the Android project and try again. Even though we were debugging the Android project, the iOS project will compile and throw errors.
Step 8 – Building and testing for iOS
As stated earlier, to build and test an iOS app, you must be connected to a Mac on your network. This Mac must have XCode installed along with the Xamarin Mac Agent. This allows Visual Studio to connect to the Mac and use its Simulator for debugging.
The simplest way to get the Xamarin Mac Agent on your test machine is to install Xamarin Studio for the Mac found at http://www.xamarin.com/download.
Once you have your Mac configured and accessible on the network, return to Visual Studio to connect by selecting Xamarin Mac Agent from the toolbar:
Locate your Mac in the list and click Connect. If it is not on the list, click Add Mac… to enter connection details manually.
Once connected, the toolbar icon will change and the link icon will appear in the Xamarin Mac Agent dialog:
You can now select the iOS project and target the iPhoneSimulator, choosing the model you want to test. In this case we’ve chosen the iPhone 6s. The models and iOS versions available to you will depend on the version of XCode and Simulator installed on your Mac.
Now select Start Debugging and the app will compile, deploy to the simulator and start. Switch over to your Mac and you should see it running.
As you can see, the labels and button are similar to those on the Android version, but particular to the iOS app. This allows you to develop an app that is familiar to each target platform user while remaining on a single code base.
Resources
For more details on how to use the OPCSystemsComponent or the OPCSystemsData components, you can refer to the Programmatic Interface section of our online help. The PCL versions of these components have the same interface as the standard .NET components, so all code examples will function in the same way.
Build iOS, Android, Windows Phone and Universal Windows Platform (UWP) apps in a familiar .NET environment – all with a single shared code base
Cross-platform development with .NET Core 2.x
The OAS Platform ships with two components built on the .NET Core 2.0 Framework. The OASData and OASConfig components allow you to read and write real time Tag data, and programmatically configure OAS servers. With these components, you can write a single code base and use it to deploy apps for multiple platforms, including native iOS and Android apps using Visual Studio and Xamarin extensions.
What’s the advantage of using .NET Core?
Before .NET Core, there was no easy way to share a single code base between applications targeting the various desktop, mobile, and device platforms. You were forced to create and maintain a code base and project for each.
Now, with .NET Core you can create and maintain a single project and build a single assembly that can be shared between IDEs and platforms. You can even use Visual Studio, one of the best IDEs for application development.
Are apps developed fully native?
Yes, apps developed using Xamarin within Visual Studio are compiled to fully native apps for the target platform.
You can develop HMI apps for iOS, Android, Windows Phone, and the Universal Windows Platform (UWP) all from a single solution containing shared code along with additional code for each target.
NOTE: The OASPCL assembly still ships with the OAS Platform installation for legacy support, but we have now made the OASData and OASConfig assemblies compatible with Xamarin projects. More information on how to use these assemblies can be found here:
Tags can also be used without a data source with a static value to update from programmatically from a .NET application or REST API or from a user interface.
Calculation can be another source for tags with values from other local or remote tags.
The following section is how to manually add and define Tags using the Configure OAS application. Tags can also be added and modified using the CSV Import and Export selections using the Configure-Tags application to use Excel or other third party Comma Separated Variable editor.
To learn how to programmatically add or modify Tags from your own Visual Studio application refer to the following article on how to add and define multiple tags with one method:
Please view the Getting Started with Open Automation Software Video to familiarize yourself with installation, setting up Tags, selecting Data Sources and Destinations, and implementing Networking and Security.
Step 1 – Start Configure App
Start Configure OAS application from the program group Open Automation Software.
Select Configure-Tags.
NOTE: The Configure application can be used to connect to remote systems using the network node name or IP address of the remote node the OAS Service is running on. Simply enter the IP Address or network node name of the remote OAS Service you wish to connect to and click on the Select key.
When selecting a service if you receive a warning dialog that the service cannot be retrieved make sure the OAS Engine is started.
If you already have the default Demo Tags loaded you can right in the Tags root and select Delete All Tags.
Step 2 – Add Tags
Click on the Add Tag button located at the top of the Tag browser.
NOTE: You can also add organizational Groups as many levels deep as you prefer and add tags to groups. To do this first add a Group to the root level, then right click on the Group in the right window to add additional Groups or Tags.
Enter the Tag name Ramp in the Add Tag dialog box.
Repeat Steps 4 and 5 with Tag name Sine.
Repeat Steps 4 and 5 with Tag name Random.
Step 3 – Modify Tags
Select Tag Ramp in the right Tag window.
All Tag properties will appear in the lower window.
For the Value Parameter set the Data Source to Simulation.
If you plan to use trending on this point enable the Trend Point option.
Set the Description field to Ramp.
Select the High High Parameter and set the Value field to 80 and enable the High High alarm.
Select the High Parameter and set the Value field to 60 and enable the High alarm.
Select the Low Parameter and set the Value field to 40 and enable the Low alarm.
Select the Low Low Parameter and set the Value field to 20 and enable the Low Low alarm.
Select the Apply Changes button in the lower right corner.
Select Tag Random and the Value Parameter.
For the Value Parameter set the Data Source to Simulation.
Set the Simulation Type to Random
If you plan to use trending on this point enable the Trend Point option.
Select Tag Sine and the Value Parameter.
For the Value Parameter set the Data Source to Simulation.
Set the Simulation Type to Sine
If you plan to use trending on this point enable the Trend Point option.
Set High Range to 1 and Low Range to -1.
Step 4 – Save Configuration
Select the Save button on the toolbar at the top.
Enter a file name to be saved in C:\ProgramData\OpenAutomationSoftware\ConfigFiles directory on Windows or ConfigFiles subdirectory on Linux.
When prompted to set the file as the default configuration to load on startup select Yes.
The default file can be changed under Configure-Options-Default Files.
 Start Configure OAS application.
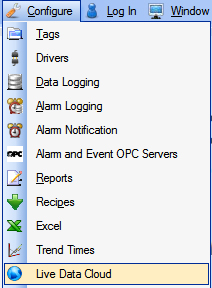
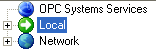
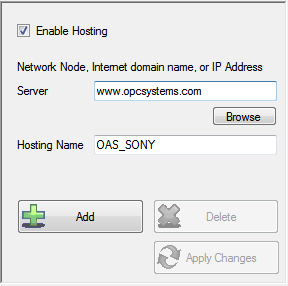


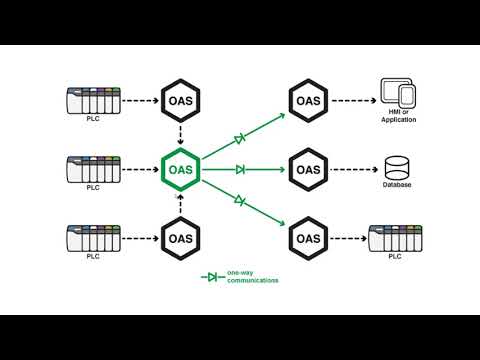

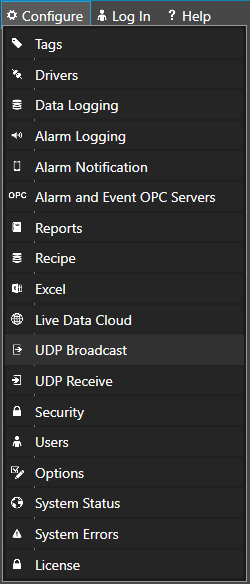

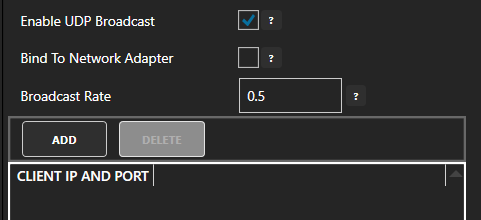
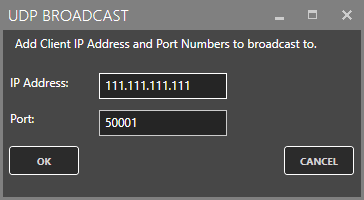
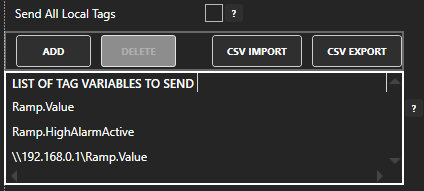

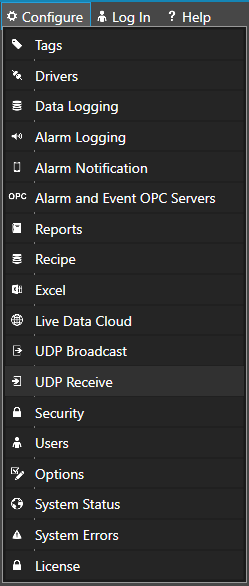
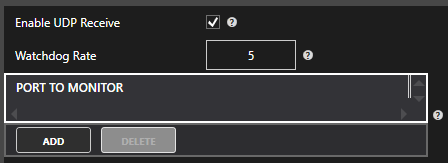
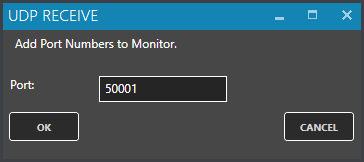


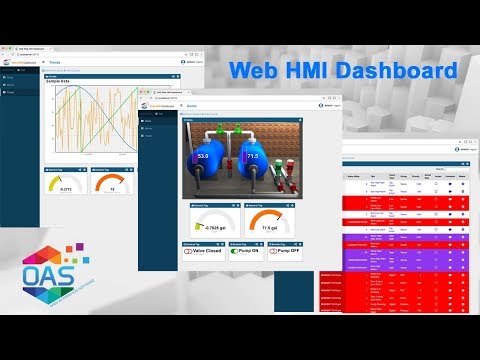


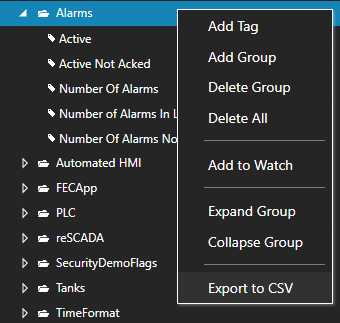
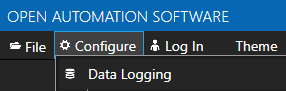
 ServerIPAddress=xxx.xxx.xxx.xxx
DataBaseName=The database name of interest inside mySQL
MYSQLUserName = The MySQL username provided above
MYSQLUserNamePassword = The Password to the database for the username provided
No spaces between elements.
ServerIPAddress=xxx.xxx.xxx.xxx
DataBaseName=The database name of interest inside mySQL
MYSQLUserName = The MySQL username provided above
MYSQLUserNamePassword = The Password to the database for the username provided
No spaces between elements.
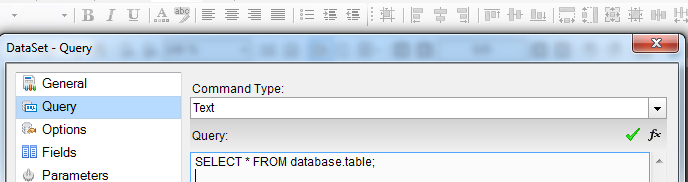 Database = DatatBaseName
Table = a table within the database.
Dataset should now show table elements.
Database = DatatBaseName
Table = a table within the database.
Dataset should now show table elements.