Tag Binding
One of the most powerful features of the UIEngine is the ability to bind Component attributes to OAS Tag values and properties. This allows you to use live data from your PLCs, devices, and even external applications to determine your UI behavior.
Learn more about OAS Tag Variables HERE
In your Component attributes, wherever you see a tag icon, you can bind this property to an OAS Tag. In the case of some properties like Colors, you can even bind multiple cascading Tag values to drive the behavior.
Simple Values
If the Component Property is a String or Numeric, the field will accept a static or default value, and binding an OAS Tag will override that value when live data is received. For example, clicking the tag icon for the Text property of a Label displays the following:
In the Text field you can directly type in the full OAS Tag path and variable. The simplest example might be something like Sine.Value where Sine is the Tag name and Value is the variable.
Below is an example of a numeric Component property that has a static value of 35 but can be driven by a Tag.
Cascading Values
When the Component property is a Boolean, Color, Image, or Icon, binding an OAS Tag has even more control. These types allow you to utiliza cascading logic to bind multiple Tags with a Boolean data type, determining the final output.
For example, in a Label's FG Color field, if you choose to bind Tags to the color, you can choose one or more Tag/Color pairs, clicking the to add more to the list or clicking to remove one from the list.
Once a Tag/Color pair is assigned, you can also choose colors for Default and Bad Quality.
The cascading logic rules follow these steps:
- If ANY of the Tags report Bad Quality, use the Bad Quality value and STOP.
- Check each of the Tags in the list in order. If a Tag evaluates to
true, STOP and use the color paired with the Tag. - If NONE of the Tags in the list evaluate to
true, use the Default value
EXAMPLE:
If we have 3 Boolean Tags on the server meant to indicate temperature ranges called TempLo, TempMid, TempHi, and assigned them to colors in this order along with Default and Bad Quality values:
| Tag | Color |
|---|---|
| TempLo.Value | |
| TempMid.Value | |
| TempHi.Value | |
| Default | |
| Bad Quality |
Here are some combinations and the resulting color:
| TempLo.Value | TempMid.Value | TempHi.Value | Result | comment |
|---|---|---|---|---|
| false | false | false | All evaluate to false - use Default | |
| true | false | false | TempLo.Value color is displayed | |
| false | true | false | TempMid.Value color is displayed | |
| false | false | true | TempHi.Value color is displayed | |
| true | true | true | Even though all are true, the first in the list that evaluates to true is TempLo.Value. Reversing the order in the list would result in the TempHi.Value color being displayed | |
| false | true | BAD QUALITY | Despite one of the Tags evaluating to true, ANY of them reporting bad data quality will result in the Bad Quality color being displayed |
TIP
The same cascading logic is applicable to simple Boolean Component parameters such as Visibility and Enabled, as well as any parameter where an Image, Icon, or Symbol are displayed.
If you want a one color/image/symbol for true and one for false, just add a single Tag to use for the true result and use the Default to represent the false condition.
Complex Values
Some Components can provide multiple value options (e.g. Check List, Radio List, Combo Box, and Multi Switch) and can have their options populated from an OAS Tag. Because options are more complex than a list of values, this is done using an OAS Tag with a JSON data type, containing an array of JSON objects.
And example JSON data structure is as follows:
[
  { "label": "First Option", "value": 1 },
  { "label": "Second Option", "value": 2 },
  { "label": "Third Option", "value": 3 }
]
Along with the JSON array, you will need to specify which object fields represent the label and value. The label is what gets displayed to the user and the value is what is stored or sent to the server for a selected option.
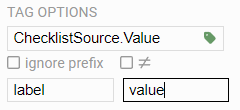
In the above example, the label is conveniently titled "label", and the value is titled "value", but these can be any fields within your JSON object.
With this structure, your field mapping will be:

TIP
Objects in your JSON array can contain more than just the label and value fields.
Also, you can map the same field in the JSON for both label and value fields.
Tag Browser
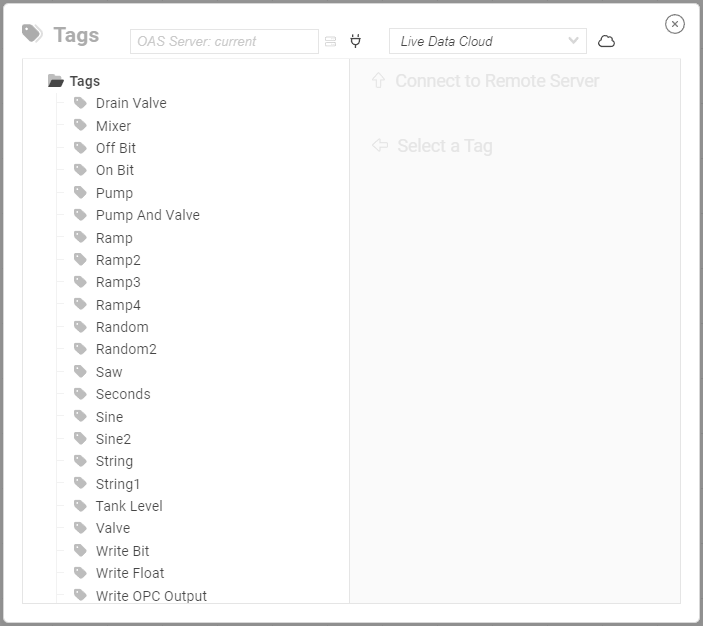
To bind a property to a Tag, click the icon in the text field to open the Tag Browser, which allows you to locate tags on local and remote OAS servers. By default, the Tag Browser will display Tags from the current server where you've accessed the UIEngine.

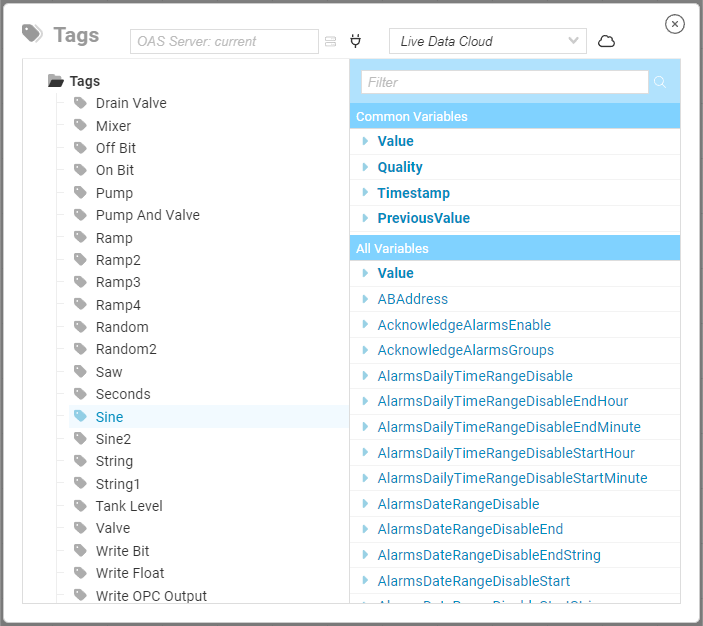
On the left side is a list of all Tags on the current OAS Server. You can browse through Tag Groups to locate the Tag you need. Once you select a Tag, you can then choose the Variable to use.

The most common variables are at the top, such as Value, Quality, Timestamp, and even the PreviousValue. These are all real time values. If you don't know which Variable you need, you can start typing into the Filter field to locate a Variable. For example, typing High will display all Variables containing that string, which typically relate to High and HighHigh Alarm conditions.
Remote Servers
In addition to using live Tag data from the current OAS Server, Component properties can be bound to tags that are on any OAS Server that is reachable from the current server.
In the header of the Tag Browser is a field used to enter the address of a remote OAS Server. This can be an IP Address, or domain name. For example, if you want to browse for tags on the OAS demo server opcweb.com, you can enter that into the server field and click the icon to connect. The icon will turn green and Tags will be available for browsing if the connection is successful.

Click the connection icon again to disconnect and return to browsing local Tags.
TIP
When you select a Tag on a remote server, you will notice that the resulting value applied to the property field will be prepended with server information. For example, if you select the Sine.Value on the opcweb.com remote server, the property will be bound to \\opcweb.com\Sine.Value
Additional Tag Binding Properties
Once you select a Tag and Variable, the will change to indicating that it is bound. Clicking the icon will allow you to further configure the behavior. For example, in simple fields you can set configure how it is displayed based on the value.
| Property | Description |
|---|---|
| ignore prefix | Ignore the Screen-level Tag Prefix and use the explicit Tag for this field |
For boolean Tags, evaluate to true when false | |
| Bad Quality Value | An optional value to inject when the server reports Bad Quality for this Tag |
Formatting
| Property | Description |
|---|---|
| Boolean | Values to use for Boolean true and false states, (e.g. 'ON' and 'OFF') |
| Numeric | Numeric formatting for truncating, rounding, and decimal places. e.g. a raw value of 3.1415 with a numeric format of 0.00 will evaluate to 3.14 |
| String | Used to inject an evaluated value into a larger string. e.g. a format of This is a value: {0} psi with a raw value of 98 will evaluate to This is a value: 98 psi. |
| Date | Used to format values that can be parsed into a Date/Time value |
TIP
Formatting properties can be combined. So you can use Boolean or Numeric formatting on the raw value, and then apply that to a String formatter to inject it into a larger string. Fore example, you may want an indicator for a Boolean to read The switch is OFF by setting the Boolean formatter to use OFF and ON and a String formatter of The switch is {0}.
Finally, once you've set your Tag Binding, exit Edit Mode to see the live data driving Component behavior. You can always return to Edit Mode to reconfigure Tag Binding.
Numeric Formatting
Date Formatting
If the value is a valid ISO date string or UNIX timestamp, you can use format the date with a format of your own choosing. For example, if you wanted to convert the value to something like 2024-01-15 12:01 pm your format string would be YYYY-MM-DD HH:mm ap. See below for all values that can be used in your format.
| Format String | Description |
|---|---|
| YYYY | Full Year |
| MM | Numeric month, 1-12 |
| DD | Day of the month, 1-31 |
| HH | Hours, 0-23 |
| hh | Hours, 1-12 |
| mm | Minutes, 0-59 |
| ss | Seconds, 0-59 |
| ap | am or pm |
