How Do I Address AB Classic Output Registers?
Please use the chart below for conversion.
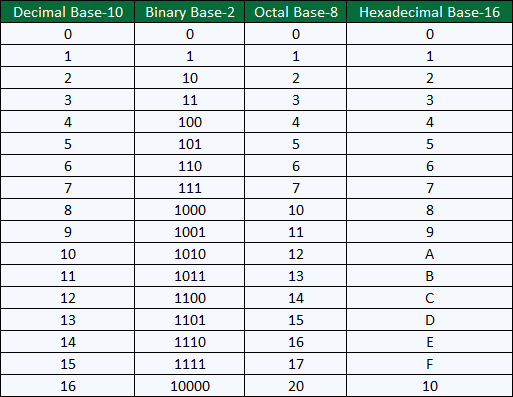
Please use the chart below for conversion.
In most, if not all cases, issues reported can be corrected by upgrading to the latest version of the OAS Platform. If you have any concerns or are experiencing an issue not listed below, contact our technical support team at support@oasiot.com.
The latest release of OAS contains several improvements that harden security and make communications even more efficient.
Read more about these improvements here.
| CVE or Ref. Number | Description | Versions Affected | Status |
| CVE-2022-26082 CVE-2022-26303 CVE-2022-26043 CVE-2022-26077 CVE-2022-26026 CVE-2022-26067 CVE-2022-27169 |
A vulnerability was reported in the OAS Engine API calls of Open Automation Software OAS Platform V16.00.0112. Recommendations: | Versions prior to v17 | Corrected in v17 |
| CVE-2022-26833 |
A vulnerability was reported in the OAS Engine REST API calls of Open Automation Software OAS Platform V16.00.0112. Recommendations: | Versions prior to v17 |
Corrected in v17 |
| CVE-2023-31242 CVE-2023-34998 CVE-2023-34353 |
Network-based authentication vulnerabilities identified. Recommendations: | v18.00.0072 | Corrected in v19 |
| CVE-2023-32615 CVE-2023-34994 |
OAS service is granted file system access with elevated permissions. Recommendations: | v18.00.0072 | Corrected in v19 |
| CVE-2023-34317 CVE-2023-32271 CVE-2023-35124 |
Additional validation required on network update calls for configuration data. Recommendations: | v18.00.0072 | Corrected in v19 |
| CVE-2024-24976 | Improper Handling of Length Parameter Inconsistency Recommendations: OAS version 19.00.0064 has been updated to correct the file data source path assignment by removing the File Data Source Path and File Name properties. Th location and file name are now fixed. | v19.00.0057 | Corrected in v19.00.0064 |
| CVE-2024-21870 CVE-2024-22178 | External Control of File Name or Path. Recommendations: The File Data Source File Name is now fixed to OASTagValues. The save security call has been removed and there is no longer a need specify the location or file name of the security file. Users can no longer specify the file name or location of the security file. Upgrade to v19.00.0064 or later. | v19.00.0057 | Corrected in v19.00.0064 |
| CVE-2024-27201 | Improper Input Validation. Recommendations: OAS version 20.00.0009 has been updated to restrict the user properties Security Group Name, Field1, Field2, Field3, and Field4 to only allow the use of letters, numbers, spaces, and characters ! # $ % & ‘ ( and ), . Upgrade to v20.00.0009 or later. | v19.00.0057 | Corrected in v20.00.0009 |
| CVE-2024-11220 | Low-level user access through automated report execution. Recommendations: OAS version 20.00.0076 has been updated to prevent report scripting. OAS version 20.00.0072 has been updated to now allow remote configuration of automated report settings. To prevent the vulnerability on prior versions:Do not share the OAS administrator authentication with unknown third parties to allow the file path from being set remotely. Do not download and install files from unknown users to the local system. | V20.00.0075 | Corrected in v20.00.0076 |
Cause
Data logging or alarm logging errors returned from the database engine when Store and Forward to Disk is disabled. You will see a warning that store and forward to disk needs to be enabled under Configure-System Errors.
Solution
Go to Configure-Options-Store and Forward and enable Store Buffer to Disk.
Cause
Data logging from a remote data source engine when Store and Forward to Disk is disabled.
Solution
Go to Configure-Options-Store and Forward and enable Store Buffer to Disk on the data source engine.
Cause
Remote data logging from a data source engine that does not have license of data logging will data buffering in the data source that cannot be resolved. You will see a warning of this under Configure-System Errors.
Solution
Disable the remote data logging and restart the data source engine or update the data source engine to OAS version 17.0.0.5 or greater.
Cause
Larger number of tags enabled for real time trending.
Solution
Change the Longest Realtime Time Frame under Configure-Options-Trending to 3600 seconds.
Cause
High number of clients subscribed to large number of tags that are changing frequently. This would include but not limited to high number of .NET applications, remote OAS Engines, remote OAS OPC UA server, remote OAS OPC DA server, OAS Excel, remote data logging.
Solution
Update the OAS Engine to version 20.0.0.103 or greater. Improved networking with multiple clients. Increases data delivery speed and reduces memory load when multiple clients are connected.
Cause
Driver Interface setup to OPC UA servers that are offline. You will see communication errors under Configure-System Errors of the OPC UA server driver interface being offline.
Solution
Update the OAS Engine to version 16.0.0.101 or greater.
Cause
Large number tags using statistic calculation functions of AVG, MOVMIN, MOVMAX, and MOVSUM for a long time period. See the total in use under Configure-System Status.
Solution
Log data to a database and use the recipe feature with aggregate field names of SUM(fieldname), AVG(fieldname), MIN(fieldname), and MAX(fieldname).
Cause
Operating system disk with no space remaining.
Solution
Free up disk space for database engine and OAS CSV logging and error recording.
Cause
MQTT, Azure IoT, AWS IoT Gateway with Store and Forward enabled in driver interface with network error to cloud service.
Solution
Go to Configure-Options-Store and Forward and enable Store Buffer to Disk.
Cause
Large number of Time On and Counts enabled with long Period 1 and Period 2 times defined with data changing frequently.
Solution
Reduce Period 1 and Period 2 times of the Time On and Counts or log events with data change logging group and use recipe feature with COUNT(fieldname) aggregate to return the number of transitions.
Cause
Retain All Realtime Alarms to Show All Occurrences in Window enabled under Configure-Options-Alarms with long retention time.
Solution
Disable Retain All Realtime Alarms to Show All Occurrences or shorten the time retained with the property Remove Old Alarms from Realtime Alarms under Configure-Options-Alarms. 0 is unlimited time which is the default.
Cause
When Log Network Transactions is enabled under Configure-Options-Systems Logging and there is high network traffic from client applications the logging buffer can be overrun and not keep up with recording the transactions to disk. Log Network Transactions should only be used for short troubleshooting sessions to track all data send to all clients.
Solution
Disable Log Network Transactions under Configure-Options-System Logging. This logging feature has been removed if it is not listed under Configure-Options.
dotMemory by JetBrains is an excellent tool for identifying what is the source of memory allocation. This will help identify what source of the memory usage is.
Download Jet Brains Memory Profiler: https://www.jetbrains.com/dotmemory
Following are the steps to create a snapshot.
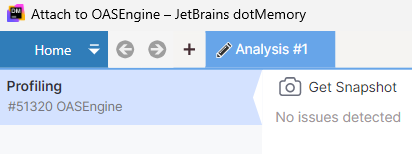
Restart the OAS Services.
Start JetBrains dotMemory.
Select Show processes of all users.

Double-click on OASEngine.exe x64 process to attach to it.

Memory profiling will begin.
Select Get Snapshot to create the first snapshot of memory.
The first snapshot will appear after all information is collected.
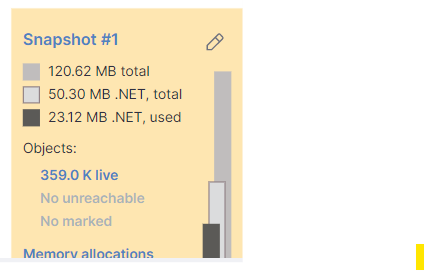
Wait until the memory usage of the OAS Engine has increased by 50% or more.
Select Get Snapshot again to create the second snapshot.
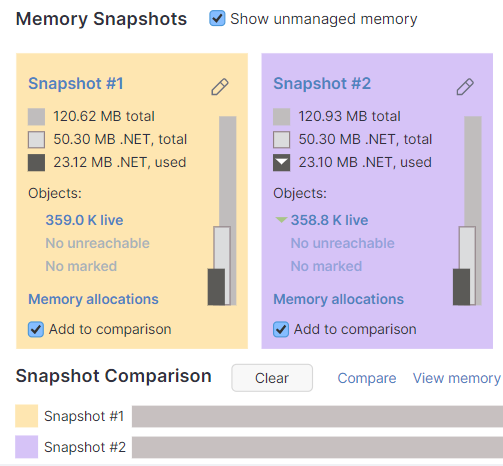
Select Detach.

Under the Home menu select Export Workspace.
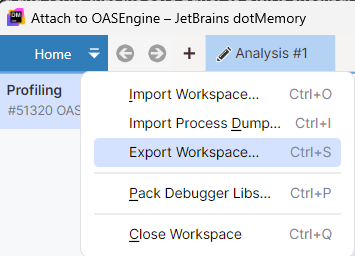
Upload the file to link provided by OAS support team.
The articles below provide helpful information to get you started with your Web HMI.
Access to tag data and the ability to see what tags are available can be restricted by user authentication or prevent unauthorized access. The Security features can be used to designate tag groups or individual tags per organization, customer, or designation on how you determine to allocate users in OAS.
Before proceeding first follow the steps in the Getting Started – Security guide to create an Admin user.
When adding tags to OAS organizing the tags in groups by area or organization will make the security restriction easy to designate tags that start with a character string.
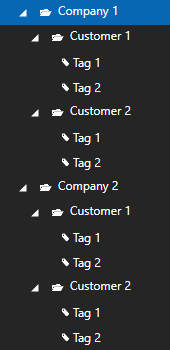
In the following steps we will use the example tag configuration demonstrate access to tags organized by company and customer.
To restrict access to read, write, and browse tags use the Security group tab Tags, Read Tags, and Write Tags of the Default security group and allow access to the designated security group defined to each user.
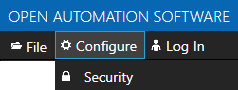
Use Configure-Security to list all currently defined Security Groups.
Select the Default security group and uncheck Enable All Features.
![]()
Under the Read Tags tab check Disable All Tags From Reading.

Note: This will prevent all applications including remote OAS Engines to receive live values from this OAS Engine.
You can optionally enable specific tags or tags start with a matching string for read access without authentication required.
Select Apply Changes to update the Default security group.
![]()
Next create security groups for customers, companies, administrators full access privileges.
The first example create a security group for Customer 1 of Company 1.
Change the Group Name property of the security group, the group name can be anything you like, we will use Company 1-Customer 1 in this example.
In the Read Tags tab leave Disable All Tags From Reading unchecked.
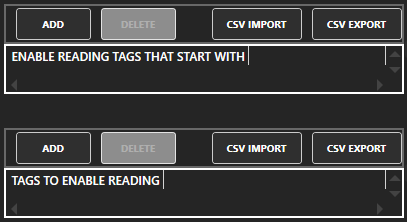
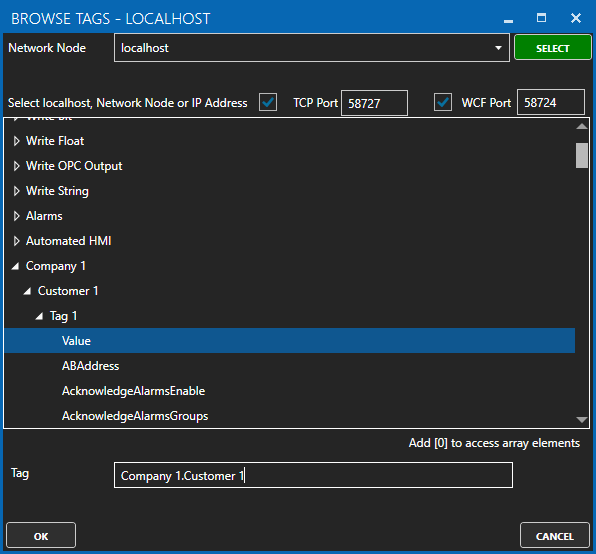
Select ADD in the list to Enable Reading Tags that Start With to browse for a tag within the Company 1.Customer 1 group and remove the tag portion of the string and select OK.
This security group will allow read access to tags that start with Company 1.Customer 1.
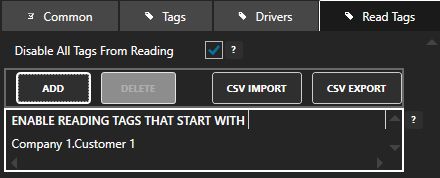
Note: If you wanted to provide company wide access to all customers set the string that starts with to Company 1. If you want to provide read access to all tags in the configuration uncheck Disable All Tags From Reading.
You can also designate tags by complete name with the list Tags To Enable Reading. This is a way to include specific tags within a tag group, but not all tags in the group.
Select Add Group.
![]()
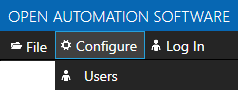
From the top menu select Configure-Users to define one or more users to the Company 1-Customer 1 group.
Enter a User Name and Password for the user that will have access to read tag from Company 1.Customer 1 tag group.
Use the Security Group pull down to select the security group you have defined for the Company 1.Customer 1 group.
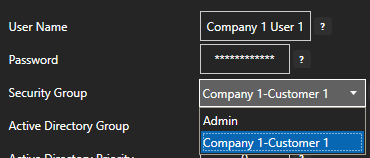
Select Add User.
![]()
Repeat the above steps for each customer in each company.
Note: To define multiple security groups and users you can use CSV Export / Import.
![]()
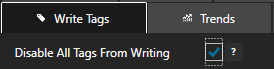
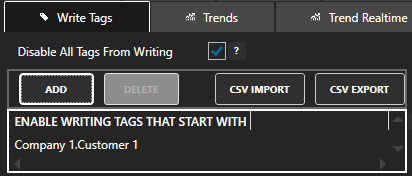
To restrict write access to tags per user use the same steps above as listed for Read Tags and use the Write Tags tab of the security groups.
In the Default security group check Disable All Tags From Writing.
In each additional security group select ADD in the list to Enable Writing Tags that Start With to browse for a tag within the Company 1.Customer 1 group and remove the tag portion of the string and select OK.
This security group will allow write access to tags that start with Company 1.Customer 1.
Note: If you wanted to provide company wide access to all customers set the string that starts with to Company 1. If you want to provide write access to all tags in the configuration uncheck Disable All Tags From Writing.
You can also designate tags by complete name with the list Tags To Enable Writing. This is a way to include specific tags within a tag group, but not all tags in the group.
To restrict browse access to tags use the same steps above as listed for Read Tags and use the property Disable All Tags from Browsing in the Tags tab of the security groups.
Check Disable All Tags From Browsing in the Default security group in the Tags tab and select Apply Changes.
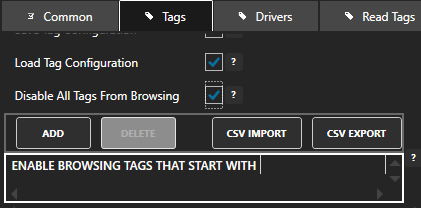
Select Apply Changes to update the Default security group.
![]()
In each additional security group select ADD in the list to Enable Browsing Tags that Start With to browse for a tag within the Company 1.Customer 1 group and remove the tag portion of the string and select OK.
This security group will allow browse access to tags that start with Company 1.Customer 1.
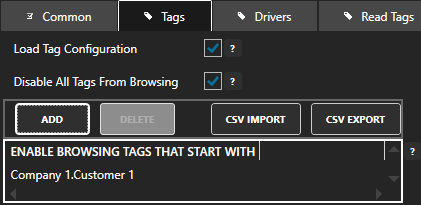
Note: If you wanted to provide company wide access to all customers set the string that starts with to Company 1. If you want to provide browse access to all tags in the configuration uncheck Disable All Tags From Browsing.
View how to Implement User Credentials in Client Applications to provide log in method for each user.
View the following video for a complete demonstration of how to publish data to AWS IoT Gateway, Azure IoT, and MQTT Brokers.
Open Configure OAS.
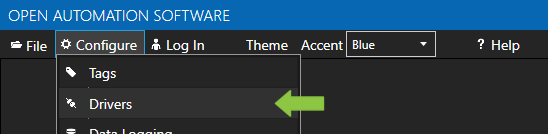
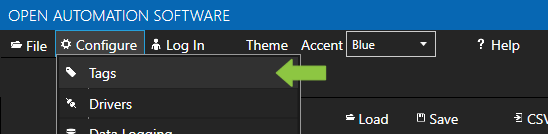
Select Configure >> Drivers from the top menu.
Select your Network Node, either local or remote.
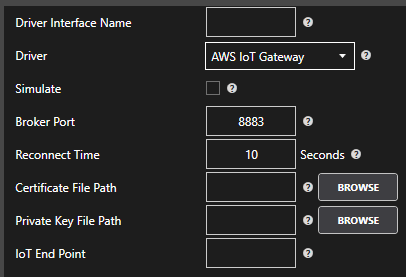
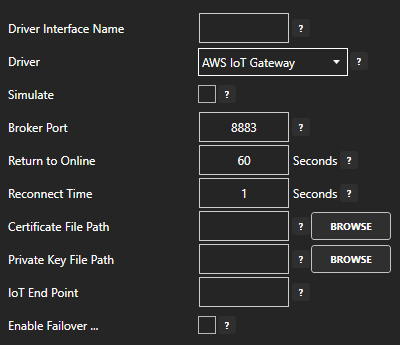
Enter the Driver Interface Name you wish to use.
Select AWS IoT Gateway from the Driver combo box.
Use the Browse buttons to select you Certificate File Path and the Private Key File Path. These are created in your AWS Management Console.
Enter the IoT End Point. This is also found in your AWS Management Console.
If you would like to define a secondary AWS end point if the primary server fails, check Enable Failover checkbox and enter it’s physical properties. If both the primary and secondary servers are offline the Return to Online settings determines the retry frequency.
View Driver Interface Failover for more information and and video demonstrating communications failover.
Note: Data that is to be published to the AWS IoT Gateway can be buffered during network failures by setting the Enable Store and Forward property to true. Define the path for the buffer files under Configure-Options-Store and Forward.
Click Add Driver on the top left.
There are 2 ways to publish data from OAS to AWS IoT Gateway. Both require Tags to be setup first for the data sources you want to transfer.
Note: If you wish to receive data from AWS IoT Gateway see Getting Started – AWS IoT Gateway under the Data Sources.
Enable Publish Selected Tags at the bottom of the Driver configuration.
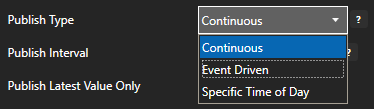
Select to publish data continuously at a specified interval, based on event, or at a specific time of day.
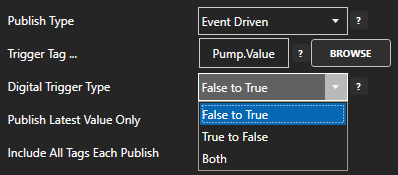
If Event Driven browse for a local or remote OAS tag that will trigger the publish. Select a Boolean tag that will change state from false to true, true to false, or both. Or choose an Integer tag that trigger a publish anytime the value changes other than 0.
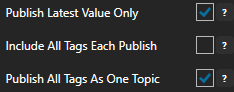
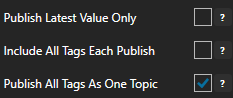
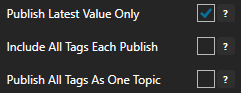
Enable Publish Latest Value Only to send only the latest value of each tag when published or disable to send all value changes since the last time a publish occurred.
Enabled Include All Tags Each Publish to send at least the latest value of each tag when published or disable to only send the tags that have changed since the last publish.
Enable Publish All Tags As One Topic to publish all tag values as one topic or disable to send each tag as its own topic.
See examples in Step 6 below for each selectable option.
Specify the Publish Topic Id if choosing to Publish All Tags As One Topic.
Specify the Tag Id, Value Id, an optional Quality Id, and Timestamp Id for each tag value that is sent.
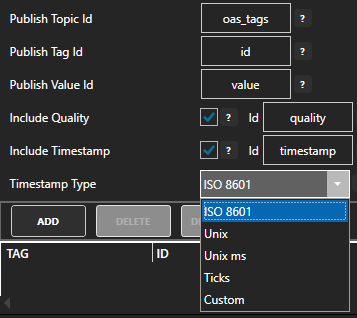
When including the Timestamp Id also specify the timestamp format, use Custom to specify your own date and time format.
Specify local and remote OAS tag variables to include in each publish and specify the Id. Value is the current value from the data source or you can select any of the over 600 tag variables of each tag to publish.
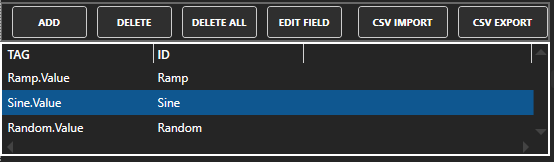
Optionally use CSV Export and CSV Import buttons to set up additional tags to publish using Microsoft Excel.
When selecting remote tags use Basic Networking syntax or Live Data Cloud syntax in the tag path.
Select Apply Changes to begin publishing to AWS IoT Gateway. Select Save to save the new driver configuration within the tag file.
Examples of publishing every 2 seconds with each tag value changing every second:
See Getting Started – Data Route to define a Target tag in any source tag.
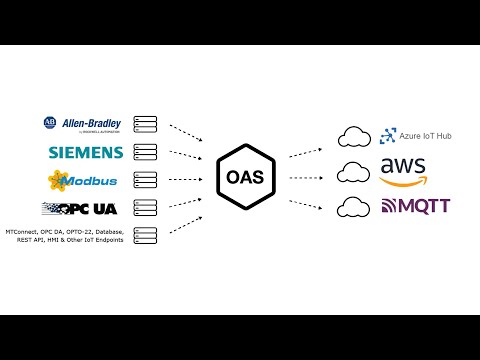
The OAS Platform offers support for handling and manipulating JSON formatted data. The articles below are guides to working with OAS and JSON.


Open Automation Software Tags can be defined to interface with AWS IoT Gateway with the built in AWS IoT Gateway Driver Interface. This tutorial walks you though downloading and installing OAS, configuring an AWS IoT Gateway driver, configuring tags and storing them as JSON packets. You may want to start by reading our What is JSON article.
If you have not already done so, you will need to download and install the OAS platform. Fully functional trial versions of the software are available for Windows, Windows IoT Core, Linux, Raspberry Pi and Docker on our downloads page.
On Windows run the downloaded Setup.exe file to install one or more of the Open Automation Software features. Select the default Typical installation if you are not sure what features to use or the Custom installation if you want to save disk space on the target system. When prompted agree to the End User License Agreement to continue the installation.
For more detailed instructions and video tutorials, visit the installation guide for your system:
Windows Installation | Linux Installation | Raspberry Pi Installation | Dockers Installation
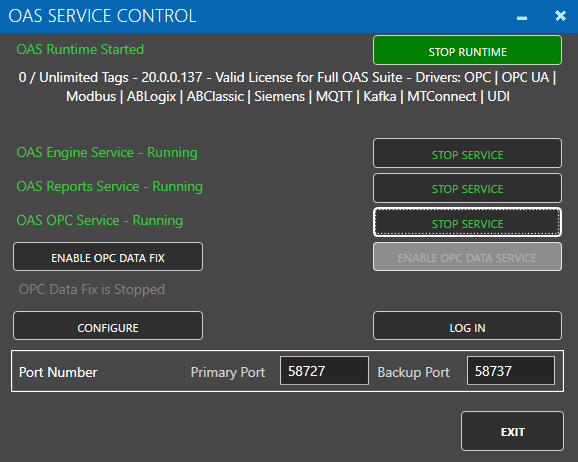
The OAS Service Control application will appear when the installation finishes on Windows. Use this application to start the 3 Services. Run the Configure OAS application on Windows and select Configure-Tags; if the first time running, the AdminCreate utility will run to create an Administrator login as shown in Step 1 of Getting Started – Security.

For more detailed instructions on configuring your AWS IoT Gateway data source, click here to see our Getting Started AWS IoT Gateway tutorial.
To add a Tag manually:


For more detailed instructions on configuring your tags, click here to see our Getting Started Tags tutorial.
Create a new tag and set it’s Data Type and Data Source to JSON. Click Ok.

Click the Edit Value button next to the Structure input field.

Enter in your JSON structure.
{
"pump": false,
"tanks": [
{
"room": 1,
"level": null,
"flowrate": null,
},
{
"room": 2,
"level": null,
"flowrate": null,
}
]
}
Click the Add button.
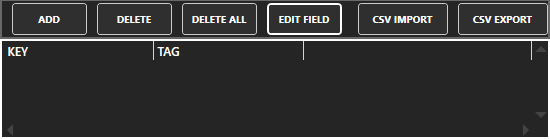
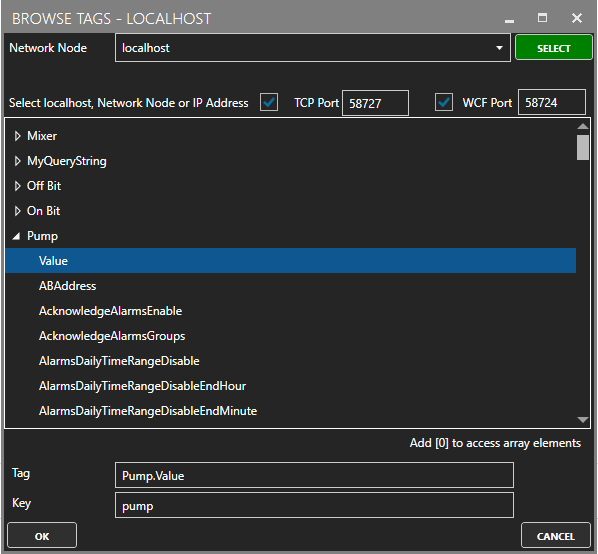
The tag browser will open. Select your Network Node. Select the tag and it’s property that you want to fill your key/value pair with. In the Key field enter the key you want to reference. Do this for each key/value pair that you want to fill.
After you are done adding your tags, your results will look like:

Click Apply Changes.
For more detailed instructions, see the JSON Data Source article in our knowledge base.

Open Automation Software Tags can be defined to connect to OPC UA Servers with the built in OPC UA Driver Interface. This tutorial walks you though downloading and installing OAS, configuring an OPC UA driver, configuring tags and storing them as JSON packets. You may want to start by reading our What is JSON article.
If you have not already done so, you will need to download and install the OAS platform. Fully functional trial versions of the software are available for Windows, Windows IoT Core, Linux, Raspberry Pi and Docker on our downloads page.
On Windows run the downloaded Setup.exe file to install one or more of the Open Automation Software features. Select the default Typical installation if you are not sure what features to use or the Custom installation if you want to save disk space on the target system. When prompted agree to the End User License Agreement to continue the installation.
For more detailed instructions and video tutorials, visit the installation guide for your system:
Windows Installation | Linux Installation | Raspberry Pi Installation | Dockers Installation
The OAS Service Control application will appear when the installation finishes on Windows. Use this application to start the 3 Services. Run the Configure OAS application on Windows and select Configure-Tags; if the first time running, the AdminCreate utility will run to create an Administrator login as shown in Step 1 of Getting Started – Security.
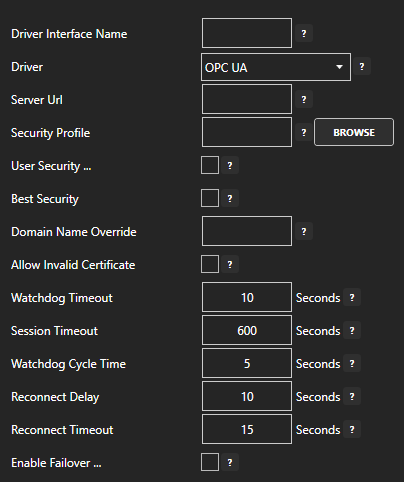
For more detailed instructions on configuring your OPC DA data source, click here to see our Getting Started OPC UA tutorial.
To add a Tag manually:
For more detailed instructions on configuring your tags, click here to see our Getting Started Tags tutorial.
Create a new tag and set it’s Data Type and Data Source to JSON. Click Ok.
Click the Edit Value button next to the Structure input field.
Enter in your JSON structure.
{
"pump": false,
"tanks": [
{
"room": 1,
"level": null,
"flowrate": null,
},
{
"room": 2,
"level": null,
"flowrate": null,
}
]
}
Click the Add button.
The tag browser will open. Select your Network Node. Select the tag and it’s property that you want to fill your key/value pair with. In the Key field enter the key you want to reference. Do this for each key/value pair that you want to fill.
After you are done adding your tags, your results will look like:
Click Apply Changes.
For more detailed instructions, see the JSON Data Source article in our knowledge base.

Open Automation Software Tags can be defined to connect to Classic OPC Data Access 2.xx and 3.0 Servers with the built in OPC Interface. This tutorial walks you though downloading and installing OAS, configuring tags from your OPC Server and and storing them as JSON packets. You may want to start by reading our What is JSON article.
If you have not already done so, you will need to download and install the OAS platform. Fully functional trial versions of the software are available for Windows, Windows IoT Core, Linux, Raspberry Pi and Docker on our downloads page.
On Windows run the downloaded Setup.exe file to install one or more of the Open Automation Software features. Select the default Typical installation if you are not sure what features to use or the Custom installation if you want to save disk space on the target system. When prompted agree to the End User License Agreement to continue the installation.
For more detailed instructions and video tutorials, visit the installation guide for your system:
Windows Installation | Linux Installation | Raspberry Pi Installation | Dockers Installation
The OAS Service Control application will appear when the installation finishes on Windows. Use this application to start the 3 Services. Run the Configure OAS application on Windows and select Configure-Tags; if the first time running, the AdminCreate utility will run to create an Administrator login as shown in Step 1 of Getting Started – Security.


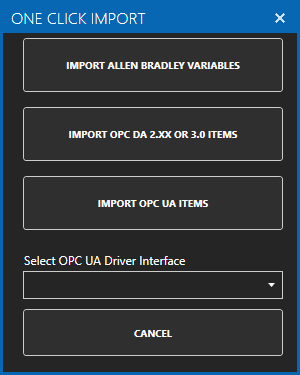
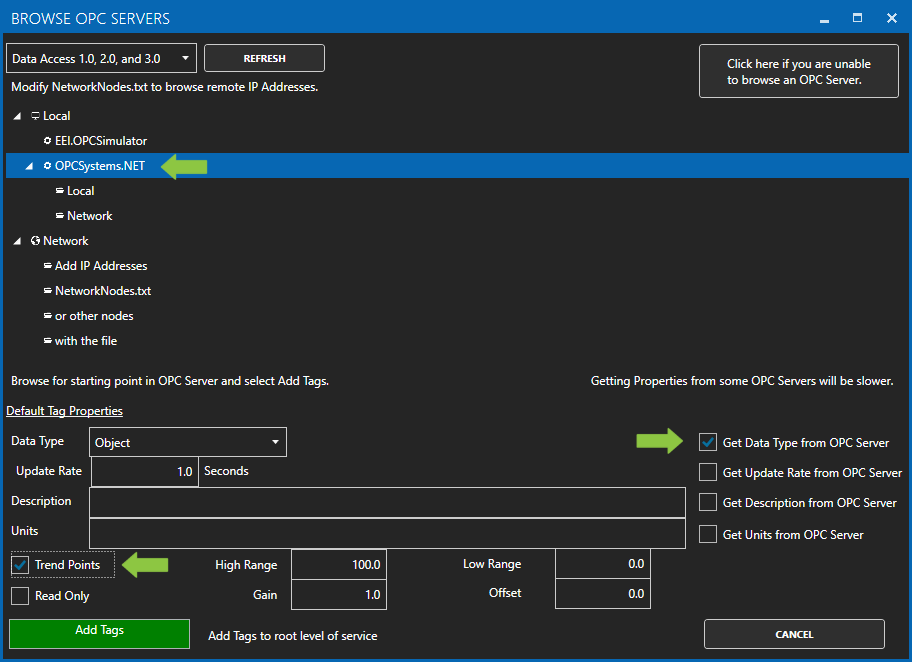
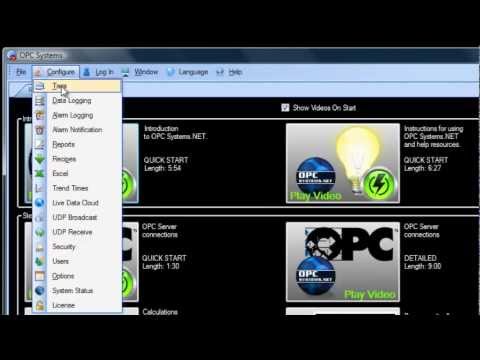
For more detailed instructions on Configuring OPC Server Tags, visit our Getting Started OPC tutorial or the One Click OPC tutorial or watch the video tutorial below:
Create a new tag and set it’s Data Type and Data Source to JSON. Click Ok.
Click the Edit Value button next to the Structure input field.
Enter in your JSON structure.
{
"pump": false,
"tanks": [
{
"room": 1,
"level": null,
"flowrate": null,
},
{
"room": 2,
"level": null,
"flowrate": null,
}
]
}
Click the Add button.
The tag browser will open. Select your Network Node. Select the tag and it’s property that you want to fill your key/value pair with. In the Key field enter the key you want to reference. Do this for each key/value pair that you want to fill.
After you are done adding your tags, your results will look like:
Click Apply Changes.
For more detailed instructions, see the JSON Data Source article in our knowledge base.