Typical OAS Deployment Architectures

The Open Automation Software is a flexible, configuration based data platform with a virtually unlimited number of possible use cases and solution implementations. In these situations it is useful to keep in mind some common patterns and best practices around concepts such as performance, security, reliability and redundancy. The Distributed Network Architecture (DNA) means OAS can operate across network boundaries and between private and public networks.

Below is a list of some possible OAS architectures and deployment types to cater for many different use cases.

Concentrator

The Concentrator architecture relies on a single OAS instances for connecting to all of your data sources and also hosts all of your data destinations such as data logging and HMI integration. This architecture can be adjusted for redundancy by adding additional instances and exchanging data between them. This architecture works great when you have a simple network, all of your field devices connect directly to a central server and you do not have any requirements for data processing, logging or visualization at the edge.

Edge

The Edge architecture is commonly used when you have multiple remote sites, each on separate edge networks with multiple field devices at each site, and a centralized operations centre. Each edge location can be licensed for a different number of tags, products and drivers, or you can share features across all edge instances and distribute the tags using flex tag licensing. This means you can configure each edge for local requirements as well as facilitate remote data transfer to a centralized location using the OAS Basic Networking feature. Licenses are typically applied at the edge and the centralized OAS instance acts as a data gateway.

An important benefit of this architecture is that the edge OAS instances can be configured to store and forward data in case of loss of networking. This means not only is data encrypted and compressed in transit, there will also be zero data loss.

Protocol Converter

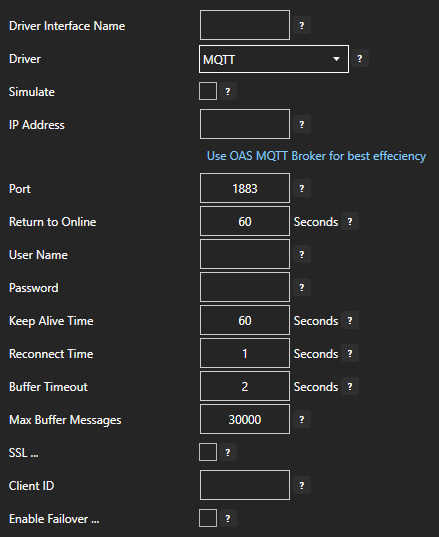
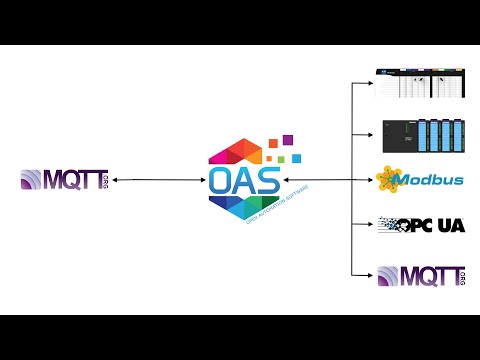
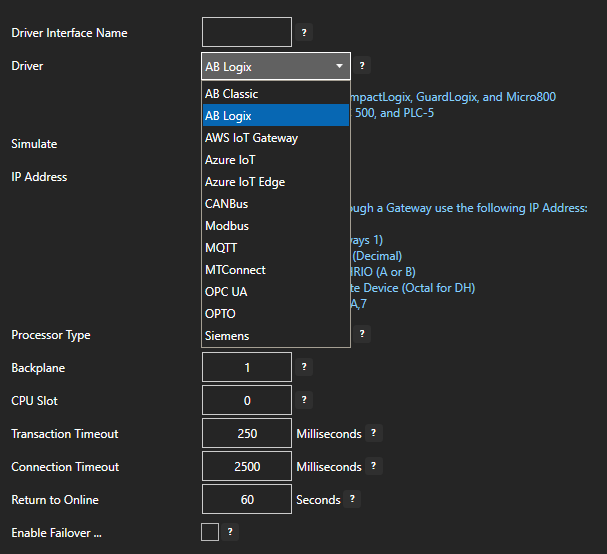
The Protocol Converter architecture is designed to allow you to move data between devices that use different protocols and to move data from a device directly into the Cloud. You can use any of the OAS supported protocols to read and write your data, such as Allen Bradley, Modbus, MTConnect, OPC UA/DA and Siemens. For Cloud connectivity, OAS supports AWS IoT, Azure IoT, Kafka and generic MQTT messaging.

This architecture uses the Data Route feature to move data from one set of tags to another or to publish data from a set of tags into the Cloud. The Data Route feature handles the data routing without writing any code. For more information see this article on IIot Data Transfer.

IT/OT

The IT/OT architecture is a typical 2-tier networking arrangement for segregation of OT and IT networks where the OAS instance in the OT network is deployed as a concentrator or edge deployment and an additional OAS instance is deployed in a DMZ to make data available to the IT network.

Depending on the security requirements, you can use a number of different configurations to achieve this architecture. If your DMZ OAS instance is simply acting as a data router, clients connecting to the DMZ OAS instance can use standard Basic Networking remote tag notation to reference the OT instance tag names. This way you only need to license the tags on your OT instance, but note that this does not support store-and-forward in case of networking loss.

If you want a copy of your data in the DMZ OAS instance, you will need to replicate the tags stored in the OT OAS instance. You can choose the method that suits you best:

  • If you want the tags to be read-only in the DMZ then you can use the “Tag” Data Source (Basic Networking). Note that this does not support store-and-forward.
  • If you want data to be read-write you can use a Proxy configuration (Live Data Cloud). Note that this does not support store-and-forward.
  • If you want fine-tuned control over which data is copied and when it is copied you can use the Data Route feature on the OT instance to push the data to the DMZ.
  • If you require a highly isolated OT network with no overlap, you can use the Unidirectional configuration (Unidirectional Network Gateway) to push data directly from the OT network into a DMZ or the IT network in a one-way data configuration.
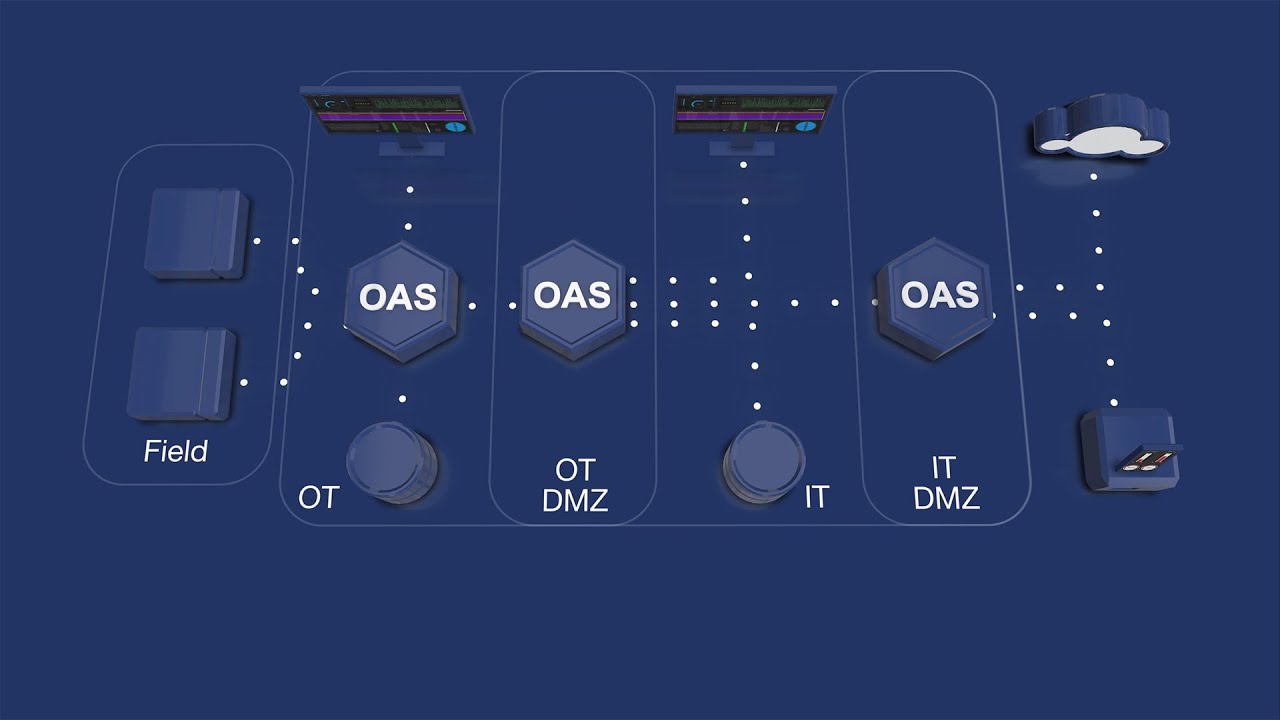
3-Tier

The 3-Tier architecture is similar to the IT/OT architecture outlined above, except that it also introduces an IT DMZ with a third, public facing OAS instance. All of the details explained in the IT/OT architecture apply to this, but the 3-Tier architecture would be used if you require integration with external clients or third-party Cloud platforms (AWS IoT, Azure IoT and MQTT).

You can move data into your IT DMZ OAS instance using the same principles explained in the IT/OT architecture. Using the Proxy configuration (Live Data Cloud), you can create an alias that represents your OT DMZ instance and thus make the tag data available to external clients using the tag path notation shown in the Proxy architecture below.

Cloud IoT integrations can be achieved using the “Publish Tags” functionality to push messages to the Cloud. You do not have to replicate the tags license in the IT DMZ as it can remotely access the tag data via the OT DMZ OAS instance.

Proxy

The Proxy architecture provides a hosted OAS instance, typically in a DMZ, that acts as a proxy between other networks, external networks or public clients and internal OAS instances. This architecture typically uses Live Data Cloud and can supplement other internal architectures such as Concentrator, Edge and IT/OT.

Using Basic Networking, the OAS instance acts as a data router allowing clients to request data from remote OAS instances without having to directly talk to a remote instance. This is very similar to the IT/OT architecture, but in this architecture only the instance in the DMZ is required to have a static IP. The internal instances can have dynamic IPs and will automatically register themselves with the OAS instance in the DMZ using an alias. Clients can use the alias of the instance they want to request data from as a prefix in the tag path as shown in the Live Data Cloud remote tag access documentation.

Unidirectional

The Unidirectional architecture is designed to protect your vital, safety critical networks by only allowing data to flow in one direction. It works by using a broadcast style protocol called UDP to send data out of the vital network and into one or more non-vital networks based on a simple IP/host and port number configuration. Since UDP does not require acknowledgement, no traffic is required to flow back into the vital network.

This feature, called Unidirectional Network Gateway or UDP Broadcast, is specifically designed for highly critical systems such as nuclear power plants, military networks and other types of safety systems. The main aim of this architecture is to mitigate against network based attacks and remote configuration changes.

Embedded

The Embedded architecture is used when OAS is hosted on a device that supports a Windows IoT or Linux operating system (such as Raspberry Pi) and provides on-board or locally connect I/O capabilities. This allows you to create an all-in-one IoT device powered by OAS and is typically used by OEMs.

This instantly gives you all of the features that OAS can provide including data logging and buffering, alarm management and notifications, REST API and an HMI using UIEngine. With private labelling and the OAS configuration API you can hide OAS and make the device your own product.

How To Read and Write Live Data with the OAS REST API

Open Automation SoftwareREST API

The OAS REST API exposes functionality for reading and writing real-time and historical Tag Data, Trend Data, and Alarms. The API can also be used for managing OAS Server configurations.

Under the Networking tab, locate the field for REST API/WebHMI Port Number. The default is 58725 but can be changed. If you are accessing the server from a remote client, you will also need to make sure your machine and/or company firewalls allow TCP traffic on the selected port.

OAS REST API Online Documentation

You can view the full documentation for the OAS REST API at https://restapi.openautomationsoftware.com. It details all of the operations available to any REST API client and can be tested using the Postman application client. In the upper right corner of the documentation, you will see a button to Run in Postman, which will install the API documentation into the Postman client for direct execution against any OAS server. 


For more information about using the OAS REST API with Postman, see our Getting Started – REST API tutorial or watch the video below:

To start you will need to authenticate a session with the REST API, generating a clientid and credential token to use in all subsequent calls. The credentials posted in this operation must be configured in OAS Security settings on the server. To learn more about configuring security, see out Getting Started – Security tutorial in the knowledge base. To use the server’s default credentials, pass an empty string for both username and password fields, but only if the server is configured with the Default user group allowing access to operations.

<!DOCTYPE html>
<html lang="en">
<head>
<meta charset="utf-8"/>
    <title>REST Client</title>
    <script src="https://code.jquery.com/jquery-3.1.1.min.js"></script>
    <script type="text/javascript">
    $(document).ready(function() {
        $.ajax({
            url: "http://localhost:58725/OASREST/v2/authenticate",
            type: "POST",
            contentType: "application/json; charset=utf-8", 
            crossDomain: true,
            dataType: "json",
            data: '{"username": "", "password": ""}',
            success: function(r) {
                // display the response status code and text
                $('#displaythis').append("Status: "+ r.status +"<br>");
                $('#displaythis').append("Client ID: "+ r.data.clientid +"<br>");
                $('#displaythis').append("Token: "+ r.data.token +"<br>");
            }
        });
    })
    </script>
</head>
    <body>        
        <div id='displaythis'></div>
    </body>
</html>

How to Send MTConnect Alarm Notifications via SMS Text or Email

How to Send MTConnect Alarm Notifications via SMS Text or Email


Open Automation Software Tags can be defined to connect to MTConnect Servers with the built in MTConnect Driver Interface. This tutorial walks you though downloading and installing OAS, configuring an MTConnect driver, configuring tags, configuring alarm limits and configuring alarm notifications. Alarms notifications can be sent via e-mail, SMS text or voice to users based on specific filter criteria.

Step 1. Download and Install the Open Automation Software and Start the OAS Service

If you have not already done so, you will need to download and install the OAS platform.  Fully functional trial versions of the software are available for Windows, Windows IoT Core, Linux, Raspberry Pi and Docker on our downloads page.

On Windows run the downloaded Setup.exe file to install one or more of the Open Automation Software features. Select the default Typical installation if you are not sure what features to use or the Custom installation if you want to save disk space on the target system.  When prompted agree to the End User License Agreement to continue the installation.

For more detailed instructions and video tutorials, visit the installation guide for your system:
Windows Installation | Linux Installation | Raspberry Pi Installation | Dockers Installation

The OAS Service Control application will appear when the installation finishes on Windows.  Use this application to start the 3 Services. Run the Configure OAS application on Windows and select Configure-Tags; if the first time running, the AdminCreate utility will run to create an Administrator login as shown in Step 1 of Getting Started – Security.


Step 2. Configure Your MTConnect Data Source

  1. First, you will need to open the Configure OAS application from the program group Open Automation Software.

  2. Select Configure >> License from the top menu and verify that MTConnect is one of the available Drivers in the lower left of the form. The demo license will have this by default. If you do not see MTConnect available, contact support@openautomationsoftware.com to update your license.

  3. Select Configure >> Drivers from the top menu.


  4. Select localhost or the remote service you wish to modify with the Select button to the right of the Network Node list.


  5. The Configure Drivers Screen will appear. Select MTConnect from the Driver dropdown box.


  6. Enter a meaningful Driver Interface Name that you will refer to this physical connection when defining Tags with a MTConnect Data Source.

  7. Leave Enable and Add Tags Automatically enabled.

  8. Specify the Live Data Url for the MTConnect stream.

  9. Click the Add Driver button above the Driver list in the left pane to add the Driver Interface as an available selection when defining Tags in the next step.

For more detailed instructions on configuring your MTConnect data source, click here to see our Getting Started MTConnect tutorial or watch the video tutorial below:


Step 3. Configure Your Tags

OAS provides multiple ways to add and define tags:

To add a Tag manually:

  1. In the OAS Configure Application, select Configure >> Tags from the top menu.


  2. Select localhost or the remote service you wish to modify with the Select button to the right of the Network Node list.


  3. Click on the Add Tag button located at the top of the Tag browser on the left portion of the screen.


  4. A dialog box will appear. Enter a name for your new tag and click ok.

  5. A configuration screen will appear for your new tag. Select your data source type in in the Data Source dropdown box.


  6. Specify the correct data type in the Data Type dropdown box.

  7. Click Apply Changes at the bottom right of the window.

For more detailed instructions on configuring your tags, click here to see our Getting Started Tags tutorial.


Step 4. Configure Alarm Limits

  1. In the OAS Configure Application, select Configure >> Tags from the top menu.


  2. Select localhost or the remote service you wish to modify with the Select button to the right of the Network Node list.


  3. Select the tag you wish to set alarm limits for from the tag browser on the left.

  4. Use the tabs at the top of the tag properties window to configure alarm limits for your tag based on type: High High, High, Low, Low Low, Digital and Rate of Change.


  5. Check the Enable Alarm checkbox to enabling your alarm limit; alternately, you can use he Enable with Tag…checkbox.


  6. Set your Alarm Limit Source with the dropdown box. If you choose Value, enter the value in the provided text field.

  7. When you have finished configuring your alarm limits, click Apply Changes in the bottom right of the properties window.

For More detailed instructions on Configuring Alarm Limits, visit our Alarm Limits tutorial or watch the video below:


Step 5. Configure Alarm Notifications

  1. In the OAS Configure Application, select Configure >> Alarm Notification from the top menu.


  2. Select localhost or the remote service you wish to log alarms from with the Select button to the right of the Network Node list.


  3. A Notifcation Group screen will appear. Give your group a meaningful name in the Notification Group Name box.

  4. In the Common tab, check Notification Active to activate your group. Alternately, check Enable Notification with Tag… and choose a tag with the Browse button that appears.

  5. Use the Filters tab to select which types of alarms you want in this group. Alarms can be filtered based on Alarm Priority, Alarm Groups, and Alarm Types.

  6. Use the Email tab to configure alarm notification via email.

  7. Use the SMS tab to configure alarm notification via text. You will need to create an account with Twilio (www.twilio.com) to handle SMS/Voice notifactions.

  8. Once you have finished configuring your notification group, click the Add Group button in the left panel to add your new group.

For more detailed instructions on Configuring Alarm Notifications, visit our Getting Started – Alarm Notification tutorial or watch the video below:


How to Log MTConnect Alarms to a Database

How to Log MTConnect Alarms to a Database

Open Automation Software Tags can be defined to connect to MTConnect Servers with the built in MTConnect Driver Interface. This tutorial walks you though downloading and installing OAS, configuring an MTConnect driver, configuring tags, configuring alarm limits and logging alarms to a database. Supported databases include SQL Server, Oracle, Access, PostgreSQL, Cassandra, MongoDB, MariaDB, SQLite, InfluxDB, MySQL, SQL Azure, Amazon Aurora, Amazon RDS, and CSV files.

Step 1. Download and Install the Open Automation Software and Start the OAS Service

If you have not already done so, you will need to download and install the OAS platform.  Fully functional trial versions of the software are available for Windows, Windows IoT Core, Linux, Raspberry Pi and Docker on our downloads page.

On Windows run the downloaded Setup.exe file to install one or more of the Open Automation Software features. Select the default Typical installation if you are not sure what features to use or the Custom installation if you want to save disk space on the target system.  When prompted agree to the End User License Agreement to continue the installation.

For more detailed instructions and video tutorials, visit the installation guide for your system:
Windows Installation | Linux Installation | Raspberry Pi Installation | Dockers Installation

The OAS Service Control application will appear when the installation finishes on Windows.  Use this application to start the 3 Services. Run the Configure OAS application on Windows and select Configure-Tags; if the first time running, the AdminCreate utility will run to create an Administrator login as shown in Step 1 of Getting Started – Security.


Step 2. Configure Your MTConnect Data Source

  1. First, you will need to open the Configure OAS application from the program group Open Automation Software.
  2. Select Configure >> License from the top menu and verify that MTConnect is one of the available Drivers in the lower left of the form. The demo license will have this by default. If you do not see MTConnect available, contact support@openautomationsoftware.com to update your license.
  3. Select Configure >> Drivers from the top menu.

  4. Select localhost or the remote service you wish to modify with the Select button to the right of the Network Node list.

  5. The Configure Drivers Screen will appear. Select MTConnect from the Driver dropdown box.

  6. Enter a meaningful Driver Interface Name that you will refer to this physical connection when defining Tags with a MTConnect Data Source.
  7. Leave Enable and Add Tags Automatically enabled.
  8. Specify the Live Data Url for the MTConnect stream.
  9. Click the Add Driver button above the Driver list in the left pane to add the Driver Interface as an available selection when defining Tags in the next step.

For more detailed instructions on configuring your MTConnect data source, click here to see our Getting Started MTConnect tutorial or watch the video tutorial below:


Step 3. Configure Your Tags

OAS provides multiple ways to add and define tags:

To add a Tag manually:

  1. In the OAS Configure Application, select Configure >> Tags from the top menu.

  2. Select localhost or the remote service you wish to modify with the Select button to the right of the Network Node list.

  3. Click on the Add Tag button located at the top of the Tag browser on the left portion of the screen.

  4. A dialog box will appear. Enter a name for your new tag and click ok.
  5. A configuration screen will appear for your new tag. Select your data source type in in the Data Source dropdown box.

  6. Specify the correct data type in the Data Type dropdown box.
  7. Click Apply Changes at the bottom right of the window.

For more detailed instructions on configuring your tags, click here to see our Getting Started Tags tutorial.


Step 4. Configure Alarm Limits

  1. In the OAS Configure Application, select Configure >> Tags from the top menu.

  2. Select localhost or the remote service you wish to modify with the Select button to the right of the Network Node list.

  3. Select the tag you wish to set alarm limits for from the tag browser on the left.
  4. Use the tabs at the top of the tag properties window to configure alarm limits for your tag based on type: High High, High, Low, Low Low, Digital and Rate of Change.

  5. Check the Enable Alarm checkbox to enabling your alarm limit; alternately, you can use he Enable with Tag…checkbox.

  6. Set your Alarm Limit Source with the dropdown box. If you choose Value, enter the value in the provided text field.
  7. When you have finished configuring your alarm limits, click Apply Changes in the bottom right of the properties window.

For More detailed instructions on Configuring Alarm Limits, visit our Alarm Limits tutorial or watch the video below:


Step 5. Configure Alarm Logging

  1. In the OAS Configure Application, select Configure >> Alarm Logging from the top menu.

  2. Select localhost or the remote service you wish to log alarms from with the Select button to the right of the Network Node list.

  3. A Logging Group screen will appear.

  4. In the Common tab, check the Logging Active checkbox to enable your group. Alternately, you can activate logging with a tag by checking that box.
  5. Use the Filters tab to select which alarms you wish to log with your group. Filtering can be done by alarm state, alarm limit, priority, groups and alarm type.
  6. In the Database tab, you will select what type of database you will be logging to and enter the connection parameters. OAS can log to SQL Server, Oracle, Access, PostgreSQL, Cassandra, MongoDB, MariaDB, SQLite, InfluxDB, and MySQL.
  7. If you wish to log to CSV, you would configure that in the CVS Logging tab.
  8. When you have finished configuring your logging group, click Add Group in the left panel to add your new group to the service.

For more detailed instructions on Configuring Alarm Logging, visit our Getting Started – Alarm Logging tutorial or watch the video below:


How to Log MQTT Alarms to a Database

How to Log MQTT Alarms to a Database

Open Automation Software Tags can be defined to connect to MQTT devices and software brokers with the built in MQTT Driver Interface. This tutorial walks you though downloading and installing OAS, configuring an MQTT driver, configuring tags, configuring alarm limits and logging alarms to a database. Supported databases include SQL Server, Oracle, Access, PostgreSQL, Cassandra, MongoDB, MariaDB, SQLite, InfluxDB, MySQL, SQL Azure, Amazon Aurora, Amazon RDS, and CSV files.

Step 1. Download and Install the Open Automation Software and Start the OAS Service

If you have not already done so, you will need to download and install the OAS platform.  Fully functional trial versions of the software are available for Windows, Windows IoT Core, Linux, Raspberry Pi and Docker on our downloads page.

On Windows run the downloaded Setup.exe file to install one or more of the Open Automation Software features. Select the default Typical installation if you are not sure what features to use or the Custom installation if you want to save disk space on the target system.  When prompted agree to the End User License Agreement to continue the installation.

For more detailed instructions and video tutorials, visit the installation guide for your system:
Windows Installation | Linux Installation | Raspberry Pi Installation | Dockers Installation

The OAS Service Control application will appear when the installation finishes on Windows.  Use this application to start the 3 Services. Run the Configure OAS application on Windows and select Configure-Tags; if the first time running, the AdminCreate utility will run to create an Administrator login as shown in Step 1 of Getting Started – Security.


Step 2. Configure Your MQTT Data Source

  1. First, you will need to open the Configure OAS application from the program group Open Automation Software.
  2. Select Configure >> License from the top menu and verify that MQTT is one of the available Drivers in the lower left of the form. The demo license will have this by default. If you do not see MQTT available, contact support@openautomationsoftware.com to update your license.
  3. Select Configure >> Drivers from the top menu.

  4. Select localhost or the remote service you wish to modify with the Select button to the right of the Network Node list.

  5. The Configure Drivers Screen will appear. Select MQTT from the Driver dropdown box.

  6. Enter a meaningful Driver Interface Name that you will refer to this physical connection when defining Tags with a MQTT Data Source.
  7. Enter the IP Address of the broker. The default port is 1883.
  8. Enter the User Name and Password if required.
  9. Set the Keep Alive Time. The default is 60 Seconds.
  10. Set the Reconnect Time. The default 10 Seconds. If the connection to the broker is lost the Reconnect Time determines how long to wait before attempting to reconnect.

For more detailed instructions on configuring your MQTT data source, click here to see our Getting Started MQTT tutorial or watch the video tutorial below:


Step 3. Configure Your Tags

OAS provides multiple ways to add and define tags:

To add a Tag manually:

  1. In the OAS Configure Application, select Configure >> Tags from the top menu.

  2. Select localhost or the remote service you wish to modify with the Select button to the right of the Network Node list.

  3. Click on the Add Tag button located at the top of the Tag browser on the left portion of the screen.

  4. A dialog box will appear. Enter a name for your new tag and click ok.
  5. A configuration screen will appear for your new tag. Select your data source type in in the Data Source dropdown box.

  6. Specify the correct data type in the Data Type dropdown box.
  7. Click Apply Changes at the bottom right of the window.

For more detailed instructions on configuring your tags, click here to see our Getting Started Tags tutorial.


Step 4. Configure Alarm Limits

  1. In the OAS Configure Application, select Configure >> Tags from the top menu.

  2. Select localhost or the remote service you wish to modify with the Select button to the right of the Network Node list.

  3. Select the tag you wish to set alarm limits for from the tag browser on the left.
  4. Use the tabs at the top of the tag properties window to configure alarm limits for your tag based on type: High High, High, Low, Low Low, Digital and Rate of Change.

  5. Check the Enable Alarm checkbox to enabling your alarm limit; alternately, you can use he Enable with Tag…checkbox.

  6. Set your Alarm Limit Source with the dropdown box. If you choose Value, enter the value in the provided text field.
  7. When you have finished configuring your alarm limits, click Apply Changes in the bottom right of the properties window.

For More detailed instructions on Configuring Alarm Limits, visit our Alarm Limits tutorial or watch the video below:


Step 5. Configure Alarm Logging

  1. In the OAS Configure Application, select Configure >> Alarm Logging from the top menu.

  2. Select localhost or the remote service you wish to log alarms from with the Select button to the right of the Network Node list.

  3. A Logging Group screen will appear.

  4. In the Common tab, check the Logging Active checkbox to enable your group. Alternately, you can activate logging with a tag by checking that box.
  5. Use the Filters tab to select which alarms you wish to log with your group. Filtering can be done by alarm state, alarm limit, priority, groups and alarm type.
  6. In the Database tab, you will select what type of database you will be logging to and enter the connection parameters. OAS can log to SQL Server, Oracle, Access, PostgreSQL, Cassandra, MongoDB, MariaDB, SQLite, InfluxDB, and MySQL.
  7. If you wish to log to CSV, you would configure that in the CVS Logging tab.
  8. When you have finished configuring your logging group, click Add Group in the left panel to add your new group to the service.

For more detailed instructions on Configuring Alarm Logging, visit our Getting Started – Alarm Logging tutorial or watch the video below:


How to Log Allen Bradley Alarms to a Database

How to Log Allen Bradley Alarms to a Database

Open Automation Software Tags can be defined to connect directly to Allen Bradley controllers with the built in ABLogix and ABClassic Driver Interfaces which support communications over Ethernet to ControlLogix, CompactLogix, GuardLogix, and Micro800 with the ABLogix driver, and MicroLogix, SLC 500, and PLC-5 with the ABClassic driver. This tutorial walks you though downloading and installing OAS, configuring an Allen Bradley driver, configuring tags, configuring alarm limits and logging alarms to a database. Supported databases include SQL Server, Oracle, Access, PostgreSQL, Cassandra, MongoDB, MariaDB, SQLite, InfluxDB, MySQL, SQL Azure, Amazon Aurora, Amazon RDS, and CSV files.

Step 1. Download and Install the Open Automation Software and Start the OAS Service

If you have not already done so, you will need to download and install the OAS platform.  Fully functional trial versions of the software are available for Windows, Windows IoT Core, Linux, Raspberry Pi and Docker on our downloads page.

On Windows run the downloaded Setup.exe file to install one or more of the Open Automation Software features. Select the default Typical installation if you are not sure what features to use or the Custom installation if you want to save disk space on the target system.  When prompted agree to the End User License Agreement to continue the installation.

For more detailed instructions and video tutorials, visit the installation guide for your system:
Windows Installation | Linux Installation | Raspberry Pi Installation | Dockers Installation

The OAS Service Control application will appear when the installation finishes on Windows.  Use this application to start the 3 Services. Run the Configure OAS application on Windows and select Configure-Tags; if the first time running, the AdminCreate utility will run to create an Administrator login as shown in Step 1 of Getting Started – Security.


Step 2. Configure Your Allen Bradley Data Source

  1. First, you will need to open the Configure OAS application from the program group Open Automation Software.
  2. Select Configure >> License from the top menu and verify that Allen Bradley is one of the available Drivers in the lower left of the form. The demo license will have this by default. If you do not see Allen Bradley available, contact support@openautomationsoftware.com to update your license.
  3. Select Configure >> Drivers from the top menu.

  4. Select localhost or the remote service you wish to modify with the Select button to the right of the Network Node list.

  5. The Configure Drivers Screen will appear. Select either AB Classic for MicroLogix, SLC 500, and PLC-5 or AB Logic for ControlLogix, CompactLogix, GuardLogix, and Micro800 from the Driver dropdown box.

  6. Enter a meaningful Driver Interface Name that you will refer to this physical connection when defining Tags with an Allen Bradley Data Source.
  7. Define the properties for the desired physical connection.
  8. Click the Add Driver button above the Driver list in the left pane to add the Driver Interface as an available selection when defining Tags in the next step.

For more detailed instructions on configuring your Allen Bradley data source, click here to see our Getting Started Allen Bradley tutorial.


Step 3. Configure Your Tags

OAS provides multiple ways to add and define tags:

To add a Tag manually:

  1. In the OAS Configure Application, select Configure >> Tags from the top menu.

  2. Select localhost or the remote service you wish to modify with the Select button to the right of the Network Node list.

  3. Click on the Add Tag button located at the top of the Tag browser on the left portion of the screen.

  4. A dialog box will appear. Enter a name for your new tag and click ok.
  5. A configuration screen will appear for your new tag. Select your data source type in in the Data Source dropdown box.

  6. Specify the correct data type in the Data Type dropdown box.
  7. Click Apply Changes at the bottom right of the window.

For more detailed instructions on configuring your tags, click here to see our Getting Started Tags tutorial.


Step 4. Configure Alarm Limits

  1. In the OAS Configure Application, select Configure >> Tags from the top menu.

  2. Select localhost or the remote service you wish to modify with the Select button to the right of the Network Node list.

  3. Select the tag you wish to set alarm limits for from the tag browser on the left.
  4. Use the tabs at the top of the tag properties window to configure alarm limits for your tag based on type: High High, High, Low, Low Low, Digital and Rate of Change.

  5. Check the Enable Alarm checkbox to enabling your alarm limit; alternately, you can use he Enable with Tag…checkbox.

  6. Set your Alarm Limit Source with the dropdown box. If you choose Value, enter the value in the provided text field.
  7. When you have finished configuring your alarm limits, click Apply Changes in the bottom right of the properties window.

For More detailed instructions on Configuring Alarm Limits, visit our Alarm Limits tutorial or watch the video below:


Step 5. Configure Alarm Logging

  1. In the OAS Configure Application, select Configure >> Alarm Logging from the top menu.

  2. Select localhost or the remote service you wish to log alarms from with the Select button to the right of the Network Node list.

  3. A Logging Group screen will appear.

  4. In the Common tab, check the Logging Active checkbox to enable your group. Alternately, you can activate logging with a tag by checking that box.
  5. Use the Filters tab to select which alarms you wish to log with your group. Filtering can be done by alarm state, alarm limit, priority, groups and alarm type.
  6. In the Database tab, you will select what type of database you will be logging to and enter the connection parameters. OAS can log to SQL Server, Oracle, Access, PostgreSQL, Cassandra, MongoDB, MariaDB, SQLite, InfluxDB, and MySQL.
  7. If you wish to log to CSV, you would configure that in the CVS Logging tab.
  8. When you have finished configuring your logging group, click Add Group in the left panel to add your new group to the service.

For more detailed instructions on Configuring Alarm Logging, visit our Getting Started – Alarm Logging tutorial or watch the video below:


How To Authenticate and Use the OAS REST API

AuthenticateOpen Automation SoftwareREST API

The OAS REST API exposes functionality for reading and writing real-time and historical Tag Data, Trend Data, and Alarms. The API can also be used for managing OAS Server configurations.

Configure the Port

To use the OAS REST API you must make sure that the OAS HTTP service is listening on the correct port. Open the OAS Configuration application and select Configure > Options, then select the Network Node and click Select.

Under the Networking tab, locate the field for REST API/WebHMI Port Number. The default is 58725 but can be changed. If you are accessing the server from a remote client, you will also need to make sure your machine and/or company firewalls allow TCP traffic on the selected port.

OAS REST API Online Documentation

You can view the full documentation for the OAS REST API at https://restapi.openautomationsoftware.com. It details all of the operations available to any REST API client and can be tested using the Postman application client. In the upper right corner of the documentation, you will see a button to Run in Postman, which will install the API documentation into the Postman client for direct execution against any OAS server. 

For more information about using the OAS REST API with Postman, see our Getting Started – REST API tutorial or watch the video below:

Authenticate a Session with the REST API

To start you will need to authenticate a session with the REST API, generating a clientid and credential token to use in all subsequent calls. The credentials posted in this operation must be configured in OAS Security settings on the server. To learn more about configuring security, see out Getting Started – Security tutorial in the knowledge base. To use the server’s default credentials, pass an empty string for both username and password fields, but only if the server is configured with the Default user group allowing access to operations.

<!DOCTYPE html>
<html lang="en">
<head>
<meta charset="utf-8"/>
    <title>REST Client</title>
    <script src="https://code.jquery.com/jquery-3.1.1.min.js"></script>
    <script type="text/javascript">
    $(document).ready(function() {
        $.ajax({
            url: "http://localhost:58725/OASREST/v2/authenticate",
            type: "POST",
            contentType: "application/json; charset=utf-8", 
            crossDomain: true,
            dataType: "json",
            data: '{"username": "", "password": ""}',
            success: function(r) {
                // display the response status code and text
                $('#displaythis').append("Status: "+ r.status +"<br>");
                $('#displaythis').append("Client ID: "+ r.data.clientid +"<br>");
                $('#displaythis').append("Token: "+ r.data.token +"<br>");
            }
        });
    })
    </script>
</head>
    <body>        
        <div id='displaythis'></div>
    </body>
</html>

How to Send OPC Server Alarm Notifications via SMS Text or Email

How to Send OPC Server Alarm Notifications via SMS Text or Email

Open Automation Software Tags can be defined to connect to Classic OPC Data Access 2.xx and 3.0 Servers with the built in OPC Interface. This tutorial walks you though downloading and installing OAS, configuring tags from your OPC Server, configuring alarm limits and configuring alarm notifications. Alarms notifications can be sent via e-mail, SMS text or voice to users based on specific filter criteria.

Step 1. Download and Install the Open Automation Software and Start the OAS Service

If you have not already done so, you will need to download and install the OAS platform.  Fully functional trial versions of the software are available for Windows, Windows IoT Core, Linux, Raspberry Pi and Docker on our downloads page.

On Windows run the downloaded Setup.exe file to install one or more of the Open Automation Software features. Select the default Typical installation if you are not sure what features to use or the Custom installation if you want to save disk space on the target system.  When prompted agree to the End User License Agreement to continue the installation.

For more detailed instructions and video tutorials, visit the installation guide for your system:
Windows Installation | Linux Installation | Raspberry Pi Installation | Dockers Installation

The OAS Service Control application will appear when the installation finishes on Windows.  Use this application to start the 3 Services. Run the Configure OAS application on Windows and select Configure-Tags; if the first time running, the AdminCreate utility will run to create an Administrator login as shown in Step 1 of Getting Started – Security.


Step 2. Configure OPC Server Tags

OAS provides multiple ways to add and define tags:

To add a Tag manually:

  1. In the OAS Configure Application, select Configure >> Tags from the top menu.

  2. Select localhost or the remote service you wish to modify with the Select button to the right of the Network Node list.

  3. Click on the Add Tag button located at the top of the Tag browser on the left portion of the screen.

  4. A dialog box will appear. Enter a name for your new tag and click ok.
  5. A configuration screen will appear for your new tag. Select OPC in the Data Source dropdown box.

  6. Use the Browse button to the right of the OPC Item to browse OPC Servers for the desired OPC Item.

  7. Select Local, the desired OPC Server, branch within the OPC Server, and OPC Item and click OK.

  8. Specify the desired OPC Update Rate for the Tag.
  9. Click Apply Changes at the bottom right of the window.

To add Tags with One Click OPC:

  1. In the OAS Configure Application, select Configure >> Tags from the top menu.

  2. Select localhost or the remote service you wish to modify with the Select button to the right of the Network Node list.

  3. To begin the One Click OPC process select the Group you would like to import to in the Tag configuration. If you want to import to the Root Level, select the Tags Group at the top of the tree.
    Then select the One Click Import button on the top menu bar.

  4. Click on the Import OPC DA 2.XX or 3.0 Items Button in the pop up window.

  5. Use the One Click OPC Wizard to browse for a branch as a starting position within an OPC Server or just select the OPC Server name itself to add all items from the selected OPC Server. For the best networking design select OPC Servers from Local even if you are configuring a remote OAS Service.

  6. Select to enable the options to Get Data Type from OPC Server and optionally the Descriptions.
    Additionally if you want to specify to Trend all of the points select Trend Points.
  7. Click Add Tags and it will automatically add all of the OPC Items from the OPC Server Branch you have selected and all of the sub Branches beneath it.
  8. Select the Save button on the toolbar at the top.

For more detailed instructions on Configuring OPC Server Tags, visit our Getting Started OPC tutorial or the One Click OPC tutorial or watch the video tutorial below:


Step 3. Configure Alarm Limits

  1. In the OAS Configure Application, select Configure >> Tags from the top menu.

  2. Select localhost or the remote service you wish to modify with the Select button to the right of the Network Node list.

  3. Select the tag you wish to set alarm limits for from the tag browser on the left.
  4. Use the tabs at the top of the tag properties window to configure alarm limits for your tag based on type: High High, High, Low, Low Low, Digital and Rate of Change.

  5. Check the Enable Alarm checkbox to enabling your alarm limit; alternately, you can use he Enable with Tag…checkbox.

  6. Set your Alarm Limit Source with the dropdown box. If you choose Value, enter the value in the provided text field.
  7. When you have finished configuring your alarm limits, click Apply Changes in the bottom right of the properties window.

For More detailed instructions on Configuring Alarm Limits, visit our Alarm Limits tutorial or watch the video below:


Step 4. Configure Alarm Notifications

  1. In the OAS Configure Application, select Configure >> Alarm Notification from the top menu.

  2. Select localhost or the remote service you wish to log alarms from with the Select button to the right of the Network Node list.

  3. A Notifcation Group screen will appear. Give your group a meaningful name in the Notification Group Name box.
  4. In the Common tab, check Notification Active to activate your group. Alternately, check Enable Notification with Tag… and choose a tag with the Browse button that appears.
  5. Use the Filters tab to select which types of alarms you want in this group. Alarms can be filtered based on Alarm Priority, Alarm Groups, and Alarm Types.
  6. Use the Email tab to configure alarm notification via email.

  7. Use the SMS tab to configure alarm notification via text. You will need to create an account with Twilio (www.twilio.com) to handle SMS/Voice notifactions.

  8. Once you have finished configuring your notification group, click the Add Group button in the left panel to add your new group.

For more detailed instructions on Configuring Alarm Notifications, visit our Getting Started – Alarm Notification tutorial or watch the video below:


How to Send MQTT Alarm Notifications via SMS Text or Email

How to Send MQTT Alarm Notifications via SMS Text or Email

Open Automation Software Tags can be defined to connect to MQTT devices and software brokers with the built in MQTT Driver Interface. If you want to interface OAS with another MQTT Client please see the Getting Started MQTT Broker guide. This tutorial walks you though downloading and installing OAS, configuring an MQTT driver, configuring tags, configuring alarm limits and configuring alarm notifications. Alarms notifications can be sent via e-mail, SMS text or voice to users based on specific filter criteria.

Step 1. Download and Install the Open Automation Software and Start the OAS Service

If you have not already done so, you will need to download and install the OAS platform.  Fully functional trial versions of the software are available for Windows, Windows IoT Core, Linux, Raspberry Pi and Docker on our downloads page.

On Windows run the downloaded Setup.exe file to install one or more of the Open Automation Software features. Select the default Typical installation if you are not sure what features to use or the Custom installation if you want to save disk space on the target system.  When prompted agree to the End User License Agreement to continue the installation.

For more detailed instructions and video tutorials, visit the installation guide for your system:
Windows Installation | Linux Installation | Raspberry Pi Installation | Dockers Installation

The OAS Service Control application will appear when the installation finishes on Windows.  Use this application to start the 3 Services. Run the Configure OAS application on Windows and select Configure-Tags; if the first time running, the AdminCreate utility will run to create an Administrator login as shown in Step 1 of Getting Started – Security.


Step 2. Configure Your MQTT Data Source

  1. First, you will need to open the Configure OAS application from the program group Open Automation Software.
  2. Select Configure >> License from the top menu and verify that MQTT is one of the available Drivers in the lower left of the form. The demo license will have this by default. If you do not see MQTT available, contact support@openautomationsoftware.com to update your license.
  3. Select Configure >> Drivers from the top menu.

  4. Select localhost or the remote service you wish to modify with the Select button to the right of the Network Node list.

  5. The Configure Drivers Screen will appear. Select MQTT from the Driver dropdown box.

  6. Enter a meaningful Driver Interface Name that you will refer to this physical connection when defining Tags with a MQTT Data Source.
  7. Enter the IP Address of the broker. The default port is 1883.
  8. Enter the User Name and Password if required.
  9. Set the Keep Alive Time. The default is 60 Seconds.
  10. Set the Reconnect Time. The default 10 Seconds. If the connection to the broker is lost the Reconnect Time determines how long to wait before attempting to reconnect.

For more detailed instructions on configuring your MQTT data source, click here to see our Getting Started MQTT tutorial or watch the video tutorial below:


Step 3. Configure Your Tags

OAS provides multiple ways to add and define tags:

To add a Tag manually:

  1. In the OAS Configure Application, select Configure >> Tags from the top menu.

  2. Select localhost or the remote service you wish to modify with the Select button to the right of the Network Node list.

  3. Click on the Add Tag button located at the top of the Tag browser on the left portion of the screen.

  4. A dialog box will appear. Enter a name for your new tag and click ok.
  5. A configuration screen will appear for your new tag. Select your data source type in in the Data Source dropdown box.

  6. Specify the correct data type in the Data Type dropdown box.
  7. Click Apply Changes at the bottom right of the window.

For more detailed instructions on configuring your tags, click here to see our Getting Started Tags tutorial.


Step 4. Configure Alarm Limits

  1. In the OAS Configure Application, select Configure >> Tags from the top menu.

  2. Select localhost or the remote service you wish to modify with the Select button to the right of the Network Node list.

  3. Select the tag you wish to set alarm limits for from the tag browser on the left.
  4. Use the tabs at the top of the tag properties window to configure alarm limits for your tag based on type: High High, High, Low, Low Low, Digital and Rate of Change.

  5. Check the Enable Alarm checkbox to enabling your alarm limit; alternately, you can use he Enable with Tag…checkbox.

  6. Set your Alarm Limit Source with the dropdown box. If you choose Value, enter the value in the provided text field.
  7. When you have finished configuring your alarm limits, click Apply Changes in the bottom right of the properties window.

For More detailed instructions on Configuring Alarm Limits, visit our Alarm Limits tutorial or watch the video below:


Step 5. Configure Alarm Notifications

  1. In the OAS Configure Application, select Configure >> Alarm Notification from the top menu.

  2. Select localhost or the remote service you wish to log alarms from with the Select button to the right of the Network Node list.

  3. A Notifcation Group screen will appear. Give your group a meaningful name in the Notification Group Name box.
  4. In the Common tab, check Notification Active to activate your group. Alternately, check Enable Notification with Tag… and choose a tag with the Browse button that appears.
  5. Use the Filters tab to select which types of alarms you want in this group. Alarms can be filtered based on Alarm Priority, Alarm Groups, and Alarm Types.
  6. Use the Email tab to configure alarm notification via email.

  7. Use the SMS tab to configure alarm notification via text. You will need to create an account with Twilio (www.twilio.com) to handle SMS/Voice notifactions.

  8. Once you have finished configuring your notification group, click the Add Group button in the left panel to add your new group.

For more detailed instructions on Configuring Alarm Notifications, visit our Getting Started – Alarm Notification tutorial or watch the video below:


How to Send Siemens Alarm Notifications via SMS Text or Email

How to Send Siemens Alarm Notifications via SMS Text or Email

Open Automation Software Tags can be defined to connect directly to Siemens S7-200, S7-300, S7-400, S7-1200, and S7-1500 controllers with the built in Siemens Driver Interface. This tutorial walks you though downloading and installing OAS, configuring a Siemens driver, configuring tags, configuring alarm limits and configuring alarm notifications. Alarms notifications can be sent via e-mail, SMS text or voice to users based on specific filter criteria.

Step 1. Download and Install the Open Automation Software and Start the OAS Service

If you have not already done so, you will need to download and install the OAS platform.  Fully functional trial versions of the software are available for Windows, Windows IoT Core, Linux, Raspberry Pi and Docker on our downloads page.

On Windows run the downloaded Setup.exe file to install one or more of the Open Automation Software features. Select the default Typical installation if you are not sure what features to use or the Custom installation if you want to save disk space on the target system.  When prompted agree to the End User License Agreement to continue the installation.

For more detailed instructions and video tutorials, visit the installation guide for your system:
Windows Installation | Linux Installation | Raspberry Pi Installation | Dockers Installation

The OAS Service Control application will appear when the installation finishes on Windows.  Use this application to start the 3 Services. Run the Configure OAS application on Windows and select Configure-Tags; if the first time running, the AdminCreate utility will run to create an Administrator login as shown in Step 1 of Getting Started – Security.


Step 2. Configure Your Siemens Data Source

  1. First, you will need to open the Configure OAS application from the program group Open Automation Software.
  2. Select Configure >> License from the top menu and verify that Siemens is one of the available Drivers in the lower left of the form. The demo license will have this by default. If you do not see Siemens available, contact support@openautomationsoftware.com to update your license.
  3. Select Configure >> Drivers from the top menu.

  4. Select localhost or the remote service you wish to modify with the Select button to the right of the Network Node list.

  5. The Configure Drivers Screen will appear. Select Siemens from the Driver dropdown box.

  6. Enter a meaningful Driver Interface Name that you will refer to this physical connection when defining Tags with a Siemens Data Source.
  7. Define the properties for the desired physical connection.
  8. Click the Add Driver button above the Driver list in the left pane to add the Driver Interface as an available selection when defining Tags in the next step.

For more detailed instructions on configuring your Siemens data source, click here to see our Getting Started Siemens tutorial.


Step 3. Configure Your Tags

OAS provides multiple ways to add and define tags:

To add a Tag manually:

  1. In the OAS Configure Application, select Configure >> Tags from the top menu.

  2. Select localhost or the remote service you wish to modify with the Select button to the right of the Network Node list.

  3. Click on the Add Tag button located at the top of the Tag browser on the left portion of the screen.

  4. A dialog box will appear. Enter a name for your new tag and click ok.
  5. A configuration screen will appear for your new tag. Select your data source type in in the Data Source dropdown box.

  6. Specify the correct data type in the Data Type dropdown box.
  7. Click Apply Changes at the bottom right of the window.

For more detailed instructions on configuring your tags, click here to see our Getting Started Tags tutorial.


Step 4. Configure Alarm Limits

  1. In the OAS Configure Application, select Configure >> Tags from the top menu.

  2. Select localhost or the remote service you wish to modify with the Select button to the right of the Network Node list.

  3. Select the tag you wish to set alarm limits for from the tag browser on the left.
  4. Use the tabs at the top of the tag properties window to configure alarm limits for your tag based on type: High High, High, Low, Low Low, Digital and Rate of Change.

  5. Check the Enable Alarm checkbox to enabling your alarm limit; alternately, you can use he Enable with Tag…checkbox.

  6. Set your Alarm Limit Source with the dropdown box. If you choose Value, enter the value in the provided text field.
  7. When you have finished configuring your alarm limits, click Apply Changes in the bottom right of the properties window.

For More detailed instructions on Configuring Alarm Limits, visit our Alarm Limits tutorial or watch the video below:


Step 5. Configure Alarm Notifications

  1. In the OAS Configure Application, select Configure >> Alarm Notification from the top menu.

  2. Select localhost or the remote service you wish to log alarms from with the Select button to the right of the Network Node list.

  3. A Notifcation Group screen will appear. Give your group a meaningful name in the Notification Group Name box.
  4. In the Common tab, check Notification Active to activate your group. Alternately, check Enable Notification with Tag… and choose a tag with the Browse button that appears.
  5. Use the Filters tab to select which types of alarms you want in this group. Alarms can be filtered based on Alarm Priority, Alarm Groups, and Alarm Types.
  6. Use the Email tab to configure alarm notification via email.

  7. Use the SMS tab to configure alarm notification via text. You will need to create an account with Twilio (www.twilio.com) to handle SMS/Voice notifactions.

  8. Once you have finished configuring your notification group, click the Add Group button in the left panel to add your new group.

For more detailed instructions on Configuring Alarm Notifications, visit our Getting Started – Alarm Notification tutorial or watch the video below: