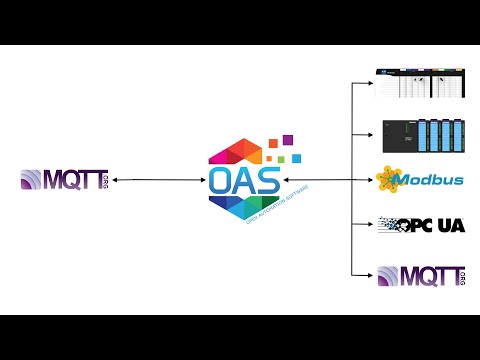
Open Automation Software Tags can be defined to connect to MQTT devices and software brokers with the built in MQTT Driver Interface. If you want to interface OAS with another MQTT Client please see the Getting Started MQTT Broker guide. The OASData component is used for real time and historical data access against a local or remote OAS instance and can be used with .NET 5, .NET Core 2.0 or greater, .NET Framework 4.61 or greater, Xamarin.iOS 10.14, Xamarin.Android 8.0, and UWP 1.0.0.16299. This tutorial walks you though downloading and installing OAS, configuring an MQTT driver, configuring tags and reading and writing to them with the .Net Data Connector. This page shows code examples in C# but VB works as well.
Step 1. Download and Install the Open Automation Software and Start the OAS Service
If you have not already done so, you will need to download and install the OAS platform. Fully functional trial versions of the software are available for Windows, Windows IoT Core, Linux, Raspberry Pi and Docker on our downloads page.
On Windows run the downloaded Setup.exe file to install one or more of the Open Automation Software features. Select the default Typical installation if you are not sure what features to use or the Custom installation if you want to save disk space on the target system. When prompted agree to the End User License Agreement to continue the installation.
The OAS Service Control application will appear when the installation finishes on Windows. Use this application to start the 3 Services. Run the Configure OAS application on Windows and select Configure-Tags; if the first time running, the AdminCreate utility will run to create an Administrator login as shown in Step 1 of Getting Started – Security.
Step 2. Configure Your MQTT Data Source
First, you will need to open the Configure OAS application from the program group Open Automation Software.
Select Configure >> License from the top menu and verify that MQTT is one of the available Drivers in the lower left of the form. The demo license will have this by default. If you do not see MQTT available, contact support@openautomationsoftware.com to update your license.
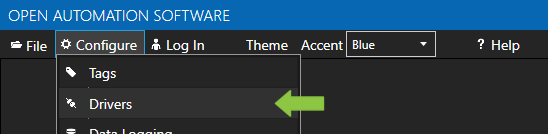
Select Configure >> Drivers from the top menu.
Select localhost or the remote service you wish to modify with the Select button to the right of the Network Node list.
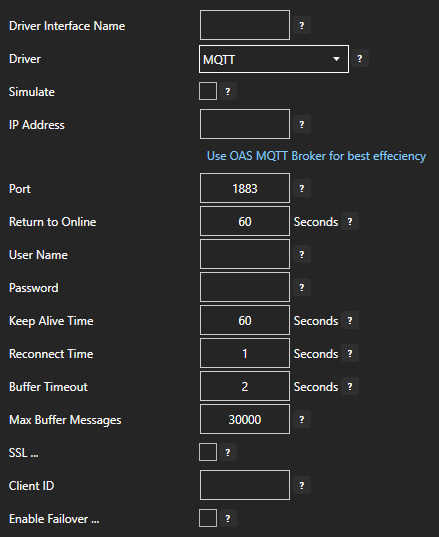
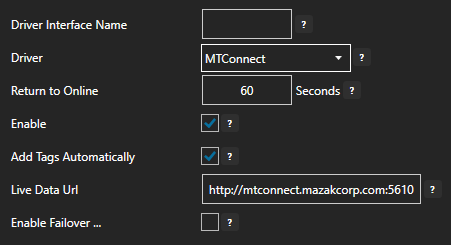
The Configure Drivers Screen will appear. Select MQTT from the Driver dropdown box.
Enter a meaningful Driver Interface Name that you will refer to this physical connection when defining Tags with a MQTT Data Source.
Enter the IP Address of the broker. The default port is 1883.
Enter the User Name and Password if required.
Set the Keep Alive Time. The default is 60 Seconds.
Set the Reconnect Time. The default 10 Seconds. If the connection to the broker is lost the Reconnect Time determines how long to wait before attempting to reconnect.
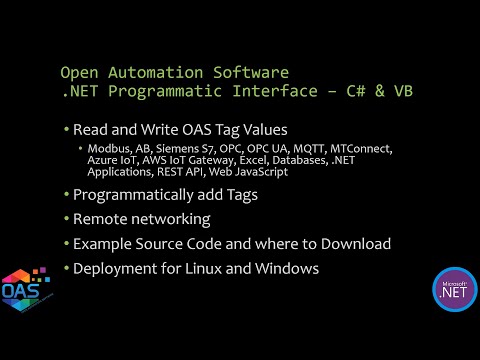
For more detailed instructions on configuring your MQTT data source, click here to see our Getting Started MQTT tutorial or watch the video tutorial below:
Step 3. Configure Your Tags
OAS provides multiple ways to add and define tags:
Manually add and define Tags using the Configure OAS application. …learn more…
Step 4. Access Your Data from a C# or VB .NET Application
The .NET Standard 2.0 OASData assembly is used to provide read and write access to OAS tag variables and can target .NET 5, .NET 6, .NET 7, .NET Core 2.o or greater, .NET Framework 4.61 or greater, Xamarin.iOS 10.14, Xamarin.Android 8.0, and UWP 1.0.0.16299.
Start a new Visual Studio Project or Open Your Existing One
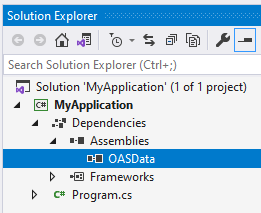
Microsoft Visual Studio 2015+ is recommended. For developing cross-platform .NET Standard or .NET Core solutions, Visual Studio 2019+ is recommended. For developing Android and/or iOS solutions, be sure to include Xamarin extensions to Visual Studio. After creating a new Visual Studio project, add a reference to the OASData assembly and all its dependencies, found in the OAS installation directory. This is typically:
This call returns an object array with the values for each tag variable.
Tags is a string array of tag names and variables to read.
Errors is an integer array returning: 0 if the tag variable quality is good 1 if the quality is bad 2 if the value could not be returned within the timeout specified.
Timeout is specified in milliseconds to wait for the call to return.
Write Tags Asynchronously
oasd.WriteTags(OASTags, OASValues);
With this call, if the tags data source is defined to a device, for example: Modbus; Siemens; Allen Bradley MQTT; OPC UA, or application writes to .Value will be written to the source defined.
Examples: Modbus, Siemens, AB, OPC UA, MQTT
Tags is a string array of tag names and variables.
Values is an object array containing the values to write to each tag.
TimeStamps array can optionally be provided to set the time of the value if the Data Source of the Tag is Value.
Write Tags Synchronously
Errors = oasd.SyncWriteTags(Tags, Values);
Tags is a string array of tag names and variables.
Values is an object array containing the values to write to each tag.
Errors is an Integer array that returns: 0 when successful; 1 when OAS Engine is not reachable; 2 when the Tags array size is not equal to the Values array.
Networking
Tag names can include an IP Address, network node name, or registered domain name if the application is deployed remote from the OAS Engine.
Open Automation Software Tags can be defined to connect directly to Allen Bradley controllers with the built in ABLogix and ABClassic Driver Interfaces which support communications over Ethernet to ControlLogix, CompactLogix, GuardLogix, and Micro800 with the ABLogix driver, and MicroLogix, SLC 500, and PLC-5 with the ABClassic driver. The OASData component is used for real time and historical data access against a local or remote OAS instance and can be used with .NET 5, .NET Core 2.0 or greater, .NET Framework 4.61 or greater, Xamarin.iOS 10.14, Xamarin.Android 8.0, and UWP 1.0.0.16299. This tutorial walks you though downloading and installing OAS, configuring an Allen Bradley driver, configuring tags and reading and writing to them with the .Net Data Connector. This page shows code examples in C# but VB works as well.
Step 1. Download and Install the Open Automation Software and Start the OAS Service
If you have not already done so, you will need to download and install the OAS platform. Fully functional trial versions of the software are available for Windows, Windows IoT Core, Linux, Raspberry Pi and Docker on our downloads page.
On Windows run the downloaded Setup.exe file to install one or more of the Open Automation Software features. Select the default Typical installation if you are not sure what features to use or the Custom installation if you want to save disk space on the target system. When prompted agree to the End User License Agreement to continue the installation.
The OAS Service Control application will appear when the installation finishes on Windows. Use this application to start the 3 Services. Run the Configure OAS application on Windows and select Configure-Tags; if the first time running, the AdminCreate utility will run to create an Administrator login as shown in Step 1 of Getting Started – Security.
Step 2. Configure Your Allen Bradley Data Source
First, you will need to open the Configure OAS application from the program group Open Automation Software.
Select Configure >> License from the top menu and verify that Allen Bradley is one of the available Drivers in the lower left of the form. The demo license will have this by default. If you do not see Allen Bradley available, contact support@openautomationsoftware.com to update your license.
Select Configure >> Drivers from the top menu.
Select localhost or the remote service you wish to modify with the Select button to the right of the Network Node list.
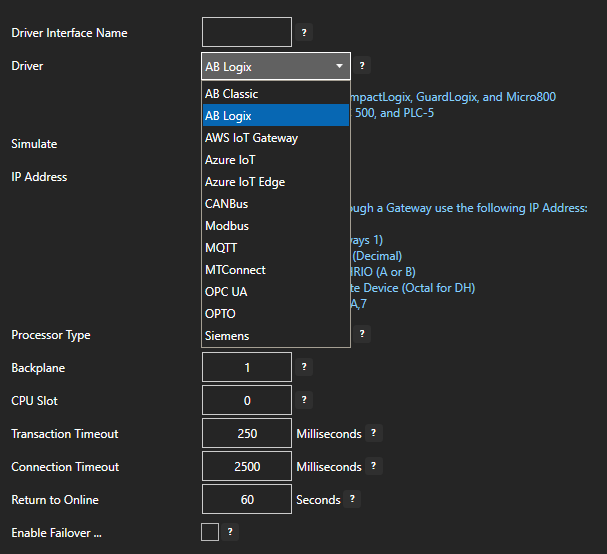
The Configure Drivers Screen will appear. Select either AB Classic for MicroLogix, SLC 500, and PLC-5 or AB Logic for ControlLogix, CompactLogix, GuardLogix, and Micro800 from the Driver dropdown box.
Enter a meaningful Driver Interface Name that you will refer to this physical connection when defining Tags with an Allen Bradley Data Source.
Define the properties for the desired physical connection.
Click the Add Driver button above the Driver list in the left pane to add the Driver Interface as an available selection when defining Tags in the next step.
Step 4. Access Your Data from a C# or VB .NET Application
The .NET Standard 2.0 OASData assembly is used to provide read and write access to OAS tag variables and can target .NET 5, .NET 6, .NET 7, .NET Core 2.o or greater, .NET Framework 4.61 or greater, Xamarin.iOS 10.14, Xamarin.Android 8.0, and UWP 1.0.0.16299.
Start a new Visual Studio Project or Open Your Existing One
Microsoft Visual Studio 2015+ is recommended. For developing cross-platform .NET Standard or .NET Core solutions, Visual Studio 2019+ is recommended. For developing Android and/or iOS solutions, be sure to include Xamarin extensions to Visual Studio. After creating a new Visual Studio project, add a reference to the OASData assembly and all its dependencies, found in the OAS installation directory. This is typically:
This call returns an object array with the values for each tag variable.
Tags is a string array of tag names and variables to read.
Errors is an integer array returning: 0 if the tag variable quality is good 1 if the quality is bad 2 if the value could not be returned within the timeout specified.
Timeout is specified in milliseconds to wait for the call to return.
Write Tags Asynchronously
oasd.WriteTags(OASTags, OASValues);
With this call, if the tags data source is defined to a device, for example: Modbus; Siemens; Allen Bradley MQTT; OPC UA, or application writes to .Value will be written to the source defined.
Examples: Modbus, Siemens, AB, OPC UA, MQTT
Tags is a string array of tag names and variables.
Values is an object array containing the values to write to each tag.
TimeStamps array can optionally be provided to set the time of the value if the Data Source of the Tag is Value.
Write Tags Synchronously
Errors = oasd.SyncWriteTags(Tags, Values);
Tags is a string array of tag names and variables.
Values is an object array containing the values to write to each tag.
Errors is an Integer array that returns: 0 when successful; 1 when OAS Engine is not reachable; 2 when the Tags array size is not equal to the Values array.
Networking
Tag names can include an IP Address, network node name, or registered domain name if the application is deployed remote from the OAS Engine.
Open Automation Software can connect directly to Siemens controllers with the built in Siemens Driver Interfaces which support communications over Ethernet to S7-200, S7-300, S7-400, S7-1200, and S7-1500. The OASData component is used for real time and historical data access against a local or remote OAS instance and can be used with .NET 5, .NET Core 2.0 or greater, .NET Framework 4.61 or greater, Xamarin.iOS 10.14, Xamarin.Android 8.0, and UWP 1.0.0.16299. This tutorial walks you though downloading and installing OAS, configuring a Siemens driver, configuring tags and reading and writing to them with the .Net Data Connector. This page shows code examples in C# but VB works as well.
Step 1. Download and Install the Open Automation Software and Start the OAS Service
If you have not already done so, you will need to download and install the OAS platform. Fully functional trial versions of the software are available for Windows, Windows IoT Core, Linux, Raspberry Pi and Docker on our downloads page.
On Windows run the downloaded Setup.exe file to install one or more of the Open Automation Software features. Select the default Typical installation if you are not sure what features to use or the Custom installation if you want to save disk space on the target system. When prompted agree to the End User License Agreement to continue the installation.
The OAS Service Control application will appear when the installation finishes on Windows. Use this application to start the 3 Services. Run the Configure OAS application on Windows and select Configure-Tags; if the first time running, the AdminCreate utility will run to create an Administrator login as shown in Step 1 of Getting Started – Security.
Step 2. Configure Your Siemens Data Source
First, you will need to open the Configure OAS application from the program group Open Automation Software.
Select Configure >> License from the top menu and verify that Siemens is one of the available Drivers in the lower left of the form. The demo license will have this by default. If you do not see Siemens available, contact support@openautomationsoftware.com to update your license.
Select Configure >> Drivers from the top menu.
Select localhost or the remote service you wish to modify with the Select button to the right of the Network Node list.
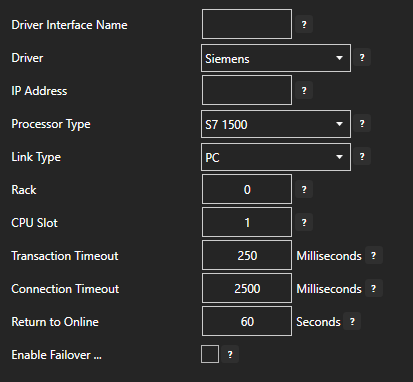
The Configure Drivers Screen will appear. Select Siemens from the Driver dropdown box.
Enter a meaningful Driver Interface Name that you will refer to this physical connection when defining Tags with a Siemens Data Source.
Define the properties for the desired physical connection.
Click the Add Driver button above the Driver list in the left pane to add the Driver Interface as an available selection when defining Tags in the next step.
Step 4. Access Your Data from a C# or VB .NET Application
The .NET Standard 2.0 OASData assembly is used to provide read and write access to OAS tag variables and can target .NET 5, .NET 6, .NET 7, .NET Core 2.o or greater, .NET Framework 4.61 or greater, Xamarin.iOS 10.14, Xamarin.Android 8.0, and UWP 1.0.0.16299.
Start a new Visual Studio Project or Open Your Existing One
Microsoft Visual Studio 2015+ is recommended. For developing cross-platform .NET Standard or .NET Core solutions, Visual Studio 2019+ is recommended. For developing Android and/or iOS solutions, be sure to include Xamarin extensions to Visual Studio. After creating a new Visual Studio project, add a reference to the OASData assembly and all its dependencies, found in the OAS installation directory. This is typically:
This call returns an object array with the values for each tag variable.
Tags is a string array of tag names and variables to read.
Errors is an integer array returning: 0 if the tag variable quality is good 1 if the quality is bad 2 if the value could not be returned within the timeout specified.
Timeout is specified in milliseconds to wait for the call to return.
Write Tags Asynchronously
oasd.WriteTags(OASTags, OASValues);
With this call, if the tags data source is defined to a device, for example: Modbus; Siemens; Allen Bradley MQTT; OPC UA, or application writes to .Value will be written to the source defined.
Examples: Modbus, Siemens, AB, OPC UA, MQTT
Tags is a string array of tag names and variables.
Values is an object array containing the values to write to each tag.
TimeStamps array can optionally be provided to set the time of the value if the Data Source of the Tag is Value.
Write Tags Synchronously
Errors = oasd.SyncWriteTags(Tags, Values);
Tags is a string array of tag names and variables.
Values is an object array containing the values to write to each tag.
Errors is an Integer array that returns: 0 when successful; 1 when OAS Engine is not reachable; 2 when the Tags array size is not equal to the Values array.
Networking
Tag names can include an IP Address, network node name, or registered domain name if the application is deployed remote from the OAS Engine.
The OASData.dll assembly is a .NET Standard 2.0 assembly which can be integrated into any .NET application with the following targets: .NET 5 or greater; NET Core 2.0 or greater ; .NET Framework 4.61 or greater; Xamarin.iOS 10.14 or greater; Xamarin.Android 8.0 or greater; and UWP 1.0.0.16299 or greater. The articles below are useful guides to get you started.
Open Automation Software Tags can be defined to connect directly to Modbus slave devices or host data to Modbus masters with the built in Modbus Driver Interface which supports communications over ethernet and serial interfaces for Modbus TCP, Modbus RTU, and Modbus ASCII protocols. The OASData component is used for real time and historical data access against a local or remote OAS instance and can be used with .NET 5, .NET 6, .NET 7, .NET Core 2.0 or greater, .NET Framework 4.61 or greater, Xamarin.iOS 10.14, Xamarin.Android 8.0, and UWP 1.0.0.16299. This tutorial walks you though downloading and installing OAS, configuring a Modbus driver, configuring tags and reading and writing to them with the .Net Data Connector. This page shows code examples in C# but VB works as well.
Step 1. Download and Install the Open Automation Software and Start the OAS Service
If you have not already done so, you will need to download and install the OAS platform. Fully functional trial versions of the software are available for Windows, Windows IoT Core, Linux, Raspberry Pi and Docker on our downloads page.
On Windows run the downloaded Setup.exe file to install one or more of the Open Automation Software features. Select the default Typical installation if you are not sure what features to use or the Custom installation if you want to save disk space on the target system. When prompted agree to the End User License Agreement to continue the installation.
The OAS Service Control application will appear when the installation finishes on Windows. Use this application to start the 3 Services. Run the Configure OAS application on Windows and select Configure-Tags; if the first time running, the AdminCreate utility will run to create an Administrator login as shown in Step 1 of Getting Started – Security.
Step 2. Configure Your Modbus Data Source
First, you will need to open the Configure OAS application from the program group Open Automation Software.
Select Configure >> License from the top menu and verify that Modbus is one of the available Drivers in the lower left of the form. The demo license will have this by default. If you do not see Modbus available, contact support@openautomationsoftware.com to update your license.
Select Configure >> Drivers from the top menu.
Select localhost or the remote service you wish to modify with the Select button to the right of the Network Node list.
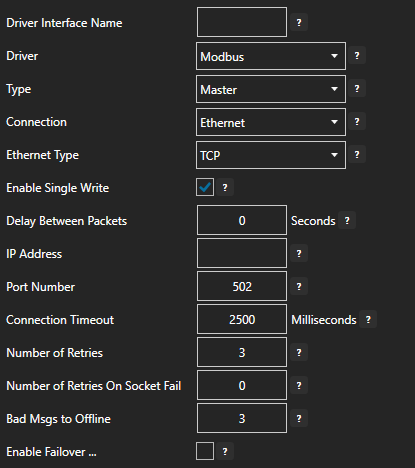
The Configure Drivers Screen will appear. Select Modbus from the Driver dropdown box.
Enter a meaningful Driver Interface Name that you will refer to this physical connection when defining Tags with a Modbus Data Source.
Specify the Connection as Ethernet or Serial.
Specify the Modbus Type as Master or Slave. Master will be used when communicating to a Modbus device. Slave will be used when other Modbus masters will be communicating to OAS.
When setting up a Slave interface over Ethernet set the IP Address to the computer IPv4 IP address or network node name if the master is on a remote PC. You can also use 127.0.0.1 or localhost if the Modbus master will be on the same computer.
For more detailed instructions on configuring your Modbus data source, click here to see our Getting Started Modbus tutorial or watch the video tutorial below:
Step 3. Configure Your Tags
OAS provides multiple ways to add and define tags:
Manually add and define Tags using the Configure OAS application. …learn more…
Step 4. Access Your Data from a C# or VB .NET Application
The .NET Standard 2.0 OASData assembly is used to provide read and write access to OAS tag variables and can target .NET 5, .NET 6, .NET 7, .NET Core 2.o or greater, .NET Framework 4.61 or greater, Xamarin.iOS 10.14, Xamarin.Android 8.0, and UWP 1.0.0.16299.
Start a new Visual Studio Project or Open Your Existing One
Microsoft Visual Studio 2015+ is recommended. For developing cross-platform .NET Standard or .NET Core solutions, Visual Studio 2019+ is recommended. For developing Android and/or iOS solutions, be sure to include Xamarin extensions to Visual Studio. After creating a new Visual Studio project, add a reference to the OASData assembly and all its dependencies, found in the OAS installation directory. This is typically:
This call returns an object array with the values for each tag variable.
Tags is a string array of tag names and variables to read.
Errors is an integer array returning: 0 if the tag variable quality is good 1 if the quality is bad 2 if the value could not be returned within the timeout specified.
Timeout is specified in milliseconds to wait for the call to return.
Write Tags Asynchronously
oasd.WriteTags(OASTags, OASValues);
With this call, if the tags data source is defined to a device, for example: Modbus; Siemens; Allen Bradley MQTT; OPC UA, or application writes to .Value will be written to the source defined.
Examples: Modbus, Siemens, AB, OPC UA, MQTT
Tags is a string array of tag names and variables.
Values is an object array containing the values to write to each tag.
TimeStamps array can optionally be provided to set the time of the value if the Data Source of the Tag is Value.
Write Tags Synchronously
Errors = oasd.SyncWriteTags(Tags, Values);
Tags is a string array of tag names and variables.
Values is an object array containing the values to write to each tag.
Errors is an Integer array that returns: 0 when successful; 1 when OAS Engine is not reachable; 2 when the Tags array size is not equal to the Values array.
Networking
Tag names can include an IP Address, network node name, or registered domain name if the application is deployed remote from the OAS Engine.
The OAS REST API is a programmatic interface that allows you to manage OPC Server alarms via JSON over HTTP. This tutorial walks you through downloading and installing OAS, configuring an OPC Server driver, configuring tags and using the REST API to access real-time and historical OPC Server alarm data. We will build a sample JavaScript Web Interface to demonstrate building an alarm viewer with the ability to acknowledge active alarms.
Step 1. Download and Install the Open Automation Software and Start the OAS Service
If you have not already done so, you will need to download and install the OAS platform. Fully functional trial versions of the software are available for Windows, Windows IoT Core, Linux, Raspberry Pi and Docker on our downloads page.
On Windows run the downloaded Setup.exe file to install one or more of the Open Automation Software features. Select the default Typical installation if you are not sure what features to use or the Custom installation if you want to save disk space on the target system. When prompted agree to the End User License Agreement to continue the installation.
The OAS Service Control application will appear when the installation finishes on Windows. Use this application to start the 3 Services. Run the Configure OAS application on Windows and select Configure-Tags; if the first time running, the AdminCreate utility will run to create an Administrator login as shown in Step 1 of Getting Started – Security.
Step 2. Configure OPC Server Tags
OAS provides multiple ways to add and define tags:
Manually add and define Tags using the Configure OAS application. …learn more…
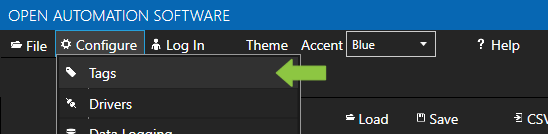
In the OAS Configure Application, select Configure >> Tags from the top menu.
Select localhost or the remote service you wish to modify with the Select button to the right of the Network Node list.
Click on the Add Tag button located at the top of the Tag browser on the left portion of the screen.
A dialog box will appear. Enter a name for your new tag and click ok.
A configuration screen will appear for your new tag. Select OPC in the Data Source dropdown box.
Use the Browse button to the right of the OPC Item to browse OPC Servers for the desired OPC Item.
Select Local, the desired OPC Server, branch within the OPC Server, and OPC Item and click OK.
Specify the desired OPC Update Rate for the Tag.
Click Apply Changes at the bottom right of the window.
To add Tags with One Click OPC:
In the OAS Configure Application, select Configure >> Tags from the top menu.
Select localhost or the remote service you wish to modify with the Select button to the right of the Network Node list.
To begin the One Click OPC process select the Group you would like to import to in the Tag configuration. If you want to import to the Root Level, select the Tags Group at the top of the tree.
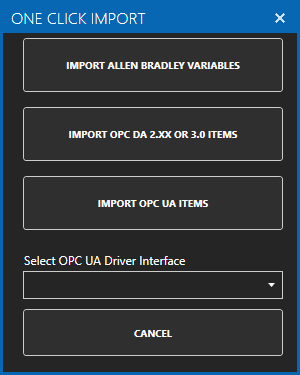
Then select the One Click Import button on the top menu bar.
Click on the Import OPC DA 2.XX or 3.0 Items Button in the pop up window.
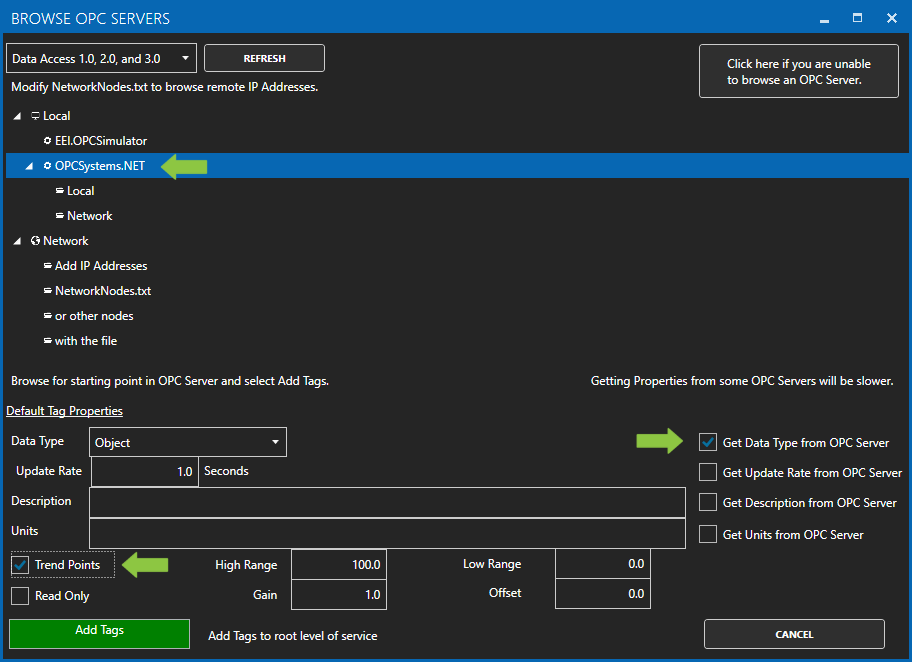
Use the One Click OPC Wizard to browse for a branch as a starting position within an OPC Server or just select the OPC Server name itself to add all items from the selected OPC Server. For the best networking design select OPC Servers from Local even if you are configuring a remote OAS Service.
Select to enable the options to Get Data Type from OPC Server and optionally the Descriptions.
Additionally if you want to specify to Trend all of the points select Trend Points.
Click Add Tags and it will automatically add all of the OPC Items from the OPC Server Branch you have selected and all of the sub Branches beneath it.
Select the Save button on the toolbar at the top.
For more detailed instructions on Configuring OPC Server Tags, visit our Getting Started OPC tutorial or the One Click OPC tutorial or watch the video tutorial below:
Step 3. Access Real Time and Historical Alarm Data with the REST API
Getting Started
To use the OAS REST API you must make sure that the OAS HTTP service is listening on the correct port. To do this, open the OAS Configuration application and select Configure > Options, then select the network node (localhost if working on the local machine) and click Select. Under the Networking tab, locate the field for REST API/WebHMI Port Number. The default is 58725 but can be changed. If you are accessing the server from a remote client, you will also need to make sure your machine and/or company firewalls allow TCP traffic on the selected port.
Above is the start of the head tag and a link to the jQuery library. We will be using jQuery for this tutorial.
var networkNode = "http://www.opcweb.com:58725"; // variable for the network node
var clientid =  ""; // holds the client id from authorization
var token =  "";    // holds the token from authorization
var polling = null; // variable for setInterval function
var drawheader = true; // flag for whether the table header needs to be drawn
var inactive  = true; // flag for show/hide inactive alarms
var currentlist = {
            "filter": {
                "minpriority": 0,
                "maxpriority": 9999,
                "networknodes": [
                "localhost"
                ],
                "alarmtypes": [
                "Digital", "High", "Low", "High High", "Low Low", "Operator"
                ]
            },
            "history": false
        }; // object for holding json data
Next, we declare some variables that we will use later. The networkNode is the URL for where the OAS Service you are calling is located. The clientid and the token are variables that we will use to hold the authentication credentials that will be returned in our first call. Polling is a variable we will use to hold the setInterval function for our repeat calls to the API to get the alarm data. The drawheader is a flag that we set to let us know if we need to draw the header of our display again as we are polling. The currentlist object holds the data we are going to send to the API later: filters for which alarms we want to see and a boolean for whether or not we want to see historical alarms.
// function to clear out the variables and html
function resetvariables(){
    clearInterval(polling);
    currentlist.id = null;
    drawheader = true;
    polling = null;
    $("#tbalarms").empty();
    $('#divalarmlistid').empty();
    $("#togglepolling").prop("value", "Start Polling");

}
The clearvariables() function above does just that. We will call it later in our application to reset our button text and reset our variables when needed.
// function to display error messages
function displaymessage(mess, fnc){
    clearInterval(polling); // in the event of an error we stop the polling
    switch(mess) {
        case 401:
            $('#diverror').html("Authentication required.");
            break;
        case 404:
            if((fnc == "delete")||(fnc == "update")){
                $('#diverror').html("Alarm List not found.");
            }else{
                $('#diverror').html("404");
            }
            break;
        default:
            $('#diverror').html(mess);
    }
}
The displaymessage() function is called when our API request returns with an error. It will display the message on the page.
Authenticate
$("#doauth").click(function(){ // click funtion for authenticatation
    clearvariables(); // clear out the old variables, we are starting over
    // api call for authenticatation
    $.ajax({
        url: networkNode + "/OASREST/v2/authenticate",
        type: "POST",
        contentType: "application/json; charset=utf-8",
        crossDomain: true,
        dataType: "json",
        data: '{"username": "", "password": ""}',
        success: function(r) {
            clientid = r.data.clientid; // store the client id for later calls
            token = r.data.token;  // store the token for later calls
            $('#divid').html(clientid); // display the client id
            $('#divtoken').html(token); // display the token
        },
        error: function (e) {
            displaymessage(e.status, "auth"); // in case of error, display the error
        }
    });
});
The first call you will always need to make is to Authenticate. This will create a session and return a clientid and token that you will send in the header of all of your subsequent calls. The API call above is inside of a click function that handles the click event for the Authenticate button. The first thing we do is call the clearvariable() function in case the user has been using the application already. When the session is created it creates a new clientid and token. Anything that may have been done previously on the page will be tied to the old session and no longer be accessible so we clear out the old display as well.
We are using the jQuery ajax() method to send an asynchronous HTTP request to the server. The first parameter url specifies the address we are sending our request to. The networkNode we set above is used here. The Authenticate call is a POST which we specify in the type parameter. Next, contentType: application/json; charset=utf-8 designates the content to be in JSON format, encoded in the UTF-8 character encoding. The crossDomain parameter is set to true, allowing us to send our request to a resource that is outside of our own domain. The dataType parameter is set to “json”, letting the server know we expect the response to come back in JSON format. In out data parameter, what we are sending to the server, we have two variables: username and password. In this example, they are empty strings which will allow us to create a session in the default security group. For more information about security groups, see the Getting Started – Security tutorial in our knowledge base.
If we were to run the Authenticate function successfully here is what would be returned:
{
    "status": "OK",
    "data": {
        "clientid": "e90c8ae8-6b12-4690-a02b-f35ad03b3d2d",
        "token": "f16c3098-b295-4572-9a6b-f53ee984d21b"
    },
    "messages": [
        "Default credential provided - access to data and operations may be limited"
    ]
}
In which case, we process the return inside of our success function. We set the clientid page variable to the clientid property of the data object of the return object and the token page variable to the token property. If an error were to be returned, we handle it in our error function where we send the message to the displaymessage() function.
Create and Delete Alarm List
// click event to handle and toggle create/delete alarmlist button
$("#createalarmlist").click(function(){
    // if alarmlist id doesn't exist, create one.
    if (!currentlist.id){
        $.ajax({
            url: networkNode + "/OASREST/v2/alarmlists",
            type: "POST",
            contentType: "application/json; charset=utf-8",
            crossDomain: true,
            dataType: "json",
            headers: {"clientid": clientid, "token": token},
            data: JSON.stringify(currentlist),
            success: function(r) {
                currentlist.id = r.data.id;  // store the returned alarmlist id in the object
                $('#divalarmlistid').html(currentlist.id); // display the alarmlist id on the page
                $('#diverror').empty(); // success, so clear the error
                $("#createalarmlist").prop("value", "Delete Alarm List"); // toggle button text
            },
            error: function (e) {
                displaymessage(e.status, "createalarmlist");  // in case of error, display the error
            }
        });

        // if alarmlist id exists, delete it.
    }else{
        $.ajax({
            url: networkNode + "/OASREST/v2/alarmlists/" + currentlist.id,
            type: "DELETE",
            contentType: "application/json; charset=utf-8",
            crossDomain: true,
            dataType: "json",
            headers: {"clientid": clientid, "token": token},
            success: function(r) {
                 resetvariables(); // clear everything out to start again
                 $("#createalarmlist").prop("value", "Create Alarm List");  // toggle button text
            },
            error: function (e) {
                displaymessage(e.status, "delete"); // in case of error, display the error
            }
        });
    }
});
The $(“#createalarmlist”).click(function() handles both creating and deleting an alarm list depending on the button state. The first thing it does is to check to see if a currentlist.id exists. If it doesn’t, it creates one with the API call. This call is a “POST” and sends the clientid and token in the header. In the data parameter, it sends in our currentlist object after formatting it. The currentlist has our filter parameters for creating the alarm list. In the success function, we assign the returned list id to our currentlist object, display it on the page, clear out any old error messages and toggle the button text. In the case of an error, we display it.
If a currentlist.id already exists, we know the user has clicked the Delete Alarm List button, so we will delete it with our API call. This one is a “DELETE” type, appends the currentlist.id to the end of the url so the server knows which list to delete, passes the clientid and the token in the header and doesn’t need a data parameter. In the success function, we call the resetvariables() function to clear out all of the old list information because we are starting over and toggle the button text. In the case of an error, we display it.
Get Alarm List
// click function to toggle polling
$("#togglepolling").click(function(){
    // if no alarm list exists, exit
    if (!currentlist.id){
        displaymessage("Alarm List not found", "poll");
        return;
    }
    // if we aren't polling, start the polling
    if (polling == null){
        polling = setInterval(getalarmlist, 1000);
        getalarmlist();
        $("#togglepolling").prop("value", "Stop Polling"); // update polling button text
    // if we are polling, stop the polling
    } else {
        clearInterval(polling);
        polling = null;
        $("#togglepolling").prop("value", "Start Polling");  // update polling button text
    }
});

// gets the alarm data and draws the table
function getalarmlist(){
    var table = $("#tbalarms");
    // only draw the header one time
    if (drawheader){
        var th = "<tr>";
        th += "<th>Alarm Date</th>";
        th += "<th class='center'>Active</th>";
        th += "<th>Text</th>";
        th += "<th>Type</th>";
        th += "<th>Group</th>";
        th += "<th class='center'>Acked</th>";
        th += "<th class='center'>Delete</th>";
        th += "</tr>";
        table.append(th);
    }
    // call to the api to get the alarms for the current list
    $.ajax({
        url: networkNode + "/OASREST/v2/alarmlists/" + currentlist.id,
        type: "GET",
        contentType: "application/json; charset=utf-8",
        crossDomain: true,
        dataType: "json",
        headers: {"clientid": clientid, "token": token},
        success: function(r) {
            $('#diverror').empty(); // success, so clear the errors
            for (var i = 0; i < r.data.length; i++){
                var temp = r.data[i].id;
                trid = temp.replaceAll('.', '_').replace(/\s/g, ''); // remove space and periods for row id
                var ts = new Date(r.data[i].alarmdate) // hold the alarm date in a date variable
                var acttxt = ""; // variable for active column text
                var ackedtxt = "<img src='images/unchecked.png' style='cursor:pointer;' ondblclick='ackalarm(\"" + r.data[i].id + "\")'>"; // Acknowledged checkbox
                var rclass = ""; // variable for row class
                // set the css class for the row base on active and acknowledged
                if (r.data[i].active) {
                    acttxt = "X";
                    rclass += "activerow";
                }else{
                    rclass += "inactive ";
                }
                if (r.data[i].acked) {
                    ackedtxt = "<img src='images/checked.png'>";
                    rclass += "ackedrow";
                }
                // build the row
                var str = "<tr class='" + rclass + "' id='" + trid + "'>";
                str += "<td class=''>" + fDate(ts) + "</td>";
                str += "<td class='center'>" + acttxt + "</td>";
                str += "<td class=''>" + r.data[i].text + "</td>";
                str += "<td class=''>" + r.data[i].type + "</td>";
                str += "<td class=''>" + r.data[i].group + "</td>";
                str += "<td class='center'>" + ackedtxt + "</td>";
                str += "<td class='center'><img src='images/delete.png' style='cursor:pointer;' onclick='deletealarm(\"" + r.data[i].id + "\")'></td>";
                str += "</tr>";
                // if the row already existed and this is an update, remove it first
                if(!drawheader){
                    $('#' + trid).remove();
                    $('#tbalarms tr:first').after(str);
                }else{
                    table.append(str);
                }
                // remove deleted alarms
                if(r.data[i].text == "DELETEALARM"){
                        $('#' + trid).remove();
                }
            }
            drawheader = false; // toggle flag for the header so the header row does not get redrawn after the first time
        }
    });
};

// function to format the date for display
function fDate(dt){
    var M = dt.getMonth() + 1;
    M = M.toString().padStart(2,0);
    var D = dt.getDate().toString().padStart(2,0);
    var H = dt.getHours().toString().padStart(2,0);
    var Min = dt.getMinutes().toString().padStart(2,0);
    var S = dt.getSeconds().toString().padStart(2,0);
    return M +"/" + D + "/" + dt.getFullYear() + " " + H + ":" + Min + ":" + S;
}
Now that we have our list created, we want to start polling the data. This is handled with the Start Polling button and the $(“#togglepolling”).click(function(). The first thing thing we do in the function is check to see if we have an alarm list created, if we don’t we display an error and exit the function. Next, we check to see if are already polling. If we aren’t, we use the JavaScript setInterval() function to call the getalarmlist() function every three seconds. We then immediately call the getalarmlist() function so that we don’t have to wait three seconds for it to run the first time.
Inside the getalarmlist() function, we check to see if the table header has already been drawn. If it hasn’t been, we draw it. Next, we call the API with a “GET” type, appending the currentlist id to the url, passing the clientid and token in the header and bypassing the data parameter as it is not needed for this call. In our success function, we clear out any old error messages and then build our display by looping through the returned array of alarms. We remove the periods and spaces from the alarm id to use it as the row id. Next, we look at alarms active and acknowledged states and do some formatting for those columns and the row color. We write out each of the returned alarm properties in our array and format the date for display. Then we check to see if this an update, (!drawheader). If it is we want to delete the old row before we add the new one. After that, we check the alarm text to see if we should delete the alarm and do so if that is the case. Finally, we set the drawheader to false so that we don’t keep redrawing it each time we poll the data. Back in our click event, we toggle the polling button text.
If the user has clicked the Stop Polling button, we clear the polling and set it to null and toggle the button text.
Update Alarms
// function to delete an alarm by id
function deletealarm(alarmid){
    var deletedata = [
        {
            "id": alarmid,
            "action" : "Delete",
            "networknode" : "localhost"
        }
    ]
    $.ajax({
        url: networkNode + "/OASREST/v2/alarmlists/set",
        type: "POST",
        headers: {"clientid": clientid, "token": token},
        contentType: "application/json; charset=utf-8",
        crossDomain: true,
        dataType: "json",
        data: JSON.stringify(deletedata),
        success: function(r) {
        }
    });
};

// function to acknowledge an alarm by id
function ackalarm(alarmid){
    var ackdata = [
        {
            "id": alarmid,
            "action" : "Ack",
            "networknode" : "localhost"
        }
    ]
    $.ajax({
        url: networkNode + "/OASREST/v2/alarmlists/set",
        type: "POST",
        headers: {"clientid": clientid, "token": token},
        contentType: "application/json; charset=utf-8",
        crossDomain: true,
        dataType: "json",
        data: JSON.stringify(ackdata),
        success: function(r) {
        }
    });
};
With the Update Alarms API call, you can Acknowledge, Delete and add Comments to an alarm. Valid operations are “Ack”, “Delete”, and “Comment” and are case-sensitive. In our demo, when the user clicks the Delete icon for the alarm, it fires the deletealarm() function, passing in the alarm id. The function calls the REST API with a “POST” type and passes the clientid and the token in the header. In the data parameter, we pass the alarm id, network node and the “Delete” action. In the polling that follows this call, the server sends “DELETEALARM” in the text of the alarm array for the deleted alarm letting us know to remove it from the display.
When the user double clicks the Acknowledged checkbox, it fires the ackalarm() function and passes in the alarm id. The function calls the REST API with a “POST” type and passes the clientid and the token in the header. In the data parameter, we pass the alarm id, network node and the “Ack” action. In the polling that follows this call, the server sends that alarm with the active property flagged as true and we then update the checkbox and row color.
Hide Inactive
$("#toggleactive").click(function(){
    if (polling){
        if (!currentlist.id){ // don't let them toggle active if there is no alarm list
            displaymessage("Alarm List not found", "toggleactive");
            return;
        }
        if (inactive){
            $("#toggleactive").prop("value", "Show Inactive");
            $('#tbalarms tr').filter('.inactive').hide(); // hide the inactive rows
            inactive = false;
        } else {
            $("#toggleactive").prop("value", "Hide Inactive");
            $('#tbalarms tr').filter('.inactive').show(); // show the inactive rows
            inactive = true;
        }
    }else{
        displaymessage("Start Polling First", "toggleactive"); // in case of error, display the error
    }
});
The Hide Inactive button does not make a call to the REST API, it just adjusts the display to hide or show the inactive alarms based on the button state.
From the Top…
<!DOCTYPE html>
<html lang="en">
<head>
<meta charset="utf-8"/>
<title>REST Example | Alarms</title>
<link rel="stylesheet" stype="text/css" href="client.css?id=12345678">
<script src="https://code.jquery.com/jquery-3.1.1.min.js"></script>
<script type="text/javascript">
var clientid = ""; // holds the client id from authorization
var token = ""; // holds the token from authorization
var drawheader = true; // flag for whether the table header needs to be drawn
var polling = null; // variable for setInterval function
var inactive = true; // flag for show/hide inactive alarms
var networkNode = "http://www.opcweb.com:58725"; // variable for the network node
var currentlist = {
"filter": {
"minpriority": 0,
"maxpriority": 9999,
"networknodes": [
"localhost"
],
"alarmtypes": [
"Digital", "High", "Low", "High High", "Low Low", "Operator"
]
},
"history": false
}; // object for holding json data
// function to clear out the variables and html
function resetvariables(){
clearInterval(polling);
currentlist.id = null;
drawheader = true;
polling = null;
$("#tbalarms").empty();
$('#divalarmlistid').empty();
$("#togglepolling").prop("value", "Start Polling");
}
// function to format the date for display
function fDate(dt){
var M = dt.getMonth() + 1;
M = M.toString().padStart(2,0);
var D = dt.getDate().toString().padStart(2,0);
var H = dt.getHours().toString().padStart(2,0);
var Min = dt.getMinutes().toString().padStart(2,0);
var S = dt.getSeconds().toString().padStart(2,0);
return M +"/" + D + "/" + dt.getFullYear() + " " + H + ":" + Min + ":" + S;
}
// function to display error messages
function displaymessage(mess, fnc){
clearInterval(polling); // in the event of an error we stop the polling
switch(mess) {
case 401:
$('#diverror').html("Authentication required.");
break;
case 404:
if((fnc == "delete")||(fnc == "update")){
$('#diverror').html("Alarm List not found.");
}else{
$('#diverror').html("404");
}
break;
default:
$('#diverror').html(mess);
}
}
// function to delete an alarm by id
function deletealarm(alarmid){
var deletedata = [
{
"id": alarmid,
"action" : "Delete",
"networknode" : "localhost"
}
]
$.ajax({
url: networkNode + "/OASREST/v2/alarmlists/set",
type: "POST",
headers: {"clientid": clientid, "token": token},
contentType: "application/json; charset=utf-8",
crossDomain: true,
dataType: "json",
data: JSON.stringify(deletedata),
success: function(r) {
}
});
};
// function to acknowledge an alarm by id
function ackalarm(alarmid){
var ackdata = [
{
"id": alarmid,
"action" : "Ack",
"networknode" : "localhost"
}
]
$.ajax({
url: networkNode + "/OASREST/v2/alarmlists/set",
type: "POST",
headers: {"clientid": clientid, "token": token},
contentType: "application/json; charset=utf-8",
crossDomain: true,
dataType: "json",
data: JSON.stringify(ackdata),
success: function(r) {
}
});
};
$(document).ready(function() {
// function to authorize user and get token and client id
$("#doauth").click(function(){
resetvariables();
// api call for authorization
$.ajax({
url: networkNode + "/OASREST/v2/authenticate",
type: "POST",
contentType: "application/json; charset=utf-8",
crossDomain: true,
dataType: "json",
data: '{"username": "", "password": ""}',
success: function(r) {
clientid = r.data.clientid; // set the clientid variable returned from the call
token = r.data.token; // set the token variable returned from the call
$('#divid').html(clientid); // display the client id
$('#divtoken').html(token); // display the token
},
error: function (e) {
displaymessage(e.status, "auth"); // in case of error, display the error
}
});
});
// click event to handle and toggle create/delete alarmlist button
$("#createalarmlist").click(function(){
// if alarmlist id doesn't exist, create one.
if (!currentlist.id){
$.ajax({
url: networkNode + "/OASREST/v2/alarmlists",
type: "POST",
contentType: "application/json; charset=utf-8",
crossDomain: true,
dataType: "json",
headers: {"clientid": clientid, "token": token},
data: JSON.stringify(currentlist),
success: function(r) {
currentlist.id = r.data.id; // store the returned alarmlist id in the object
$('#divalarmlistid').html(currentlist.id); // display the alarmlist id on the page
$('#diverror').empty(); // success, so clear the error
$("#createalarmlist").prop("value", "Delete Alarm List"); // toggle button text
},
error: function (e) {
displaymessage(e.status, "createalarmlist"); // in case of error, display the error
}
});
// if alarmlist id exists, delete it.
}else{
$.ajax({
url: networkNode + "/OASREST/v2/alarmlists/" + currentlist.id,
type: "DELETE",
contentType: "application/json; charset=utf-8",
crossDomain: true,
dataType: "json",
headers: {"clientid": clientid, "token": token},
success: function(r) {
resetvariables(); // clear everything out to start again
$("#createalarmlist").prop("value", "Create Alarm List"); // toggle button text
},
error: function (e) {
displaymessage(e.status, "delete"); // in case of error, display the error
}
});
}
});
// click function to toggle polling
$("#togglepolling").click(function(){
// if no alarm list exists, exit
if (!currentlist.id){
displaymessage("Alarm List not found", "poll");
return;
}
// if we aren't polling, start the polling
if (polling == null){
polling = setInterval(getalarmlist, 1000);
getalarmlist();
$("#togglepolling").prop("value", "Stop Polling"); // update polling button text
// if we are polling, stop the polling
} else {
clearInterval(polling);
polling = null;
$("#togglepolling").prop("value", "Start Polling"); // update polling button text
}
});
// gets the alarm data and draws the table
function getalarmlist(){
var table = $("#tbalarms");
// only draw the header one time
if (drawheader){
var th = "<tr>";
th += "<th>Alarm Date</th>";
th += "<th class='center'>Active</th>";
th += "<th>Text</th>";
th += "<th>Type</th>";
th += "<th>Group</th>";
th += "<th class='center'>Acked</th>";
th += "<th class='center'>Delete</th>";
th += "</tr>";
table.append(th);
}
// call to the api to get the alarms for the current list
$.ajax({
url: networkNode + "/OASREST/v2/alarmlists/" + currentlist.id,
type: "GET",
contentType: "application/json; charset=utf-8",
crossDomain: true,
dataType: "json",
headers: {"clientid": clientid, "token": token},
success: function(r) {
$('#diverror').empty(); // success, so clear the errors
for (var i = 0; i < r.data.length; i++){
var temp = r.data[i].id;
trid = temp.replaceAll('.', '_').replace(/\s/g, ''); // remove space and periods for row id
var ts = new Date(r.data[i].alarmdate) // hold the alarm date in a date variable
var acttxt = ""; // variable for active column text
var ackedtxt = "<img src='images/unchecked.png' style='cursor:pointer;' ondblclick='ackalarm(\"" + r.data[i].id + "\")'>"; // Acknowledged checkbox
var rclass = ""; // variable for row class
// set the css class for the row base on active and acknowledged
if (r.data[i].active) {
acttxt = "X";
rclass += "activerow";
}else{
rclass += "inactive ";
}
if (r.data[i].acked) {
ackedtxt = "<img src='images/checked.png'>";
rclass += "ackedrow";
}
// build the row
var str = "<tr class='" + rclass + "' id='" + trid + "'>";
str += "<td class=''>" + fDate(ts) + "</td>";
str += "<td class='center'>" + acttxt + "</td>";
str += "<td class=''>" + r.data[i].text + "</td>";
str += "<td class=''>" + r.data[i].type + "</td>";
str += "<td class=''>" + r.data[i].group + "</td>";
str += "<td class='center'>" + ackedtxt + "</td>";
str += "<td class='center'><img src='images/delete.png' style='cursor:pointer;' onclick='deletealarm(\"" + r.data[i].id + "\")'></td>";
str += "</tr>";
// if the row already existed and this is an update, remove it first
if(!drawheader){
$('#' + trid).remove();
$('#tbalarms tr:first').after(str);
}else{
table.append(str);
}
// remove deleted alarms
if(r.data[i].text == "DELETEALARM"){
$('#' + trid).remove();
}
}
drawheader = false; // toggle flag for the header so the header row does not get redrawn after the first time
}
});
};
// click function to toggle polling
$("#togglepolling").click(function(){
// if no alarm list exists, exit
if (!currentlist.id){
displaymessage("Alarm List not found", "poll");
return;
}
// if we aren't polling, start the polling
if (polling == null){
polling = setInterval(getalarmlist, 1000);
getalarmlist();
$("#togglepolling").prop("value", "Stop Polling"); // update polling button text
// if we are polling, stop the polling
} else {
clearInterval(polling);
polling = null;
$("#togglepolling").prop("value", "Start Polling"); // update polling button text
}
});
$("#toggleactive").click(function(){
if (polling){
if (!currentlist.id){ // don't let them toggle active if there is no alarm list
displaymessage("Alarm List not found", "toggleactive");
return;
}
if (inactive){
$("#toggleactive").prop("value", "Show Inactive");
$('#tbalarms tr').filter('.inactive').hide(); // hide the inactive rows
inactive = false;
} else {
$("#toggleactive").prop("value", "Hide Inactive");
$('#tbalarms tr').filter('.inactive').show(); // show the inactive rows
inactive = true;
}
}else{
displaymessage("Start Polling First", "toggleactive"); // in case of error, display the error
}
});
});
</script>
</head>
<body>
<div class='main'>
<input type='button' id='doauth' class='button' value='Authenticate'><input type='button' id='createalarmlist' class='button' value='Create Alarm List'><input type='button' id='togglepolling' class='button' value='Start Polling'><input type='button' id='toggleactive' class='button' value='Hide Inactive'><br><br>
<div class='outer'><div class='label'>Client ID:</div><div id='divid' class='value'></div></div>
<div class='outer'><div class='label'>Token:</div><div id='divtoken' class='value'></div></div>
<div class='outer'><div class='label'>Alarm List ID:</div><div id='divalarmlistid' class='value'></div></div><br>
<div class='outer'><div class='label'>Message:</div><div id='diverror' class='value'></div></div><br>
<div id='displaythis'></div>
<div style='overflow: auto; width: 100%; height: 500px;'><table id='tbalarms'></table></div>
</div>
</body>
</html>
To download the source code for this tutorial, click here.
The OAS REST API is a programmatic interface that allows you to manage OPC UA alarms via JSON over HTTP. This tutorial walks you through downloading and installing OAS, configuring an OPC UA driver, configuring tags and using the REST API to access real-time and historical OPC UA alarm data. We will build a sample JavaScript Web Interface to demonstrate building an alarm viewer with the ability to acknowledge active alarms.
Step 1. Download and Install the Open Automation Software and Start the OAS Service
If you have not already done so, you will need to download and install the OAS platform. Fully functional trial versions of the software are available for Windows, Windows IoT Core, Linux, Raspberry Pi and Docker on our downloads page.
On Windows run the downloaded Setup.exe file to install one or more of the Open Automation Software features. Select the default Typical installation if you are not sure what features to use or the Custom installation if you want to save disk space on the target system. When prompted agree to the End User License Agreement to continue the installation.
The OAS Service Control application will appear when the installation finishes on Windows. Use this application to start the 3 Services. Run the Configure OAS application on Windows and select Configure-Tags; if the first time running, the AdminCreate utility will run to create an Administrator login as shown in Step 1 of Getting Started – Security.
Step 2. Configure Your OPC UA Data Source
First, you will need to open the Configure OAS application from the program group Open Automation Software.
Select Configure >> License from the top menu and verify that OPC UA is one of the available Drivers in the lower left of the form. The demo license will have this by default. If you do not see OPC UA available, contact support@openautomationsoftware.com to update your license.
Select Configure >> Drivers from the top menu.
Select localhost or the remote service you wish to modify with the Select button to the right of the Network Node list.
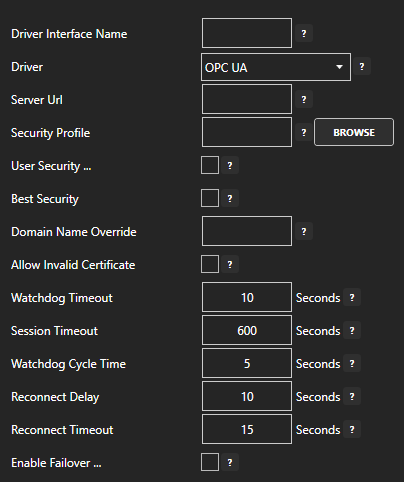
The Configure Drivers Screen will appear. Select OPC UA from the Driver dropdown box.
Enter a meaningful Driver Interface Name that you will refer to this physical connection when defining Tags with a OPC UA Data Source.
Define the properties for the desired physical connection.
Click the Add Driver button above the Driver list in the left pane to add the Driver Interface as an available selection when defining Tags in the next step.
Step 4. Access Real Time and Historical Alarm Data with the REST API
Getting Started
To use the OAS REST API you must make sure that the OAS HTTP service is listening on the correct port. To do this, open the OAS Configuration application and select Configure > Options, then select the network node (localhost if working on the local machine) and click Select. Under the Networking tab, locate the field for REST API/WebHMI Port Number. The default is 58725 but can be changed. If you are accessing the server from a remote client, you will also need to make sure your machine and/or company firewalls allow TCP traffic on the selected port.
Above is the start of the head tag and a link to the jQuery library. We will be using jQuery for this tutorial.
var networkNode = "http://www.opcweb.com:58725"; // variable for the network node
var clientid =  ""; // holds the client id from authorization
var token =  "";    // holds the token from authorization
var polling = null; // variable for setInterval function
var drawheader = true; // flag for whether the table header needs to be drawn
var inactive  = true; // flag for show/hide inactive alarms
var currentlist = {
            "filter": {
                "minpriority": 0,
                "maxpriority": 9999,
                "networknodes": [
                "localhost"
                ],
                "alarmtypes": [
                "Digital", "High", "Low", "High High", "Low Low", "Operator"
                ]
            },
            "history": false
        }; // object for holding json data
Next, we declare some variables that we will use later. The networkNode is the URL for where the OAS Service you are calling is located. The clientid and the token are variables that we will use to hold the authentication credentials that will be returned in our first call. Polling is a variable we will use to hold the setInterval function for our repeat calls to the API to get the alarm data. The drawheader is a flag that we set to let us know if we need to draw the header of our display again as we are polling. The currentlist object holds the data we are going to send to the API later: filters for which alarms we want to see and a boolean for whether or not we want to see historical alarms.
// function to clear out the variables and html
function resetvariables(){
    clearInterval(polling);
    currentlist.id = null;
    drawheader = true;
    polling = null;
    $("#tbalarms").empty();
    $('#divalarmlistid').empty();
    $("#togglepolling").prop("value", "Start Polling");

}
The clearvariables() function above does just that. We will call it later in our application to reset our button text and reset our variables when needed.
// function to display error messages
function displaymessage(mess, fnc){
    clearInterval(polling); // in the event of an error we stop the polling
    switch(mess) {
        case 401:
            $('#diverror').html("Authentication required.");
            break;
        case 404:
            if((fnc == "delete")||(fnc == "update")){
                $('#diverror').html("Alarm List not found.");
            }else{
                $('#diverror').html("404");
            }
            break;
        default:
            $('#diverror').html(mess);
    }
}
The displaymessage() function is called when our API request returns with an error. It will display the message on the page.
Authenticate
$("#doauth").click(function(){ // click funtion for authenticatation
    clearvariables(); // clear out the old variables, we are starting over
    // api call for authenticatation
    $.ajax({
        url: networkNode + "/OASREST/v2/authenticate",
        type: "POST",
        contentType: "application/json; charset=utf-8",
        crossDomain: true,
        dataType: "json",
        data: '{"username": "", "password": ""}',
        success: function(r) {
            clientid = r.data.clientid; // store the client id for later calls
            token = r.data.token;  // store the token for later calls
            $('#divid').html(clientid); // display the client id
            $('#divtoken').html(token); // display the token
        },
        error: function (e) {
            displaymessage(e.status, "auth"); // in case of error, display the error
        }
    });
});
The first call you will always need to make is to Authenticate. This will create a session and return a clientid and token that you will send in the header of all of your subsequent calls. The API call above is inside of a click function that handles the click event for the Authenticate button. The first thing we do is call the clearvariable() function in case the user has been using the application already. When the session is created it creates a new clientid and token. Anything that may have been done previously on the page will be tied to the old session and no longer be accessible so we clear out the old display as well.
We are using the jQuery ajax() method to send an asynchronous HTTP request to the server. The first parameter url specifies the address we are sending our request to. The networkNode we set above is used here. The Authenticate call is a POST which we specify in the type parameter. Next, contentType: application/json; charset=utf-8 designates the content to be in JSON format, encoded in the UTF-8 character encoding. The crossDomain parameter is set to true, allowing us to send our request to a resource that is outside of our own domain. The dataType parameter is set to “json”, letting the server know we expect the response to come back in JSON format. In out data parameter, what we are sending to the server, we have two variables: username and password. In this example, they are empty strings which will allow us to create a session in the default security group. For more information about security groups, see the Getting Started – Security tutorial in our knowledge base.
If we were to run the Authenticate function successfully here is what would be returned:
{
    "status": "OK",
    "data": {
        "clientid": "e90c8ae8-6b12-4690-a02b-f35ad03b3d2d",
        "token": "f16c3098-b295-4572-9a6b-f53ee984d21b"
    },
    "messages": [
        "Default credential provided - access to data and operations may be limited"
    ]
}
In which case, we process the return inside of our success function. We set the clientid page variable to the clientid property of the data object of the return object and the token page variable to the token property. If an error were to be returned, we handle it in our error function where we send the message to the displaymessage() function.
Create and Delete Alarm List
// click event to handle and toggle create/delete alarmlist button
$("#createalarmlist").click(function(){
    // if alarmlist id doesn't exist, create one.
    if (!currentlist.id){
        $.ajax({
            url: networkNode + "/OASREST/v2/alarmlists",
            type: "POST",
            contentType: "application/json; charset=utf-8",
            crossDomain: true,
            dataType: "json",
            headers: {"clientid": clientid, "token": token},
            data: JSON.stringify(currentlist),
            success: function(r) {
                currentlist.id = r.data.id;  // store the returned alarmlist id in the object
                $('#divalarmlistid').html(currentlist.id); // display the alarmlist id on the page
                $('#diverror').empty(); // success, so clear the error
                $("#createalarmlist").prop("value", "Delete Alarm List"); // toggle button text
            },
            error: function (e) {
                displaymessage(e.status, "createalarmlist");  // in case of error, display the error
            }
        });

        // if alarmlist id exists, delete it.
    }else{
        $.ajax({
            url: networkNode + "/OASREST/v2/alarmlists/" + currentlist.id,
            type: "DELETE",
            contentType: "application/json; charset=utf-8",
            crossDomain: true,
            dataType: "json",
            headers: {"clientid": clientid, "token": token},
            success: function(r) {
                 resetvariables(); // clear everything out to start again
                 $("#createalarmlist").prop("value", "Create Alarm List");  // toggle button text
            },
            error: function (e) {
                displaymessage(e.status, "delete"); // in case of error, display the error
            }
        });
    }
});
The $(“#createalarmlist”).click(function() handles both creating and deleting an alarm list depending on the button state. The first thing it does is to check to see if a currentlist.id exists. If it doesn’t, it creates one with the API call. This call is a “POST” and sends the clientid and token in the header. In the data parameter, it sends in our currentlist object after formatting it. The currentlist has our filter parameters for creating the alarm list. In the success function, we assign the returned list id to our currentlist object, display it on the page, clear out any old error messages and toggle the button text. In the case of an error, we display it.
If a currentlist.id already exists, we know the user has clicked the Delete Alarm List button, so we will delete it with our API call. This one is a “DELETE” type, appends the currentlist.id to the end of the url so the server knows which list to delete, passes the clientid and the token in the header and doesn’t need a data parameter. In the success function, we call the resetvariables() function to clear out all of the old list information because we are starting over and toggle the button text. In the case of an error, we display it.
Get Alarm List
// click function to toggle polling
$("#togglepolling").click(function(){
    // if no alarm list exists, exit
    if (!currentlist.id){
        displaymessage("Alarm List not found", "poll");
        return;
    }
    // if we aren't polling, start the polling
    if (polling == null){
        polling = setInterval(getalarmlist, 1000);
        getalarmlist();
        $("#togglepolling").prop("value", "Stop Polling"); // update polling button text
    // if we are polling, stop the polling
    } else {
        clearInterval(polling);
        polling = null;
        $("#togglepolling").prop("value", "Start Polling");  // update polling button text
    }
});

// gets the alarm data and draws the table
function getalarmlist(){
    var table = $("#tbalarms");
    // only draw the header one time
    if (drawheader){
        var th = "<tr>";
        th += "<th>Alarm Date</th>";
        th += "<th class='center'>Active</th>";
        th += "<th>Text</th>";
        th += "<th>Type</th>";
        th += "<th>Group</th>";
        th += "<th class='center'>Acked</th>";
        th += "<th class='center'>Delete</th>";
        th += "</tr>";
        table.append(th);
    }
    // call to the api to get the alarms for the current list
    $.ajax({
        url: networkNode + "/OASREST/v2/alarmlists/" + currentlist.id,
        type: "GET",
        contentType: "application/json; charset=utf-8",
        crossDomain: true,
        dataType: "json",
        headers: {"clientid": clientid, "token": token},
        success: function(r) {
            $('#diverror').empty(); // success, so clear the errors
            for (var i = 0; i < r.data.length; i++){
                var temp = r.data[i].id;
                trid = temp.replaceAll('.', '_').replace(/\s/g, ''); // remove space and periods for row id
                var ts = new Date(r.data[i].alarmdate) // hold the alarm date in a date variable
                var acttxt = ""; // variable for active column text
                var ackedtxt = "<img src='images/unchecked.png' style='cursor:pointer;' ondblclick='ackalarm(\"" + r.data[i].id + "\")'>"; // Acknowledged checkbox
                var rclass = ""; // variable for row class
                // set the css class for the row base on active and acknowledged
                if (r.data[i].active) {
                    acttxt = "X";
                    rclass += "activerow";
                }else{
                    rclass += "inactive ";
                }
                if (r.data[i].acked) {
                    ackedtxt = "<img src='images/checked.png'>";
                    rclass += "ackedrow";
                }
                // build the row
                var str = "<tr class='" + rclass + "' id='" + trid + "'>";
                str += "<td class=''>" + fDate(ts) + "</td>";
                str += "<td class='center'>" + acttxt + "</td>";
                str += "<td class=''>" + r.data[i].text + "</td>";
                str += "<td class=''>" + r.data[i].type + "</td>";
                str += "<td class=''>" + r.data[i].group + "</td>";
                str += "<td class='center'>" + ackedtxt + "</td>";
                str += "<td class='center'><img src='images/delete.png' style='cursor:pointer;' onclick='deletealarm(\"" + r.data[i].id + "\")'></td>";
                str += "</tr>";
                // if the row already existed and this is an update, remove it first
                if(!drawheader){
                    $('#' + trid).remove();
                    $('#tbalarms tr:first').after(str);
                }else{
                    table.append(str);
                }
                // remove deleted alarms
                if(r.data[i].text == "DELETEALARM"){
                        $('#' + trid).remove();
                }
            }
            drawheader = false; // toggle flag for the header so the header row does not get redrawn after the first time
        }
    });
};

// function to format the date for display
function fDate(dt){
    var M = dt.getMonth() + 1;
    M = M.toString().padStart(2,0);
    var D = dt.getDate().toString().padStart(2,0);
    var H = dt.getHours().toString().padStart(2,0);
    var Min = dt.getMinutes().toString().padStart(2,0);
    var S = dt.getSeconds().toString().padStart(2,0);
    return M +"/" + D + "/" + dt.getFullYear() + " " + H + ":" + Min + ":" + S;
}
Now that we have our list created, we want to start polling the data. This is handled with the Start Polling button and the $(“#togglepolling”).click(function(). The first thing thing we do in the function is check to see if we have an alarm list created, if we don’t we display an error and exit the function. Next, we check to see if are already polling. If we aren’t, we use the JavaScript setInterval() function to call the getalarmlist() function every three seconds. We then immediately call the getalarmlist() function so that we don’t have to wait three seconds for it to run the first time.
Inside the getalarmlist() function, we check to see if the table header has already been drawn. If it hasn’t been, we draw it. Next, we call the API with a “GET” type, appending the currentlist id to the url, passing the clientid and token in the header and bypassing the data parameter as it is not needed for this call. In our success function, we clear out any old error messages and then build our display by looping through the returned array of alarms. We remove the periods and spaces from the alarm id to use it as the row id. Next, we look at alarms active and acknowledged states and do some formatting for those columns and the row color. We write out each of the returned alarm properties in our array and format the date for display. Then we check to see if this an update, (!drawheader). If it is we want to delete the old row before we add the new one. After that, we check the alarm text to see if we should delete the alarm and do so if that is the case. Finally, we set the drawheader to false so that we don’t keep redrawing it each time we poll the data. Back in our click event, we toggle the polling button text.
If the user has clicked the Stop Polling button, we clear the polling and set it to null and toggle the button text.
Update Alarms
// function to delete an alarm by id
function deletealarm(alarmid){
    var deletedata = [
        {
            "id": alarmid,
            "action" : "Delete",
            "networknode" : "localhost"
        }
    ]
    $.ajax({
        url: networkNode + "/OASREST/v2/alarmlists/set",
        type: "POST",
        headers: {"clientid": clientid, "token": token},
        contentType: "application/json; charset=utf-8",
        crossDomain: true,
        dataType: "json",
        data: JSON.stringify(deletedata),
        success: function(r) {
        }
    });
};

// function to acknowledge an alarm by id
function ackalarm(alarmid){
    var ackdata = [
        {
            "id": alarmid,
            "action" : "Ack",
            "networknode" : "localhost"
        }
    ]
    $.ajax({
        url: networkNode + "/OASREST/v2/alarmlists/set",
        type: "POST",
        headers: {"clientid": clientid, "token": token},
        contentType: "application/json; charset=utf-8",
        crossDomain: true,
        dataType: "json",
        data: JSON.stringify(ackdata),
        success: function(r) {
        }
    });
};
With the Update Alarms API call, you can Acknowledge, Delete and add Comments to an alarm. Valid operations are “Ack”, “Delete”, and “Comment” and are case-sensitive. In our demo, when the user clicks the Delete icon for the alarm, it fires the deletealarm() function, passing in the alarm id. The function calls the REST API with a “POST” type and passes the clientid and the token in the header. In the data parameter, we pass the alarm id, network node and the “Delete” action. In the polling that follows this call, the server sends “DELETEALARM” in the text of the alarm array for the deleted alarm letting us know to remove it from the display.
When the user double clicks the Acknowledged checkbox, it fires the ackalarm() function and passes in the alarm id. The function calls the REST API with a “POST” type and passes the clientid and the token in the header. In the data parameter, we pass the alarm id, network node and the “Ack” action. In the polling that follows this call, the server sends that alarm with the active property flagged as true and we then update the checkbox and row color.
Hide Inactive
$("#toggleactive").click(function(){
    if (polling){
        if (!currentlist.id){ // don't let them toggle active if there is no alarm list
            displaymessage("Alarm List not found", "toggleactive");
            return;
        }
        if (inactive){
            $("#toggleactive").prop("value", "Show Inactive");
            $('#tbalarms tr').filter('.inactive').hide(); // hide the inactive rows
            inactive = false;
        } else {
            $("#toggleactive").prop("value", "Hide Inactive");
            $('#tbalarms tr').filter('.inactive').show(); // show the inactive rows
            inactive = true;
        }
    }else{
        displaymessage("Start Polling First", "toggleactive"); // in case of error, display the error
    }
});
The Hide Inactive button does not make a call to the REST API, it just adjusts the display to hide or show the inactive alarms based on the button state.
From the Top…
<!DOCTYPE html>
<html lang="en">
<head>
<meta charset="utf-8"/>
<title>REST Example | Alarms</title>
<link rel="stylesheet" stype="text/css" href="client.css?id=12345678">
<script src="https://code.jquery.com/jquery-3.1.1.min.js"></script>
<script type="text/javascript">
var clientid = ""; // holds the client id from authorization
var token = ""; // holds the token from authorization
var drawheader = true; // flag for whether the table header needs to be drawn
var polling = null; // variable for setInterval function
var inactive = true; // flag for show/hide inactive alarms
var networkNode = "http://www.opcweb.com:58725"; // variable for the network node
var currentlist = {
"filter": {
"minpriority": 0,
"maxpriority": 9999,
"networknodes": [
"localhost"
],
"alarmtypes": [
"Digital", "High", "Low", "High High", "Low Low", "Operator"
]
},
"history": false
}; // object for holding json data
// function to clear out the variables and html
function resetvariables(){
clearInterval(polling);
currentlist.id = null;
drawheader = true;
polling = null;
$("#tbalarms").empty();
$('#divalarmlistid').empty();
$("#togglepolling").prop("value", "Start Polling");
}
// function to format the date for display
function fDate(dt){
var M = dt.getMonth() + 1;
M = M.toString().padStart(2,0);
var D = dt.getDate().toString().padStart(2,0);
var H = dt.getHours().toString().padStart(2,0);
var Min = dt.getMinutes().toString().padStart(2,0);
var S = dt.getSeconds().toString().padStart(2,0);
return M +"/" + D + "/" + dt.getFullYear() + " " + H + ":" + Min + ":" + S;
}
// function to display error messages
function displaymessage(mess, fnc){
clearInterval(polling); // in the event of an error we stop the polling
switch(mess) {
case 401:
$('#diverror').html("Authentication required.");
break;
case 404:
if((fnc == "delete")||(fnc == "update")){
$('#diverror').html("Alarm List not found.");
}else{
$('#diverror').html("404");
}
break;
default:
$('#diverror').html(mess);
}
}
// function to delete an alarm by id
function deletealarm(alarmid){
var deletedata = [
{
"id": alarmid,
"action" : "Delete",
"networknode" : "localhost"
}
]
$.ajax({
url: networkNode + "/OASREST/v2/alarmlists/set",
type: "POST",
headers: {"clientid": clientid, "token": token},
contentType: "application/json; charset=utf-8",
crossDomain: true,
dataType: "json",
data: JSON.stringify(deletedata),
success: function(r) {
}
});
};
// function to acknowledge an alarm by id
function ackalarm(alarmid){
var ackdata = [
{
"id": alarmid,
"action" : "Ack",
"networknode" : "localhost"
}
]
$.ajax({
url: networkNode + "/OASREST/v2/alarmlists/set",
type: "POST",
headers: {"clientid": clientid, "token": token},
contentType: "application/json; charset=utf-8",
crossDomain: true,
dataType: "json",
data: JSON.stringify(ackdata),
success: function(r) {
}
});
};
$(document).ready(function() {
// function to authorize user and get token and client id
$("#doauth").click(function(){
resetvariables();
// api call for authorization
$.ajax({
url: networkNode + "/OASREST/v2/authenticate",
type: "POST",
contentType: "application/json; charset=utf-8",
crossDomain: true,
dataType: "json",
data: '{"username": "", "password": ""}',
success: function(r) {
clientid = r.data.clientid; // set the clientid variable returned from the call
token = r.data.token; // set the token variable returned from the call
$('#divid').html(clientid); // display the client id
$('#divtoken').html(token); // display the token
},
error: function (e) {
displaymessage(e.status, "auth"); // in case of error, display the error
}
});
});
// click event to handle and toggle create/delete alarmlist button
$("#createalarmlist").click(function(){
// if alarmlist id doesn't exist, create one.
if (!currentlist.id){
$.ajax({
url: networkNode + "/OASREST/v2/alarmlists",
type: "POST",
contentType: "application/json; charset=utf-8",
crossDomain: true,
dataType: "json",
headers: {"clientid": clientid, "token": token},
data: JSON.stringify(currentlist),
success: function(r) {
currentlist.id = r.data.id; // store the returned alarmlist id in the object
$('#divalarmlistid').html(currentlist.id); // display the alarmlist id on the page
$('#diverror').empty(); // success, so clear the error
$("#createalarmlist").prop("value", "Delete Alarm List"); // toggle button text
},
error: function (e) {
displaymessage(e.status, "createalarmlist"); // in case of error, display the error
}
});
// if alarmlist id exists, delete it.
}else{
$.ajax({
url: networkNode + "/OASREST/v2/alarmlists/" + currentlist.id,
type: "DELETE",
contentType: "application/json; charset=utf-8",
crossDomain: true,
dataType: "json",
headers: {"clientid": clientid, "token": token},
success: function(r) {
resetvariables(); // clear everything out to start again
$("#createalarmlist").prop("value", "Create Alarm List"); // toggle button text
},
error: function (e) {
displaymessage(e.status, "delete"); // in case of error, display the error
}
});
}
});
// click function to toggle polling
$("#togglepolling").click(function(){
// if no alarm list exists, exit
if (!currentlist.id){
displaymessage("Alarm List not found", "poll");
return;
}
// if we aren't polling, start the polling
if (polling == null){
polling = setInterval(getalarmlist, 1000);
getalarmlist();
$("#togglepolling").prop("value", "Stop Polling"); // update polling button text
// if we are polling, stop the polling
} else {
clearInterval(polling);
polling = null;
$("#togglepolling").prop("value", "Start Polling"); // update polling button text
}
});
// gets the alarm data and draws the table
function getalarmlist(){
var table = $("#tbalarms");
// only draw the header one time
if (drawheader){
var th = "<tr>";
th += "<th>Alarm Date</th>";
th += "<th class='center'>Active</th>";
th += "<th>Text</th>";
th += "<th>Type</th>";
th += "<th>Group</th>";
th += "<th class='center'>Acked</th>";
th += "<th class='center'>Delete</th>";
th += "</tr>";
table.append(th);
}
// call to the api to get the alarms for the current list
$.ajax({
url: networkNode + "/OASREST/v2/alarmlists/" + currentlist.id,
type: "GET",
contentType: "application/json; charset=utf-8",
crossDomain: true,
dataType: "json",
headers: {"clientid": clientid, "token": token},
success: function(r) {
$('#diverror').empty(); // success, so clear the errors
for (var i = 0; i < r.data.length; i++){
var temp = r.data[i].id;
trid = temp.replaceAll('.', '_').replace(/\s/g, ''); // remove space and periods for row id
var ts = new Date(r.data[i].alarmdate) // hold the alarm date in a date variable
var acttxt = ""; // variable for active column text
var ackedtxt = "<img src='images/unchecked.png' style='cursor:pointer;' ondblclick='ackalarm(\"" + r.data[i].id + "\")'>"; // Acknowledged checkbox
var rclass = ""; // variable for row class
// set the css class for the row base on active and acknowledged
if (r.data[i].active) {
acttxt = "X";
rclass += "activerow";
}else{
rclass += "inactive ";
}
if (r.data[i].acked) {
ackedtxt = "<img src='images/checked.png'>";
rclass += "ackedrow";
}
// build the row
var str = "<tr class='" + rclass + "' id='" + trid + "'>";
str += "<td class=''>" + fDate(ts) + "</td>";
str += "<td class='center'>" + acttxt + "</td>";
str += "<td class=''>" + r.data[i].text + "</td>";
str += "<td class=''>" + r.data[i].type + "</td>";
str += "<td class=''>" + r.data[i].group + "</td>";
str += "<td class='center'>" + ackedtxt + "</td>";
str += "<td class='center'><img src='images/delete.png' style='cursor:pointer;' onclick='deletealarm(\"" + r.data[i].id + "\")'></td>";
str += "</tr>";
// if the row already existed and this is an update, remove it first
if(!drawheader){
$('#' + trid).remove();
$('#tbalarms tr:first').after(str);
}else{
table.append(str);
}
// remove deleted alarms
if(r.data[i].text == "DELETEALARM"){
$('#' + trid).remove();
}
}
drawheader = false; // toggle flag for the header so the header row does not get redrawn after the first time
}
});
};
// click function to toggle polling
$("#togglepolling").click(function(){
// if no alarm list exists, exit
if (!currentlist.id){
displaymessage("Alarm List not found", "poll");
return;
}
// if we aren't polling, start the polling
if (polling == null){
polling = setInterval(getalarmlist, 1000);
getalarmlist();
$("#togglepolling").prop("value", "Stop Polling"); // update polling button text
// if we are polling, stop the polling
} else {
clearInterval(polling);
polling = null;
$("#togglepolling").prop("value", "Start Polling"); // update polling button text
}
});
$("#toggleactive").click(function(){
if (polling){
if (!currentlist.id){ // don't let them toggle active if there is no alarm list
displaymessage("Alarm List not found", "toggleactive");
return;
}
if (inactive){
$("#toggleactive").prop("value", "Show Inactive");
$('#tbalarms tr').filter('.inactive').hide(); // hide the inactive rows
inactive = false;
} else {
$("#toggleactive").prop("value", "Hide Inactive");
$('#tbalarms tr').filter('.inactive').show(); // show the inactive rows
inactive = true;
}
}else{
displaymessage("Start Polling First", "toggleactive"); // in case of error, display the error
}
});
});
</script>
</head>
<body>
<div class='main'>
<input type='button' id='doauth' class='button' value='Authenticate'><input type='button' id='createalarmlist' class='button' value='Create Alarm List'><input type='button' id='togglepolling' class='button' value='Start Polling'><input type='button' id='toggleactive' class='button' value='Hide Inactive'><br><br>
<div class='outer'><div class='label'>Client ID:</div><div id='divid' class='value'></div></div>
<div class='outer'><div class='label'>Token:</div><div id='divtoken' class='value'></div></div>
<div class='outer'><div class='label'>Alarm List ID:</div><div id='divalarmlistid' class='value'></div></div><br>
<div class='outer'><div class='label'>Message:</div><div id='diverror' class='value'></div></div><br>
<div id='displaythis'></div>
<div style='overflow: auto; width: 100%; height: 500px;'><table id='tbalarms'></table></div>
</div>
</body>
</html>
To download the source code for this tutorial, click here.
The OAS REST API is a programmatic interface that allows you to manage Siemens alarms via JSON over HTTP. This tutorial walks you through downloading and installing OAS, configuring a Siemens driver, configuring tags and using the REST API to access real-time and historical Siemens alarm data. We will build a sample JavaScript Web Interface to demonstrate building an alarm viewer with the ability to acknowledge active alarms.
Step 1. Download and Install the Open Automation Software and Start the OAS Service
If you have not already done so, you will need to download and install the OAS platform. Fully functional trial versions of the software are available for Windows, Windows IoT Core, Linux, Raspberry Pi and Docker on our downloads page.
On Windows run the downloaded Setup.exe file to install one or more of the Open Automation Software features. Select the default Typical installation if you are not sure what features to use or the Custom installation if you want to save disk space on the target system. When prompted agree to the End User License Agreement to continue the installation.
The OAS Service Control application will appear when the installation finishes on Windows. Use this application to start the 3 Services. Run the Configure OAS application on Windows and select Configure-Tags; if the first time running, the AdminCreate utility will run to create an Administrator login as shown in Step 1 of Getting Started – Security.
Step 2. Configure Your Siemens Data Source
First, you will need to open the Configure OAS application from the program group Open Automation Software.
Select Configure >> License from the top menu and verify that Siemens is one of the available Drivers in the lower left of the form. The demo license will have this by default. If you do not see Siemens available, contact support@openautomationsoftware.com to update your license.
Select Configure >> Drivers from the top menu.
Select localhost or the remote service you wish to modify with the Select button to the right of the Network Node list.
The Configure Drivers Screen will appear. Select Siemens from the Driver dropdown box.
Enter a meaningful Driver Interface Name that you will refer to this physical connection when defining Tags with a Siemens Data Source.
Define the properties for the desired physical connection.
Click the Add Driver button above the Driver list in the left pane to add the Driver Interface as an available selection when defining Tags in the next step.
Step 4. Access Real Time and Historical Alarm Data with the REST API
Getting Started
To use the OAS REST API you must make sure that the OAS HTTP service is listening on the correct port. To do this, open the OAS Configuration application and select Configure > Options, then select the network node (localhost if working on the local machine) and click Select. Under the Networking tab, locate the field for REST API/WebHMI Port Number. The default is 58725 but can be changed. If you are accessing the server from a remote client, you will also need to make sure your machine and/or company firewalls allow TCP traffic on the selected port.
Above is the start of the head tag and a link to the jQuery library. We will be using jQuery for this tutorial.
var networkNode = "http://www.opcweb.com:58725"; // variable for the network node
var clientid =  ""; // holds the client id from authorization
var token =  "";    // holds the token from authorization
var polling = null; // variable for setInterval function
var drawheader = true; // flag for whether the table header needs to be drawn
var inactive  = true; // flag for show/hide inactive alarms
var currentlist = {
            "filter": {
                "minpriority": 0,
                "maxpriority": 9999,
                "networknodes": [
                "localhost"
                ],
                "alarmtypes": [
                "Digital", "High", "Low", "High High", "Low Low", "Operator"
                ]
            },
            "history": false
        }; // object for holding json data
Next, we declare some variables that we will use later. The networkNode is the URL for where the OAS Service you are calling is located. The clientid and the token are variables that we will use to hold the authentication credentials that will be returned in our first call. Polling is a variable we will use to hold the setInterval function for our repeat calls to the API to get the alarm data. The drawheader is a flag that we set to let us know if we need to draw the header of our display again as we are polling. The currentlist object holds the data we are going to send to the API later: filters for which alarms we want to see and a boolean for whether or not we want to see historical alarms.
// function to clear out the variables and html
function resetvariables(){
    clearInterval(polling);
    currentlist.id = null;
    drawheader = true;
    polling = null;
    $("#tbalarms").empty();
    $('#divalarmlistid').empty();
    $("#togglepolling").prop("value", "Start Polling");

}
The clearvariables() function above does just that. We will call it later in our application to reset our button text and reset our variables when needed.
// function to display error messages
function displaymessage(mess, fnc){
    clearInterval(polling); // in the event of an error we stop the polling
    switch(mess) {
        case 401:
            $('#diverror').html("Authentication required.");
            break;
        case 404:
            if((fnc == "delete")||(fnc == "update")){
                $('#diverror').html("Alarm List not found.");
            }else{
                $('#diverror').html("404");
            }
            break;
        default:
            $('#diverror').html(mess);
    }
}
The displaymessage() function is called when our API request returns with an error. It will display the message on the page.
Authenticate
$("#doauth").click(function(){ // click funtion for authenticatation
    clearvariables(); // clear out the old variables, we are starting over
    // api call for authenticatation
    $.ajax({
        url: networkNode + "/OASREST/v2/authenticate",
        type: "POST",
        contentType: "application/json; charset=utf-8",
        crossDomain: true,
        dataType: "json",
        data: '{"username": "", "password": ""}',
        success: function(r) {
            clientid = r.data.clientid; // store the client id for later calls
            token = r.data.token;  // store the token for later calls
            $('#divid').html(clientid); // display the client id
            $('#divtoken').html(token); // display the token
        },
        error: function (e) {
            displaymessage(e.status, "auth"); // in case of error, display the error
        }
    });
});
The first call you will always need to make is to Authenticate. This will create a session and return a clientid and token that you will send in the header of all of your subsequent calls. The API call above is inside of a click function that handles the click event for the Authenticate button. The first thing we do is call the clearvariable() function in case the user has been using the application already. When the session is created it creates a new clientid and token. Anything that may have been done previously on the page will be tied to the old session and no longer be accessible so we clear out the old display as well.
We are using the jQuery ajax() method to send an asynchronous HTTP request to the server. The first parameter url specifies the address we are sending our request to. The networkNode we set above is used here. The Authenticate call is a POST which we specify in the type parameter. Next, contentType: application/json; charset=utf-8 designates the content to be in JSON format, encoded in the UTF-8 character encoding. The crossDomain parameter is set to true, allowing us to send our request to a resource that is outside of our own domain. The dataType parameter is set to “json”, letting the server know we expect the response to come back in JSON format. In out data parameter, what we are sending to the server, we have two variables: username and password. In this example, they are empty strings which will allow us to create a session in the default security group. For more information about security groups, see the Getting Started – Security tutorial in our knowledge base.
If we were to run the Authenticate function successfully here is what would be returned:
{
    "status": "OK",
    "data": {
        "clientid": "e90c8ae8-6b12-4690-a02b-f35ad03b3d2d",
        "token": "f16c3098-b295-4572-9a6b-f53ee984d21b"
    },
    "messages": [
        "Default credential provided - access to data and operations may be limited"
    ]
}
In which case, we process the return inside of our success function. We set the clientid page variable to the clientid property of the data object of the return object and the token page variable to the token property. If an error were to be returned, we handle it in our error function where we send the message to the displaymessage() function.
Create and Delete Alarm List
// click event to handle and toggle create/delete alarmlist button
$("#createalarmlist").click(function(){
    // if alarmlist id doesn't exist, create one.
    if (!currentlist.id){
        $.ajax({
            url: networkNode + "/OASREST/v2/alarmlists",
            type: "POST",
            contentType: "application/json; charset=utf-8",
            crossDomain: true,
            dataType: "json",
            headers: {"clientid": clientid, "token": token},
            data: JSON.stringify(currentlist),
            success: function(r) {
                currentlist.id = r.data.id;  // store the returned alarmlist id in the object
                $('#divalarmlistid').html(currentlist.id); // display the alarmlist id on the page
                $('#diverror').empty(); // success, so clear the error
                $("#createalarmlist").prop("value", "Delete Alarm List"); // toggle button text
            },
            error: function (e) {
                displaymessage(e.status, "createalarmlist");  // in case of error, display the error
            }
        });

        // if alarmlist id exists, delete it.
    }else{
        $.ajax({
            url: networkNode + "/OASREST/v2/alarmlists/" + currentlist.id,
            type: "DELETE",
            contentType: "application/json; charset=utf-8",
            crossDomain: true,
            dataType: "json",
            headers: {"clientid": clientid, "token": token},
            success: function(r) {
                 resetvariables(); // clear everything out to start again
                 $("#createalarmlist").prop("value", "Create Alarm List");  // toggle button text
            },
            error: function (e) {
                displaymessage(e.status, "delete"); // in case of error, display the error
            }
        });
    }
});
The $(“#createalarmlist”).click(function() handles both creating and deleting an alarm list depending on the button state. The first thing it does is to check to see if a currentlist.id exists. If it doesn’t, it creates one with the API call. This call is a “POST” and sends the clientid and token in the header. In the data parameter, it sends in our currentlist object after formatting it. The currentlist has our filter parameters for creating the alarm list. In the success function, we assign the returned list id to our currentlist object, display it on the page, clear out any old error messages and toggle the button text. In the case of an error, we display it.
If a currentlist.id already exists, we know the user has clicked the Delete Alarm List button, so we will delete it with our API call. This one is a “DELETE” type, appends the currentlist.id to the end of the url so the server knows which list to delete, passes the clientid and the token in the header and doesn’t need a data parameter. In the success function, we call the resetvariables() function to clear out all of the old list information because we are starting over and toggle the button text. In the case of an error, we display it.
Get Alarm List
// click function to toggle polling
$("#togglepolling").click(function(){
    // if no alarm list exists, exit
    if (!currentlist.id){
        displaymessage("Alarm List not found", "poll");
        return;
    }
    // if we aren't polling, start the polling
    if (polling == null){
        polling = setInterval(getalarmlist, 1000);
        getalarmlist();
        $("#togglepolling").prop("value", "Stop Polling"); // update polling button text
    // if we are polling, stop the polling
    } else {
        clearInterval(polling);
        polling = null;
        $("#togglepolling").prop("value", "Start Polling");  // update polling button text
    }
});

// gets the alarm data and draws the table
function getalarmlist(){
    var table = $("#tbalarms");
    // only draw the header one time
    if (drawheader){
        var th = "<tr>";
        th += "<th>Alarm Date</th>";
        th += "<th class='center'>Active</th>";
        th += "<th>Text</th>";
        th += "<th>Type</th>";
        th += "<th>Group</th>";
        th += "<th class='center'>Acked</th>";
        th += "<th class='center'>Delete</th>";
        th += "</tr>";
        table.append(th);
    }
    // call to the api to get the alarms for the current list
    $.ajax({
        url: networkNode + "/OASREST/v2/alarmlists/" + currentlist.id,
        type: "GET",
        contentType: "application/json; charset=utf-8",
        crossDomain: true,
        dataType: "json",
        headers: {"clientid": clientid, "token": token},
        success: function(r) {
            $('#diverror').empty(); // success, so clear the errors
            for (var i = 0; i < r.data.length; i++){
                var temp = r.data[i].id;
                trid = temp.replaceAll('.', '_').replace(/\s/g, ''); // remove space and periods for row id
                var ts = new Date(r.data[i].alarmdate) // hold the alarm date in a date variable
                var acttxt = ""; // variable for active column text
                var ackedtxt = "<img src='images/unchecked.png' style='cursor:pointer;' ondblclick='ackalarm(\"" + r.data[i].id + "\")'>"; // Acknowledged checkbox
                var rclass = ""; // variable for row class
                // set the css class for the row base on active and acknowledged
                if (r.data[i].active) {
                    acttxt = "X";
                    rclass += "activerow";
                }else{
                    rclass += "inactive ";
                }
                if (r.data[i].acked) {
                    ackedtxt = "<img src='images/checked.png'>";
                    rclass += "ackedrow";
                }
                // build the row
                var str = "<tr class='" + rclass + "' id='" + trid + "'>";
                str += "<td class=''>" + fDate(ts) + "</td>";
                str += "<td class='center'>" + acttxt + "</td>";
                str += "<td class=''>" + r.data[i].text + "</td>";
                str += "<td class=''>" + r.data[i].type + "</td>";
                str += "<td class=''>" + r.data[i].group + "</td>";
                str += "<td class='center'>" + ackedtxt + "</td>";
                str += "<td class='center'><img src='images/delete.png' style='cursor:pointer;' onclick='deletealarm(\"" + r.data[i].id + "\")'></td>";
                str += "</tr>";
                // if the row already existed and this is an update, remove it first
                if(!drawheader){
                    $('#' + trid).remove();
                    $('#tbalarms tr:first').after(str);
                }else{
                    table.append(str);
                }
                // remove deleted alarms
                if(r.data[i].text == "DELETEALARM"){
                        $('#' + trid).remove();
                }
            }
            drawheader = false; // toggle flag for the header so the header row does not get redrawn after the first time
        }
    });
};

// function to format the date for display
function fDate(dt){
    var M = dt.getMonth() + 1;
    M = M.toString().padStart(2,0);
    var D = dt.getDate().toString().padStart(2,0);
    var H = dt.getHours().toString().padStart(2,0);
    var Min = dt.getMinutes().toString().padStart(2,0);
    var S = dt.getSeconds().toString().padStart(2,0);
    return M +"/" + D + "/" + dt.getFullYear() + " " + H + ":" + Min + ":" + S;
}
Now that we have our list created, we want to start polling the data. This is handled with the Start Polling button and the $(“#togglepolling”).click(function(). The first thing thing we do in the function is check to see if we have an alarm list created, if we don’t we display an error and exit the function. Next, we check to see if are already polling. If we aren’t, we use the JavaScript setInterval() function to call the getalarmlist() function every three seconds. We then immediately call the getalarmlist() function so that we don’t have to wait three seconds for it to run the first time.
Inside the getalarmlist() function, we check to see if the table header has already been drawn. If it hasn’t been, we draw it. Next, we call the API with a “GET” type, appending the currentlist id to the url, passing the clientid and token in the header and bypassing the data parameter as it is not needed for this call. In our success function, we clear out any old error messages and then build our display by looping through the returned array of alarms. We remove the periods and spaces from the alarm id to use it as the row id. Next, we look at alarms active and acknowledged states and do some formatting for those columns and the row color. We write out each of the returned alarm properties in our array and format the date for display. Then we check to see if this an update, (!drawheader). If it is we want to delete the old row before we add the new one. After that, we check the alarm text to see if we should delete the alarm and do so if that is the case. Finally, we set the drawheader to false so that we don’t keep redrawing it each time we poll the data. Back in our click event, we toggle the polling button text.
If the user has clicked the Stop Polling button, we clear the polling and set it to null and toggle the button text.
Update Alarms
// function to delete an alarm by id
function deletealarm(alarmid){
    var deletedata = [
        {
            "id": alarmid,
            "action" : "Delete",
            "networknode" : "localhost"
        }
    ]
    $.ajax({
        url: networkNode + "/OASREST/v2/alarmlists/set",
        type: "POST",
        headers: {"clientid": clientid, "token": token},
        contentType: "application/json; charset=utf-8",
        crossDomain: true,
        dataType: "json",
        data: JSON.stringify(deletedata),
        success: function(r) {
        }
    });
};

// function to acknowledge an alarm by id
function ackalarm(alarmid){
    var ackdata = [
        {
            "id": alarmid,
            "action" : "Ack",
            "networknode" : "localhost"
        }
    ]
    $.ajax({
        url: networkNode + "/OASREST/v2/alarmlists/set",
        type: "POST",
        headers: {"clientid": clientid, "token": token},
        contentType: "application/json; charset=utf-8",
        crossDomain: true,
        dataType: "json",
        data: JSON.stringify(ackdata),
        success: function(r) {
        }
    });
};
With the Update Alarms API call, you can Acknowledge, Delete and add Comments to an alarm. Valid operations are “Ack”, “Delete”, and “Comment” and are case-sensitive. In our demo, when the user clicks the Delete icon for the alarm, it fires the deletealarm() function, passing in the alarm id. The function calls the REST API with a “POST” type and passes the clientid and the token in the header. In the data parameter, we pass the alarm id, network node and the “Delete” action. In the polling that follows this call, the server sends “DELETEALARM” in the text of the alarm array for the deleted alarm letting us know to remove it from the display.
When the user double clicks the Acknowledged checkbox, it fires the ackalarm() function and passes in the alarm id. The function calls the REST API with a “POST” type and passes the clientid and the token in the header. In the data parameter, we pass the alarm id, network node and the “Ack” action. In the polling that follows this call, the server sends that alarm with the active property flagged as true and we then update the checkbox and row color.
Hide Inactive
$("#toggleactive").click(function(){
    if (polling){
        if (!currentlist.id){ // don't let them toggle active if there is no alarm list
            displaymessage("Alarm List not found", "toggleactive");
            return;
        }
        if (inactive){
            $("#toggleactive").prop("value", "Show Inactive");
            $('#tbalarms tr').filter('.inactive').hide(); // hide the inactive rows
            inactive = false;
        } else {
            $("#toggleactive").prop("value", "Hide Inactive");
            $('#tbalarms tr').filter('.inactive').show(); // show the inactive rows
            inactive = true;
        }
    }else{
        displaymessage("Start Polling First", "toggleactive"); // in case of error, display the error
    }
});
The Hide Inactive button does not make a call to the REST API, it just adjusts the display to hide or show the inactive alarms based on the button state.
From the Top…
<!DOCTYPE html>
<html lang="en">
<head>
<meta charset="utf-8"/>
<title>REST Example | Alarms</title>
<link rel="stylesheet" stype="text/css" href="client.css?id=12345678">
<script src="https://code.jquery.com/jquery-3.1.1.min.js"></script>
<script type="text/javascript">
var clientid = ""; // holds the client id from authorization
var token = ""; // holds the token from authorization
var drawheader = true; // flag for whether the table header needs to be drawn
var polling = null; // variable for setInterval function
var inactive = true; // flag for show/hide inactive alarms
var networkNode = "http://www.opcweb.com:58725"; // variable for the network node
var currentlist = {
"filter": {
"minpriority": 0,
"maxpriority": 9999,
"networknodes": [
"localhost"
],
"alarmtypes": [
"Digital", "High", "Low", "High High", "Low Low", "Operator"
]
},
"history": false
}; // object for holding json data
// function to clear out the variables and html
function resetvariables(){
clearInterval(polling);
currentlist.id = null;
drawheader = true;
polling = null;
$("#tbalarms").empty();
$('#divalarmlistid').empty();
$("#togglepolling").prop("value", "Start Polling");
}
// function to format the date for display
function fDate(dt){
var M = dt.getMonth() + 1;
M = M.toString().padStart(2,0);
var D = dt.getDate().toString().padStart(2,0);
var H = dt.getHours().toString().padStart(2,0);
var Min = dt.getMinutes().toString().padStart(2,0);
var S = dt.getSeconds().toString().padStart(2,0);
return M +"/" + D + "/" + dt.getFullYear() + " " + H + ":" + Min + ":" + S;
}
// function to display error messages
function displaymessage(mess, fnc){
clearInterval(polling); // in the event of an error we stop the polling
switch(mess) {
case 401:
$('#diverror').html("Authentication required.");
break;
case 404:
if((fnc == "delete")||(fnc == "update")){
$('#diverror').html("Alarm List not found.");
}else{
$('#diverror').html("404");
}
break;
default:
$('#diverror').html(mess);
}
}
// function to delete an alarm by id
function deletealarm(alarmid){
var deletedata = [
{
"id": alarmid,
"action" : "Delete",
"networknode" : "localhost"
}
]
$.ajax({
url: networkNode + "/OASREST/v2/alarmlists/set",
type: "POST",
headers: {"clientid": clientid, "token": token},
contentType: "application/json; charset=utf-8",
crossDomain: true,
dataType: "json",
data: JSON.stringify(deletedata),
success: function(r) {
}
});
};
// function to acknowledge an alarm by id
function ackalarm(alarmid){
var ackdata = [
{
"id": alarmid,
"action" : "Ack",
"networknode" : "localhost"
}
]
$.ajax({
url: networkNode + "/OASREST/v2/alarmlists/set",
type: "POST",
headers: {"clientid": clientid, "token": token},
contentType: "application/json; charset=utf-8",
crossDomain: true,
dataType: "json",
data: JSON.stringify(ackdata),
success: function(r) {
}
});
};
$(document).ready(function() {
// function to authorize user and get token and client id
$("#doauth").click(function(){
resetvariables();
// api call for authorization
$.ajax({
url: networkNode + "/OASREST/v2/authenticate",
type: "POST",
contentType: "application/json; charset=utf-8",
crossDomain: true,
dataType: "json",
data: '{"username": "", "password": ""}',
success: function(r) {
clientid = r.data.clientid; // set the clientid variable returned from the call
token = r.data.token; // set the token variable returned from the call
$('#divid').html(clientid); // display the client id
$('#divtoken').html(token); // display the token
},
error: function (e) {
displaymessage(e.status, "auth"); // in case of error, display the error
}
});
});
// click event to handle and toggle create/delete alarmlist button
$("#createalarmlist").click(function(){
// if alarmlist id doesn't exist, create one.
if (!currentlist.id){
$.ajax({
url: networkNode + "/OASREST/v2/alarmlists",
type: "POST",
contentType: "application/json; charset=utf-8",
crossDomain: true,
dataType: "json",
headers: {"clientid": clientid, "token": token},
data: JSON.stringify(currentlist),
success: function(r) {
currentlist.id = r.data.id; // store the returned alarmlist id in the object
$('#divalarmlistid').html(currentlist.id); // display the alarmlist id on the page
$('#diverror').empty(); // success, so clear the error
$("#createalarmlist").prop("value", "Delete Alarm List"); // toggle button text
},
error: function (e) {
displaymessage(e.status, "createalarmlist"); // in case of error, display the error
}
});
// if alarmlist id exists, delete it.
}else{
$.ajax({
url: networkNode + "/OASREST/v2/alarmlists/" + currentlist.id,
type: "DELETE",
contentType: "application/json; charset=utf-8",
crossDomain: true,
dataType: "json",
headers: {"clientid": clientid, "token": token},
success: function(r) {
resetvariables(); // clear everything out to start again
$("#createalarmlist").prop("value", "Create Alarm List"); // toggle button text
},
error: function (e) {
displaymessage(e.status, "delete"); // in case of error, display the error
}
});
}
});
// click function to toggle polling
$("#togglepolling").click(function(){
// if no alarm list exists, exit
if (!currentlist.id){
displaymessage("Alarm List not found", "poll");
return;
}
// if we aren't polling, start the polling
if (polling == null){
polling = setInterval(getalarmlist, 1000);
getalarmlist();
$("#togglepolling").prop("value", "Stop Polling"); // update polling button text
// if we are polling, stop the polling
} else {
clearInterval(polling);
polling = null;
$("#togglepolling").prop("value", "Start Polling"); // update polling button text
}
});
// gets the alarm data and draws the table
function getalarmlist(){
var table = $("#tbalarms");
// only draw the header one time
if (drawheader){
var th = "<tr>";
th += "<th>Alarm Date</th>";
th += "<th class='center'>Active</th>";
th += "<th>Text</th>";
th += "<th>Type</th>";
th += "<th>Group</th>";
th += "<th class='center'>Acked</th>";
th += "<th class='center'>Delete</th>";
th += "</tr>";
table.append(th);
}
// call to the api to get the alarms for the current list
$.ajax({
url: networkNode + "/OASREST/v2/alarmlists/" + currentlist.id,
type: "GET",
contentType: "application/json; charset=utf-8",
crossDomain: true,
dataType: "json",
headers: {"clientid": clientid, "token": token},
success: function(r) {
$('#diverror').empty(); // success, so clear the errors
for (var i = 0; i < r.data.length; i++){
var temp = r.data[i].id;
trid = temp.replaceAll('.', '_').replace(/\s/g, ''); // remove space and periods for row id
var ts = new Date(r.data[i].alarmdate) // hold the alarm date in a date variable
var acttxt = ""; // variable for active column text
var ackedtxt = "<img src='images/unchecked.png' style='cursor:pointer;' ondblclick='ackalarm(\"" + r.data[i].id + "\")'>"; // Acknowledged checkbox
var rclass = ""; // variable for row class
// set the css class for the row base on active and acknowledged
if (r.data[i].active) {
acttxt = "X";
rclass += "activerow";
}else{
rclass += "inactive ";
}
if (r.data[i].acked) {
ackedtxt = "<img src='images/checked.png'>";
rclass += "ackedrow";
}
// build the row
var str = "<tr class='" + rclass + "' id='" + trid + "'>";
str += "<td class=''>" + fDate(ts) + "</td>";
str += "<td class='center'>" + acttxt + "</td>";
str += "<td class=''>" + r.data[i].text + "</td>";
str += "<td class=''>" + r.data[i].type + "</td>";
str += "<td class=''>" + r.data[i].group + "</td>";
str += "<td class='center'>" + ackedtxt + "</td>";
str += "<td class='center'><img src='images/delete.png' style='cursor:pointer;' onclick='deletealarm(\"" + r.data[i].id + "\")'></td>";
str += "</tr>";
// if the row already existed and this is an update, remove it first
if(!drawheader){
$('#' + trid).remove();
$('#tbalarms tr:first').after(str);
}else{
table.append(str);
}
// remove deleted alarms
if(r.data[i].text == "DELETEALARM"){
$('#' + trid).remove();
}
}
drawheader = false; // toggle flag for the header so the header row does not get redrawn after the first time
}
});
};
// click function to toggle polling
$("#togglepolling").click(function(){
// if no alarm list exists, exit
if (!currentlist.id){
displaymessage("Alarm List not found", "poll");
return;
}
// if we aren't polling, start the polling
if (polling == null){
polling = setInterval(getalarmlist, 1000);
getalarmlist();
$("#togglepolling").prop("value", "Stop Polling"); // update polling button text
// if we are polling, stop the polling
} else {
clearInterval(polling);
polling = null;
$("#togglepolling").prop("value", "Start Polling"); // update polling button text
}
});
$("#toggleactive").click(function(){
if (polling){
if (!currentlist.id){ // don't let them toggle active if there is no alarm list
displaymessage("Alarm List not found", "toggleactive");
return;
}
if (inactive){
$("#toggleactive").prop("value", "Show Inactive");
$('#tbalarms tr').filter('.inactive').hide(); // hide the inactive rows
inactive = false;
} else {
$("#toggleactive").prop("value", "Hide Inactive");
$('#tbalarms tr').filter('.inactive').show(); // show the inactive rows
inactive = true;
}
}else{
displaymessage("Start Polling First", "toggleactive"); // in case of error, display the error
}
});
});
</script>
</head>
<body>
<div class='main'>
<input type='button' id='doauth' class='button' value='Authenticate'><input type='button' id='createalarmlist' class='button' value='Create Alarm List'><input type='button' id='togglepolling' class='button' value='Start Polling'><input type='button' id='toggleactive' class='button' value='Hide Inactive'><br><br>
<div class='outer'><div class='label'>Client ID:</div><div id='divid' class='value'></div></div>
<div class='outer'><div class='label'>Token:</div><div id='divtoken' class='value'></div></div>
<div class='outer'><div class='label'>Alarm List ID:</div><div id='divalarmlistid' class='value'></div></div><br>
<div class='outer'><div class='label'>Message:</div><div id='diverror' class='value'></div></div><br>
<div id='displaythis'></div>
<div style='overflow: auto; width: 100%; height: 500px;'><table id='tbalarms'></table></div>
</div>
</body>
</html>
To download the source code for this tutorial, click here.
The OAS REST API is a programmatic interface that allows you to manage MQTT alarms via JSON over HTTP. This tutorial walks you through downloading and installing OAS, configuring an MQTT driver, configuring tags and using the REST API to access real-time and historical MQTT alarm data. We will build a sample JavaScript Web Interface to demonstrate building an alarm viewer with the ability to acknowledge active alarms.
Step 1. Download and Install the Open Automation Software and Start the OAS Service
If you have not already done so, you will need to download and install the OAS platform. Fully functional trial versions of the software are available for Windows, Windows IoT Core, Linux, Raspberry Pi and Docker on our downloads page.
On Windows run the downloaded Setup.exe file to install one or more of the Open Automation Software features. Select the default Typical installation if you are not sure what features to use or the Custom installation if you want to save disk space on the target system. When prompted agree to the End User License Agreement to continue the installation.
The OAS Service Control application will appear when the installation finishes on Windows. Use this application to start the 3 Services. Run the Configure OAS application on Windows and select Configure-Tags; if the first time running, the AdminCreate utility will run to create an Administrator login as shown in Step 1 of Getting Started – Security.
Step 2. Configure Your MQTT Data Source
First, you will need to open the Configure OAS application from the program group Open Automation Software.
Select Configure >> License from the top menu and verify that MQTT is one of the available Drivers in the lower left of the form. The demo license will have this by default. If you do not see MQTT available, contact support@openautomationsoftware.com to update your license.
Select Configure >> Drivers from the top menu.
Select localhost or the remote service you wish to modify with the Select button to the right of the Network Node list.
The Configure Drivers Screen will appear. Select MQTT from the Driver dropdown box.
Enter a meaningful Driver Interface Name that you will refer to this physical connection when defining Tags with a MQTT Data Source.
Enter the IP Address of the broker. The default port is 1883.
Enter the User Name and Password if required.
Set the Keep Alive Time. The default is 60 Seconds.
Set the Reconnect Time. The default 10 Seconds. If the connection to the broker is lost the Reconnect Time determines how long to wait before attempting to reconnect.
For more detailed instructions on configuring your MQTT data source, click here to see our Getting Started MQTT tutorial or watch the video tutorial below:
Step 3. Configure Your Tags
OAS provides multiple ways to add and define tags:
Manually add and define Tags using the Configure OAS application. …learn more…
Step 4. Access Real Time and Historical Alarm Data with the REST API
Getting Started
To use the OAS REST API you must make sure that the OAS HTTP service is listening on the correct port. To do this, open the OAS Configuration application and select Configure > Options, then select the network node (localhost if working on the local machine) and click Select. Under the Networking tab, locate the field for REST API/WebHMI Port Number. The default is 58725 but can be changed. If you are accessing the server from a remote client, you will also need to make sure your machine and/or company firewalls allow TCP traffic on the selected port.
Above is the start of the head tag and a link to the jQuery library. We will be using jQuery for this tutorial.
var networkNode = "http://www.opcweb.com:58725"; // variable for the network node
var clientid =  ""; // holds the client id from authorization
var token =  "";    // holds the token from authorization
var polling = null; // variable for setInterval function
var drawheader = true; // flag for whether the table header needs to be drawn
var inactive  = true; // flag for show/hide inactive alarms
var currentlist = {
            "filter": {
                "minpriority": 0,
                "maxpriority": 9999,
                "networknodes": [
                "localhost"
                ],
                "alarmtypes": [
                "Digital", "High", "Low", "High High", "Low Low", "Operator"
                ]
            },
            "history": false
        }; // object for holding json data
Next, we declare some variables that we will use later. The networkNode is the URL for where the OAS Service you are calling is located. The clientid and the token are variables that we will use to hold the authentication credentials that will be returned in our first call. Polling is a variable we will use to hold the setInterval function for our repeat calls to the API to get the alarm data. The drawheader is a flag that we set to let us know if we need to draw the header of our display again as we are polling. The currentlist object holds the data we are going to send to the API later: filters for which alarms we want to see and a boolean for whether or not we want to see historical alarms.
// function to clear out the variables and html
function resetvariables(){
    clearInterval(polling);
    currentlist.id = null;
    drawheader = true;
    polling = null;
    $("#tbalarms").empty();
    $('#divalarmlistid').empty();
    $("#togglepolling").prop("value", "Start Polling");

}
The clearvariables() function above does just that. We will call it later in our application to reset our button text and reset our variables when needed.
// function to display error messages
function displaymessage(mess, fnc){
    clearInterval(polling); // in the event of an error we stop the polling
    switch(mess) {
        case 401:
            $('#diverror').html("Authentication required.");
            break;
        case 404:
            if((fnc == "delete")||(fnc == "update")){
                $('#diverror').html("Alarm List not found.");
            }else{
                $('#diverror').html("404");
            }
            break;
        default:
            $('#diverror').html(mess);
    }
}
The displaymessage() function is called when our API request returns with an error. It will display the message on the page.
Authenticate
$("#doauth").click(function(){ // click funtion for authenticatation
    clearvariables(); // clear out the old variables, we are starting over
    // api call for authenticatation
    $.ajax({
        url: networkNode + "/OASREST/v2/authenticate",
        type: "POST",
        contentType: "application/json; charset=utf-8",
        crossDomain: true,
        dataType: "json",
        data: '{"username": "", "password": ""}',
        success: function(r) {
            clientid = r.data.clientid; // store the client id for later calls
            token = r.data.token;  // store the token for later calls
            $('#divid').html(clientid); // display the client id
            $('#divtoken').html(token); // display the token
        },
        error: function (e) {
            displaymessage(e.status, "auth"); // in case of error, display the error
        }
    });
});
The first call you will always need to make is to Authenticate. This will create a session and return a clientid and token that you will send in the header of all of your subsequent calls. The API call above is inside of a click function that handles the click event for the Authenticate button. The first thing we do is call the clearvariable() function in case the user has been using the application already. When the session is created it creates a new clientid and token. Anything that may have been done previously on the page will be tied to the old session and no longer be accessible so we clear out the old display as well.
We are using the jQuery ajax() method to send an asynchronous HTTP request to the server. The first parameter url specifies the address we are sending our request to. The networkNode we set above is used here. The Authenticate call is a POST which we specify in the type parameter. Next, contentType: application/json; charset=utf-8 designates the content to be in JSON format, encoded in the UTF-8 character encoding. The crossDomain parameter is set to true, allowing us to send our request to a resource that is outside of our own domain. The dataType parameter is set to “json”, letting the server know we expect the response to come back in JSON format. In out data parameter, what we are sending to the server, we have two variables: username and password. In this example, they are empty strings which will allow us to create a session in the default security group. For more information about security groups, see the Getting Started – Security tutorial in our knowledge base.
If we were to run the Authenticate function successfully here is what would be returned:
{
    "status": "OK",
    "data": {
        "clientid": "e90c8ae8-6b12-4690-a02b-f35ad03b3d2d",
        "token": "f16c3098-b295-4572-9a6b-f53ee984d21b"
    },
    "messages": [
        "Default credential provided - access to data and operations may be limited"
    ]
}
In which case, we process the return inside of our success function. We set the clientid page variable to the clientid property of the data object of the return object and the token page variable to the token property. If an error were to be returned, we handle it in our error function where we send the message to the displaymessage() function.
Create and Delete Alarm List
// click event to handle and toggle create/delete alarmlist button
$("#createalarmlist").click(function(){
    // if alarmlist id doesn't exist, create one.
    if (!currentlist.id){
        $.ajax({
            url: networkNode + "/OASREST/v2/alarmlists",
            type: "POST",
            contentType: "application/json; charset=utf-8",
            crossDomain: true,
            dataType: "json",
            headers: {"clientid": clientid, "token": token},
            data: JSON.stringify(currentlist),
            success: function(r) {
                currentlist.id = r.data.id;  // store the returned alarmlist id in the object
                $('#divalarmlistid').html(currentlist.id); // display the alarmlist id on the page
                $('#diverror').empty(); // success, so clear the error
                $("#createalarmlist").prop("value", "Delete Alarm List"); // toggle button text
            },
            error: function (e) {
                displaymessage(e.status, "createalarmlist");  // in case of error, display the error
            }
        });

        // if alarmlist id exists, delete it.
    }else{
        $.ajax({
            url: networkNode + "/OASREST/v2/alarmlists/" + currentlist.id,
            type: "DELETE",
            contentType: "application/json; charset=utf-8",
            crossDomain: true,
            dataType: "json",
            headers: {"clientid": clientid, "token": token},
            success: function(r) {
                 resetvariables(); // clear everything out to start again
                 $("#createalarmlist").prop("value", "Create Alarm List");  // toggle button text
            },
            error: function (e) {
                displaymessage(e.status, "delete"); // in case of error, display the error
            }
        });
    }
});
The $(“#createalarmlist”).click(function() handles both creating and deleting an alarm list depending on the button state. The first thing it does is to check to see if a currentlist.id exists. If it doesn’t, it creates one with the API call. This call is a “POST” and sends the clientid and token in the header. In the data parameter, it sends in our currentlist object after formatting it. The currentlist has our filter parameters for creating the alarm list. In the success function, we assign the returned list id to our currentlist object, display it on the page, clear out any old error messages and toggle the button text. In the case of an error, we display it.
If a currentlist.id already exists, we know the user has clicked the Delete Alarm List button, so we will delete it with our API call. This one is a “DELETE” type, appends the currentlist.id to the end of the url so the server knows which list to delete, passes the clientid and the token in the header and doesn’t need a data parameter. In the success function, we call the resetvariables() function to clear out all of the old list information because we are starting over and toggle the button text. In the case of an error, we display it.
Get Alarm List
// click function to toggle polling
$("#togglepolling").click(function(){
    // if no alarm list exists, exit
    if (!currentlist.id){
        displaymessage("Alarm List not found", "poll");
        return;
    }
    // if we aren't polling, start the polling
    if (polling == null){
        polling = setInterval(getalarmlist, 1000);
        getalarmlist();
        $("#togglepolling").prop("value", "Stop Polling"); // update polling button text
    // if we are polling, stop the polling
    } else {
        clearInterval(polling);
        polling = null;
        $("#togglepolling").prop("value", "Start Polling");  // update polling button text
    }
});

// gets the alarm data and draws the table
function getalarmlist(){
    var table = $("#tbalarms");
    // only draw the header one time
    if (drawheader){
        var th = "<tr>";
        th += "<th>Alarm Date</th>";
        th += "<th class='center'>Active</th>";
        th += "<th>Text</th>";
        th += "<th>Type</th>";
        th += "<th>Group</th>";
        th += "<th class='center'>Acked</th>";
        th += "<th class='center'>Delete</th>";
        th += "</tr>";
        table.append(th);
    }
    // call to the api to get the alarms for the current list
    $.ajax({
        url: networkNode + "/OASREST/v2/alarmlists/" + currentlist.id,
        type: "GET",
        contentType: "application/json; charset=utf-8",
        crossDomain: true,
        dataType: "json",
        headers: {"clientid": clientid, "token": token},
        success: function(r) {
            $('#diverror').empty(); // success, so clear the errors
            for (var i = 0; i < r.data.length; i++){
                var temp = r.data[i].id;
                trid = temp.replaceAll('.', '_').replace(/\s/g, ''); // remove space and periods for row id
                var ts = new Date(r.data[i].alarmdate) // hold the alarm date in a date variable
                var acttxt = ""; // variable for active column text
                var ackedtxt = "<img src='images/unchecked.png' style='cursor:pointer;' ondblclick='ackalarm(\"" + r.data[i].id + "\")'>"; // Acknowledged checkbox
                var rclass = ""; // variable for row class
                // set the css class for the row base on active and acknowledged
                if (r.data[i].active) {
                    acttxt = "X";
                    rclass += "activerow";
                }else{
                    rclass += "inactive ";
                }
                if (r.data[i].acked) {
                    ackedtxt = "<img src='images/checked.png'>";
                    rclass += "ackedrow";
                }
                // build the row
                var str = "<tr class='" + rclass + "' id='" + trid + "'>";
                str += "<td class=''>" + fDate(ts) + "</td>";
                str += "<td class='center'>" + acttxt + "</td>";
                str += "<td class=''>" + r.data[i].text + "</td>";
                str += "<td class=''>" + r.data[i].type + "</td>";
                str += "<td class=''>" + r.data[i].group + "</td>";
                str += "<td class='center'>" + ackedtxt + "</td>";
                str += "<td class='center'><img src='images/delete.png' style='cursor:pointer;' onclick='deletealarm(\"" + r.data[i].id + "\")'></td>";
                str += "</tr>";
                // if the row already existed and this is an update, remove it first
                if(!drawheader){
                    $('#' + trid).remove();
                    $('#tbalarms tr:first').after(str);
                }else{
                    table.append(str);
                }
                // remove deleted alarms
                if(r.data[i].text == "DELETEALARM"){
                        $('#' + trid).remove();
                }
            }
            drawheader = false; // toggle flag for the header so the header row does not get redrawn after the first time
        }
    });
};

// function to format the date for display
function fDate(dt){
    var M = dt.getMonth() + 1;
    M = M.toString().padStart(2,0);
    var D = dt.getDate().toString().padStart(2,0);
    var H = dt.getHours().toString().padStart(2,0);
    var Min = dt.getMinutes().toString().padStart(2,0);
    var S = dt.getSeconds().toString().padStart(2,0);
    return M +"/" + D + "/" + dt.getFullYear() + " " + H + ":" + Min + ":" + S;
}
Now that we have our list created, we want to start polling the data. This is handled with the Start Polling button and the $(“#togglepolling”).click(function(). The first thing thing we do in the function is check to see if we have an alarm list created, if we don’t we display an error and exit the function. Next, we check to see if are already polling. If we aren’t, we use the JavaScript setInterval() function to call the getalarmlist() function every three seconds. We then immediately call the getalarmlist() function so that we don’t have to wait three seconds for it to run the first time.
Inside the getalarmlist() function, we check to see if the table header has already been drawn. If it hasn’t been, we draw it. Next, we call the API with a “GET” type, appending the currentlist id to the url, passing the clientid and token in the header and bypassing the data parameter as it is not needed for this call. In our success function, we clear out any old error messages and then build our display by looping through the returned array of alarms. We remove the periods and spaces from the alarm id to use it as the row id. Next, we look at alarms active and acknowledged states and do some formatting for those columns and the row color. We write out each of the returned alarm properties in our array and format the date for display. Then we check to see if this an update, (!drawheader). If it is we want to delete the old row before we add the new one. After that, we check the alarm text to see if we should delete the alarm and do so if that is the case. Finally, we set the drawheader to false so that we don’t keep redrawing it each time we poll the data. Back in our click event, we toggle the polling button text.
If the user has clicked the Stop Polling button, we clear the polling and set it to null and toggle the button text.
Update Alarms
// function to delete an alarm by id
function deletealarm(alarmid){
    var deletedata = [
        {
            "id": alarmid,
            "action" : "Delete",
            "networknode" : "localhost"
        }
    ]
    $.ajax({
        url: networkNode + "/OASREST/v2/alarmlists/set",
        type: "POST",
        headers: {"clientid": clientid, "token": token},
        contentType: "application/json; charset=utf-8",
        crossDomain: true,
        dataType: "json",
        data: JSON.stringify(deletedata),
        success: function(r) {
        }
    });
};

// function to acknowledge an alarm by id
function ackalarm(alarmid){
    var ackdata = [
        {
            "id": alarmid,
            "action" : "Ack",
            "networknode" : "localhost"
        }
    ]
    $.ajax({
        url: networkNode + "/OASREST/v2/alarmlists/set",
        type: "POST",
        headers: {"clientid": clientid, "token": token},
        contentType: "application/json; charset=utf-8",
        crossDomain: true,
        dataType: "json",
        data: JSON.stringify(ackdata),
        success: function(r) {
        }
    });
};
With the Update Alarms API call, you can Acknowledge, Delete and add Comments to an alarm. Valid operations are “Ack”, “Delete”, and “Comment” and are case-sensitive. In our demo, when the user clicks the Delete icon for the alarm, it fires the deletealarm() function, passing in the alarm id. The function calls the REST API with a “POST” type and passes the clientid and the token in the header. In the data parameter, we pass the alarm id, network node and the “Delete” action. In the polling that follows this call, the server sends “DELETEALARM” in the text of the alarm array for the deleted alarm letting us know to remove it from the display.
When the user double clicks the Acknowledged checkbox, it fires the ackalarm() function and passes in the alarm id. The function calls the REST API with a “POST” type and passes the clientid and the token in the header. In the data parameter, we pass the alarm id, network node and the “Ack” action. In the polling that follows this call, the server sends that alarm with the active property flagged as true and we then update the checkbox and row color.
Hide Inactive
$("#toggleactive").click(function(){
    if (polling){
        if (!currentlist.id){ // don't let them toggle active if there is no alarm list
            displaymessage("Alarm List not found", "toggleactive");
            return;
        }
        if (inactive){
            $("#toggleactive").prop("value", "Show Inactive");
            $('#tbalarms tr').filter('.inactive').hide(); // hide the inactive rows
            inactive = false;
        } else {
            $("#toggleactive").prop("value", "Hide Inactive");
            $('#tbalarms tr').filter('.inactive').show(); // show the inactive rows
            inactive = true;
        }
    }else{
        displaymessage("Start Polling First", "toggleactive"); // in case of error, display the error
    }
});
The Hide Inactive button does not make a call to the REST API, it just adjusts the display to hide or show the inactive alarms based on the button state.
From the Top…
<!DOCTYPE html>
<html lang="en">
<head>
<meta charset="utf-8"/>
<title>REST Example | Alarms</title>
<link rel="stylesheet" stype="text/css" href="client.css?id=12345678">
<script src="https://code.jquery.com/jquery-3.1.1.min.js"></script>
<script type="text/javascript">
var clientid = ""; // holds the client id from authorization
var token = ""; // holds the token from authorization
var drawheader = true; // flag for whether the table header needs to be drawn
var polling = null; // variable for setInterval function
var inactive = true; // flag for show/hide inactive alarms
var networkNode = "http://www.opcweb.com:58725"; // variable for the network node
var currentlist = {
"filter": {
"minpriority": 0,
"maxpriority": 9999,
"networknodes": [
"localhost"
],
"alarmtypes": [
"Digital", "High", "Low", "High High", "Low Low", "Operator"
]
},
"history": false
}; // object for holding json data
// function to clear out the variables and html
function resetvariables(){
clearInterval(polling);
currentlist.id = null;
drawheader = true;
polling = null;
$("#tbalarms").empty();
$('#divalarmlistid').empty();
$("#togglepolling").prop("value", "Start Polling");
}
// function to format the date for display
function fDate(dt){
var M = dt.getMonth() + 1;
M = M.toString().padStart(2,0);
var D = dt.getDate().toString().padStart(2,0);
var H = dt.getHours().toString().padStart(2,0);
var Min = dt.getMinutes().toString().padStart(2,0);
var S = dt.getSeconds().toString().padStart(2,0);
return M +"/" + D + "/" + dt.getFullYear() + " " + H + ":" + Min + ":" + S;
}
// function to display error messages
function displaymessage(mess, fnc){
clearInterval(polling); // in the event of an error we stop the polling
switch(mess) {
case 401:
$('#diverror').html("Authentication required.");
break;
case 404:
if((fnc == "delete")||(fnc == "update")){
$('#diverror').html("Alarm List not found.");
}else{
$('#diverror').html("404");
}
break;
default:
$('#diverror').html(mess);
}
}
// function to delete an alarm by id
function deletealarm(alarmid){
var deletedata = [
{
"id": alarmid,
"action" : "Delete",
"networknode" : "localhost"
}
]
$.ajax({
url: networkNode + "/OASREST/v2/alarmlists/set",
type: "POST",
headers: {"clientid": clientid, "token": token},
contentType: "application/json; charset=utf-8",
crossDomain: true,
dataType: "json",
data: JSON.stringify(deletedata),
success: function(r) {
}
});
};
// function to acknowledge an alarm by id
function ackalarm(alarmid){
var ackdata = [
{
"id": alarmid,
"action" : "Ack",
"networknode" : "localhost"
}
]
$.ajax({
url: networkNode + "/OASREST/v2/alarmlists/set",
type: "POST",
headers: {"clientid": clientid, "token": token},
contentType: "application/json; charset=utf-8",
crossDomain: true,
dataType: "json",
data: JSON.stringify(ackdata),
success: function(r) {
}
});
};
$(document).ready(function() {
// function to authorize user and get token and client id
$("#doauth").click(function(){
resetvariables();
// api call for authorization
$.ajax({
url: networkNode + "/OASREST/v2/authenticate",
type: "POST",
contentType: "application/json; charset=utf-8",
crossDomain: true,
dataType: "json",
data: '{"username": "", "password": ""}',
success: function(r) {
clientid = r.data.clientid; // set the clientid variable returned from the call
token = r.data.token; // set the token variable returned from the call
$('#divid').html(clientid); // display the client id
$('#divtoken').html(token); // display the token
},
error: function (e) {
displaymessage(e.status, "auth"); // in case of error, display the error
}
});
});
// click event to handle and toggle create/delete alarmlist button
$("#createalarmlist").click(function(){
// if alarmlist id doesn't exist, create one.
if (!currentlist.id){
$.ajax({
url: networkNode + "/OASREST/v2/alarmlists",
type: "POST",
contentType: "application/json; charset=utf-8",
crossDomain: true,
dataType: "json",
headers: {"clientid": clientid, "token": token},
data: JSON.stringify(currentlist),
success: function(r) {
currentlist.id = r.data.id; // store the returned alarmlist id in the object
$('#divalarmlistid').html(currentlist.id); // display the alarmlist id on the page
$('#diverror').empty(); // success, so clear the error
$("#createalarmlist").prop("value", "Delete Alarm List"); // toggle button text
},
error: function (e) {
displaymessage(e.status, "createalarmlist"); // in case of error, display the error
}
});
// if alarmlist id exists, delete it.
}else{
$.ajax({
url: networkNode + "/OASREST/v2/alarmlists/" + currentlist.id,
type: "DELETE",
contentType: "application/json; charset=utf-8",
crossDomain: true,
dataType: "json",
headers: {"clientid": clientid, "token": token},
success: function(r) {
resetvariables(); // clear everything out to start again
$("#createalarmlist").prop("value", "Create Alarm List"); // toggle button text
},
error: function (e) {
displaymessage(e.status, "delete"); // in case of error, display the error
}
});
}
});
// click function to toggle polling
$("#togglepolling").click(function(){
// if no alarm list exists, exit
if (!currentlist.id){
displaymessage("Alarm List not found", "poll");
return;
}
// if we aren't polling, start the polling
if (polling == null){
polling = setInterval(getalarmlist, 1000);
getalarmlist();
$("#togglepolling").prop("value", "Stop Polling"); // update polling button text
// if we are polling, stop the polling
} else {
clearInterval(polling);
polling = null;
$("#togglepolling").prop("value", "Start Polling"); // update polling button text
}
});
// gets the alarm data and draws the table
function getalarmlist(){
var table = $("#tbalarms");
// only draw the header one time
if (drawheader){
var th = "<tr>";
th += "<th>Alarm Date</th>";
th += "<th class='center'>Active</th>";
th += "<th>Text</th>";
th += "<th>Type</th>";
th += "<th>Group</th>";
th += "<th class='center'>Acked</th>";
th += "<th class='center'>Delete</th>";
th += "</tr>";
table.append(th);
}
// call to the api to get the alarms for the current list
$.ajax({
url: networkNode + "/OASREST/v2/alarmlists/" + currentlist.id,
type: "GET",
contentType: "application/json; charset=utf-8",
crossDomain: true,
dataType: "json",
headers: {"clientid": clientid, "token": token},
success: function(r) {
$('#diverror').empty(); // success, so clear the errors
for (var i = 0; i < r.data.length; i++){
var temp = r.data[i].id;
trid = temp.replaceAll('.', '_').replace(/\s/g, ''); // remove space and periods for row id
var ts = new Date(r.data[i].alarmdate) // hold the alarm date in a date variable
var acttxt = ""; // variable for active column text
var ackedtxt = "<img src='images/unchecked.png' style='cursor:pointer;' ondblclick='ackalarm(\"" + r.data[i].id + "\")'>"; // Acknowledged checkbox
var rclass = ""; // variable for row class
// set the css class for the row base on active and acknowledged
if (r.data[i].active) {
acttxt = "X";
rclass += "activerow";
}else{
rclass += "inactive ";
}
if (r.data[i].acked) {
ackedtxt = "<img src='images/checked.png'>";
rclass += "ackedrow";
}
// build the row
var str = "<tr class='" + rclass + "' id='" + trid + "'>";
str += "<td class=''>" + fDate(ts) + "</td>";
str += "<td class='center'>" + acttxt + "</td>";
str += "<td class=''>" + r.data[i].text + "</td>";
str += "<td class=''>" + r.data[i].type + "</td>";
str += "<td class=''>" + r.data[i].group + "</td>";
str += "<td class='center'>" + ackedtxt + "</td>";
str += "<td class='center'><img src='images/delete.png' style='cursor:pointer;' onclick='deletealarm(\"" + r.data[i].id + "\")'></td>";
str += "</tr>";
// if the row already existed and this is an update, remove it first
if(!drawheader){
$('#' + trid).remove();
$('#tbalarms tr:first').after(str);
}else{
table.append(str);
}
// remove deleted alarms
if(r.data[i].text == "DELETEALARM"){
$('#' + trid).remove();
}
}
drawheader = false; // toggle flag for the header so the header row does not get redrawn after the first time
}
});
};
// click function to toggle polling
$("#togglepolling").click(function(){
// if no alarm list exists, exit
if (!currentlist.id){
displaymessage("Alarm List not found", "poll");
return;
}
// if we aren't polling, start the polling
if (polling == null){
polling = setInterval(getalarmlist, 1000);
getalarmlist();
$("#togglepolling").prop("value", "Stop Polling"); // update polling button text
// if we are polling, stop the polling
} else {
clearInterval(polling);
polling = null;
$("#togglepolling").prop("value", "Start Polling"); // update polling button text
}
});
$("#toggleactive").click(function(){
if (polling){
if (!currentlist.id){ // don't let them toggle active if there is no alarm list
displaymessage("Alarm List not found", "toggleactive");
return;
}
if (inactive){
$("#toggleactive").prop("value", "Show Inactive");
$('#tbalarms tr').filter('.inactive').hide(); // hide the inactive rows
inactive = false;
} else {
$("#toggleactive").prop("value", "Hide Inactive");
$('#tbalarms tr').filter('.inactive').show(); // show the inactive rows
inactive = true;
}
}else{
displaymessage("Start Polling First", "toggleactive"); // in case of error, display the error
}
});
});
</script>
</head>
<body>
<div class='main'>
<input type='button' id='doauth' class='button' value='Authenticate'><input type='button' id='createalarmlist' class='button' value='Create Alarm List'><input type='button' id='togglepolling' class='button' value='Start Polling'><input type='button' id='toggleactive' class='button' value='Hide Inactive'><br><br>
<div class='outer'><div class='label'>Client ID:</div><div id='divid' class='value'></div></div>
<div class='outer'><div class='label'>Token:</div><div id='divtoken' class='value'></div></div>
<div class='outer'><div class='label'>Alarm List ID:</div><div id='divalarmlistid' class='value'></div></div><br>
<div class='outer'><div class='label'>Message:</div><div id='diverror' class='value'></div></div><br>
<div id='displaythis'></div>
<div style='overflow: auto; width: 100%; height: 500px;'><table id='tbalarms'></table></div>
</div>
</body>
</html>
To download the source code for this tutorial, click here.
The OAS REST API is a programmatic interface that allows you to manage MTConnect alarms via JSON over HTTP. This tutorial walks you through downloading and installing OAS, configuring an MTConnect driver, configuring tags and using the REST API to access real-time and historical MTConnect alarm data. We will build a sample JavaScript Web Interface to demonstrate building an alarm viewer with the ability to acknowledge active alarms.
Step 1. Download and Install the Open Automation Software and Start the OAS Service
If you have not already done so, you will need to download and install the OAS platform. Fully functional trial versions of the software are available for Windows, Windows IoT Core, Linux, Raspberry Pi and Docker on our downloads page.
On Windows run the downloaded Setup.exe file to install one or more of the Open Automation Software features. Select the default Typical installation if you are not sure what features to use or the Custom installation if you want to save disk space on the target system. When prompted agree to the End User License Agreement to continue the installation.
The OAS Service Control application will appear when the installation finishes on Windows. Use this application to start the 3 Services. Run the Configure OAS application on Windows and select Configure-Tags; if the first time running, the AdminCreate utility will run to create an Administrator login as shown in Step 1 of Getting Started – Security.
Step 2.
First, you will need to open the Configure OAS application from the program group Open Automation Software.
Select Configure >> License from the top menu and verify that MTConnect is one of the available Drivers in the lower left of the form. The demo license will have this by default. If you do not see MTConnect available, contact support@openautomationsoftware.com to update your license.
Select Configure >> Drivers from the top menu.
Select localhost or the remote service you wish to modify with the Select button to the right of the Network Node list.
The Configure Drivers Screen will appear. Select MTConnect from the Driver dropdown box.
Enter a meaningful Driver Interface Name that you will refer to this physical connection when defining Tags with a MTConnect Data Source.
Leave Enable and Add Tags Automatically enabled.
Specify the Live Data Url for the MTConnect stream.
Click the Add Driver button above the Driver list in the left pane to add the Driver Interface as an available selection when defining Tags in the next step.
For more detailed instructions on configuring your MTConnect data source, click here to see our Getting Started MTConnect tutorial or watch the video tutorial below:
Step 3. Configure Your Tags
OAS provides multiple ways to add and define tags:
Manually add and define Tags using the Configure OAS application. …learn more…
Step 4. Access Real Time and Historical Alarm Data with the REST API
Getting Started
To use the OAS REST API you must make sure that the OAS HTTP service is listening on the correct port. To do this, open the OAS Configuration application and select Configure > Options, then select the network node (localhost if working on the local machine) and click Select. Under the Networking tab, locate the field for REST API/WebHMI Port Number. The default is 58725 but can be changed. If you are accessing the server from a remote client, you will also need to make sure your machine and/or company firewalls allow TCP traffic on the selected port.
Above is the start of the head tag and a link to the jQuery library. We will be using jQuery for this tutorial.
var networkNode = "http://www.opcweb.com:58725"; // variable for the network node
var clientid =  ""; // holds the client id from authorization
var token =  "";    // holds the token from authorization
var polling = null; // variable for setInterval function
var drawheader = true; // flag for whether the table header needs to be drawn
var inactive  = true; // flag for show/hide inactive alarms
var currentlist = {
            "filter": {
                "minpriority": 0,
                "maxpriority": 9999,
                "networknodes": [
                "localhost"
                ],
                "alarmtypes": [
                "Digital", "High", "Low", "High High", "Low Low", "Operator"
                ]
            },
            "history": false
        }; // object for holding json data
Next, we declare some variables that we will use later. The networkNode is the URL for where the OAS Service you are calling is located. The clientid and the token are variables that we will use to hold the authentication credentials that will be returned in our first call. Polling is a variable we will use to hold the setInterval function for our repeat calls to the API to get the alarm data. The drawheader is a flag that we set to let us know if we need to draw the header of our display again as we are polling. The currentlist object holds the data we are going to send to the API later: filters for which alarms we want to see and a boolean for whether or not we want to see historical alarms.
// function to clear out the variables and html
function resetvariables(){
    clearInterval(polling);
    currentlist.id = null;
    drawheader = true;
    polling = null;
    $("#tbalarms").empty();
    $('#divalarmlistid').empty();
    $("#togglepolling").prop("value", "Start Polling");

}
The clearvariables() function above does just that. We will call it later in our application to reset our button text and reset our variables when needed.
// function to display error messages
function displaymessage(mess, fnc){
    clearInterval(polling); // in the event of an error we stop the polling
    switch(mess) {
        case 401:
            $('#diverror').html("Authentication required.");
            break;
        case 404:
            if((fnc == "delete")||(fnc == "update")){
                $('#diverror').html("Alarm List not found.");
            }else{
                $('#diverror').html("404");
            }
            break;
        default:
            $('#diverror').html(mess);
    }
}
The displaymessage() function is called when our API request returns with an error. It will display the message on the page.
Authenticate
$("#doauth").click(function(){ // click funtion for authenticatation
    clearvariables(); // clear out the old variables, we are starting over
    // api call for authenticatation
    $.ajax({
        url: networkNode + "/OASREST/v2/authenticate",
        type: "POST",
        contentType: "application/json; charset=utf-8",
        crossDomain: true,
        dataType: "json",
        data: '{"username": "", "password": ""}',
        success: function(r) {
            clientid = r.data.clientid; // store the client id for later calls
            token = r.data.token;  // store the token for later calls
            $('#divid').html(clientid); // display the client id
            $('#divtoken').html(token); // display the token
        },
        error: function (e) {
            displaymessage(e.status, "auth"); // in case of error, display the error
        }
    });
});
The first call you will always need to make is to Authenticate. This will create a session and return a clientid and token that you will send in the header of all of your subsequent calls. The API call above is inside of a click function that handles the click event for the Authenticate button. The first thing we do is call the clearvariable() function in case the user has been using the application already. When the session is created it creates a new clientid and token. Anything that may have been done previously on the page will be tied to the old session and no longer be accessible so we clear out the old display as well.
We are using the jQuery ajax() method to send an asynchronous HTTP request to the server. The first parameter url specifies the address we are sending our request to. The networkNode we set above is used here. The Authenticate call is a POST which we specify in the type parameter. Next, contentType: application/json; charset=utf-8 designates the content to be in JSON format, encoded in the UTF-8 character encoding. The crossDomain parameter is set to true, allowing us to send our request to a resource that is outside of our own domain. The dataType parameter is set to “json”, letting the server know we expect the response to come back in JSON format. In out data parameter, what we are sending to the server, we have two variables: username and password. In this example, they are empty strings which will allow us to create a session in the default security group. For more information about security groups, see the Getting Started – Security tutorial in our knowledge base.
If we were to run the Authenticate function successfully here is what would be returned:
{
    "status": "OK",
    "data": {
        "clientid": "e90c8ae8-6b12-4690-a02b-f35ad03b3d2d",
        "token": "f16c3098-b295-4572-9a6b-f53ee984d21b"
    },
    "messages": [
        "Default credential provided - access to data and operations may be limited"
    ]
}
In which case, we process the return inside of our success function. We set the clientid page variable to the clientid property of the data object of the return object and the token page variable to the token property. If an error were to be returned, we handle it in our error function where we send the message to the displaymessage() function.
Create and Delete Alarm List
// click event to handle and toggle create/delete alarmlist button
$("#createalarmlist").click(function(){
    // if alarmlist id doesn't exist, create one.
    if (!currentlist.id){
        $.ajax({
            url: networkNode + "/OASREST/v2/alarmlists",
            type: "POST",
            contentType: "application/json; charset=utf-8",
            crossDomain: true,
            dataType: "json",
            headers: {"clientid": clientid, "token": token},
            data: JSON.stringify(currentlist),
            success: function(r) {
                currentlist.id = r.data.id;  // store the returned alarmlist id in the object
                $('#divalarmlistid').html(currentlist.id); // display the alarmlist id on the page
                $('#diverror').empty(); // success, so clear the error
                $("#createalarmlist").prop("value", "Delete Alarm List"); // toggle button text
            },
            error: function (e) {
                displaymessage(e.status, "createalarmlist");  // in case of error, display the error
            }
        });

        // if alarmlist id exists, delete it.
    }else{
        $.ajax({
            url: networkNode + "/OASREST/v2/alarmlists/" + currentlist.id,
            type: "DELETE",
            contentType: "application/json; charset=utf-8",
            crossDomain: true,
            dataType: "json",
            headers: {"clientid": clientid, "token": token},
            success: function(r) {
                 resetvariables(); // clear everything out to start again
                 $("#createalarmlist").prop("value", "Create Alarm List");  // toggle button text
            },
            error: function (e) {
                displaymessage(e.status, "delete"); // in case of error, display the error
            }
        });
    }
});
The $(“#createalarmlist”).click(function() handles both creating and deleting an alarm list depending on the button state. The first thing it does is to check to see if a currentlist.id exists. If it doesn’t, it creates one with the API call. This call is a “POST” and sends the clientid and token in the header. In the data parameter, it sends in our currentlist object after formatting it. The currentlist has our filter parameters for creating the alarm list. In the success function, we assign the returned list id to our currentlist object, display it on the page, clear out any old error messages and toggle the button text. In the case of an error, we display it.
If a currentlist.id already exists, we know the user has clicked the Delete Alarm List button, so we will delete it with our API call. This one is a “DELETE” type, appends the currentlist.id to the end of the url so the server knows which list to delete, passes the clientid and the token in the header and doesn’t need a data parameter. In the success function, we call the resetvariables() function to clear out all of the old list information because we are starting over and toggle the button text. In the case of an error, we display it.
Get Alarm List
// click function to toggle polling
$("#togglepolling").click(function(){
    // if no alarm list exists, exit
    if (!currentlist.id){
        displaymessage("Alarm List not found", "poll");
        return;
    }
    // if we aren't polling, start the polling
    if (polling == null){
        polling = setInterval(getalarmlist, 1000);
        getalarmlist();
        $("#togglepolling").prop("value", "Stop Polling"); // update polling button text
    // if we are polling, stop the polling
    } else {
        clearInterval(polling);
        polling = null;
        $("#togglepolling").prop("value", "Start Polling");  // update polling button text
    }
});

// gets the alarm data and draws the table
function getalarmlist(){
    var table = $("#tbalarms");
    // only draw the header one time
    if (drawheader){
        var th = "<tr>";
        th += "<th>Alarm Date</th>";
        th += "<th class='center'>Active</th>";
        th += "<th>Text</th>";
        th += "<th>Type</th>";
        th += "<th>Group</th>";
        th += "<th class='center'>Acked</th>";
        th += "<th class='center'>Delete</th>";
        th += "</tr>";
        table.append(th);
    }
    // call to the api to get the alarms for the current list
    $.ajax({
        url: networkNode + "/OASREST/v2/alarmlists/" + currentlist.id,
        type: "GET",
        contentType: "application/json; charset=utf-8",
        crossDomain: true,
        dataType: "json",
        headers: {"clientid": clientid, "token": token},
        success: function(r) {
            $('#diverror').empty(); // success, so clear the errors
            for (var i = 0; i < r.data.length; i++){
                var temp = r.data[i].id;
                trid = temp.replaceAll('.', '_').replace(/\s/g, ''); // remove space and periods for row id
                var ts = new Date(r.data[i].alarmdate) // hold the alarm date in a date variable
                var acttxt = ""; // variable for active column text
                var ackedtxt = "<img src='images/unchecked.png' style='cursor:pointer;' ondblclick='ackalarm(\"" + r.data[i].id + "\")'>"; // Acknowledged checkbox
                var rclass = ""; // variable for row class
                // set the css class for the row base on active and acknowledged
                if (r.data[i].active) {
                    acttxt = "X";
                    rclass += "activerow";
                }else{
                    rclass += "inactive ";
                }
                if (r.data[i].acked) {
                    ackedtxt = "<img src='images/checked.png'>";
                    rclass += "ackedrow";
                }
                // build the row
                var str = "<tr class='" + rclass + "' id='" + trid + "'>";
                str += "<td class=''>" + fDate(ts) + "</td>";
                str += "<td class='center'>" + acttxt + "</td>";
                str += "<td class=''>" + r.data[i].text + "</td>";
                str += "<td class=''>" + r.data[i].type + "</td>";
                str += "<td class=''>" + r.data[i].group + "</td>";
                str += "<td class='center'>" + ackedtxt + "</td>";
                str += "<td class='center'><img src='images/delete.png' style='cursor:pointer;' onclick='deletealarm(\"" + r.data[i].id + "\")'></td>";
                str += "</tr>";
                // if the row already existed and this is an update, remove it first
                if(!drawheader){
                    $('#' + trid).remove();
                    $('#tbalarms tr:first').after(str);
                }else{
                    table.append(str);
                }
                // remove deleted alarms
                if(r.data[i].text == "DELETEALARM"){
                        $('#' + trid).remove();
                }
            }
            drawheader = false; // toggle flag for the header so the header row does not get redrawn after the first time
        }
    });
};

// function to format the date for display
function fDate(dt){
    var M = dt.getMonth() + 1;
    M = M.toString().padStart(2,0);
    var D = dt.getDate().toString().padStart(2,0);
    var H = dt.getHours().toString().padStart(2,0);
    var Min = dt.getMinutes().toString().padStart(2,0);
    var S = dt.getSeconds().toString().padStart(2,0);
    return M +"/" + D + "/" + dt.getFullYear() + " " + H + ":" + Min + ":" + S;
}
Now that we have our list created, we want to start polling the data. This is handled with the Start Polling button and the $(“#togglepolling”).click(function(). The first thing thing we do in the function is check to see if we have an alarm list created, if we don’t we display an error and exit the function. Next, we check to see if are already polling. If we aren’t, we use the JavaScript setInterval() function to call the getalarmlist() function every three seconds. We then immediately call the getalarmlist() function so that we don’t have to wait three seconds for it to run the first time.
Inside the getalarmlist() function, we check to see if the table header has already been drawn. If it hasn’t been, we draw it. Next, we call the API with a “GET” type, appending the currentlist id to the url, passing the clientid and token in the header and bypassing the data parameter as it is not needed for this call. In our success function, we clear out any old error messages and then build our display by looping through the returned array of alarms. We remove the periods and spaces from the alarm id to use it as the row id. Next, we look at alarms active and acknowledged states and do some formatting for those columns and the row color. We write out each of the returned alarm properties in our array and format the date for display. Then we check to see if this an update, (!drawheader). If it is we want to delete the old row before we add the new one. After that, we check the alarm text to see if we should delete the alarm and do so if that is the case. Finally, we set the drawheader to false so that we don’t keep redrawing it each time we poll the data. Back in our click event, we toggle the polling button text.
If the user has clicked the Stop Polling button, we clear the polling and set it to null and toggle the button text.
Update Alarms
// function to delete an alarm by id
function deletealarm(alarmid){
    var deletedata = [
        {
            "id": alarmid,
            "action" : "Delete",
            "networknode" : "localhost"
        }
    ]
    $.ajax({
        url: networkNode + "/OASREST/v2/alarmlists/set",
        type: "POST",
        headers: {"clientid": clientid, "token": token},
        contentType: "application/json; charset=utf-8",
        crossDomain: true,
        dataType: "json",
        data: JSON.stringify(deletedata),
        success: function(r) {
        }
    });
};

// function to acknowledge an alarm by id
function ackalarm(alarmid){
    var ackdata = [
        {
            "id": alarmid,
            "action" : "Ack",
            "networknode" : "localhost"
        }
    ]
    $.ajax({
        url: networkNode + "/OASREST/v2/alarmlists/set",
        type: "POST",
        headers: {"clientid": clientid, "token": token},
        contentType: "application/json; charset=utf-8",
        crossDomain: true,
        dataType: "json",
        data: JSON.stringify(ackdata),
        success: function(r) {
        }
    });
};
With the Update Alarms API call, you can Acknowledge, Delete and add Comments to an alarm. Valid operations are “Ack”, “Delete”, and “Comment” and are case-sensitive. In our demo, when the user clicks the Delete icon for the alarm, it fires the deletealarm() function, passing in the alarm id. The function calls the REST API with a “POST” type and passes the clientid and the token in the header. In the data parameter, we pass the alarm id, network node and the “Delete” action. In the polling that follows this call, the server sends “DELETEALARM” in the text of the alarm array for the deleted alarm letting us know to remove it from the display.
When the user double clicks the Acknowledged checkbox, it fires the ackalarm() function and passes in the alarm id. The function calls the REST API with a “POST” type and passes the clientid and the token in the header. In the data parameter, we pass the alarm id, network node and the “Ack” action. In the polling that follows this call, the server sends that alarm with the active property flagged as true and we then update the checkbox and row color.
Hide Inactive
$("#toggleactive").click(function(){
    if (polling){
        if (!currentlist.id){ // don't let them toggle active if there is no alarm list
            displaymessage("Alarm List not found", "toggleactive");
            return;
        }
        if (inactive){
            $("#toggleactive").prop("value", "Show Inactive");
            $('#tbalarms tr').filter('.inactive').hide(); // hide the inactive rows
            inactive = false;
        } else {
            $("#toggleactive").prop("value", "Hide Inactive");
            $('#tbalarms tr').filter('.inactive').show(); // show the inactive rows
            inactive = true;
        }
    }else{
        displaymessage("Start Polling First", "toggleactive"); // in case of error, display the error
    }
});
The Hide Inactive button does not make a call to the REST API, it just adjusts the display to hide or show the inactive alarms based on the button state.
From the Top…
<!DOCTYPE html>
<html lang="en">
<head>
<meta charset="utf-8"/>
<title>REST Example | Alarms</title>
<link rel="stylesheet" stype="text/css" href="client.css?id=12345678">
<script src="https://code.jquery.com/jquery-3.1.1.min.js"></script>
<script type="text/javascript">
var clientid = ""; // holds the client id from authorization
var token = ""; // holds the token from authorization
var drawheader = true; // flag for whether the table header needs to be drawn
var polling = null; // variable for setInterval function
var inactive = true; // flag for show/hide inactive alarms
var networkNode = "http://www.opcweb.com:58725"; // variable for the network node
var currentlist = {
"filter": {
"minpriority": 0,
"maxpriority": 9999,
"networknodes": [
"localhost"
],
"alarmtypes": [
"Digital", "High", "Low", "High High", "Low Low", "Operator"
]
},
"history": false
}; // object for holding json data
// function to clear out the variables and html
function resetvariables(){
clearInterval(polling);
currentlist.id = null;
drawheader = true;
polling = null;
$("#tbalarms").empty();
$('#divalarmlistid').empty();
$("#togglepolling").prop("value", "Start Polling");
}
// function to format the date for display
function fDate(dt){
var M = dt.getMonth() + 1;
M = M.toString().padStart(2,0);
var D = dt.getDate().toString().padStart(2,0);
var H = dt.getHours().toString().padStart(2,0);
var Min = dt.getMinutes().toString().padStart(2,0);
var S = dt.getSeconds().toString().padStart(2,0);
return M +"/" + D + "/" + dt.getFullYear() + " " + H + ":" + Min + ":" + S;
}
// function to display error messages
function displaymessage(mess, fnc){
clearInterval(polling); // in the event of an error we stop the polling
switch(mess) {
case 401:
$('#diverror').html("Authentication required.");
break;
case 404:
if((fnc == "delete")||(fnc == "update")){
$('#diverror').html("Alarm List not found.");
}else{
$('#diverror').html("404");
}
break;
default:
$('#diverror').html(mess);
}
}
// function to delete an alarm by id
function deletealarm(alarmid){
var deletedata = [
{
"id": alarmid,
"action" : "Delete",
"networknode" : "localhost"
}
]
$.ajax({
url: networkNode + "/OASREST/v2/alarmlists/set",
type: "POST",
headers: {"clientid": clientid, "token": token},
contentType: "application/json; charset=utf-8",
crossDomain: true,
dataType: "json",
data: JSON.stringify(deletedata),
success: function(r) {
}
});
};
// function to acknowledge an alarm by id
function ackalarm(alarmid){
var ackdata = [
{
"id": alarmid,
"action" : "Ack",
"networknode" : "localhost"
}
]
$.ajax({
url: networkNode + "/OASREST/v2/alarmlists/set",
type: "POST",
headers: {"clientid": clientid, "token": token},
contentType: "application/json; charset=utf-8",
crossDomain: true,
dataType: "json",
data: JSON.stringify(ackdata),
success: function(r) {
}
});
};
$(document).ready(function() {
// function to authorize user and get token and client id
$("#doauth").click(function(){
resetvariables();
// api call for authorization
$.ajax({
url: networkNode + "/OASREST/v2/authenticate",
type: "POST",
contentType: "application/json; charset=utf-8",
crossDomain: true,
dataType: "json",
data: '{"username": "", "password": ""}',
success: function(r) {
clientid = r.data.clientid; // set the clientid variable returned from the call
token = r.data.token; // set the token variable returned from the call
$('#divid').html(clientid); // display the client id
$('#divtoken').html(token); // display the token
},
error: function (e) {
displaymessage(e.status, "auth"); // in case of error, display the error
}
});
});
// click event to handle and toggle create/delete alarmlist button
$("#createalarmlist").click(function(){
// if alarmlist id doesn't exist, create one.
if (!currentlist.id){
$.ajax({
url: networkNode + "/OASREST/v2/alarmlists",
type: "POST",
contentType: "application/json; charset=utf-8",
crossDomain: true,
dataType: "json",
headers: {"clientid": clientid, "token": token},
data: JSON.stringify(currentlist),
success: function(r) {
currentlist.id = r.data.id; // store the returned alarmlist id in the object
$('#divalarmlistid').html(currentlist.id); // display the alarmlist id on the page
$('#diverror').empty(); // success, so clear the error
$("#createalarmlist").prop("value", "Delete Alarm List"); // toggle button text
},
error: function (e) {
displaymessage(e.status, "createalarmlist"); // in case of error, display the error
}
});
// if alarmlist id exists, delete it.
}else{
$.ajax({
url: networkNode + "/OASREST/v2/alarmlists/" + currentlist.id,
type: "DELETE",
contentType: "application/json; charset=utf-8",
crossDomain: true,
dataType: "json",
headers: {"clientid": clientid, "token": token},
success: function(r) {
resetvariables(); // clear everything out to start again
$("#createalarmlist").prop("value", "Create Alarm List"); // toggle button text
},
error: function (e) {
displaymessage(e.status, "delete"); // in case of error, display the error
}
});
}
});
// click function to toggle polling
$("#togglepolling").click(function(){
// if no alarm list exists, exit
if (!currentlist.id){
displaymessage("Alarm List not found", "poll");
return;
}
// if we aren't polling, start the polling
if (polling == null){
polling = setInterval(getalarmlist, 1000);
getalarmlist();
$("#togglepolling").prop("value", "Stop Polling"); // update polling button text
// if we are polling, stop the polling
} else {
clearInterval(polling);
polling = null;
$("#togglepolling").prop("value", "Start Polling"); // update polling button text
}
});
// gets the alarm data and draws the table
function getalarmlist(){
var table = $("#tbalarms");
// only draw the header one time
if (drawheader){
var th = "<tr>";
th += "<th>Alarm Date</th>";
th += "<th class='center'>Active</th>";
th += "<th>Text</th>";
th += "<th>Type</th>";
th += "<th>Group</th>";
th += "<th class='center'>Acked</th>";
th += "<th class='center'>Delete</th>";
th += "</tr>";
table.append(th);
}
// call to the api to get the alarms for the current list
$.ajax({
url: networkNode + "/OASREST/v2/alarmlists/" + currentlist.id,
type: "GET",
contentType: "application/json; charset=utf-8",
crossDomain: true,
dataType: "json",
headers: {"clientid": clientid, "token": token},
success: function(r) {
$('#diverror').empty(); // success, so clear the errors
for (var i = 0; i < r.data.length; i++){
var temp = r.data[i].id;
trid = temp.replaceAll('.', '_').replace(/\s/g, ''); // remove space and periods for row id
var ts = new Date(r.data[i].alarmdate) // hold the alarm date in a date variable
var acttxt = ""; // variable for active column text
var ackedtxt = "<img src='images/unchecked.png' style='cursor:pointer;' ondblclick='ackalarm(\"" + r.data[i].id + "\")'>"; // Acknowledged checkbox
var rclass = ""; // variable for row class
// set the css class for the row base on active and acknowledged
if (r.data[i].active) {
acttxt = "X";
rclass += "activerow";
}else{
rclass += "inactive ";
}
if (r.data[i].acked) {
ackedtxt = "<img src='images/checked.png'>";
rclass += "ackedrow";
}
// build the row
var str = "<tr class='" + rclass + "' id='" + trid + "'>";
str += "<td class=''>" + fDate(ts) + "</td>";
str += "<td class='center'>" + acttxt + "</td>";
str += "<td class=''>" + r.data[i].text + "</td>";
str += "<td class=''>" + r.data[i].type + "</td>";
str += "<td class=''>" + r.data[i].group + "</td>";
str += "<td class='center'>" + ackedtxt + "</td>";
str += "<td class='center'><img src='images/delete.png' style='cursor:pointer;' onclick='deletealarm(\"" + r.data[i].id + "\")'></td>";
str += "</tr>";
// if the row already existed and this is an update, remove it first
if(!drawheader){
$('#' + trid).remove();
$('#tbalarms tr:first').after(str);
}else{
table.append(str);
}
// remove deleted alarms
if(r.data[i].text == "DELETEALARM"){
$('#' + trid).remove();
}
}
drawheader = false; // toggle flag for the header so the header row does not get redrawn after the first time
}
});
};
// click function to toggle polling
$("#togglepolling").click(function(){
// if no alarm list exists, exit
if (!currentlist.id){
displaymessage("Alarm List not found", "poll");
return;
}
// if we aren't polling, start the polling
if (polling == null){
polling = setInterval(getalarmlist, 1000);
getalarmlist();
$("#togglepolling").prop("value", "Stop Polling"); // update polling button text
// if we are polling, stop the polling
} else {
clearInterval(polling);
polling = null;
$("#togglepolling").prop("value", "Start Polling"); // update polling button text
}
});
$("#toggleactive").click(function(){
if (polling){
if (!currentlist.id){ // don't let them toggle active if there is no alarm list
displaymessage("Alarm List not found", "toggleactive");
return;
}
if (inactive){
$("#toggleactive").prop("value", "Show Inactive");
$('#tbalarms tr').filter('.inactive').hide(); // hide the inactive rows
inactive = false;
} else {
$("#toggleactive").prop("value", "Hide Inactive");
$('#tbalarms tr').filter('.inactive').show(); // show the inactive rows
inactive = true;
}
}else{
displaymessage("Start Polling First", "toggleactive"); // in case of error, display the error
}
});
});
</script>
</head>
<body>
<div class='main'>
<input type='button' id='doauth' class='button' value='Authenticate'><input type='button' id='createalarmlist' class='button' value='Create Alarm List'><input type='button' id='togglepolling' class='button' value='Start Polling'><input type='button' id='toggleactive' class='button' value='Hide Inactive'><br><br>
<div class='outer'><div class='label'>Client ID:</div><div id='divid' class='value'></div></div>
<div class='outer'><div class='label'>Token:</div><div id='divtoken' class='value'></div></div>
<div class='outer'><div class='label'>Alarm List ID:</div><div id='divalarmlistid' class='value'></div></div><br>
<div class='outer'><div class='label'>Message:</div><div id='diverror' class='value'></div></div><br>
<div id='displaythis'></div>
<div style='overflow: auto; width: 100%; height: 500px;'><table id='tbalarms'></table></div>
</div>
</body>
</html>
To download the source code for this tutorial, click here.