How to Access Sparkplug B Data with a REST API

How To Access Sparkplug B Data with REST API


The OAS REST API is a programmatic interface that enables you to access Sparkplug B data from an Edge of Network Node via JSON over HTTP. In this tutorial, you will learn how to download and install OAS, set up a Sparkplug B Host Application driver interface, configure tags, and use the REST API to transfer your Sparkplug B Data. We will also create a sample JavaScript Web Interface to demonstrate how to read, write, and display Sparkplug B Metric data.

Step 1. Download and Install the Open Automation Software and Start the OAS Service

If you have not already done so, you will need to download and install the OAS platform.  Fully functional trial versions of the software are available for Windows, Windows IoT Core, Linux, Raspberry Pi and Docker on our downloads page.

On Windows run the downloaded Setup.exe file to install one or more of the Open Automation Software features. Select the default Typical installation if you are not sure what features to use or the Custom installation if you want to save disk space on the target system.  When prompted agree to the End User License Agreement to continue the installation.

For more detailed instructions and video tutorials, visit the installation guide for your system:
Windows Installation | Linux Installation | Raspberry Pi Installation | Dockers Installation

When the installation is finished the OAS Service Control application will appear.  Use this application to start the 4 Services. If this is the first time installing the software it will automatically enter Runtime with an example Tag Configuration.


Step 2. Set Up Sparkplug B Host App to Access EoN Node Data.

Select Configure-Drivers.

Configure Drivers

Enter a meaningful Driver Interface Name that you will refer to this connection and define the properties.

Set the driver to Sparkplug B.
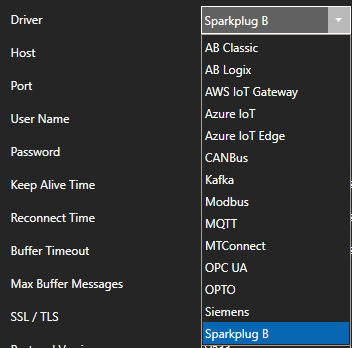
Enter the Host property to the IP Address of the of the host broker or just use localhost for a local broker. 

Set the Port property of the host broker to connect to.  The default port is 1883 or 8883 for SSL.

Note: The OAS MQTT Broker can be used to host data locally.  To use another broker on the default ports on the same computer change the OAS MQTT Broker Port under Configure-Options-MQTT Broker.

Enter the User Name and Password if required.

Set the MQTT Protocol Version to V311 or V500.
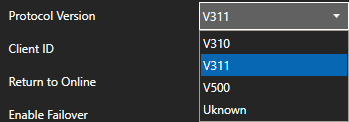
Set the Client ID to a unique value, each driver interface must have a specific value different than all other clients connecting to the host.

Set the Mode to Host App for OAS to control the online state of each Edge of Node defined to the shared Host Application ID. Or set to Client App to access EoN Node data without controlling their state.

Set the Host ID to the specific value that the Edge of Nodes will be using as the Host Application ID.

Set the Sparkplug B Version to 2.2 or 3.0.

To automatically add tags for each Metric from the matching Group, Edge of Nodes, and Devices enable the property Add Client Tags Automatically.

When enabled optionally set the Filter Groups, Edge Nodes, and Devices that tags should be added from for each of their Metrics.  Leave the Filter fields blank to include all Edge of Nodes publishing data to the broker.

Select the Add Driver button in the left part of the form to add the Driver Interface as an available selection when defining Tags in the next step.

Add Driver

You are now ready to add tags for specific Sparkplug B EoN Node Metric values.

Note: If the Driver Interface property Add Client Tags Automatically was enabled tags will be created for you, you can skip this step to add tags manually.

Select Configure-Tags.

Menu Configure Tags

Note: You can add organizational Groups as many levels deep as you prefer and add tags to groups.  To do this first add a Group to Tags Group at the root level, then right click on the Group in the right window to add additional Groups or Tags.

Select Add Tag.

Add Tag

Change the Data Source Tag property to Sparkplug B.
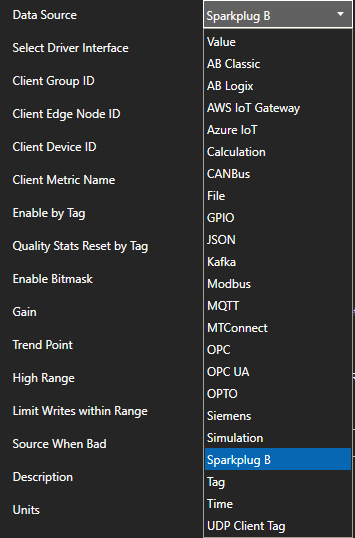
Select the correct Driver Interface from the Driver Interface pull down list.

Specify the Client Group IDClient Edge Node IDClient Device ID, and Client Metric Name for the Edge of Node Metric value to read and write.
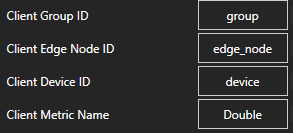
Select the Data Type of the Tag to match the data type of the Metric.

Select Apply Changes and the current value for the Metric should appear with Good Quality.

Select the Save button from the toolbar to save your configuration.

Save Button

You can view the Getting Started with Sparkplug B Video to familiarize yourself with the above steps to setup OAS as a Sparkplug B Edge of Network Node and a Host Application

  • 00:00 – Introduction
  • 01:10 – Download OAS
  • 01:46 – Quick Start
  • 02:08 – Edge of Network Node
  • 05:52 – EoN Tags
  • 07:04 – Host Application
  • 09:20 – SpB Client Tags
  • 10:22 – Programatic Interface
  • 10:59 – CSV Export / Import
  • 12:27 – Multiple Metric Tags
  • 13:46 – Modbus
  • 16:10 – DCMD Metric Write
  • 17:00 – Data Route
  • 17:58 – Networking
  • 18:17 – Save Configuration
  • 18:56 – OAS Platform

Step 3. Access Data with the OAS REST API
How To Read and Write Live Data with the OAS REST API


We are going to discuss how to read and write live data with the OAS REST API. The interface below is what we will be building. You can see the live version of it here: http://www.opcweb.com/examples/restexamples/realtimedata.htm.
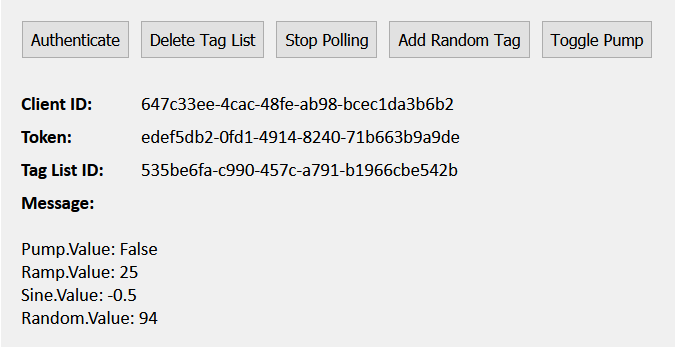
Getting Started

To use the OAS REST API you must make sure that the OAS HTTP service is listening on the correct port. To do this, open the OAS Configuration application and select Configure > Options, then select the network node (localhost if working on the local machine) and click Select. Under the Networking tab, locate the field for REST API/WebHMI Port Number. The default is 58725 but can be changed. If you are accessing the server from a remote client, you will also need to make sure your machine and/or company firewalls allow TCP traffic on the selected port.

You can find full documentation for the OAS REST API here: http://restapi.openautomationsoftware.com as well as a link to open it in Postman.

Setting up the Page

<!DOCTYPE html>
<html lang="en">
<head>
<meta charset="utf-8"/>
    <title>REST Example | Real Time Data</title>
    <link rel="stylesheet" href="client.css">
    <script src="https://code.jquery.com/jquery-3.1.1.min.js"></script>
    <script type="text/javascript">

Above is the start of the head tag and a link to the jQuery library. We will be using jQuery for this tutorial.

        var networkNode = "http://www.opcweb.com:58725";
        var clientid =  ""; // holds the client id from authorization
        var token =  "";    // holds the token from authorization
        var drawheader = true; // flag for whether the table header needs to be drawn
        var polling = null; // variable for setInterval function    
        var pumpval = null; // holds the last pump value
        var currentlist = {
            "tags":[
                {"path": "Pump.Value"},
                {"path": "Ramp.Value"},
                {"path": "Sine.Value"}
            ]
        };

Next we declare some variables that we will use later. The networkNode is the URL for where the OAS Service you are calling is located. The clientid and the token are variables that we will use to hold the authentication credentials that will be returned in our first call. Next, polling is a variable we will use to hold the setInterval function for our repeat calls to the API to get the tag data. The pumpval boolean holds the pump tags value on the page so that we can update it without asking for it’s current value first. The currentlist object starts out with the tag array that we are going to send in the requests to create and update the tag list, we will add to it later.

        // function to clear out variables for a reset
        function clearvariables(){
            delete currentlist.id;
            clearInterval(polling);
            polling = null;
            $('#diverror').empty();
            $('#divtaglistid').empty();
            $('#displaythis').empty();
            $("#createtaglist").prop("value", "Create Tag List");
            $("#dopolling").prop("value", "Start Polling");
        }
        

The clearvariables() function above does just that. We will call it later in our application to reset our button text and reset our variables when needed.

        // function to display error messages 
        function displaymessage(mess, fnc){
            clearInterval(polling); // in the event of an error we stop the polling
            switch(mess) {
                case 401:
                    $('#diverror').html("Authentication required.");
                    break;
                case 404:
                    if((fnc == "delete")||(fnc == "update")){
                        $('#diverror').html("Tag List not found.");
                    }else{
                        $('#diverror').html("404"); 
                    }
                    break;
                default:
                    $('#diverror').html(mess);
                }                       
        }

The displaymessage() function is called when our API request returns with an error. It will display the message on the page.

Authenticate

$("#doauth").click(function(){ // click funtion for authenticatation
    clearvariables(); // clear out the old variables, we are starting over   
    // api call for authenticatation
    $.ajax({
        url: networkNode + "/OASREST/v2/authenticate",
        type: "POST",
        contentType: "application/json; charset=utf-8", 
        crossDomain: true,
        dataType: "json",
        data: '{"username": "", "password": ""}',
        success: function(r) {
            clientid = r.data.clientid; // store the client id for later calls
            token = r.data.token;  // store the token for later calls      
            $('#divid').html(clientid); // display the client id
            $('#divtoken').html(token); // display the token
        },
        error: function (e) {
            displaymessage(e.status, "auth"); // in case of error, display the error         
        }
    });
});

The first call you will always need to make is to Authenticate. This will create a session and return a clientid and token that you will send in the header of all of your subsequent calls. The API call above is inside of a click function that handles the click event for the Authenticate button. The first thing we do is call the clearvariable() function in case the user has been using the application already. When the session is created it creates a new clientid and token. Anything that may have been done previously on the page will be tied to the old session and no longer be accessible so we clear out the old display as well.

We are using the jQuery ajax() method to send an asynchronous HTTP request to the server. The first parameter url specifies the address we are sending our request to. The networkNode we set above is used here. The Authenticate call is a POST which we specify in the type parameter. Next, contentType: application/json; charset=utf-8 designates the content to be in JSON format, encoded in the UTF-8 character encoding. The crossDomain parameter is set to true, allowing us to send our request to a resource that is outside of our own domain. The dataType parameter is set to “json”, letting the server know we expect the response to come back in JSON format. In out data parameter, what we are sending to the server, we have two variables: username and password. In this example, they are empty strings which will allow us to create a session in the default security group. For more information about security groups, see the Getting Started – Security tutorial in our knowledge base.

If we were to run the Authenticate function successfully here is what would be returned:

{
    "status": "OK",
    "data": {
        "clientid": "e90c8ae8-6b12-4690-a02b-f35ad03b3d2d",
        "token": "f16c3098-b295-4572-9a6b-f53ee984d21b"
    },
    "messages": [
        "Default credential provided - access to data and operations may be limited"
    ]
}

In which case, we process the return inside of our success function. We set the clientid page variable to the clientid property of the data object of the return object and the token page variable to the token property. If an error were to be returned, we handle it in our error function where we send the message to the displaymessage() function.

Create and Delete the Tag List

// click function to create or delete tag list 
$("#createtaglist").click(function(){
    // if there is no id, create one
    if (!currentlist.id){ 
        // api call to create the tag list
        $.ajax({
            url: networkNode + "/OASREST/v2/taglists",
            type: "POST",
            contentType: "application/json; charset=utf-8", 
            crossDomain: true,
            dataType: "json",
            headers: {"clientid": clientid, "token": token},
            data: JSON.stringify(currentlist),
            success: function(r) {
                currentlist.id = r.data.id;
                $('#diverror').empty();
                $('#divtaglistid').html(currentlist.id);
                $("#createtaglist").prop("value", "Delete Tag List"); // toggle button
            },
            error: function (e) {
                displaymessage(e.status, "create"); // in case of error, display the error    
            }
        });
    // if there is an id, delete it
    }else{
        clearInterval(polling); // stop the polling and clear out the variable                   
        polling = null;
        $("#dopolling").prop("value", "Start Polling"); // toggle polling button
        // api call to delete the tag list
        $.ajax({
            url: networkNode + "/OASREST/v2/taglists/" + currentlist.id,
            type: "DELETE",
            contentType: "application/json; charset=utf-8", 
            crossDomain: true,
            dataType: "json",
            headers: {"clientid": clientid, "token": token},
            success: function(r) {
                if(currentlist.tags.some(el => el.path === "Random.Value")){  // if the random tag has been added, remove it to reset to original list
                    currentlist.tags.pop(); 
                }
                delete currentlist.id; 
                $('#divtaglistid').empty();  //empty the displays
                $('#displaythis').empty();
                $("#createtaglist").prop("value", "Create Tag List"); // toggle button
            },
            error: function (e) {
                displaymessage(e.status, "delete"); // in case of error, display the error   
            }
        });
    }
});

Next we have a click function, $(“#createtaglist”).click(function(), that handles creating and deleting the tag list. We will toggle it’s value back and forth based on the existence of the currentlist.id that we will add to our data object variable after it is returned from our API call.

Let’s look first at the Create Tag List call, it is also a “POST”. In this call we have added a header parameter, which passes in our clientid and token. In the data parameter, we pass in the tag list array that we created at the top of the page in our currentlist object. Before we pass the tag array in, we format it with the JSON.stringify() method that converts a JavaScript object or value to a JSON string. In the function that handles a successful call, we set the currentlist.id to the returned tag list id, display it on the page, clear out the error display since we were successful and toggle the button text.

If a tag list already exists, the click function will delete it. First we stop the polling of the data, set the polling variable to null and toggle the button text. In the Delete Tag List call, we add the currentlist.id to the end of the url so the API knows which list we want to delete. The type is changed to “DELETE” here. Again, we pass the clientid and token in the header. In the success function, the first the we do is check to see the Random tag has been added to our list via the Add Random button. If it has, we want to delete it with currentlist.tags.pop() so that our list is back to it’s original state and it doesn’t get added twice. Next, we delete the currentlist.id from our object with delete currentlist.id. Finally, we clear out the displays and toggle the button text. In the event of an error, we display the message.

Get Tag List

// api call to get the latest tag values for the list
function getthetags(){
    $.ajax({
        url: networkNode + "/OASREST/v2/taglists/" + currentlist.id,
        type: "GET",
        contentType: "application/json; charset=utf-8", 
        crossDomain: true,
        dataType: "json",
        headers: {"clientid": clientid, "token": token},
        success: function(r) {
            pumpval = r.tags[0].value; // hold onto the pump value so we can update it
            $('#displaythis').empty(); // empty out old display
            $.each(r.tags, function(key,tag) {
                $('#displaythis').append(tag.path + ': ' + tag.value + "<br>");               
            });              
        },
        error: function (e) {
            displaymessage(e); // in case of error, display the error    
        }
    }); 
}

// click event to toggle polling
$("#dopolling").click(function(){
    if (!currentlist.id){  // if no list exists, display message, exit
        displaymessage("Tag List not found", "poll");
        return;
    }
    if (polling == null){ // if polling exists, stop it
        polling = setInterval("getthetags()", 1000);  // start the polling 
        $("#dopolling").prop("value", "Stop Polling"); // toggle button
    } else { //if polling doesn't exist, start it
        clearInterval(polling);  // stop the polling and clear the variable
        polling = null;
        $("#dopolling").prop("value", "Start Polling"); // toggle button
    }
});

Now that we have created the tag list, we want to get the tag data. We will also use the JavaScript setInterval function to repeatedly poll the data. When the user clicks the Start Polling button the $(“#dopolling”).click(function() fires. First we check to see if a tag list exists, if it doesn’t we display an error message and exit the function. Next, we check to see if we are already polling. If we are, we know the user has clicked the Stop Polling button. In this case, we clear use clearInterval(polling) to stop the polling, set it to null and toggle the button text. If we aren’t already polling we know the user has clicked the Start Polling button. In this case, we use the setInterval function to call our getthetags() function once every second and then toggle the button text.

In the getthetags() function, we launch our API call. At the end of the url we add the currentlist.id so the server knows which tag list we want. The request type is “GET” and we send the clientid and token in the header. Below is the data that comes back:

{
    "id": "664c93ed-2f29-460c-9691-f4730c04ce40",
    "tags": [
        {
            "path": "Pump.Value",
            "value": "False",
            "quality": true,
            "type": "boolean"
        },
        {
            "path": "Ramp.Value",
            "value": "37",
            "quality": true,
            "type": "float"
        },
        {
            "path": "Sine.Value",
            "value": "-0.296687960624695",
            "quality": true,
            "type": "float"
        }
    ]
}

In our success function, we set the pumpval page variable to r.tags[0].value which is the value of the Pump tank as it is the first tag in our tag list array. We are storing the value in case the user clicks the Toggle Pump button. Next we use the jQuery .each() function to iterate through the returned tags array to display the data on the page. In case of error, we display the error message.

Update Tag List

// click event for adding random tag
$("#updatetaglist").click(function(){
    if (currentlist.id == ""){ // if no list exists, exit
        displaymessage("Tag List not found", "update");
        return;
    }
    if(!currentlist.tags.some(el => el.path === "Random.Value")){  // check to see if it is already there, if it's not add it
        currentlist.tags.push({"path": "Random.Value"});
        // api call to update the tag list
        $.ajax({
            url: networkNode + "/OASREST/v2/taglists",
            type: "PUT",
            contentType: "application/json; charset=utf-8", 
            crossDomain: true,
            dataType: "json",
            headers: {"clientid": clientid, "token": token},
            data: JSON.stringify(currentlist),
            success: function(r) {
            },
            error: function (e) {
                displaymessage(e.status, "update");  // in case of error, display the error                  
            }
        });
    }
}); 

The Update Tag List call is inside of our $(“#updatetaglist”).click(function() and fired when the user clicks the Add Random button. Again, we check to make sure the currentlist.id exists and exit the function if it does not. Next we check the tags array to see if the Random tag has been added previously, we don’t want to add it twice. If it is there, we skip over this function, otherwise, we add it to the array and make our API call. The request type is “PUT” and we pass the clientid and the token in the header. In the data parameter we use the JSON.stringify function to format our current list object which now includes the currentlist.id and the Random tag as a JSON string. This tells the server to use this updated tag list for the tag list we have already created. We don’t have to do anything in our success function here, we are already polling and our getthetags() function can handle the addition. In case of error, we display the error.

Set Tag Values

// click event to toggle the pump value
$("#togglepump").click(function(){
    if (currentlist.id == ""){ // if no list exists, exit
        displaymessage("Tag List not found", "toggle");
        return;
    }
    var flagpump = false;
    if (pumpval == "False"){ // see what the current stored pump value is and flip it
        flagpump = true;
    }
    // api call to update the pump value
    $.ajax({
        url: networkNode + "/OASREST/v2/taglists/set",
        type: "POST",
        contentType: "application/json; charset=utf-8", 
        crossDomain: true,
        dataType: "json",
        headers: {"clientid": clientid, "token": token},
        data: '{"values":[{"path": "Pump.Value", "value": "' + flagpump + '"}]}',
        success: function(r) {
        },
        error: function (e) {
            displaymessage(e.status, "update");  // in case of error, display the error                          
        }
    });
});

The Toggle Pump button fires the click $(“#togglepump”).click(function(). Inside of this function, we first check to see if the currentlist.id exists. If it does not, we exit the function. Otherwise, we get evaluate our current pumpval page variable and flip it. Our API call here is a “POST” and we send the clientid and the token in the header. Our data parameter contains an array of objects containing the path to the tag and parameter we want to update, along with the new value. Our array has only one object, the Pump, but we could send in multiple tags to update with this call. Again we don’t have to do anything in our success function here, we are already polling. In case of error, we display the error.

An optional parameter that can be sent in this call is timestamp. Use this method if implementing a custom data source. The timestamp field is a numeric representation of the number of ticks since 1/1/1970. In JavaScript this can be retrieved from a Date object using the .GetTime() method. It would look like this:

{ "values": 
    [ 
    { "path": "Pump.Value", "value": true, "timestamp": 1490110444474 }, 
    { "path": "Ramp.Value", "value": 37, "timestamp": 1490110444474 } 
    ] 
}

All Together Now…

<!DOCTYPE html>
<html lang="en">
<head>
<meta charset="utf-8"/>
    <title>REST Example | Real Time Data</title>
    <link rel="stylesheet" href="client.css">
    <script src="https://code.jquery.com/jquery-3.1.1.min.js"></script>
    <script type="text/javascript">

        var networkNode = "http://www.opcweb.com:58725";
        var clientid =  ""; // holds the client id from authorization
        var token =  "";    // holds the token from authorization       
        var polling = null; // variable for setInterval function    
        var pumpval = null; // holds the last pump value
        var currentlist = {
            "tags":[    
                {"path": "Pump.Value"},
                {"path": "Ramp.Value"},
                {"path": "Sine.Value"}
            ]
        };

        // function to clear out variables for a reset
        function clearvariables(){
            delete currentlist.id;
            clearInterval(polling);
            polling = null;
            $('#diverror').empty();
            $('#divtaglistid').empty();
            $('#displaythis').empty();
            $("#createtaglist").prop("value", "Create Tag List");
            $("#dopolling").prop("value", "Start Polling");
        }
        
        // function to display error messages 
        function displaymessage(mess, fnc){
            clearInterval(polling); // in the event of an error we stop the polling
            switch(mess) {
                case 401:
                    $('#diverror').html("Authentication required.");
                    break;
                case 404:
                    if((fnc == "delete")||(fnc == "update")){
                        $('#diverror').html("Tag List not found.");
                    }else{
                        $('#diverror').html("404"); 
                    }
                    break;
                default:
                    $('#diverror').html(mess);
                }                       
        }
        
        // api call to get the latest tag values for the list
        function getthetags(){
            $.ajax({
                url: networkNode + "/OASREST/v2/taglists/" + currentlist.id,
                type: "GET",
                contentType: "application/json; charset=utf-8", 
                crossDomain: true,
                dataType: "json",
                headers: {"clientid": clientid, "token": token},
                success: function(r) {
                    console.log(r);
                    pumpval = r.tags[0].value; // hold onto the pump value so we can update it
                    $('#displaythis').empty(); // empty out old display
                    $.each(r.tags, function(key,tag) {
                        $('#displaythis').append(tag.path + ': ' + tag.value + "<br>");               
                    });              
                },
                error: function (e) {
                    displaymessage(e); // in case of error, display the error    
                }
            }); 
        }
        
        $(document).ready(function() {
            
            $("#doauth").click(function(){ // click funtion for authorization
                clearvariables(); // clear out the old variables, we are starting over   
                // api call for authorization
                $.ajax({
                    url: networkNode + "/OASREST/v2/authenticate",
                    type: "POST",
                    contentType: "application/json; charset=utf-8", 
                    crossDomain: true,
                    dataType: "json",
                    data: '{"username": "", "password": ""}',
                    success: function(r) {
                        clientid = r.data.clientid; // store the client id for later calls
                        token = r.data.token;  // store the token for later calls      
                        $('#divid').html(clientid); // display the client id
                        $('#divtoken').html(token); // display the token 
                    },
                    error: function (e) {
                        displaymessage(e.status, "auth"); // in case of error, display the error         
                    }
                });
            });
            
            // click function to create or delete tag list 
            $("#createtaglist").click(function(){
                // if there is no id, create one
                if (!currentlist.id){ 
                    // api call to create the tag list
                    $.ajax({
                        url: networkNode + "/OASREST/v2/taglists",
                        type: "POST",
                        contentType: "application/json; charset=utf-8", 
                        crossDomain: true,
                        dataType: "json",
                        headers: {"clientid": clientid, "token": token},
                        data: JSON.stringify(currentlist),
                        success: function(r) {
                            currentlist.id = r.data.id;                            
                            $('#divtaglistid').html(currentlist.id);
                            $('#diverror').empty();
                            $("#createtaglist").prop("value", "Delete Tag List"); // toggle button
                        },
                        error: function (e) {
                            displaymessage(e.status, "create"); // in case of error, display the error    
                        }
                    });
                // if there is an id, delete it
                }else{
                    clearInterval(polling); // stop the polling and clear out the variable                   
                    polling = null;
                    $("#dopolling").prop("value", "Start Polling"); // toggle polling button
                    // api call to delete the tag list
                    $.ajax({
                        url: networkNode + "/OASREST/v2/taglists/" + currentlist.id,
                        type: "DELETE",
                        contentType: "application/json; charset=utf-8", 
                        crossDomain: true,
                        dataType: "json",
                        headers: {"clientid": clientid, "token": token},
                        success: function(r) {
                            if(currentlist.tags.some(el => el.path === "Random.Value")){  // if the random tag has been added, remove it to reset to original list
                                currentlist.tags.pop(); 
                            }
                            delete currentlist.id; 
                            $('#divtaglistid').empty();  //empty the displays
                            $('#displaythis').empty();
                            $("#createtaglist").prop("value", "Create Tag List"); // toggle button
                        },
                        error: function (e) {
                            displaymessage(e.status, "delete"); // in case of error, display the error   
                        }
                    });
                }
            });

            // click event for adding random tag
            $("#updatetaglist").click(function(){
                if (currentlist.id == ""){ // if no list exists, exit
                    displaymessage("Tag List not found", "update");
                    return;
                }
                if(!currentlist.tags.some(el => el.path === "Random.Value")){  // check to see if it is already there, if it's not add it
                    currentlist.tags.push({"path": "Random.Value"});                
                    // api call to update the tag list
                    $.ajax({
                        url: networkNode + "/OASREST/v2/taglists",
                        type: "PUT",
                        contentType: "application/json; charset=utf-8", 
                        crossDomain: true,
                        dataType: "json",
                        headers: {"clientid": clientid, "token": token},
                        data: JSON.stringify(currentlist),
                        success: function(r) {
                        },
                        error: function (e) {
                            displaymessage(e.status, "update");  // in case of error, display the error                  
                        }
                    });
                }
            });           

            // click event to toggle the pump value
            $("#togglepump").click(function(){
                if (currentlist.id == ""){ // if no list exists, exit
                    displaymessage("Tag List not found", "toggle");
                    return;
                }
                var flagpump = false;
                if (pumpval == "False"){ // see what the current stored pump value is and flip it
                    flagpump = true;
                }
                // api call to update the pump value
                $.ajax({
                    url: networkNode + "/OASREST/v2/taglists/set",
                    type: "POST",
                    contentType: "application/json; charset=utf-8", 
                    crossDomain: true,
                    dataType: "json",
                    headers: {"clientid": clientid, "token": token},
                    data: '{"values":[{"path": "Pump.Value", "value": "' + flagpump + '"}]}',
                    success: function(r) {
                    },
                    error: function (e) {
                        displaymessage(e.status, "update");  // in case of error, display the error                          
                    }
                });
            });

            // click event to toggle polling
            $("#dopolling").click(function(){
                if (!currentlist.id){  // if no list exists, display message, exit
                    displaymessage("Tag List not found", "poll");
                    return;
                }
                if (polling == null){ // if polling exists, stop it
                    polling = setInterval("getthetags()", 1000);  // start the polling 
                    $("#dopolling").prop("value", "Stop Polling"); // toggle button
                } else { //if polling doesn't exist, start it
                    clearInterval(polling);  // stop the polling and clear the variable
                    polling = null;
                    $("#dopolling").prop("value", "Start Polling"); // toggle button
                }
            });

        });


    </script>
</head>
    <body>
        <div class='main'>
            <input type='button' id='doauth' class='button' value='Authenticate'><input type='button' id='createtaglist' class='button' value='Create Tag List'>
            <input type='button' id='dopolling' class='button' value='Start Polling'><input type='button' id='updatetaglist' class='button' value='Add Random Tag'>
            <input type='button' id='togglepump' class='button' value='Toggle Pump'><br><br>
            <div class='outer'><div class='label'>Client ID:</div><div  id='divid' class='value'></div></div>
            <div class='outer'><div class='label'>Token:</div><div id='divtoken' class='value'></div></div>
            <div class='outer'><div class='label'>Tag List ID:</div><div id='divtaglistid' class='value'></div></div>         
            <div class='outer'><div class='label'>Message:</div><div  id='diverror' class='value'></div></div><br>
            <div id='displaythis'></div>
        </div>
    </body>
</html>>

To download the source code for this tutorial, click here.

How to Access Sparkplug B Data from a C# or VB .NET Application

How To Access Sparkplug B Data with a .NET Application

How to Access Sparkplug B Data from a C# or VB .NET Application

Open Automation Software allows you to establish direct connections to data from MQTT brokers at Sparkplug B Edge of Network Nodes. The OASData component enables you to access real-time and historical data from a local or remote OAS instance with various versions of .NET, including .NET 5, .NET 6, .NET 7, .NET Core 2.0 or later, .NET Framework 4.61 or later, Xamarin.iOS 10.14, Xamarin.Android 8.0, and UWP 1.0.0.16299. This tutorial guides you through the process of downloading and installing OAS, configuring a Sparkplug B driver, defining tags, and reading and writing data to them using the .Net Data Connector. You can find code examples in C# and Visual Basic on this page.

Step 1. Download and Install the Open Automation Software and Start the OAS Service

If you have not already done so, you will need to download and install the OAS platform.  Fully functional trial versions of the software are available for Windows, Windows IoT Core, Linux, Raspberry Pi and Docker on our downloads page.

On Windows run the downloaded Setup.exe file to install one or more of the Open Automation Software features. Select the default Typical installation if you are not sure what features to use or the Custom installation if you want to save disk space on the target system.  When prompted agree to the End User License Agreement to continue the installation.

For more detailed instructions and video tutorials, visit the installation guide for your system:
Windows Installation | Linux Installation | Raspberry Pi Installation | Dockers Installation

When the installation is finished the OAS Service Control application will appear.  Use this application to start the 4 Services. If this is the first time installing the software it will automatically enter Runtime with an example Tag Configuration.


Step 2. Set Up Sparkplug B Host App to Access EoN Node Data.

Select Configure-Drivers.

Configure Drivers

Enter a meaningful Driver Interface Name that you will refer to this connection and define the properties.

Set the driver to Sparkplug B.

Enter the Host property to the IP Address of the of the host broker or just use localhost for a local broker. 

Set the Port property of the host broker to connect to.  The default port is 1883 or 8883 for SSL.

Note: The OAS MQTT Broker can be used to host data locally.  To use another broker on the default ports on the same computer change the OAS MQTT Broker Port under Configure-Options-MQTT Broker.

Enter the User Name and Password if required.

Set the MQTT Protocol Version to V311 or V500.

Set the Client ID to a unique value, each driver interface must have a specific value different than all other clients connecting to the host.

Set the Mode to Host App for OAS to control the online state of each Edge of Node defined to the shared Host Application ID. Or set to Client App to access EoN Node data without controlling their state.

Set the Host ID to the specific value that the Edge of Nodes will be using as the Host Application ID.

Set the Sparkplug B Version to 2.2 or 3.0.

To automatically add tags for each Metric from the matching Group, Edge of Nodes, and Devices enable the property Add Client Tags Automatically.

When enabled optionally set the Filter Groups, Edge Nodes, and Devices that tags should be added from for each of their Metrics.  Leave the Filter fields blank to include all Edge of Nodes publishing data to the broker.

Select the Add Driver button in the left part of the form to add the Driver Interface as an available selection when defining Tags in the next step.

Add Driver

You are now ready to add tags for specific Sparkplug B EoN Node Metric values.

Note: If the Driver Interface property Add Client Tags Automatically was enabled tags will be created for you, you can skip this step to add tags manually.

Select Configure-Tags.

Menu Configure Tags

Note: You can add organizational Groups as many levels deep as you prefer and add tags to groups.  To do this first add a Group to Tags Group at the root level, then right click on the Group in the right window to add additional Groups or Tags.

Select Add Tag.

Add Tag

Change the Data Source Tag property to Sparkplug B.

Select the correct Driver Interface from the Driver Interface pull down list.

Specify the Client Group IDClient Edge Node IDClient Device ID, and Client Metric Name for the Edge of Node Metric value to read and write.

Select the Data Type of the Tag to match the data type of the Metric.

Select Apply Changes and the current value for the Metric should appear with Good Quality.

Select the Save button from the toolbar to save your configuration.

Save Button

You can view the Getting Started with Sparkplug B Video to familiarize yourself with the above steps to setup OAS as a Sparkplug B Edge of Network Node and a Host Application

  • 00:00 – Introduction
  • 01:10 – Download OAS
  • 01:46 – Quick Start
  • 02:08 – Edge of Network Node
  • 05:52 – EoN Tags
  • 07:04 – Host Application
  • 09:20 – SpB Client Tags
  • 10:22 – Programatic Interface
  • 10:59 – CSV Export / Import
  • 12:27 – Multiple Metric Tags
  • 13:46 – Modbus
  • 16:10 – DCMD Metric Write
  • 17:00 – Data Route
  • 17:58 – Networking
  • 18:17 – Save Configuration
  • 18:56 – OAS Platform

Step 3. Configure Your Tags

OAS provides multiple ways to add and define tags:

To add a Tag manually:

  1. In the OAS Configure Application, select Configure >> Tags from the top menu.

  2. Select localhost or the remote service you wish to modify with the Select button to the right of the Network Node list.

  3. Click on the Add Tag button located at the top of the Tag browser on the left portion of the screen.

  4. A dialog box will appear. Enter a name for your new tag and click ok.
  5. A configuration screen will appear for your new tag. Select your data source type in in the Data Source dropdown box.

  6. Specify the correct data type in the Data Type dropdown box.
  7. Click Apply Changes at the bottom right of the window.

For more detailed instructions on configuring your tags, click here to see our Getting Started Tags tutorial.


Step 4. Access Your Data from a C# or VB .NET Application

The .NET Standard 2.0 OASData assembly is used to provide read and write access to OAS tag variables and can target .NET 5, .NET 6, .NET 7, .NET Core 2.o or greater, .NET Framework 4.61 or greater, Xamarin.iOS 10.14, Xamarin.Android 8.0, and UWP 1.0.0.16299.

Start a new Visual Studio Project or Open Your Existing One

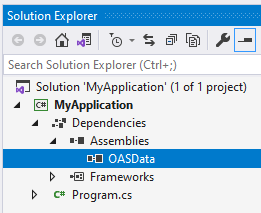
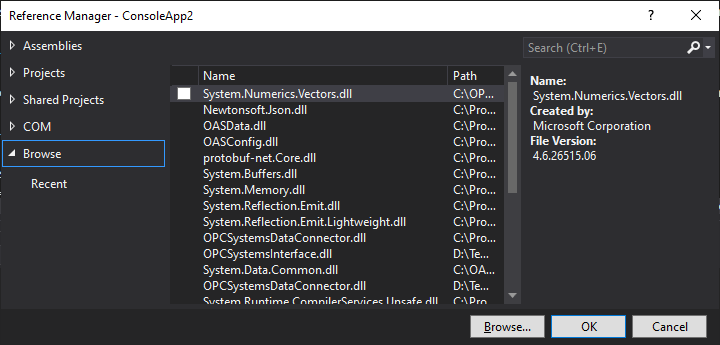
Microsoft Visual Studio 2015+ is recommended. For developing cross-platform .NET Standard or .NET Core solutions, Visual Studio 2019+ is recommended. For developing Android and/or iOS solutions, be sure to include Xamarin extensions to Visual Studio. After creating a new Visual Studio project, add a reference to the OASData assembly and all its dependencies, found in the OAS installation directory. This is typically:

C:\Program Files\Open Automation Software\OAS\Controls\NetStanard\OASData\OASData.dll

Create an instance of the OASData.Data class

static OASData.Data oasd = new OASData.Data();

Your application typically does not need more than one instance of the OASData.Data class. So, this can be created when your application starts.

Read Tags Asynchronously

oasd.ValuesChangedAll += OASDValuesChangedAll; 
private void OASDValuesChangedAll(string[] Tags, object[] Values, bool[] Qualities, DateTime[] TimeStamps);

oasd.AddTags(new string[] {
"Sine.Value",
"Random.Value",
"Ramp.Value"
});

Values are returned in the ValuesChangedAll event anytime values change in a tag variable. AddTags adds tags for subscription.

Read Tags Synchronously

Values = oasd.SyncReadTags(Tags, ref Errors, 10000);
  • This call returns an object array with the values for each tag variable.
  • Tags is a string array of tag names and variables to read.
  • Errors is an integer array returning: 0 if the tag variable quality is good 1 if the quality is bad 2 if the value could not be returned within the timeout specified.
  • Timeout is specified in milliseconds to wait for the call to return.

Write Tags Asynchronously

oasd.WriteTags(OASTags, OASValues);

With this call, if the tags data source is defined to a device, for example: Modbus; Siemens; Allen Bradley MQTT; OPC UA, or application writes to .Value will be written to the source defined.

Examples: Modbus, Siemens, AB, OPC UA, MQTT

  • Tags is a string array of tag names and variables.
  • Values is an object array containing the values to write to each tag.
  • TimeStamps array can optionally be provided to set the time of the value if the Data Source of the Tag is Value.

Write Tags Synchronously

Errors = oasd.SyncWriteTags(Tags, Values);
  • Tags is a string array of tag names and variables.
  • Values is an object array containing the values to write to each tag.
  • Errors is an Integer array that returns: 0 when successful; 1 when OAS Engine is not reachable; 2 when the Tags array size is not equal to the Values array.

Networking

Tag names can include an IP Address, network node name, or registered domain name if the application is deployed remote from the OAS Engine.

Basic Networking Example:

\\192.168.0.1\TagName.Value

Live Data Cloud Networking Example:

\\www.opcweb.com\RemoteSCADAHosting.MyLDCNode.TagName.Value

For more information, see Getting Started with OASData and IIoT Example Service Code or watch the video below:

How to Access Sparkplug B Alarms with a REST API

The OAS REST API provides a way to programmatically manage and access Sparkplug B alarms using JSON over HTTP. This tutorial takes you through the steps of downloading and installing OAS, configuring a Sparkplug B driver to access Metric values from a Sparkplug B Edge of Network Node Device, and using the REST API to access real-time and historical Sparkplug B alarm data. We will create a sample JavaScript Web Interface to demonstrate how to build an alarm viewer with the ability to acknowledge active alarms.

Step 1. Download and Install the Open Automation Software and Start the OAS Service

If you have not already done so, you will need to download and install the OAS platform.  Fully functional trial versions of the software are available for Windows, Windows IoT Core, Linux, Raspberry Pi and Docker on our downloads page.

On Windows run the downloaded Setup.exe file to install one or more of the Open Automation Software features. Select the default Typical installation if you are not sure what features to use or the Custom installation if you want to save disk space on the target system.  When prompted agree to the End User License Agreement to continue the installation.

For more detailed instructions and video tutorials, visit the installation guide for your system:
Windows Installation | Linux Installation | Raspberry Pi Installation | Dockers Installation

When the installation is finished the OAS Service Control application will appear.  Use this application to start the 4 Services. If this is the first time installing the software it will automatically enter Runtime with an example Tag Configuration.


Step 2. Set Up Sparkplug B Host App to Access EoN Node Data.

Select Configure-Drivers.

Configure Drivers

Enter a meaningful Driver Interface Name that you will refer to this connection and define the properties.

Set the driver to Sparkplug B.

Enter the Host property to the IP Address of the of the host broker or just use localhost for a local broker. 

Set the Port property of the host broker to connect to.  The default port is 1883 or 8883 for SSL.

Note: The OAS MQTT Broker can be used to host data locally.  To use another broker on the default ports on the same computer change the OAS MQTT Broker Port under Configure-Options-MQTT Broker.

Enter the User Name and Password if required.

Set the MQTT Protocol Version to V311 or V500.

Set the Client ID to a unique value, each driver interface must have a specific value different than all other clients connecting to the host.

Set the Mode to Host App for OAS to control the online state of each Edge of Node defined to the shared Host Application ID. Or set to Client App to access EoN Node data without controlling their state.

Set the Host ID to the specific value that the Edge of Nodes will be using as the Host Application ID.

Set the Sparkplug B Version to 2.2 or 3.0.

To automatically add tags for each Metric from the matching Group, Edge of Nodes, and Devices enable the property Add Client Tags Automatically.

When enabled optionally set the Filter Groups, Edge Nodes, and Devices that tags should be added from for each of their Metrics.  Leave the Filter fields blank to include all Edge of Nodes publishing data to the broker.

Select the Add Driver button in the left part of the form to add the Driver Interface as an available selection when defining Tags in the next step.

Add Driver

You are now ready to add tags for specific Sparkplug B EoN Node Metric values.

Note: If the Driver Interface property Add Client Tags Automatically was enabled tags will be created for you, you can skip this step to add tags manually.

Select Configure-Tags.

Menu Configure Tags

Note: You can add organizational Groups as many levels deep as you prefer and add tags to groups.  To do this first add a Group to Tags Group at the root level, then right click on the Group in the right window to add additional Groups or Tags.

Select Add Tag.

Add Tag

Change the Data Source Tag property to Sparkplug B.

Select the correct Driver Interface from the Driver Interface pull down list.

Specify the Client Group IDClient Edge Node IDClient Device ID, and Client Metric Name for the Edge of Node Metric value to read and write.

Select the Data Type of the Tag to match the data type of the Metric.

Select Apply Changes and the current value for the Metric should appear with Good Quality.

Select the Save button from the toolbar to save your configuration.

Save Button

You can view the Getting Started with Sparkplug B Video to familiarize yourself with the above steps to setup OAS as a Sparkplug B Edge of Network Node and a Host Application

  • 00:00 – Introduction
  • 01:10 – Download OAS
  • 01:46 – Quick Start
  • 02:08 – Edge of Network Node
  • 05:52 – EoN Tags
  • 07:04 – Host Application
  • 09:20 – SpB Client Tags
  • 10:22 – Programatic Interface
  • 10:59 – CSV Export / Import
  • 12:27 – Multiple Metric Tags
  • 13:46 – Modbus
  • 16:10 – DCMD Metric Write
  • 17:00 – Data Route
  • 17:58 – Networking
  • 18:17 – Save Configuration
  • 18:56 – OAS Platform

Step 3. Configure Your Tags

OAS provides multiple ways to add and define tags:

To add a Tag manually:

  1. In the OAS Configure Application, select Configure >> Tags from the top menu.

  2. Select localhost or the remote service you wish to modify with the Select button to the right of the Network Node list.

  3. Click on the Add Tag button located at the top of the Tag browser on the left portion of the screen.

  4. A dialog box will appear. Enter a name for your new tag and click ok.
  5. A configuration screen will appear for your new tag. Select your data source type in in the Data Source dropdown box.

  6. Specify the correct data type in the Data Type dropdown box.
  7. Click Apply Changes at the bottom right of the window.

For more detailed instructions on configuring your tags, click here to see our Getting Started Tags tutorial.


Step 4. Access Real Time and Historical Alarm Data with the REST API

Getting Started

To use the OAS REST API you must make sure that the OAS HTTP service is listening on the correct port. To do this, open the OAS Configuration application and select Configure > Options, then select the network node (localhost if working on the local machine) and click Select. Under the Networking tab, locate the field for REST API/WebHMI Port Number. The default is 58725 but can be changed. If you are accessing the server from a remote client, you will also need to make sure your machine and/or company firewalls allow TCP traffic on the selected port.

You can find full documentation for the OAS REST API here: http://restapi.openautomationsoftware.com as well as a link to open it in Postman.

How to Access Real Time and Historical Alarm Data with the OAS REST API

Setting up the Page

<!DOCTYPE html>
<html lang="en">
<head>
<meta charset="utf-8"/>
    <title>REST Example | Alarms</title>
    <link rel="stylesheet" href="client.css">
    <script src="https://code.jquery.com/jquery-3.1.1.min.js"></script>
    <script type="text/javascript">

Above is the start of the head tag and a link to the jQuery library. We will be using jQuery for this tutorial.

var networkNode = "http://www.opcweb.com:58725"; // variable for the network node
var clientid =  ""; // holds the client id from authorization
var token =  "";    // holds the token from authorization
var polling = null; // variable for setInterval function
var drawheader = true; // flag for whether the table header needs to be drawn
var inactive  = true; // flag for show/hide inactive alarms
var currentlist = {
            "filter": {
                "minpriority": 0,
                "maxpriority": 9999,
                "networknodes": [
                "localhost"
                ],
                "alarmtypes": [
                "Digital", "High", "Low", "High High", "Low Low", "Operator"
                ]
            },
            "history": false
        }; // object for holding json data

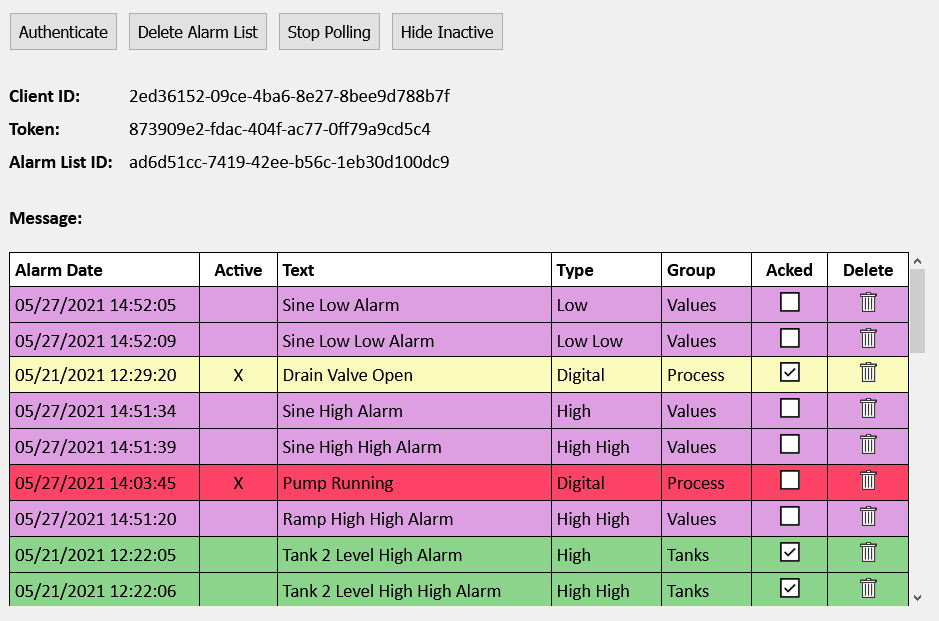
Next, we declare some variables that we will use later. The networkNode is the URL for where the OAS Service you are calling is located. The clientid and the token are variables that we will use to hold the authentication credentials that will be returned in our first call. Polling is a variable we will use to hold the setInterval function for our repeat calls to the API to get the alarm data. The drawheader is a flag that we set to let us know if we need to draw the header of our display again as we are polling. The currentlist object holds the data we are going to send to the API later: filters for which alarms we want to see and a boolean for whether or not we want to see historical alarms.

// function to clear out the variables and html         
function resetvariables(){
    clearInterval(polling);            
    currentlist.id = null;
    drawheader = true;
    polling = null;
    $("#tbalarms").empty();
    $('#divalarmlistid').empty();
    $("#togglepolling").prop("value", "Start Polling");

}        

The clearvariables() function above does just that. We will call it later in our application to reset our button text and reset our variables when needed.

// function to display error messages       
function displaymessage(mess, fnc){
    clearInterval(polling); // in the event of an error we stop the polling
    switch(mess) {
        case 401:
            $('#diverror').html("Authentication required.");
            break;
        case 404:
            if((fnc == "delete")||(fnc == "update")){
                $('#diverror').html("Alarm List not found.");
            }else{
                $('#diverror').html("404"); 
            }
            break;
        default:
            $('#diverror').html(mess);
    }                       
}

The displaymessage() function is called when our API request returns with an error. It will display the message on the page.

Authenticate

$("#doauth").click(function(){ // click funtion for authenticatation
    clearvariables(); // clear out the old variables, we are starting over   
    // api call for authenticatation
    $.ajax({
        url: networkNode + "/OASREST/v2/authenticate",
        type: "POST",
        contentType: "application/json; charset=utf-8", 
        crossDomain: true,
        dataType: "json",
        data: '{"username": "", "password": ""}',
        success: function(r) {
            clientid = r.data.clientid; // store the client id for later calls
            token = r.data.token;  // store the token for later calls      
            $('#divid').html(clientid); // display the client id
            $('#divtoken').html(token); // display the token
        },
        error: function (e) {
            displaymessage(e.status, "auth"); // in case of error, display the error         
        }
    });
});

The first call you will always need to make is to Authenticate. This will create a session and return a clientid and token that you will send in the header of all of your subsequent calls. The API call above is inside of a click function that handles the click event for the Authenticate button. The first thing we do is call the clearvariable() function in case the user has been using the application already. When the session is created it creates a new clientid and token. Anything that may have been done previously on the page will be tied to the old session and no longer be accessible so we clear out the old display as well.

We are using the jQuery ajax() method to send an asynchronous HTTP request to the server. The first parameter url specifies the address we are sending our request to. The networkNode we set above is used here. The Authenticate call is a POST which we specify in the type parameter. Next, contentType: application/json; charset=utf-8 designates the content to be in JSON format, encoded in the UTF-8 character encoding. The crossDomain parameter is set to true, allowing us to send our request to a resource that is outside of our own domain. The dataType parameter is set to “json”, letting the server know we expect the response to come back in JSON format. In out data parameter, what we are sending to the server, we have two variables: username and password. In this example, they are empty strings which will allow us to create a session in the default security group. For more information about security groups, see the Getting Started – Security tutorial in our knowledge base.

If we were to run the Authenticate function successfully here is what would be returned:

{
    "status": "OK",
    "data": {
        "clientid": "e90c8ae8-6b12-4690-a02b-f35ad03b3d2d",
        "token": "f16c3098-b295-4572-9a6b-f53ee984d21b"
    },
    "messages": [
        "Default credential provided - access to data and operations may be limited"
    ]
}

In which case, we process the return inside of our success function. We set the clientid page variable to the clientid property of the data object of the return object and the token page variable to the token property. If an error were to be returned, we handle it in our error function where we send the message to the displaymessage() function.

Create and Delete Alarm List

// click event to handle and toggle create/delete alarmlist button
$("#createalarmlist").click(function(){
    // if alarmlist id doesn't exist, create one.
    if (!currentlist.id){
        $.ajax({
            url: networkNode + "/OASREST/v2/alarmlists",
            type: "POST",
            contentType: "application/json; charset=utf-8", 
            crossDomain: true,
            dataType: "json",
            headers: {"clientid": clientid, "token": token},                    
            data: JSON.stringify(currentlist),
            success: function(r) {
                currentlist.id = r.data.id;  // store the returned alarmlist id in the object              
                $('#divalarmlistid').html(currentlist.id); // display the alarmlist id on the page
                $('#diverror').empty(); // success, so clear the error
                $("#createalarmlist").prop("value", "Delete Alarm List"); // toggle button text
            },
            error: function (e) {
                displaymessage(e.status, "createalarmlist");  // in case of error, display the error    
            }                        
        });
       
        // if alarmlist id exists, delete it.
    }else{                   
        $.ajax({
            url: networkNode + "/OASREST/v2/alarmlists/" + currentlist.id,
            type: "DELETE",
            contentType: "application/json; charset=utf-8", 
            crossDomain: true,
            dataType: "json",
            headers: {"clientid": clientid, "token": token},
            success: function(r) {
                 resetvariables(); // clear everything out to start again
                 $("#createalarmlist").prop("value", "Create Alarm List");  // toggle button text   
            },
            error: function (e) {
                displaymessage(e.status, "delete"); // in case of error, display the error    
            }
        });                   
    }                               
});

The $(“#createalarmlist”).click(function() handles both creating and deleting an alarm list depending on the button state. The first thing it does is to check to see if a currentlist.id exists. If it doesn’t, it creates one with the API call. This call is a “POST” and sends the clientid and token in the header. In the data parameter, it sends in our currentlist object after formatting it. The currentlist has our filter parameters for creating the alarm list. In the success function, we assign the returned list id to our currentlist object, display it on the page, clear out any old error messages and toggle the button text. In the case of an error, we display it.

If a currentlist.id already exists, we know the user has clicked the Delete Alarm List button, so we will delete it with our API call. This one is a “DELETE” type, appends the currentlist.id to the end of the url so the server knows which list to delete, passes the clientid and the token in the header and doesn’t need a data parameter. In the success function, we call the resetvariables() function to clear out all of the old list information because we are starting over and toggle the button text. In the case of an error, we display it.

Get Alarm List

// click function to toggle polling
$("#togglepolling").click(function(){
    // if no alarm list exists, exit
    if (!currentlist.id){
        displaymessage("Alarm List not found", "poll");
        return;
    }
    // if we aren't polling, start the polling
    if (polling == null){                    
        polling = setInterval(getalarmlist, 1000);
        getalarmlist();
        $("#togglepolling").prop("value", "Stop Polling"); // update polling button text
    // if we are polling, stop the polling
    } else {
        clearInterval(polling);
        polling = null;
        $("#togglepolling").prop("value", "Start Polling");  // update polling button text
    }
});

// gets the alarm data and draws the table
function getalarmlist(){
    var table = $("#tbalarms");
    // only draw the header one time
    if (drawheader){
        var th = "<tr>";
        th += "<th>Alarm Date</th>";
        th += "<th class='center'>Active</th>";
        th += "<th>Text</th>";
        th += "<th>Type</th>";
        th += "<th>Group</th>";
        th += "<th class='center'>Acked</th>";
        th += "<th class='center'>Delete</th>";
        th += "</tr>";
        table.append(th);
    }
    // call to the api to get the alarms for the current list
    $.ajax({
        url: networkNode + "/OASREST/v2/alarmlists/" + currentlist.id,
        type: "GET",
        contentType: "application/json; charset=utf-8", 
        crossDomain: true,
        dataType: "json",
        headers: {"clientid": clientid, "token": token},
        success: function(r) {
            $('#diverror').empty(); // success, so clear the errors                 
            for (var i = 0; i < r.data.length; i++){
                var temp = r.data[i].id;
                trid = temp.replaceAll('.', '_').replace(/\s/g, ''); // remove space and periods for row id     
                var ts = new Date(r.data[i].alarmdate) // hold the alarm date in a date variable
                var acttxt = ""; // variable for active column text
                var ackedtxt = "<img src='images/unchecked.png' style='cursor:pointer;' ondblclick='ackalarm(\"" + r.data[i].id + "\")'>"; // Acknowledged checkbox 
                var rclass = ""; // variable for row class
                // set the css class for the row base on active and acknowledged                    
                if (r.data[i].active) {
                    acttxt = "X";
                    rclass += "activerow";
                }else{
                    rclass += "inactive ";
                }
                if (r.data[i].acked) {
                    ackedtxt = "<img src='images/checked.png'>";
                    rclass += "ackedrow";
                }
                // build the row
                var str = "<tr class='" + rclass + "' id='" + trid + "'>";
                str += "<td class=''>" + fDate(ts) + "</td>";
                str += "<td class='center'>" + acttxt + "</td>";
                str += "<td class=''>" + r.data[i].text + "</td>";
                str += "<td class=''>" + r.data[i].type + "</td>";
                str += "<td class=''>" + r.data[i].group + "</td>";
                str += "<td class='center'>" + ackedtxt + "</td>";
                str += "<td class='center'><img src='images/delete.png' style='cursor:pointer;' onclick='deletealarm(\"" + r.data[i].id + "\")'></td>";
                str += "</tr>";
                // if the row already existed and this is an update, remove it first
                if(!drawheader){
                    $('#' + trid).remove();
                    $('#tbalarms tr:first').after(str);
                }else{                               
                    table.append(str);                                
                }                            
                // remove deleted alarms
                if(r.data[i].text == "DELETEALARM"){                           
                        $('#' + trid).remove();
                }
            }                           
            drawheader = false; // toggle flag for the header so the header row does not get redrawn after the first time
        }
    });
};

// function to format the date for display
function fDate(dt){
    var M = dt.getMonth() + 1;
    M = M.toString().padStart(2,0);
    var D = dt.getDate().toString().padStart(2,0);
    var H = dt.getHours().toString().padStart(2,0);
    var Min = dt.getMinutes().toString().padStart(2,0);
    var S = dt.getSeconds().toString().padStart(2,0);
    return M +"/" + D + "/" + dt.getFullYear() + " " + H + ":" + Min + ":" + S;
}

Now that we have our list created, we want to start polling the data. This is handled with the Start Polling button and the $(“#togglepolling”).click(function(). The first thing thing we do in the function is check to see if we have an alarm list created, if we don’t we display an error and exit the function. Next, we check to see if are already polling. If we aren’t, we use the JavaScript setInterval() function to call the getalarmlist() function every three seconds. We then immediately call the getalarmlist() function so that we don’t have to wait three seconds for it to run the first time.

Inside the getalarmlist() function, we check to see if the table header has already been drawn. If it hasn’t been, we draw it. Next, we call the API with a “GET” type, appending the currentlist id to the url, passing the clientid and token in the header and bypassing the data parameter as it is not needed for this call. In our success function, we clear out any old error messages and then build our display by looping through the returned array of alarms. We remove the periods and spaces from the alarm id to use it as the row id. Next, we look at alarms active and acknowledged states and do some formatting for those columns and the row color. We write out each of the returned alarm properties in our array and format the date for display. Then we check to see if this an update, (!drawheader). If it is we want to delete the old row before we add the new one. After that, we check the alarm text to see if we should delete the alarm and do so if that is the case. Finally, we set the drawheader to false so that we don’t keep redrawing it each time we poll the data. Back in our click event, we toggle the polling button text.

If the user has clicked the Stop Polling button, we clear the polling and set it to null and toggle the button text.

Update Alarms

// function to delete an alarm by id
function deletealarm(alarmid){
    var deletedata = [
        {
            "id": alarmid,
            "action" : "Delete",
            "networknode" : "localhost"
        }
    ]
    $.ajax({
        url: networkNode + "/OASREST/v2/alarmlists/set",
        type: "POST",
        headers: {"clientid": clientid, "token": token},  
        contentType: "application/json; charset=utf-8", 
        crossDomain: true,
        dataType: "json",
        data: JSON.stringify(deletedata),
        success: function(r) {        
        }
    });
};

// function to acknowledge an alarm by id
function ackalarm(alarmid){
    var ackdata = [
        {
            "id": alarmid,
            "action" : "Ack",
            "networknode" : "localhost"
        }
    ]
    $.ajax({
        url: networkNode + "/OASREST/v2/alarmlists/set",
        type: "POST",
        headers: {"clientid": clientid, "token": token},  
        contentType: "application/json; charset=utf-8", 
        crossDomain: true,
        dataType: "json",
        data: JSON.stringify(ackdata),
        success: function(r) {        
        }
    });
};

With the Update Alarms API call, you can Acknowledge, Delete and add Comments to an alarm. Valid operations are “Ack”, “Delete”, and “Comment” and are case-sensitive. In our demo, when the user clicks the Delete icon for the alarm, it fires the deletealarm() function, passing in the alarm id. The function calls the REST API with a “POST” type and passes the clientid and the token in the header. In the data parameter, we pass the alarm id, network node and the “Delete” action. In the polling that follows this call, the server sends “DELETEALARM” in the text of the alarm array for the deleted alarm letting us know to remove it from the display.

When the user double clicks the Acknowledged checkbox, it fires the ackalarm() function and passes in the alarm id. The function calls the REST API with a “POST” type and passes the clientid and the token in the header. In the data parameter, we pass the alarm id, network node and the “Ack” action. In the polling that follows this call, the server sends that alarm with the active property flagged as true and we then update the checkbox and row color.

Hide Inactive

$("#toggleactive").click(function(){
    if (polling){
        if (!currentlist.id){ // don't let them toggle active if there is no alarm list
            displaymessage("Alarm List not found", "toggleactive");
            return;
        }    
        if (inactive){
            $("#toggleactive").prop("value", "Show Inactive");
            $('#tbalarms tr').filter('.inactive').hide(); // hide the inactive rows
            inactive = false;   
        } else {              
            $("#toggleactive").prop("value", "Hide Inactive");
            $('#tbalarms tr').filter('.inactive').show(); // show the inactive rows
            inactive = true; 
        }            
    }else{
        displaymessage("Start Polling First", "toggleactive"); // in case of error, display the error    
    }
});

The Hide Inactive button does not make a call to the REST API, it just adjusts the display to hide or show the inactive alarms based on the button state.

From the Top…

<!DOCTYPE html>
<html lang="en">
<head>
<meta charset="utf-8"/>
    <title>REST Example | Alarms</title>
    <link rel="stylesheet" stype="text/css" href="client.css?id=12345678">
    <script src="https://code.jquery.com/jquery-3.1.1.min.js"></script>
    <script type="text/javascript">

        var clientid =  ""; // holds the client id from authorization
        var token =  "";    // holds the token from authorization
        var drawheader = true; // flag for whether the table header needs to be drawn
        var polling = null; // variable for setInterval function
        var inactive  = true; // flag for show/hide inactive alarms
        var networkNode = "http://www.opcweb.com:58725"; // variable for the network node
        var currentlist = {
                    "filter": {
                        "minpriority": 0,
                        "maxpriority": 9999,
                        "networknodes": [
                        "localhost"
                        ],
                        "alarmtypes": [
                        "Digital", "High", "Low", "High High", "Low Low", "Operator"
                        ]
                    },
                    "history": false
                }; // object for holding json data

        // function to clear out the variables and html         
        function resetvariables(){
            clearInterval(polling);            
            currentlist.id = null;
            drawheader = true;
            polling = null;
            $("#tbalarms").empty();
            $('#divalarmlistid').empty();
            $("#togglepolling").prop("value", "Start Polling");

        }

        // function to format the date for display
        function fDate(dt){
            var M = dt.getMonth() + 1;
            M = M.toString().padStart(2,0);
            var D = dt.getDate().toString().padStart(2,0);
            var H = dt.getHours().toString().padStart(2,0);
            var Min = dt.getMinutes().toString().padStart(2,0);
            var S = dt.getSeconds().toString().padStart(2,0);
            return M +"/" + D + "/" + dt.getFullYear() + " " + H + ":" + Min + ":" + S;
        }

        // function to display error messages       
        function displaymessage(mess, fnc){
            clearInterval(polling); // in the event of an error we stop the polling
            switch(mess) {
                case 401:
                    $('#diverror').html("Authentication required.");
                    break;
                case 404:
                    if((fnc == "delete")||(fnc == "update")){
                        $('#diverror').html("Alarm List not found.");
                    }else{
                        $('#diverror').html("404"); 
                    }
                    break;
                default:
                    $('#diverror').html(mess);
            }                       
        }

        // function to delete an alarm by id
        function deletealarm(alarmid){
            var deletedata = [
                {
                    "id": alarmid,
                    "action" : "Delete",
                    "networknode" : "localhost"
                }
            ]
            $.ajax({
                url: networkNode + "/OASREST/v2/alarmlists/set",
                type: "POST",
                headers: {"clientid": clientid, "token": token},  
                contentType: "application/json; charset=utf-8", 
                crossDomain: true,
                dataType: "json",
                data: JSON.stringify(deletedata),
                success: function(r) {        
                }
            });
        };

        // function to acknowledge an alarm by id
        function ackalarm(alarmid){
            var ackdata = [
                {
                    "id": alarmid,
                    "action" : "Ack",
                    "networknode" : "localhost"
                }
            ]
            $.ajax({
                url: networkNode + "/OASREST/v2/alarmlists/set",
                type: "POST",
                headers: {"clientid": clientid, "token": token},  
                contentType: "application/json; charset=utf-8", 
                crossDomain: true,
                dataType: "json",
                data: JSON.stringify(ackdata),
                success: function(r) {        
                }
            });
        };

        $(document).ready(function() {

            // function to authorize user and get token and client id
            $("#doauth").click(function(){
                resetvariables();
                // api call for authorization
                $.ajax({
                    url: networkNode + "/OASREST/v2/authenticate",
                    type: "POST",
                    contentType: "application/json; charset=utf-8", 
                    crossDomain: true,
                    dataType: "json",
                    data: '{"username": "", "password": ""}',
                    success: function(r) {
                        clientid = r.data.clientid; // set the clientid variable returned from the call 
                        token = r.data.token;   // set the token variable returned from the call
                        $('#divid').html(clientid); // display the client id
                        $('#divtoken').html(token); // display the token
                    },
                    error: function (e) {
                        displaymessage(e.status, "auth"); // in case of error, display the error    
                    }
                });
            });
            
            // click event to handle and toggle create/delete alarmlist button
            $("#createalarmlist").click(function(){
                // if alarmlist id doesn't exist, create one.
                if (!currentlist.id){
                    $.ajax({
                        url: networkNode + "/OASREST/v2/alarmlists",
                        type: "POST",
                        contentType: "application/json; charset=utf-8", 
                        crossDomain: true,
                        dataType: "json",
                        headers: {"clientid": clientid, "token": token},                    
                        data: JSON.stringify(currentlist),
                        success: function(r) {
                            currentlist.id = r.data.id;  // store the returned alarmlist id in the object              
                            $('#divalarmlistid').html(currentlist.id); // display the alarmlist id on the page
                            $('#diverror').empty(); // success, so clear the error
                            $("#createalarmlist").prop("value", "Delete Alarm List"); // toggle button text
                        },
                        error: function (e) {
                            displaymessage(e.status, "createalarmlist");  // in case of error, display the error    
                        }                        
                    });                   
                    // if alarmlist id exists, delete it.
                }else{                   
                    $.ajax({
                        url: networkNode + "/OASREST/v2/alarmlists/" + currentlist.id,
                        type: "DELETE",
                        contentType: "application/json; charset=utf-8", 
                        crossDomain: true,
                        dataType: "json",
                        headers: {"clientid": clientid, "token": token},
                        success: function(r) {
                            resetvariables(); // clear everything out to start again
                            $("#createalarmlist").prop("value", "Create Alarm List");  // toggle button text         
                        },
                        error: function (e) {
                            displaymessage(e.status, "delete"); // in case of error, display the error    
                        }
                    });             
                }                               
            });

            // click function to toggle polling
            $("#togglepolling").click(function(){
                // if no alarm list exists, exit
                if (!currentlist.id){
                    displaymessage("Alarm List not found", "poll");
                    return;
                }
                // if we aren't polling, start the polling
                if (polling == null){                    
                    polling = setInterval(getalarmlist, 1000);
                    getalarmlist();
                    $("#togglepolling").prop("value", "Stop Polling"); // update polling button text
                // if we are polling, stop the polling
                } else {
                    clearInterval(polling);
                    polling = null;
                    $("#togglepolling").prop("value", "Start Polling");  // update polling button text
                }
            });

            // gets the alarm data and draws the table
            function getalarmlist(){
                var table = $("#tbalarms");
                // only draw the header one time
                if (drawheader){
                    var th = "<tr>";
                    th += "<th>Alarm Date</th>";
                    th += "<th class='center'>Active</th>";
                    th += "<th>Text</th>";
                    th += "<th>Type</th>";
                    th += "<th>Group</th>";
                    th += "<th class='center'>Acked</th>";
                    th += "<th class='center'>Delete</th>";
                    th += "</tr>";
                    table.append(th);
                }
                // call to the api to get the alarms for the current list
                $.ajax({
                    url: networkNode + "/OASREST/v2/alarmlists/" + currentlist.id,
                    type: "GET",
                    contentType: "application/json; charset=utf-8", 
                    crossDomain: true,
                    dataType: "json",
                    headers: {"clientid": clientid, "token": token},
                    success: function(r) {
                        $('#diverror').empty(); // success, so clear the errors   
                        for (var i = 0; i < r.data.length; i++){
                            var temp = r.data[i].id;
                            trid = temp.replaceAll('.', '_').replace(/\s/g, ''); // remove space and periods for row id     
                            var ts = new Date(r.data[i].alarmdate) // hold the alarm date in a date variable
                            var acttxt = ""; // variable for active column text
                            var ackedtxt = "<img src='images/unchecked.png' style='cursor:pointer;' ondblclick='ackalarm(\"" + r.data[i].id + "\")'>"; // Acknowledged checkbox 
                            var rclass = ""; // variable for row class
                            // set the css class for the row base on active and acknowledged                    
                            if (r.data[i].active) {
                                acttxt = "X";
                                rclass += "activerow";
                            }else{
                                rclass += "inactive ";
                            }
                            if (r.data[i].acked) {
                                ackedtxt = "<img src='images/checked.png'>";
                                rclass += "ackedrow";
                            }
                            // build the row
                            var str = "<tr class='" + rclass + "' id='" + trid + "'>";
                            str += "<td class=''>" + fDate(ts) + "</td>";
                            str += "<td class='center'>" + acttxt + "</td>";
                            str += "<td class=''>" + r.data[i].text + "</td>";
                            str += "<td class=''>" + r.data[i].type + "</td>";
                            str += "<td class=''>" + r.data[i].group + "</td>";
                            str += "<td class='center'>" + ackedtxt + "</td>";
                            str += "<td class='center'><img src='images/delete.png' style='cursor:pointer;' onclick='deletealarm(\"" + r.data[i].id + "\")'></td>";
                            str += "</tr>";
                            // if the row already existed and this is an update, remove it first
                            if(!drawheader){
                                $('#' + trid).remove();
                                $('#tbalarms tr:first').after(str);
                            }else{                               
                                table.append(str);                                
                            }                            
                            // remove deleted alarms
                            if(r.data[i].text == "DELETEALARM"){                           
                                 $('#' + trid).remove();
                            }
                        }                           
                        drawheader = false; // toggle flag for the header so the header row does not get redrawn after the first time
                    }
                });
            };
           
            // click function to toggle polling
            $("#togglepolling").click(function(){
                // if no alarm list exists, exit
                if (!currentlist.id){
                    displaymessage("Alarm List not found", "poll");
                    return;
                }
                // if we aren't polling, start the polling
                if (polling == null){                    
                    polling = setInterval(getalarmlist, 1000);
                    getalarmlist();
                    $("#togglepolling").prop("value", "Stop Polling"); // update polling button text
                // if we are polling, stop the polling
                } else {
                    clearInterval(polling);
                    polling = null;
                    $("#togglepolling").prop("value", "Start Polling");  // update polling button text
                }
            });

            $("#toggleactive").click(function(){
                if (polling){
                    if (!currentlist.id){ // don't let them toggle active if there is no alarm list
                        displaymessage("Alarm List not found", "toggleactive");
                        return;
                    }    
                    if (inactive){
                        $("#toggleactive").prop("value", "Show Inactive");
                        $('#tbalarms tr').filter('.inactive').hide(); // hide the inactive rows
                        inactive = false;   
                    } else {              
                        $("#toggleactive").prop("value", "Hide Inactive");
                        $('#tbalarms tr').filter('.inactive').show(); // show the inactive rows
                        inactive = true; 
                    }            
                }else{
                    displaymessage("Start Polling First", "toggleactive"); // in case of error, display the error    
                }
             });

           
        });

    </script>
</head>
    <body>
        <div class='main'>
            <input type='button' id='doauth' class='button' value='Authenticate'><input type='button' id='createalarmlist' class='button' value='Create Alarm List'><input type='button' id='togglepolling' class='button' value='Start Polling'><input type='button' id='toggleactive' class='button' value='Hide Inactive'><br><br>
            <div class='outer'><div class='label'>Client ID:</div><div  id='divid' class='value'></div></div>
            <div class='outer'><div class='label'>Token:</div><div id='divtoken' class='value'></div></div>
            <div class='outer'><div class='label'>Alarm List ID:</div><div id='divalarmlistid' class='value'></div></div><br>
            <div class='outer'><div class='label'>Message:</div><div  id='diverror' class='value'></div></div><br>
            <div id='displaythis'></div>  
            <div style='overflow: auto; width: 100%; height: 500px;'><table id='tbalarms'></table></div>
        </div>
    </body>
</html>

To download the source code for this tutorial, click here.

Troubleshooting – .NET Data

Bad Data Quality in .NET Application.
Below are some possible reasons your .NET application is not able to read OAS tag values.

Data Source Quality

Use Configure-Tags to verify that the data quality of the source tags is "Good Quality". Menu Configure Tags
Quality Good

Security

The Default security group on either the local or remote OAS Engine may have Disable All Tags from Reading checked under the Read Tags Tab.  See Restrict Tag Access of Security setup to see how read, write, and browse access can be restricted. View how to Implement User Credentials in Client Applications to provide log in method for each user in the .NET application.

Network

.NET applications can be defined to communicate to remote OAS Engines.  See Network Communications Troubleshooting to verify that port 58727 is allowing both incoming and outgoing traffic through your firewall.

Tag Path

The full tag path would include the full tag name including its parent groups and the variable of the Tag.
MyGroup.MyTag.Value
Tag names are case sensitive and the current value of a tag would be .Value as the most common variable.
If the tag is from a remote OAS Engine see Basic Networking for standard remote tag syntax or Live Data Cloud Networking if the OAS Engine system has a dynamic IP address.
\\192.168.0.1\TagName.Value

License

Use Configure-License to verify that a product feature .NET Data Connector, WinForm HMI, or WPF HMI is enabled on the data source system where the tags are located. Menu Configure License
Enabled Products

Target Framework for WPF and WinForm Applications

The project type for WinForm and WPF applications should be set to include (.NET Framework) and target .NET Framework 4.6.1 or greater. WinForm Target Framework See the correct project type for WinForm above that is listed as Windows Forms App (.NET Framework) while Windows Forms App would not be the correct project type.

Assembly References

Visual Studio on some operating systems will assign a legacy assembly to the project causing an incompatibility due to an older version of the reference assembly.  A common assembly that can be incorrect is Newtonsoft.Json that has been registered in the GAC by another software product. Select Newtonsoft.Json under the Project References to verify the correct path and version as 13.0.0.0.
Newtonsoft.Json Assembly Reference If the Path does not reference the OAS installation directory remove the reference and select to Add Reference and browse for dll from the respective directory for the specific product feature. For .NET Framework applications include the .dlls located in C:\Program Files\Open Automation Software\OAS\Controls\NetFramework\. The Target Framework set for the VS project must be .NET Framework 4.6.1 or greater. For .NET Standard supporting the following targets include the. dlls located in C:\Program Files\Open Automation Software\OAS\Controls\NetStandard\. See a list of locations for the correct type in the troubleshooting type After updating to OAS Version 17 the project no longer compiles for a list of correct project reference paths for each type of Visual Studio Project.

.NET Assembly is Blocked

If you have copied an application or project to another computer you may need to Unblock one or more the .dll files. Right click on the .dll file that you have downloaded. Check the Unblock checkbox for security as shown in the example below, then click Apply or OK. Excel Add-In

Legacy .NET Application with OAS Version 17

 If the OAS .NET assemblies are from OAS version 16 or less contact support@oasiot.com for compatibility instructions.
After updating to OAS Version 17 the project no longer compiles
OAS version 17 implements an improved network interface which requires some additional assemblies. All dependent .dlls are located in the relative subdirectory of the Controls directory of the OAS installation directory, typically C:\Program Files\Open Automation Software\OAS\Controls\. To add a reference to a Visual Studio project right click on References in the Solution Explorer. Add Reference Select Browse to browse the directory for each application feature. Browse Assemblies Include all .dlls files in the respective directory for the specific product feature. For .NET Framework applications include the .dlls located in C:\Program Files\Open Automation Software\OAS\Controls\NetFramework\. The Target Framework set for the VS project must be .NET Framework 4.6.1 or greater. For .NET Standard supporting the following targets include the. dlls located in C:\Program Files\Open Automation Software\OAS\Controls\NetStandard\.
  • .NET 6
  • .NET 5
  • .NET Core 2.0 or greater
  • .NET Framework 4.61 or greater
  • Xamarin.iOS 10.14 or greater
  • Xamarin.Android 8.0 or greater
  • UWP 1.0.0.16299 or greater
WPF HMI Assemblies
  • C:\Program Files\Open Automation Software\OAS\Controls\NetFramework\OPCWPFDashboard\
WinForm HMI Assemblies
  • C:\Program Files\Open Automation Software\OAS\Controls\NetFramework\OPCControls\
Alarm .NET Assemblies
  • C:\Program Files\Open Automation Software\OAS\Controls\NetFramework\OPCAlarmControl\
  • C:\Program Files\Open Automation Software\OAS\Controls\NetFramework\OPCAlarmDataOnly\
  • C:\Program Files\Open Automation Software\OAS\Controls\NetStandard\OASAlarms\
Trend .NET Assemblies
  • C:\Program Files\Open Automation Software\OAS\Controls\NetFramework\OPCTrendControl\
  • C:\Program Files\Open Automation Software\OAS\Controls\NetFramework\OPCTrendDataOnly\
  • C:\Program Files\Open Automation Software\OAS\Controls\NetStandard\OASTrends\
.NET Data Connector Assemblies
  • C:\Program Files\Open Automation Software\OAS\Controls\NetFramework\OPCSystemsDataConnector\
  • C:\Program Files\Open Automation Software\OAS\Controls\NetStandard\OASData\
Server Configuration Assemblies
  • C:\Program Files\Open Automation Software\OAS\Controls\NetFramework\OPCSystems\
  • C:\Program Files\Open Automation Software\OAS\Controls\NetStandard\OASConfig\

Bad Data Quality in .NET Application.

Below are some possible reasons your .NET application is not able to read OAS tag values.

Data Source Quality

Use Configure-Tags to verify that the data quality of the source tags is “Good Quality”.

Menu Configure Tags

Quality Good

Security

The Default security group on either the local or remote OAS Engine may have Disable All Tags from Reading checked under the Read Tags Tab.  See Restrict Tag Access of Security setup to see how read, write, and browse access can be restricted.

View how to Implement User Credentials in Client Applications to provide log in method for each user in the .NET application.

Network

.NET applications can be defined to communicate to remote OAS Engines.  See Network Communications Troubleshooting to verify that port 58727 is allowing both incoming and outgoing traffic through your firewall.

Tag Path

The full tag path would include the full tag name including its parent groups and the variable of the Tag.

MyGroup.MyTag.Value

Tag names are case sensitive and the current value of a tag would be .Value as the most common variable.

If the tag is from a remote OAS Engine see Basic Networking for standard remote tag syntax or Live Data Cloud Networking if the OAS Engine system has a dynamic IP address.
\\192.168.0.1\TagName.Value

License

Use Configure-License to verify that a product feature .NET Data Connector, WinForm HMI, or WPF HMI is enabled on the data source system where the tags are located.

Menu Configure License

Enabled Products

Target Framework for WPF and WinForm Applications

The project type for WinForm and WPF applications should be set to include (.NET Framework) and target .NET Framework 4.6.1 or greater.

WinForm Target Framework

See the correct project type for WinForm above that is listed as Windows Forms App (.NET Framework) while Windows Forms App would not be the correct project type.

Assembly References

Visual Studio on some operating systems will assign a legacy assembly to the project causing an incompatibility due to an older version of the reference assembly.  A common assembly that can be incorrect is Newtonsoft.Json that has been registered in the GAC by another software product.

Select Newtonsoft.Json under the Project References to verify the correct path and version as 13.0.0.0.

Newtonsoft.Json Assembly Reference

If the Path does not reference the OAS installation directory remove the reference and select to Add Reference and browse for dll from the respective directory for the specific product feature. For .NET Framework applications include the .dlls located in C:\Program Files\Open Automation Software\OAS\Controls\NetFramework\. The Target Framework set for the VS project must be .NET Framework 4.6.1 or greater. For .NET Standard supporting the following targets include the. dlls located in C:\Program Files\Open Automation Software\OAS\Controls\NetStandard\.

See a list of locations for the correct type in the troubleshooting type After updating to OAS Version 17 the project no longer compiles for a list of correct project reference paths for each type of Visual Studio Project.

.NET Assembly is Blocked

If you have copied an application or project to another computer you may need to Unblock one or more the .dll files.

Right click on the .dll file that you have downloaded. Check the Unblock checkbox for security as shown in the example below, then click Apply or OK.

Excel Add-In

Legacy .NET Application with OAS Version 17

 If the OAS .NET assemblies are from OAS version 16 or less contact support@oasiot.com for compatibility instructions.

After updating to OAS Version 17 the project no longer compiles

OAS version 17 implements an improved network interface which requires some additional assemblies.

All dependent .dlls are located in the relative subdirectory of the Controls directory of the OAS installation directory, typically C:\Program Files\Open Automation Software\OAS\Controls\.

To add a reference to a Visual Studio project right click on References in the Solution Explorer.

Add Reference

Select Browse to browse the directory for each application feature.

Browse Assemblies

Include all .dlls files in the respective directory for the specific product feature.

For .NET Framework applications include the .dlls located in C:\Program Files\Open Automation Software\OAS\Controls\NetFramework\.

The Target Framework set for the VS project must be .NET Framework 4.6.1 or greater.

For .NET Standard supporting the following targets include the. dlls located in C:\Program Files\Open Automation Software\OAS\Controls\NetStandard\.

  • .NET 6
  • .NET 5
  • .NET Core 2.0 or greater
  • .NET Framework 4.61 or greater
  • Xamarin.iOS 10.14 or greater
  • Xamarin.Android 8.0 or greater
  • UWP 1.0.0.16299 or greater

WPF HMI Assemblies

  • C:\Program Files\Open Automation Software\OAS\Controls\NetFramework\OPCWPFDashboard\

WinForm HMI Assemblies

  • C:\Program Files\Open Automation Software\OAS\Controls\NetFramework\OPCControls\

Alarm .NET Assemblies

  • C:\Program Files\Open Automation Software\OAS\Controls\NetFramework\OPCAlarmControl\
  • C:\Program Files\Open Automation Software\OAS\Controls\NetFramework\OPCAlarmDataOnly\
  • C:\Program Files\Open Automation Software\OAS\Controls\NetStandard\OASAlarms\

Trend .NET Assemblies

  • C:\Program Files\Open Automation Software\OAS\Controls\NetFramework\OPCTrendControl\
  • C:\Program Files\Open Automation Software\OAS\Controls\NetFramework\OPCTrendDataOnly\
  • C:\Program Files\Open Automation Software\OAS\Controls\NetStandard\OASTrends\

.NET Data Connector Assemblies

  • C:\Program Files\Open Automation Software\OAS\Controls\NetFramework\OPCSystemsDataConnector\
  • C:\Program Files\Open Automation Software\OAS\Controls\NetStandard\OASData\

Server Configuration Assemblies

  • C:\Program Files\Open Automation Software\OAS\Controls\NetFramework\OPCSystems\
  • C:\Program Files\Open Automation Software\OAS\Controls\NetStandard\OASConfig\

Troubleshooting – REST API

How do I troubleshoot REST API calls?

If there are errors executing a REST API call, you can check the OAS Configuration app, click on the triangle icon (should be flashing of there's an error) and you'll see system errors.

Locate the REST API and expand it out and you should see the failed calls. But it often won't give you the detailed HTTP request/response and just contain the failed URL that was attempted. It's a good way to see if people are hitting incorrect endpoints.

If you use Postman to execute REST API calls, you can see the proper URLs, headers, body contents, etc. for making proper calls.

If you ever get these response or codes, this is what they mean:
401: Unauthorized - you have not included the clientid and token fields in the request header, or the session has expired
500: Unknown server error - this may be something we need to investigate since the data was submitted properly but an error occurred on the server processing the request.
404: The object you're trying to GET or PUT (update) does not exist

If you see "Service Unavailable" that means the REST API did not start up properly.
If you see a message indicating the Endpoint does not exist, this means the URL is not correct for the call.

If there's something specific you're attempting and don't know what the issue is, you can always look at a successful call from Postman's console and it will expose everything in the request header/body and response header/body. You can compare it to your failing call to see what you might need, such as the correct Content-type. You can always let us know what call you're stuck on and we can investigate why it might not work for you.

How to Access MTConnect Data from a C# or VB .NET Application

How to Access MTConnect Data from a C# or VB .NET Application

Open Automation Software Tags can be defined to connect to MTConnect Servers with the built in MTConnect Driver Interface. The OASData component is used for real time and historical data access against a local or remote OAS instance and can be used with .NET 5, .NET Core 2.0 or greater, .NET Framework 4.61 or greater, Xamarin.iOS 10.14, Xamarin.Android 8.0, and UWP 1.0.0.16299. This tutorial walks you though downloading and installing OAS, configuring an MTConnect driver, configuring tags and reading and writing to them with the .Net Data Connector. This page shows code examples in C# but VB works as well.

Step 1. Download and Install the Open Automation Software and Start the OAS Service

If you have not already done so, you will need to download and install the OAS platform.  Fully functional trial versions of the software are available for Windows, Windows IoT Core, Linux, Raspberry Pi and Docker on our downloads page.

On Windows run the downloaded Setup.exe file to install one or more of the Open Automation Software features. Select the default Typical installation if you are not sure what features to use or the Custom installation if you want to save disk space on the target system.  When prompted agree to the End User License Agreement to continue the installation.

For more detailed instructions and video tutorials, visit the installation guide for your system:
Windows Installation | Linux Installation | Raspberry Pi Installation | Dockers Installation

When the installation is finished the OAS Service Control application will appear.  Use this application to start the 4 Services. If this is the first time installing the software it will automatically enter Runtime with an example Tag Configuration.


Step 2. Configure Your MTConnect Data Source

  1. First, you will need to open the Configure OAS application from the program group Open Automation Software.
  2. Select Configure >> License from the top menu and verify that MTConnect is one of the available Drivers in the lower left of the form. The demo license will have this by default. If you do not see MTConnect available, contact support@openautomationsoftware.com to update your license.
  3. Select Configure >> Drivers from the top menu.

  4. Select localhost or the remote service you wish to modify with the Select button to the right of the Network Node list.

  5. The Configure Drivers Screen will appear. Select MTConnect from the Driver dropdown box.

  6. Enter a meaningful Driver Interface Name that you will refer to this physical connection when defining Tags with a MTConnect Data Source.
  7. Leave Enable and Add Tags Automatically enabled.
  8. Specify the Live Data Url for the MTConnect stream.
  9. Click the Add Driver button above the Driver list in the left pane to add the Driver Interface as an available selection when defining Tags in the next step.

For more detailed instructions on configuring your MTConnect data source, click here to see our Getting Started MTConnect tutorial or watch the video tutorial below:


Step 3. Configure Your Tags

OAS provides multiple ways to add and define tags:

To add a Tag manually:

  1. In the OAS Configure Application, select Configure >> Tags from the top menu.

  2. Select localhost or the remote service you wish to modify with the Select button to the right of the Network Node list.

  3. Click on the Add Tag button located at the top of the Tag browser on the left portion of the screen.

  4. A dialog box will appear. Enter a name for your new tag and click ok.
  5. A configuration screen will appear for your new tag. Select your data source type in in the Data Source dropdown box.

  6. Specify the correct data type in the Data Type dropdown box.
  7. Click Apply Changes at the bottom right of the window.

For more detailed instructions on configuring your tags, click here to see our Getting Started Tags tutorial.


Step 4. Access Your Data from a C# or VB .NET Application

The .NET Standard 2.0 OASData assembly is used to provide read and write access to OAS tag variables and can target .NET 5, .NET 6, .NET 7, .NET Core 2.o or greater, .NET Framework 4.61 or greater, Xamarin.iOS 10.14, Xamarin.Android 8.0, and UWP 1.0.0.16299.

Start a new Visual Studio Project or Open Your Existing One

Microsoft Visual Studio 2015+ is recommended. For developing cross-platform .NET Standard or .NET Core solutions, Visual Studio 2019+ is recommended. For developing Android and/or iOS solutions, be sure to include Xamarin extensions to Visual Studio. After creating a new Visual Studio project, add a reference to the OASData assembly and all its dependencies, found in the OAS installation directory. This is typically:

C:\Program Files\Open Automation Software\OAS\Controls\NetStanard\OASData\OASData.dll

Create an instance of the OASData.Data class

static OASData.Data oasd = new OASData.Data();

Your application typically does not need more than one instance of the OASData.Data class. So, this can be created when your application starts.

Read Tags Asynchronously

oasd.ValuesChangedAll += OASDValuesChangedAll; 
private void OASDValuesChangedAll(string[] Tags, object[] Values, bool[] Qualities, DateTime[] TimeStamps);

oasd.AddTags(new string[] {
"Sine.Value",
"Random.Value",
"Ramp.Value"
});

Values are returned in the ValuesChangedAll event anytime values change in a tag variable. AddTags adds tags for subscription.

Read Tags Synchronously

Values = oasd.SyncReadTags(Tags, ref Errors, 10000);
  • This call returns an object array with the values for each tag variable.
  • Tags is a string array of tag names and variables to read.
  • Errors is an integer array returning: 0 if the tag variable quality is good 1 if the quality is bad 2 if the value could not be returned within the timeout specified.
  • Timeout is specified in milliseconds to wait for the call to return.

Write Tags Asynchronously

oasd.WriteTags(OASTags, OASValues);

With this call, if the tags data source is defined to a device, for example: Modbus; Siemens; Allen Bradley MQTT; OPC UA, or application writes to .Value will be written to the source defined.

Examples: Modbus, Siemens, AB, OPC UA, MQTT

  • Tags is a string array of tag names and variables.
  • Values is an object array containing the values to write to each tag.
  • TimeStamps array can optionally be provided to set the time of the value if the Data Source of the Tag is Value.

Write Tags Synchronously

Errors = oasd.SyncWriteTags(Tags, Values);
  • Tags is a string array of tag names and variables.
  • Values is an object array containing the values to write to each tag.
  • Errors is an Integer array that returns: 0 when successful; 1 when OAS Engine is not reachable; 2 when the Tags array size is not equal to the Values array.

Networking

Tag names can include an IP Address, network node name, or registered domain name if the application is deployed remote from the OAS Engine.

Basic Networking Example:

\\192.168.0.1\TagName.Value

Live Data Cloud Networking Example:

\\www.opcweb.com\RemoteSCADAHosting.MyLDCNode.TagName.Value

For more information, see Getting Started with OASData and IIoT Example Service Code or watch the video below:

How to Access OPC Server Data from a C# or VB .NET Application

How to Access OPC Server Data from a C# or VB .NET Application

Open Automation Software Tags can be defined to connect to Classic OPC Data Access 2.xx and 3.0 Servers with the built in OPC Interface. The OASData component is used for real time and historical data access against a local or remote OAS instance and can be used with .NET 5, .NET Core 2.0 or greater, .NET Framework 4.61 or greater, Xamarin.iOS 10.14, Xamarin.Android 8.0, and UWP 1.0.0.16299. This tutorial walks you though downloading and installing OAS, configuring an OPC Server driver, configuring tags and reading and writing to them with the .Net Data Connector. This page shows code examples in C# but VB works as well.

Step 1. Download and Install the Open Automation Software and Start the OAS Service

If you have not already done so, you will need to download and install the OAS platform.  Fully functional trial versions of the software are available for Windows, Windows IoT Core, Linux, Raspberry Pi and Docker on our downloads page.

On Windows run the downloaded Setup.exe file to install one or more of the Open Automation Software features. Select the default Typical installation if you are not sure what features to use or the Custom installation if you want to save disk space on the target system.  When prompted agree to the End User License Agreement to continue the installation.

For more detailed instructions and video tutorials, visit the installation guide for your system:
Windows Installation | Linux Installation | Raspberry Pi Installation | Dockers Installation

When the installation is finished the OAS Service Control application will appear.  Use this application to start the 4 Services. If this is the first time installing the software it will automatically enter Runtime with an example Tag Configuration.


Step 2. Configure OPC Server Tags

OAS provides multiple ways to add and define tags:

To add a Tag manually:

  1. In the OAS Configure Application, select Configure >> Tags from the top menu.

  2. Select localhost or the remote service you wish to modify with the Select button to the right of the Network Node list.

  3. Click on the Add Tag button located at the top of the Tag browser on the left portion of the screen.

  4. A dialog box will appear. Enter a name for your new tag and click ok.
  5. A configuration screen will appear for your new tag. Select OPC in the Data Source dropdown box.

  6. Use the Browse button to the right of the OPC Item to browse OPC Servers for the desired OPC Item.

  7. Select Local, the desired OPC Server, branch within the OPC Server, and OPC Item and click OK.

  8. Specify the desired OPC Update Rate for the Tag.
  9. Click Apply Changes at the bottom right of the window.

To add Tags with One Click OPC:

  1. In the OAS Configure Application, select Configure >> Tags from the top menu.

  2. Select localhost or the remote service you wish to modify with the Select button to the right of the Network Node list.

  3. To begin the One Click OPC process select the Group you would like to import to in the Tag configuration. If you want to import to the Root Level, select the Tags Group at the top of the tree.
    Then select the One Click Import button on the top menu bar.

  4. Click on the Import OPC DA 2.XX or 3.0 Items Button in the pop up window.

  5. Use the One Click OPC Wizard to browse for a branch as a starting position within an OPC Server or just select the OPC Server name itself to add all items from the selected OPC Server. For the best networking design select OPC Servers from Local even if you are configuring a remote OAS Service.

  6. Select to enable the options to Get Data Type from OPC Server and optionally the Descriptions.
    Additionally if you want to specify to Trend all of the points select Trend Points.
  7. Click Add Tags and it will automatically add all of the OPC Items from the OPC Server Branch you have selected and all of the sub Branches beneath it.
  8. Select the Save button on the toolbar at the top.

For more detailed instructions on Configuring OPC Server Tags, visit our Getting Started OPC tutorial or the One Click OPC tutorial or watch the video tutorial below:


Step 3. Access Your Data from a C# or VB .NET Application

The .NET Standard 2.0 OASData assembly is used to provide read and write access to OAS tag variables and can target .NET 5, .NET 6, .NET 7, .NET Core 2.o or greater, .NET Framework 4.61 or greater, Xamarin.iOS 10.14, Xamarin.Android 8.0, and UWP 1.0.0.16299.

Start a new Visual Studio Project or Open Your Existing One

Microsoft Visual Studio 2015+ is recommended. For developing cross-platform .NET Standard or .NET Core solutions, Visual Studio 2019+ is recommended. For developing Android and/or iOS solutions, be sure to include Xamarin extensions to Visual Studio. After creating a new Visual Studio project, add a reference to the OASData assembly and all its dependencies, found in the OAS installation directory. This is typically:

C:\Program Files\Open Automation Software\OAS\Controls\NetStanard\OASData\OASData.dll

Create an instance of the OASData.Data class

static OASData.Data oasd = new OASData.Data();

Your application typically does not need more than one instance of the OASData.Data class. So, this can be created when your application starts.

Read Tags Asynchronously

oasd.ValuesChangedAll += OASDValuesChangedAll; 
private void OASDValuesChangedAll(string[] Tags, object[] Values, bool[] Qualities, DateTime[] TimeStamps);

oasd.AddTags(new string[] {
"Sine.Value",
"Random.Value",
"Ramp.Value"
});

Values are returned in the ValuesChangedAll event anytime values change in a tag variable. AddTags adds tags for subscription.

Read Tags Synchronously

Values = oasd.SyncReadTags(Tags, ref Errors, 10000);
  • This call returns an object array with the values for each tag variable.
  • Tags is a string array of tag names and variables to read.
  • Errors is an integer array returning: 0 if the tag variable quality is good 1 if the quality is bad 2 if the value could not be returned within the timeout specified.
  • Timeout is specified in milliseconds to wait for the call to return.

Write Tags Asynchronously

oasd.WriteTags(OASTags, OASValues);

With this call, if the tags data source is defined to a device, for example: Modbus; Siemens; Allen Bradley MQTT; OPC UA, or application writes to .Value will be written to the source defined.

Examples: Modbus, Siemens, AB, OPC UA, MQTT

  • Tags is a string array of tag names and variables.
  • Values is an object array containing the values to write to each tag.
  • TimeStamps array can optionally be provided to set the time of the value if the Data Source of the Tag is Value.

Write Tags Synchronously

Errors = oasd.SyncWriteTags(Tags, Values);
  • Tags is a string array of tag names and variables.
  • Values is an object array containing the values to write to each tag.
  • Errors is an Integer array that returns: 0 when successful; 1 when OAS Engine is not reachable; 2 when the Tags array size is not equal to the Values array.

Networking

Tag names can include an IP Address, network node name, or registered domain name if the application is deployed remote from the OAS Engine.

Basic Networking Example:

\\192.168.0.1\TagName.Value

Live Data Cloud Networking Example:

\\www.opcweb.com\RemoteSCADAHosting.MyLDCNode.TagName.Value

For more information, see Getting Started with OASData and IIoT Example Service Code or watch the video below:

How to Access OPTO Data from a C# or VB .NET Application

How to Access OPTO Data from a C# or VB .NET Application

Open Automation Software Tags can be defined to connect directly to OPTO controllers with the built in OPTO Driver Interfaces which support communications over Ethernet. The OASData component is used for real time and historical data access against a local or remote OAS instance and can be used with .NET 5, .NET Core 2.0 or greater, .NET Framework 4.61 or greater, Xamarin.iOS 10.14, Xamarin.Android 8.0, and UWP 1.0.0.16299. This tutorial walks you though downloading and installing OAS, configuring an OPTO driver, configuring tags and reading and writing to them with the .Net Data Connector. This page shows code examples in C# but VB works as well.

Step 1. Download and Install the Open Automation Software and Start the OAS Service

If you have not already done so, you will need to download and install the OAS platform.  Fully functional trial versions of the software are available for Windows, Windows IoT Core, Linux, Raspberry Pi and Docker on our downloads page.

On Windows run the downloaded Setup.exe file to install one or more of the Open Automation Software features. Select the default Typical installation if you are not sure what features to use or the Custom installation if you want to save disk space on the target system.  When prompted agree to the End User License Agreement to continue the installation.

For more detailed instructions and video tutorials, visit the installation guide for your system:
Windows Installation | Linux Installation | Raspberry Pi Installation | Dockers Installation

When the installation is finished the OAS Service Control application will appear.  Use this application to start the 4 Services. If this is the first time installing the software it will automatically enter Runtime with an example Tag Configuration.


Step 2. Configure Your OPTO Data Source

  1. First, you will need to open the Configure OAS application from the program group Open Automation Software.
  2. Select Configure >> License from the top menu and verify that OPTO is one of the available Drivers in the lower left of the form. The demo license will have this by default. If you do not see OPTO available, contact support@openautomationsoftware.com to update your license.
  3. Select Configure >> Drivers from the top menu.

  4. Select localhost or the remote service you wish to modify with the Select button to the right of the Network Node list.

  5. The Configure Drivers Screen will appear. Select OPTO from the Driver dropdown box.

  6. Enter a meaningful Driver Interface Name that you will refer to this physical connection when defining Tags with a OPTO Data Source.
  7. Define the properties for the desired physical connection.
  8. Click Add Driver at the the top of the left portion of the window.

For more detailed instructions on configuring your OPTO data source, click here to see our Getting Started OPTO tutorial.


Step 3. Configure Your Tags

OAS provides multiple ways to add and define tags:

To add a Tag manually:

  1. In the OAS Configure Application, select Configure >> Tags from the top menu.

  2. Select localhost or the remote service you wish to modify with the Select button to the right of the Network Node list.

  3. Click on the Add Tag button located at the top of the Tag browser on the left portion of the screen.

  4. A dialog box will appear. Enter a name for your new tag and click ok.
  5. A configuration screen will appear for your new tag. Select your data source type in in the Data Source dropdown box.

  6. Specify the correct data type in the Data Type dropdown box.
  7. Click Apply Changes at the bottom right of the window.

For more detailed instructions on configuring your tags, click here to see our Getting Started Tags tutorial.


Step 4. Access Your Data from a C# or VB .NET Application

The .NET Standard 2.0 OASData assembly is used to provide read and write access to OAS tag variables and can target .NET 5, .NET 6, .NET 7, .NET Core 2.o or greater, .NET Framework 4.61 or greater, Xamarin.iOS 10.14, Xamarin.Android 8.0, and UWP 1.0.0.16299.

Start a new Visual Studio Project or Open Your Existing One

Microsoft Visual Studio 2015+ is recommended. For developing cross-platform .NET Standard or .NET Core solutions, Visual Studio 2019+ is recommended. For developing Android and/or iOS solutions, be sure to include Xamarin extensions to Visual Studio. After creating a new Visual Studio project, add a reference to the OASData assembly and all its dependencies, found in the OAS installation directory. This is typically:

C:\Program Files\Open Automation Software\OAS\Controls\NetStanard\OASData\OASData.dll

Create an instance of the OASData.Data class

static OASData.Data oasd = new OASData.Data();

Your application typically does not need more than one instance of the OASData.Data class. So, this can be created when your application starts.

Read Tags Asynchronously

oasd.ValuesChangedAll += OASDValuesChangedAll; 
private void OASDValuesChangedAll(string[] Tags, object[] Values, bool[] Qualities, DateTime[] TimeStamps);

oasd.AddTags(new string[] {
"Sine.Value",
"Random.Value",
"Ramp.Value"
});

Values are returned in the ValuesChangedAll event anytime values change in a tag variable. AddTags adds tags for subscription.

Read Tags Synchronously

Values = oasd.SyncReadTags(Tags, ref Errors, 10000);
  • This call returns an object array with the values for each tag variable.
  • Tags is a string array of tag names and variables to read.
  • Errors is an integer array returning: 0 if the tag variable quality is good 1 if the quality is bad 2 if the value could not be returned within the timeout specified.
  • Timeout is specified in milliseconds to wait for the call to return.

Write Tags Asynchronously

oasd.WriteTags(OASTags, OASValues);

With this call, if the tags data source is defined to a device, for example: Modbus; Siemens; Allen Bradley MQTT; OPC UA, or application writes to .Value will be written to the source defined.

Examples: Modbus, Siemens, AB, OPC UA, MQTT

  • Tags is a string array of tag names and variables.
  • Values is an object array containing the values to write to each tag.
  • TimeStamps array can optionally be provided to set the time of the value if the Data Source of the Tag is Value.

Write Tags Synchronously

Errors = oasd.SyncWriteTags(Tags, Values);
  • Tags is a string array of tag names and variables.
  • Values is an object array containing the values to write to each tag.
  • Errors is an Integer array that returns: 0 when successful; 1 when OAS Engine is not reachable; 2 when the Tags array size is not equal to the Values array.

Networking

Tag names can include an IP Address, network node name, or registered domain name if the application is deployed remote from the OAS Engine.

Basic Networking Example:

\\192.168.0.1\TagName.Value

Live Data Cloud Networking Example:

\\www.opcweb.com\RemoteSCADAHosting.MyLDCNode.TagName.Value

For more information, see Getting Started with OASData and IIoT Example Service Code or watch the video below: