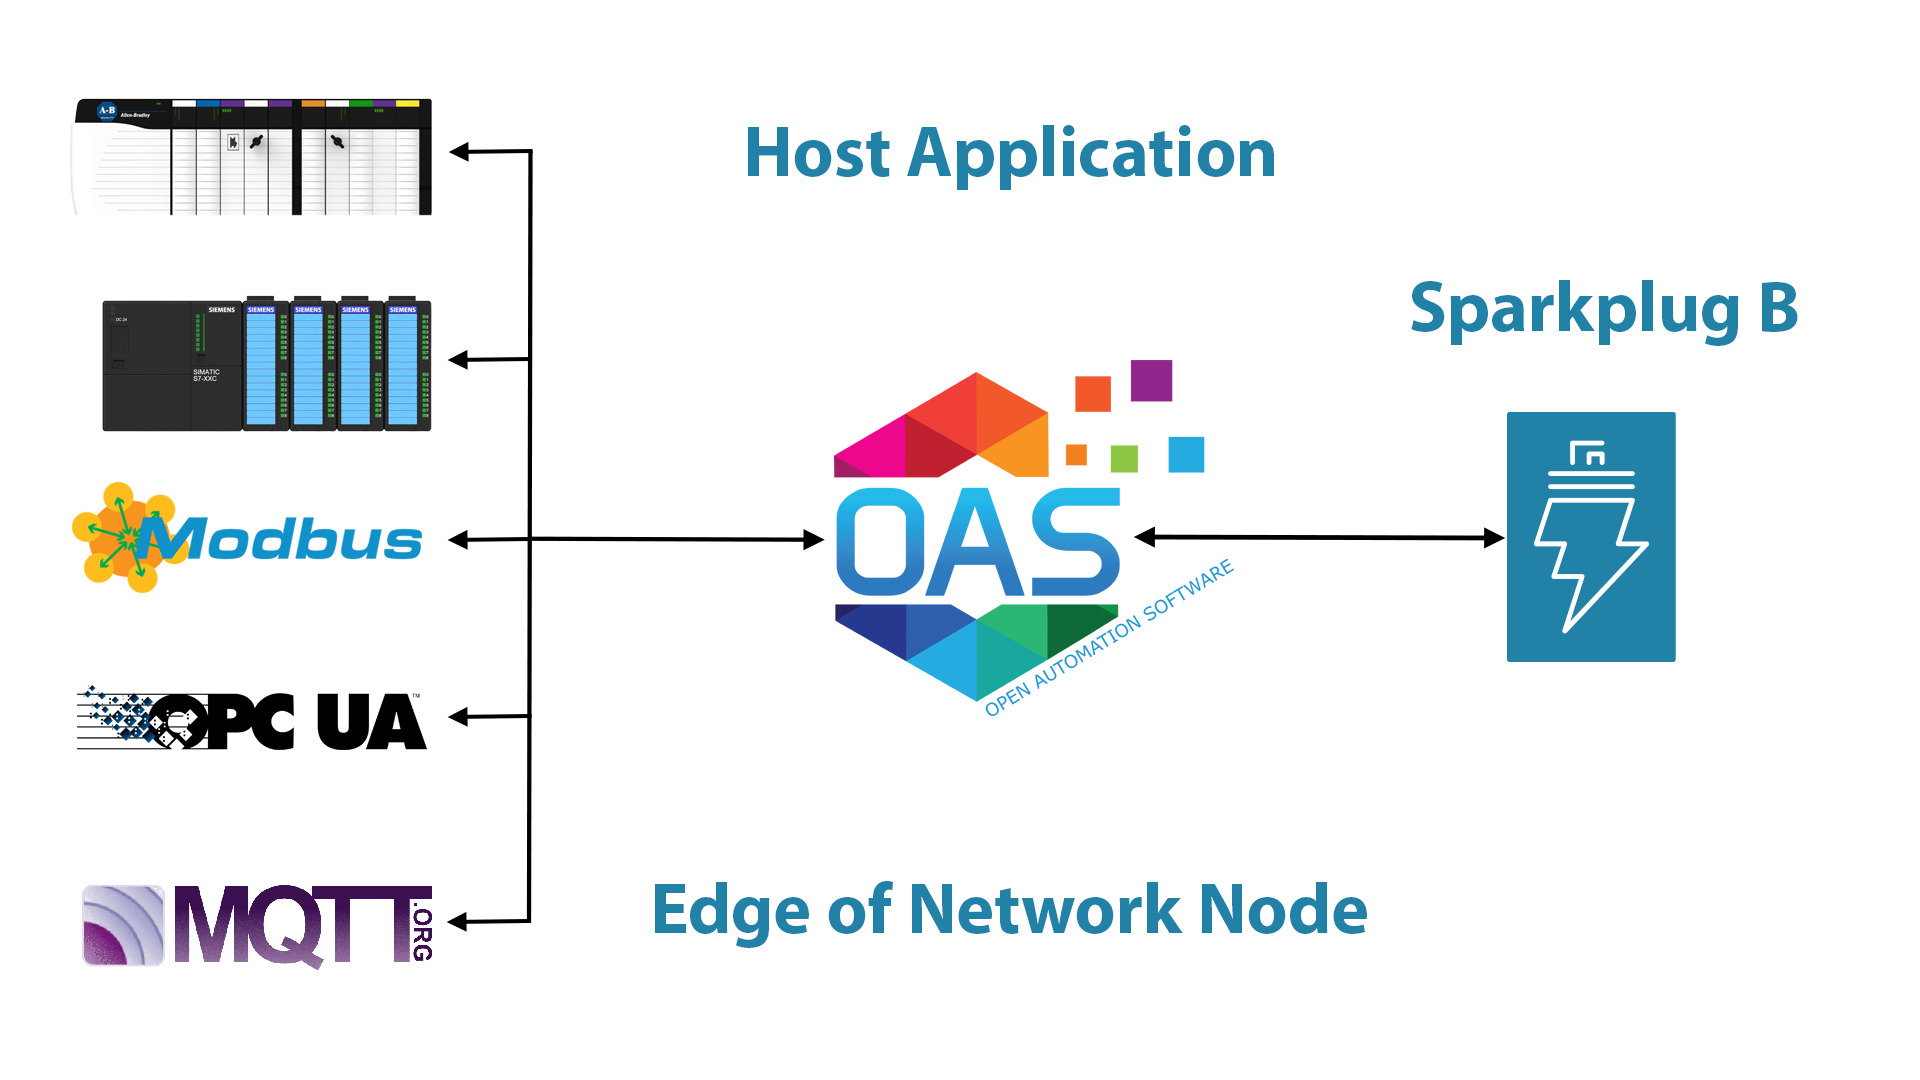
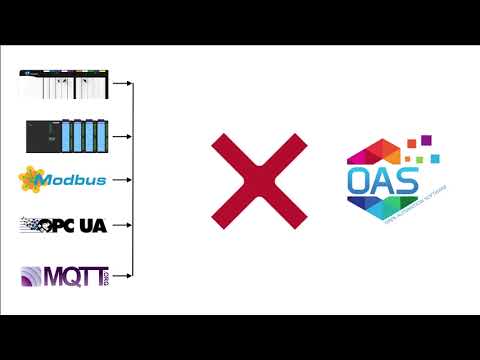
Open Automation Software can transfer data from Modbus TCP, Modbus RTU, and Modbus ASCII devices to local or remote MQTT brokers with Sparkplug B protocol as an Edge of Network Node. Use the following guide to set up data transfer from Modbus to Sparkplug B. This tutorial walks you through downloading and installing OAS, defining Modbus tags, and publishing data to MQTT brokers with Sparkplug B payloads. All OAS tag values can be published as Sparkplug B data simply by specifying the Host Group ID, Edge Node ID, Device ID, and Metric name.
Step 1. Download and Install the Open Automation Software and Start the OAS Service
If you have not already done so, you will need to download and install the OAS platform. Fully functional trial versions of the software are available for Windows, Windows IoT Core, Linux, Raspberry Pi and Docker on our downloads page.
On Windows run the downloaded Setup.exe file to install one or more of the Open Automation Software features. Select the default Typical installation if you are not sure what features to use or the Custom installation if you want to save disk space on the target system. When prompted agree to the End User License Agreement to continue the installation.
The OAS Service Control application will appear when the installation finishes on Windows. Use this application to start the 3 Services. Run the Configure OAS application on Windows and select Configure-Tags; if the first time running, the AdminCreate utility will run to create an Administrator login as shown in Step 1 of Getting Started – Security.
Step 2. Configure Your Modbus Data Source
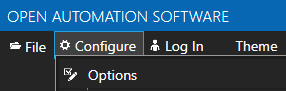
First, you will need to open the Configure OAS application from the program group Open Automation Software.
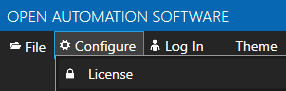
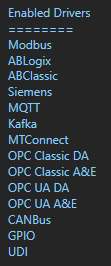
Select Configure >> License from the top menu and verify that Modbus is one of the available Drivers in the lower left of the form. The demo license will have this by default. If you do not see Modbus available, contact support@openautomationsoftware.com to update your license.
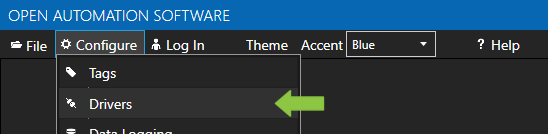
Select Configure >> Drivers from the top menu.
Select localhost or the remote service you wish to modify with the Select button to the right of the Network Node list.
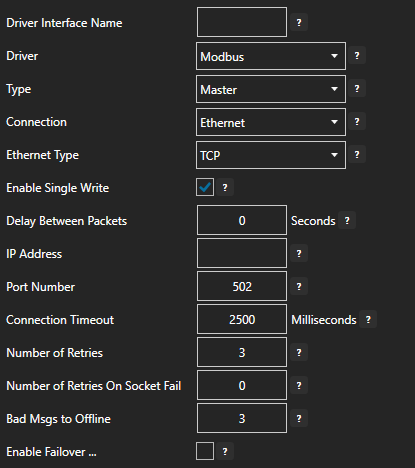
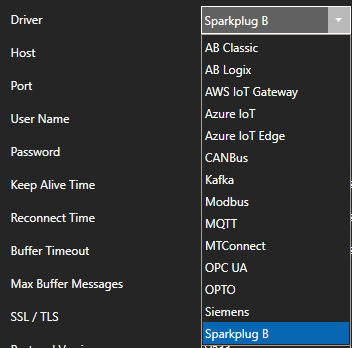
The Configure Drivers Screen will appear. Select Modbus from the Driver dropdown box.
Enter a meaningful Driver Interface Name that you will refer to this physical connection when defining Tags with a Modbus Data Source.
Specify the Connection as Ethernet or Serial.
Specify the Modbus Type as Master or Slave. Master will be used when communicating to a Modbus device. Slave will be used when other Modbus masters will be communicating to OAS.
When setting up a Slave interface over Ethernet set the IP Address to the computer IPv4 IP address or network node name if the master is on a remote PC. You can also use 127.0.0.1 or localhost if the Modbus master will be on the same computer.
For more detailed instructions on configuring your Modbus data source, click here to see our Getting Started Modbus tutorial or watch the video tutorial below:
Step 3. Configure Modbus Tags
OAS provides multiple ways to add and define tags:
Manually add and define Tags using the Configure OAS application. …learn more…
Step 4. Define Sparkplug B Group ID, Edge Node ID, Device ID, and Metric Names.
Select Configure-Drivers.
Enter a meaningful Driver Interface Name that you will refer to this connection and define the properties.
Set the driver to Sparkplug B.
Enter the Host property to the IP Address of the of the host broker or just use localhost for a local broker.
Set the Port property of the host broker to connect to. The default port is 1883 or 8883 for SSL.
Note: The OAS MQTT Broker can be used to host data locally. To use another broker on the default ports on the same computer change the OAS MQTT Broker Port under Configure-Options-MQTT Broker.
Enter the User Name and Password if required.
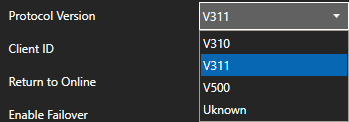
Set the MQTT Protocol Version to V311 or V500.
Set the Client ID to a unique value, each driver interface must have a specific value different than all other clients connecting to the host.
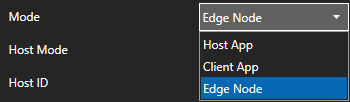
Set the Mode to Edge Node.
Set the Hode Mode to Remote Hosted if a Host Application to control the state of this Edge Node including another OAS driver set as Host App. Set to Self Hosted to have this OAS driver control the state of the Edge Node.
Set the Host ID to the specific value that the Edge of Nodes will be using as the Host Application ID.
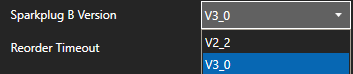
Set the Sparkplug B Version to 2.2 or 3.0.
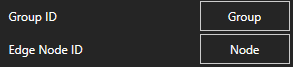
Set the Group ID and Edge Node ID that defines this EoN Node.
Note: This Group ID and Edge Node ID values will be used in the next steps to define which OAS tags will be enabled for hosting values in the next step to Define OAS Tags as EoN Node using the Host Group ID and Host Edge Node ID tag properties.
Optionally set the Device ID Filter to include only a specific device defined by the Tag property Host Device ID. Leave blank to include all tags with all Host Device IDs defined with same Group ID and Edge Node ID.
Select the Add Driver button in the left part of the form to add the Driver Interface.
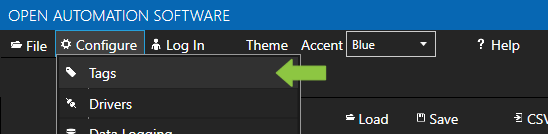
Select Configure-Tags.
Select a tag defined in the first step as the data source.
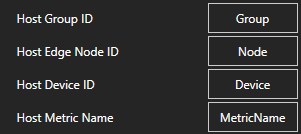
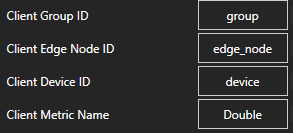
Set the Host properties of the tag to match the Group ID and Edge Node ID defined in the Sparkplug B Driver Interface. Set the Device ID to represent the Sparkplug B device. Set the Metric Name to represent the value from the source tag.
Note: The Group ID / Edge Node ID / Device ID / Metric Name combination must be unique in the OAS Engine.
Repeat the same step for all source tags or use the CSV Export button to save to a CSV file then update the Value – SpB Host Group ID, Value – SpB Host Edge Node ID, Value – SpB Host Device ID, and Value – SpB Host Metric Name columns in the CSV file using Excel, save, close Excel, then use the CSV Import button.
Data is now publishing to the MQTT broker defined in the Sparkplug B driver interface if running in Self Hosted or the Host Application state for the Host ID is online.
Select the Save button from the toolbar to save your configuration.
You can view the Getting Started with Sparkplug B Video to familiarize yourself with the above steps to setup OAS as a Sparkplug B Edge of Network Node and a Host Application
Open Automation Software’s latest update now includes a new interface for Sparkplug B Edge of Network Nodes and Host Applications.
The OAS IIoT platform has recently added support for Sparkplug B as an Edge Network Node and a Host Application. Sparkplug B is an industry-standard that enables common topic and payload definitions for MQTT data transport.
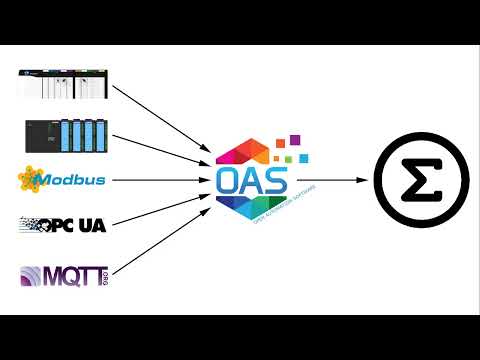
As an Edge of Network (EoN) Node for Sparkplug B, OAS can offer bi-directional communications to all tags in the OAS Engine using any combination of Sparkplug B identifiers. This is achieved using four new properties to define the hosting Group ID, Edge Node ID, Device ID, and Metric name in each OAS tag.
This interface supports all data sources of OAS, including Allen Bradley ControlLogix, CompactLogix, GuardLogix, Micro800 MicroLogix, SLC 500, PLC-5 PLCs, Siemens S7 controllers, Modbus TCP, RTU, and ASCII masters and slaves, OPC UA clients and servers, OPC DA clients and servers, MTConnect, custom MQTT payloads, .NET interfaces, REST API, and databases.
In addition, OAS provides a Sparkplug B Host Application interface to control and consume data from the EoN Node to receive and extract NDATA and DDATA automatically to tag values and write data to EoN Node Metric values through NCMD and DCMD Sparkplug B commands. OAS tags can also be created automatically based on the NBIRTH and DBIRTH data received from an EoN Node.
You can connect to any third-party MQTT Broker that supports MQTT V3.11 or V5.0, including HiveMQ, Mosquitto, or OAS built-in MQTT Broker. OAS supports Sparkplug B versions 2.2 and 3.0.
For step-by-step instructions for setting up Sparkplug B communications, watch the video below:
You can also utilize the OAS Data Route feature to enable server-to-server data transport and additional protocol translation, including Sparkplug B EoN Node to EoN Node data transfer.
The following guide are the steps to define OAS as a Sparkplug B Host Application to receive and update Edge Node Metric values. The interface can control the online state of each Edge of Node or just act as a client.
You can view the Getting Started with Sparkplug B Video to familiarize yourself with the following steps to setup Sparkplug B communications.
00:00 – Introduction
01:10 – Download OAS
01:46 – Quick Start
02:08 – Edge of Network Node
05:52 – EoN Tags
07:04 – Host Application
09:20 – SpB Client Tags
10:22 – Programatic Interface
10:59 – CSV Export / Import
12:27 – Multiple Metric Tags
13:46 – Modbus
16:10 – DCMD Metric Write
17:00 – Data Route
17:58 – Networking
18:17 – Save Configuration
18:56 – OAS Platform
Step 1 – Check MQTT License
Start Configure OAS application from the program group Open Automation Software.
Select Configure-License and verify that MQTT is one of the available Drivers in the lower left of the form. If you do not see the MQTT driver available contact support@oasiot.com to update your license.
NOTE: To configure remote OAS Engines enter the IP Address or node name in the Network Node field and click on Select.
NOTE: You will need to be running Open Automation Software Version 19.0.0.54 or greater to support Sparkplug B communications. Use Configure-Options-System Status to check the version of the running OAS Engine. You can download the latest version at www.openautomationsoftware.com/downloads/open-automation-software/ or use the Update Version button under Configure-License to update to the latest version of OAS.
Step 2 – Configure Sparkplug B Host Driver
Select Configure-Drivers.
Define the properties for the desired Sparkplug B Host.
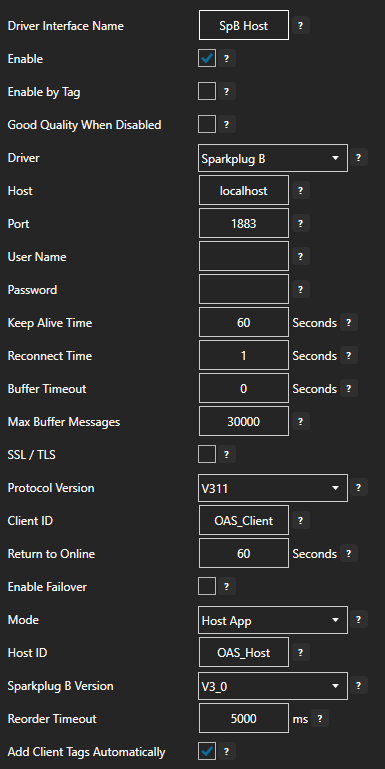
Enter a meaningful Driver Interface Name that you will refer to this physical connection when defining Tags with Sparkplug B source.
Set the Driver property to Sparkplug B.
Enter the Host property to the IP Address of the of the host broker or just use localhost for a local broker.
Set the Port property of the host broker to connect to. The default port is 1883 or 8883 for SSL.
Note: The OAS MQTT Broker can be used to host data locally. To use another broker on the default ports on the same computer change the OAS MQTT Broker Port under Configure-Options-MQTT Broker.
Enter the User Name and Password if required.
Keep Alive Time – Default is 60 Seconds.
Reconnect Time – Default 1 Second. If the connection to the broker is lost the Reconnect Time determines how long to wait before attempting to reconnect.
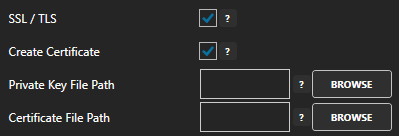
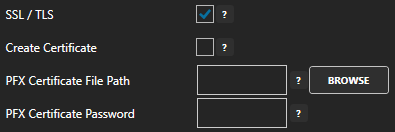
To connect with Transport Layer Security enable the property SSL / TLS.
Specify the Private Key File and Certificate File to use.
Uncheck the property Create Certificate to specify a PFX Certificate File and PFX Certificate Password.
Set the MQTT Protocol Version to V311 or V500.
Set the Client ID to a unique value, each driver interface must have a specific value different than all other clients connecting to the host.
Optionally define a secondary failover Host Broker if the primary Host Broker fails with the property Enable Failover.
If both the primary and secondary broker are offline the Return to Online settings determines the retry frequency.
View Driver Interface Failover for more information and and video demonstrating communications failover.
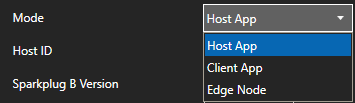
Set the Mode to Host App for OAS to control the online state of each Edge of Node defined to the shared Host Application ID.
Note: To enable a communication interface to Edge of Nodes, but not set the state of the Host ID set the mode to Client App.
Set the Host ID to the specific value that the Edge of Nodes will be using as the Host Application ID.
Set the Sparkplug B Version to 2.2 or 3.0.
To automatically add tags for each Metric from the matching Group, Edge of Nodes, and Devices enable the property Add Client Tags Automatically.
When enabled optionally set the Filter Groups, Edge Nodes, and Devices that tags should be added from for each of their Metrics. Leave the Filter fields blank to include all Edge of Nodes publishing data to the broker.
Select the Add Driver button in the left part of the form to add the Driver Interface as an available selection when defining Tags in the next step.
NOTE: If you need to define several Driver Interfaces you can use the CSV Export and CSV Import on the toolbar in the upper right together with Microsoft Excel.
Step 3 – Configure Tags to Define Metric Data from Edge Nodes
Select Configure-Tags.
NOTE: If the Driver Interface property Add Client Tags Automatically was enabled tags will be created for you, you can skip this step to add tags manually.
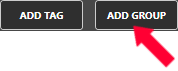
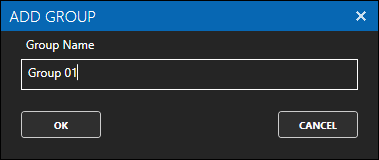
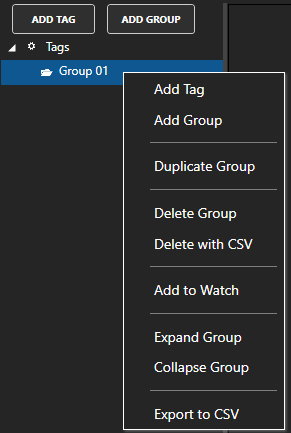
Select Add Group.
NOTE: You can add organizational Groups as many levels deep as you prefer and add tags to groups. To do this first add a Group to the root level, then right click on the Group in the right window to add additional Groups or Tags.
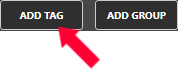
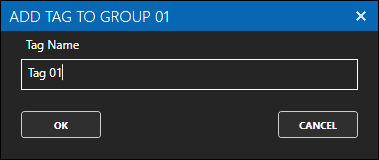
Select Add Tag to add a tag to the group selected.
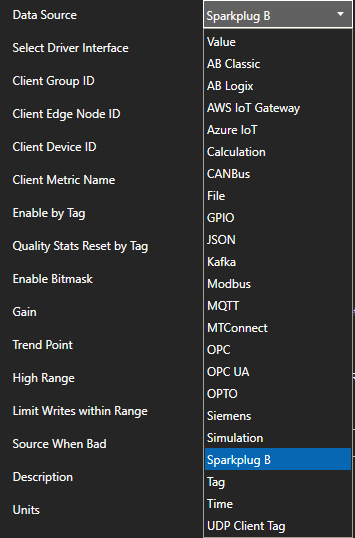
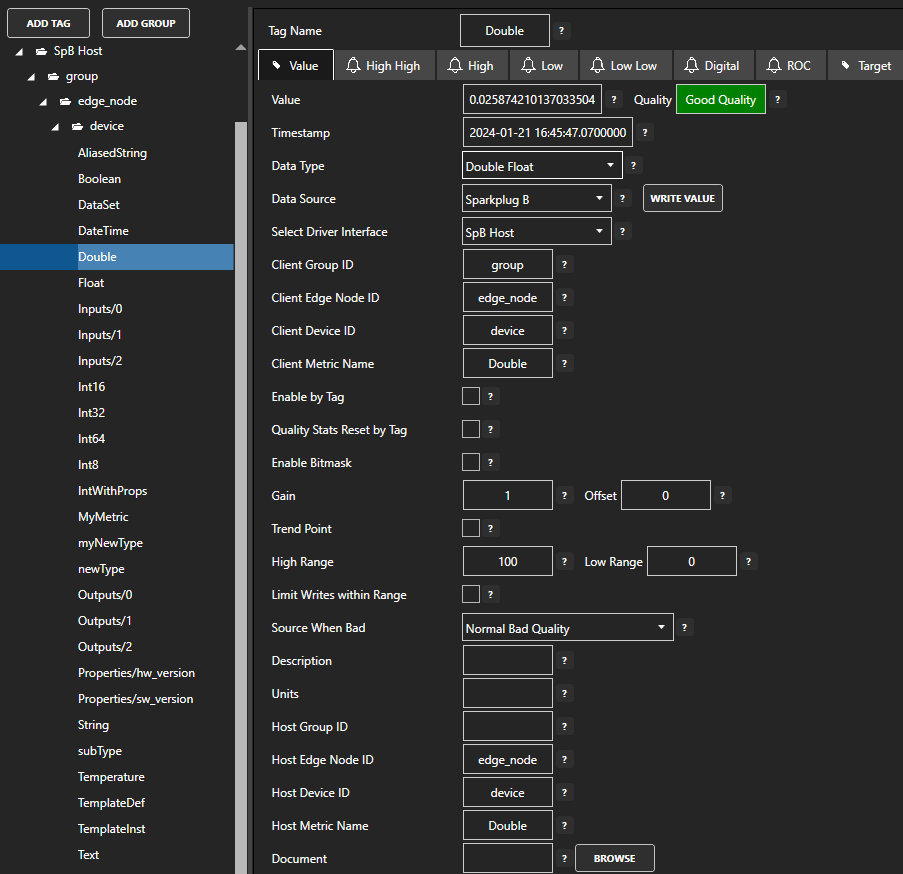
Change the Data Source Tag property to Sparkplug B.
Select the correct Driver Interface from the Driver Interface pull down list.
Specify the Client Group ID, Client Edge Node ID, Client Device ID, and Client Metric Name for the Edge of Node Metric value to read and write.
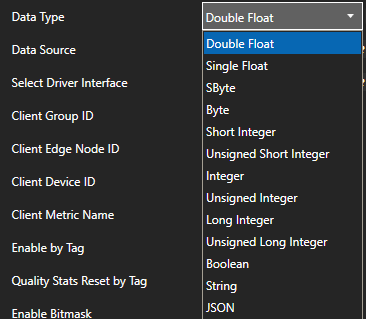
Select the Data Type of the Tag to match the data type of the Metric.
Select Apply Changes and the current value for the Metric should appear with Good Quality.
NOTE: The above tag was automatically created using the Sparkplug B Test Compliance Kit as an Edge of Node source.
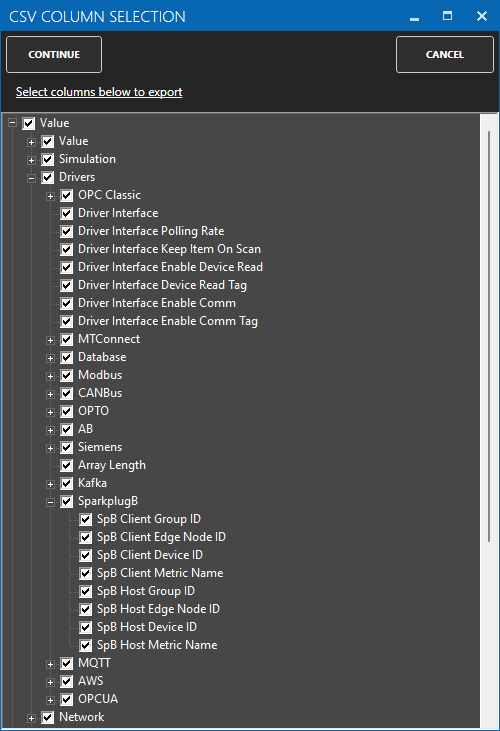
To define multiple tags use the CSV Export and CSV Import on the toolbar in the upper right together with Microsoft Excel.
When exporting tags choose which columns to include in the CSV file. There are over 800 properties available for use in each tag and reducing the amount of data can help to focus on the properties of interest.
NOTE: You can also programmatically define Tags using the free to use .NET OASConfig assembly or OAS REST API.
Step 4 – Save Sparkplug B Tags and Drivers
Select the Save button on the toolbar at the top.
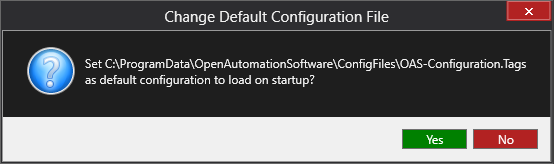
Enter a file name to be saved in C:\ProgramData\OpenAutomationSoftware\ConfigFiles directory on Windows or ConfigFiles subdirectory on Linux.
When prompted to set the file as the default configuration to load on startup select Yes.
NOTE: The tags and and drivers are both saved into one file.
View the following video for explanation of each parameter and how to enable Total for a tag:
00:00 – Introduction
00:17 – Define Properties
00:30 – Create a New Tag
03:30 – Totalization Process
06:42 – Reset Function
08:34 – Control the active state
09:53 – Set the initial value
11:10 – Persist the total when system is restarted
12:51 – More Questions
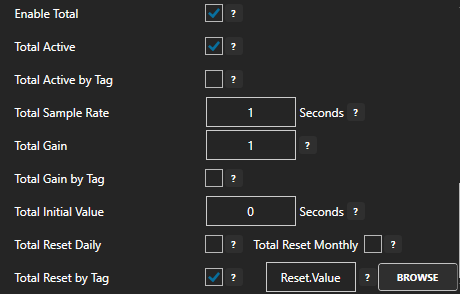
When this feature is enabled the current value will be summed at the sample rate specified with each value multiplied by the total gain before addition to the total.
Total Variables:
The Total feature will keep track of the following:
Total – The summation of all sampled values.
TotalSamples – The number of samples added since the last total reset.
TotalAverage – The total divided by the number of samples.
TotalPrevious – The previous total when the last reset was performed.
TotalPreviousSamples – The previous number of samples when the last reset was performed.
TotalAverage – The previous average when the last reset was performed.
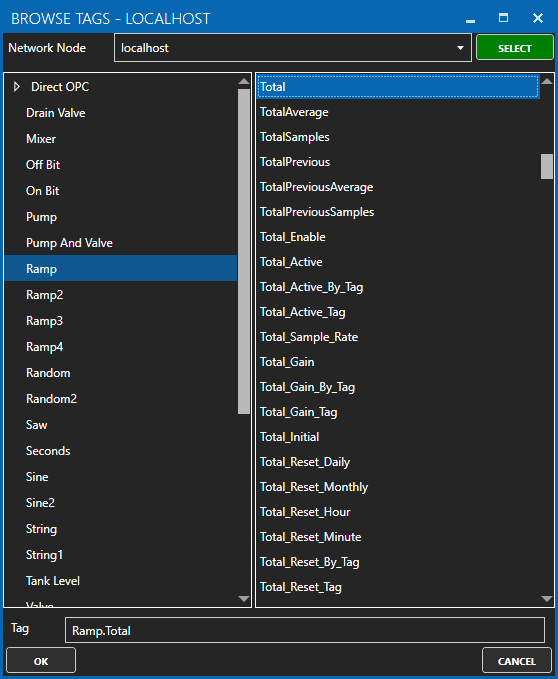
The following image shows how the points will appear for connection in a client.
Configuration Properties:
The following configuration properties are used to enable and control the summation of values.
Enable Total
Enables the summation of the current value to update the Total variables.
Total Active
When enabled totalizing is active at the specified sample rate.
When disabled totalizing is paused.
Total Active by Tag
When enabled Active state is controlled by a Boolean tag value.
Total Sample Rate
The rate at which the value * gain is added to the total in seconds.
Total Gain
The gain will be multiplied to the value before adding to the total.
Use a negative gain or value if you want the total to decrease on each sample.
Total Gain by Tag
When enabled the gain to multiply to value is controlled by Tag.
Total Initial Value
The value that the total will be initialized to when the total is reset.
Total Reset Daily
When enabled the total is set to the Total Initial Value on the reset hour and minute.
Total Reset Monthly
When enabled the total is set to the Total Initial Value on the reset hour and minute on the first day of the month.
Total Reset by Tag
When enabled a Boolean tag transition from false to true will set the total to the Total Initial Value.
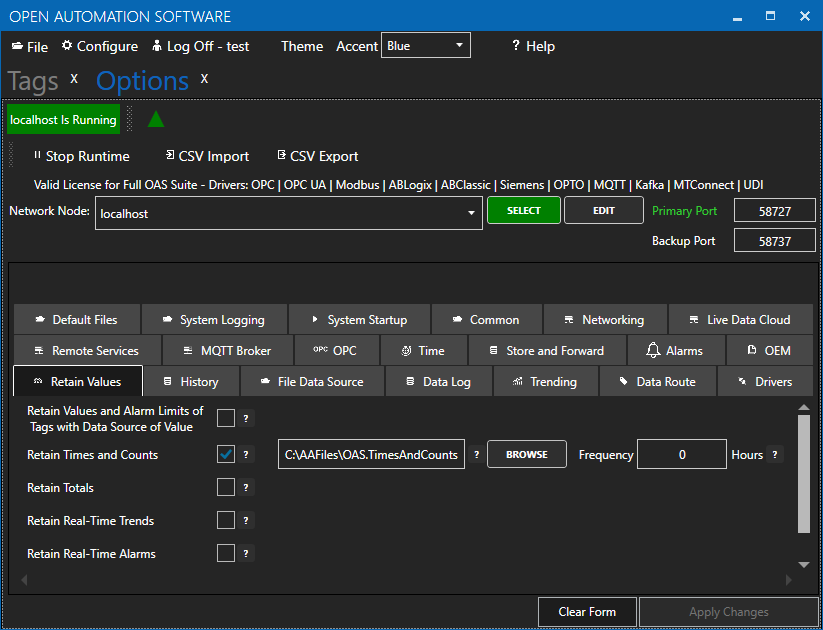
Retain Totals on Service Restart
To retain the total values after a system restart go to Configure-Options-Retain Values and enable to retain Totals to a file.
You can optionally specify a save frequency in hours to save the live total values at a specified rate. If the save Frequency is left at 0 the totals are only saved when the runtime is stopped or an orderly system shutdown.
Below are some helpful troubleshooting steps to resolve connection errors with OPC UA server.
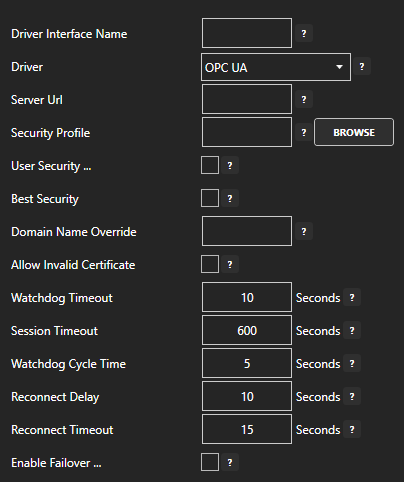
Server Url
The Server Url under Configure-Drivers must be specified correctly to then browse for the available Security Profiles.
Refer to the OPC UA server vendors documentation for the correct endpoint of the server.
Once the Server Url is correctly set use the Browse button to select the Security Profile.
Certificate Authentication
If the OPC UA Server’s authentication certificate is rejected it will be placed in C:\ProgramData\OpenAutomationSoftware\pki\rejected\certs on Windows or the pki\rejected\certs sub-directory where the OAS Engine is located on Linux. To resolve and move the OPC UA Server’s certificate file in the rejected\certs directory to trusted\certs.
OAS Certificate Creation
Version 18.0.0.17 of OAS added the ability to self create a certificate for OPC UA Servers and Clients to authenticate against. Check the current version under Configure-System Status and if older than version 18.0.0.17 update the version of OAS if you are receiving a certificate authentication error under Configure-System Errors.
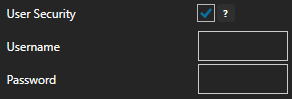
User Authentication
If the OPC UA Server requires a user name and password to validate the connection enable User Security under Configure-Drivers and specify the Username and Password that is required by the OPC UA Server.
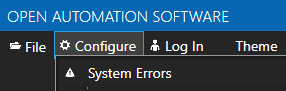
System Errors
Select Configure-System Errors and expand any OPC UA or Driver Interface error to see the details of the error.
The information provided can often help you determine the cause of communication failures.
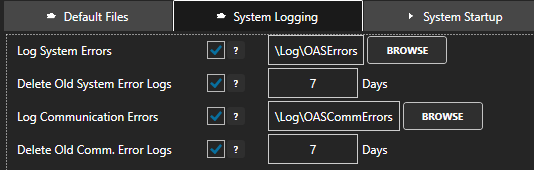
The history of all systems errors can be found in the OAS Error Log specified under Configure-Options-System Logging.
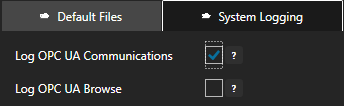
Log OPC UA Communications
You can enable the OPC UA transaction logging under Configure-Options-System Logging to track all interface calls to the OPC UA server.
Specify the location of where the communication logs will be saved with the property Transaction Log Path further down in System Logging.
Apply Changes, save all configuration files, and restart the OAS Engine.
There will be multiple files generated with the opcua within the file name and also the base OAS Transactions file.
UA Expert
The UA Expert program is a good test application to communicate to OPC UA server to verify the server can be interfaced with.
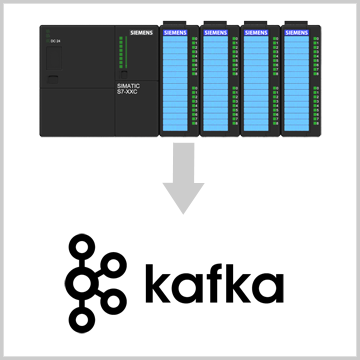
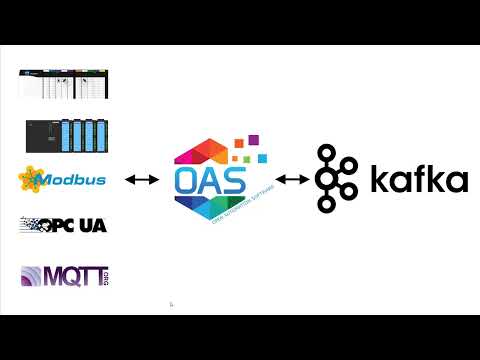
Open Automation Software can be setup to transfer data from S7 Controllers to Kafka brokers. Use the following guide to setup data transfer from S7-200, S7-300, S7-400, S7-1200, and S7-1500 controllers to Kafka. This tutorial walks you through downloading and installing OAS, defining the Siemens S7 interface, creating data source tags, and publishing data to Kafka in a JSON format. The message topic to publish is automatically formatted to include tag id, value, quality, and timestamp. All JSON packet parameters are configurable to deliver the Kafka topic message in the desired format.
Step 1. Download and Install the Open Automation Software and Start the OAS Service
If you have not already done so, you will need to download and install the OAS platform. Fully functional trial versions of the software are available for Windows, Windows IoT Core, Linux, Raspberry Pi and Docker on our downloads page.
On Windows run the downloaded Setup.exe file to install one or more of the Open Automation Software features. Select the default Typical installation if you are not sure what features to use or the Custom installation if you want to save disk space on the target system. When prompted agree to the End User License Agreement to continue the installation.
The OAS Service Control application will appear when the installation finishes on Windows. Use this application to start the 3 Services. Run the Configure OAS application on Windows and select Configure-Tags; if the first time running, the AdminCreate utility will run to create an Administrator login as shown in Step 1 of Getting Started – Security.
Step 2. Configure Your Siemens Data Source
First, you will need to open the Configure OAS application from the program group Open Automation Software.
Select Configure >> License from the top menu and verify that Siemens is one of the available Drivers in the lower left of the form. The demo license will have this by default. If you do not see Siemens available, contact support@openautomationsoftware.com to update your license.
Select Configure >> Drivers from the top menu.
Select localhost or the remote service you wish to modify with the Select button to the right of the Network Node list.
The Configure Drivers Screen will appear. Select Siemens from the Driver dropdown box.
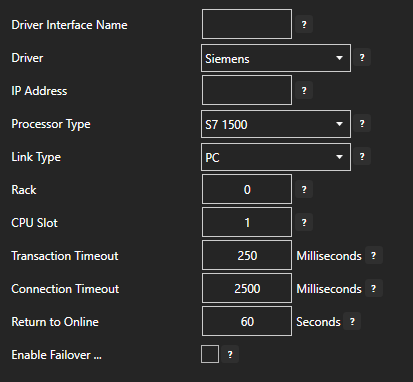
Enter a meaningful Driver Interface Name that you will refer to this physical connection when defining Tags with a Siemens Data Source.
Define the properties for the desired physical connection.
Click the Add Driver button above the Driver list in the left pane to add the Driver Interface as an available selection when defining Tags in the next step.
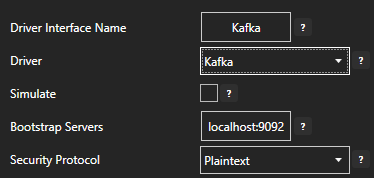
Enter a meaningful Driver Interface Name that you will refer to this connection and define the properties.
Set the driver to Kafka. Set the Bootstrap Servers of the brokers you wish to publish to.
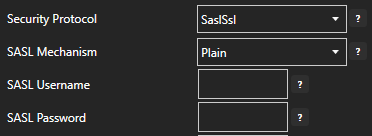
If sending data to the cloud set the appropriate Security Protocol.
When connecting with Confluent Cloud set the SASL Username with the provided API Key and the SASL Password with the Secret Key.
Enable Publish Selected Tags at the bottom of the Driver configuration.
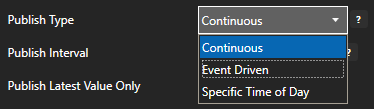
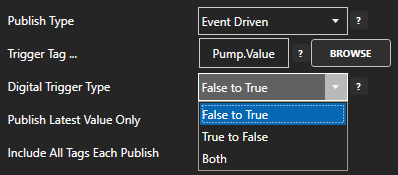
Select to publish data continuously at a specified interval, based on event, or at a specific time of day.
If Event Driven browse for a local or remote OAS tag that will trigger the publish. Select a Boolean tag that will change state from false to true, true to false, or both. Or choose an Integer tag that trigger a publish anytime the value changes other than 0.
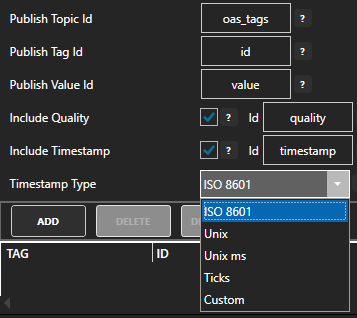
Specify the Publish Topic Id if choosing to Publish All Tags As One Topic.
When publishing as one topic to optimize communications with Kafka multiple messages are sent for each publish when the number of tag value changes exceeds the Max Tags Per Publish limit.
Specify the Tag Id, Value Id, an optional Quality Id, and Timestamp Id for each tag value that is sent.
When including the Timestamp Id also specify the timestamp format, use Custom to specify your own date and time format.
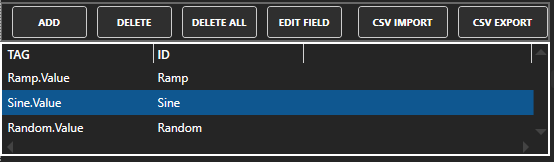
Specify local and remote OAS tag variables to include in each publish and specify the Id. Value is the current value from the data source or you can select any of the over 600 tag variables of each tag to publish.
Optionally use CSV Export and CSV Import buttons to set up additional tags to publish using Microsoft Excel.
Open Automation Software can be setup to transfer data from OPC UA servers to Kafka brokers. Use the following guide to setup data transfer from OPC UA servers to Kafka. This tutorial walks you through downloading and installing OAS, defining the OPC server interface and automated tag creation with the One Click OPC UA feature, and publishing data to Kafka in a JSON format. The message topic to publish is automatically formatted to include tag id, value, quality, and timestamp. All JSON packet parameters are configurable to deliver the Kafka topic message in the desired format.
Step 1. Download and Install the Open Automation Software and Start the OAS Service
If you have not already done so, you will need to download and install the OAS platform. Fully functional trial versions of the software are available for Windows, Windows IoT Core, Linux, Raspberry Pi and Docker on our downloads page.
On Windows run the downloaded Setup.exe file to install one or more of the Open Automation Software features. Select the default Typical installation if you are not sure what features to use or the Custom installation if you want to save disk space on the target system. When prompted agree to the End User License Agreement to continue the installation.
The OAS Service Control application will appear when the installation finishes on Windows. Use this application to start the 3 Services. Run the Configure OAS application on Windows and select Configure-Tags; if the first time running, the AdminCreate utility will run to create an Administrator login as shown in Step 1 of Getting Started – Security.
Step 2. Configure Your OPC UA Data Source
First, you will need to open the Configure OAS application from the program group Open Automation Software.
Select Configure >> License from the top menu and verify that OPC UA is one of the available Drivers in the lower left of the form. The demo license will have this by default. If you do not see OPC UA available, contact support@openautomationsoftware.com to update your license.
Select Configure >> Drivers from the top menu.
Select localhost or the remote service you wish to modify with the Select button to the right of the Network Node list.
The Configure Drivers Screen will appear. Select OPC UA from the Driver dropdown box.
Enter a meaningful Driver Interface Name that you will refer to this physical connection when defining Tags with a OPC UA Data Source.
Define the properties for the desired physical connection.
Click the Add Driver button above the Driver list in the left pane to add the Driver Interface as an available selection when defining Tags in the next step.
Enter a meaningful Driver Interface Name that you will refer to this connection and define the properties.
Set the driver to Kafka. Set the Bootstrap Servers of the brokers you wish to publish to.
If sending data to the cloud set the appropriate Security Protocol.
When connecting with Confluent Cloud set the SASL Username with the provided API Key and the SASL Password with the Secret Key.
Enable Publish Selected Tags at the bottom of the Driver configuration.
Select to publish data continuously at a specified interval, based on event, or at a specific time of day.
If Event Driven browse for a local or remote OAS tag that will trigger the publish. Select a Boolean tag that will change state from false to true, true to false, or both. Or choose an Integer tag that trigger a publish anytime the value changes other than 0.
Specify the Publish Topic Id if choosing to Publish All Tags As One Topic.
When publishing as one topic to optimize communications with Kafka multiple messages are sent for each publish when the number of tag value changes exceeds the Max Tags Per Publish limit.
Specify the Tag Id, Value Id, an optional Quality Id, and Timestamp Id for each tag value that is sent.
When including the Timestamp Id also specify the timestamp format, use Custom to specify your own date and time format.
Specify local and remote OAS tag variables to include in each publish and specify the Id. Value is the current value from the data source or you can select any of the over 600 tag variables of each tag to publish.
Optionally use CSV Export and CSV Import buttons to set up additional tags to publish using Microsoft Excel.