You can private label Open Automation Software to deploy as your own IIoT software product quickly and easily. Edit the file OEMSettings.csv to include your company name, product name, support email, and web links. The settings will update the Configure OAS application, OAS Service application, and messages from the OAS Engine.
Prerequisite: OAS version 14.00.0017 or later must be used to support the OEM Settings.
OEMSettings.csv
The OEMSettings.csv file should be places in the same directory where the OAS Configuration.exe file, OAS_Service_Control.exe file, and OASEngine.exe service is deployed. The OEM Settings will update both the Windows version and Linux version of the OAS Engine, the file is identical for both versions.
The default location for Windows installation is C:\Program Files\Open Automation Software\OAS\ where you will find the example file. If editing directly in the installation folder launch your editor to Run As Administrator. As an alternative copy the file to another location for editing and copy back to the installation directory.
The default location for Linux installation is in the oas-linux root.
The OEMSettings.csv contains 2 columns, Item Name and Value. The item names must remain as the default names as these names are used as the identifier. The values will be changed to match your desired names and links.
Following are default values of the OEMSettings.csv file.
“Item Name”,”Value” “Company Name”,”Open Automation Software” “Product Name”,”Open Automation Software” “Short Product Name”,”OAS” “Help Web Page”,”/knowledge-base/getting-started-with-oas/” “Videos Web Page”,”/videos/” “License Key Generation Web Page”,”/manual-license-key-generator/” “Classic OPC Server Troubleshoot Web Page”,”/knowledge-base/overview-opc-troubleshooting/” “Access Remote Mapped Drive Web Page”,”/ufaqs/logging-ms-access-remote-mapped-drive-get-error-data-logging/” “Contact Company for Maintenance Renewal”,”Contact Open Automation Software at https://openautomationsoftware.com or reseller for renewal or install previous version.” “Support Email”,”support @ oasiot.com” “OPC UA Session Name”,”Open Automation Software” “OPC UA Application Name”,”Open Automation Software@localhost” “OPC UA Application Uri”,”urn:localhost:OpenAutomationSoftware:OpenAutomationSoftware” “OPC UA Product Name”,”urn:OpenAutomationSoftware” “OPC UA Certificate Subject Name”,”CN=Open Automation Software@localhost/O=Open Automation Software” “ProgramData Folder”,”OpenAutomationSoftware” “AppData Folder”,”Open Automation Software” “Tag Prefix”,”Open Automation Software” “Service Prefix”,”OAS” “Engine Service”,”OAS Engine” “Framwork 4.6.1 Service”,”OAS Framework 4.6.1 Service” “Reports Service”,”OAS Reports Service” “Classic OPC Service”,”OAS OPC Service” “Config App Image Path”,”Custom\Logo.ico”
OAS Configuration Application Icon
You can define the application icon using InstallShield or other install builder using the Shortcuts item. In InstallShield project go to Shortcuts and select the shortcut for the OAS Configuration application. There you can set the Icon property to your desired .ico file.
Security is included for free with all of the product features of Open Automation Software. To ensure that all requests for server data be performed by an authorized user, the OAS Web HMI Script Library attaches an authentication token to each request. This token is generated by the Open Automation Software Server when provided a valid credential. The token will expire after a period of disuse, or when the Open Automation Software Server is restarted, so it should be generated dynamically when a page is initially accessed.
This article covers how to generate and store these tokens with:
ASP.NET both C# and VB
JavaScript
STEP 1
The first step for either method is the same: define and configure your security groups and users. This Getting Started – Security article describes how to do that with the OAS configuration tool. There is also a video about that here. Security users and group can also be set up with the OAS programmatic interface, learn about that here.
You will need to include a few files at the top of your pages as well:
jQuery v1.8.3 or later
The OAS Web HMI Script Library
A small block of Javascript containing an authentication token and URL location of the Open Automation Software Server.
In the button click event, first assign the username and password entered by the user to local variables. Next, instantiate a new instance of the OASConfig.Config object. Then, assign the token returned by the GetToken method to an ASP.NET session variable. Doing so allows you to retrieve that information in the subsequent pages. Depending on the version of ASP.NET you are using, you can pass the token in different ways. The example also stores the OAS Server address as a session variable. Finally, redirect the user to the next page.
Private Sub btnSubmit_Click(sender As Object, e As EventArgs) Handles btnSubmit.Click
  Dim un As String = username.Value
  Dim pw As String = password.Value
  Dim err As String = ""
  Dim token As String = ""
  Dim config As New OASConfig.Config()
  token = config.GetToken(un, pw, "", err)
  Session("token") = token
  Session("OASServer") = "http://localhost:58725"
  Response.Redirect("default.aspx")
End Sub
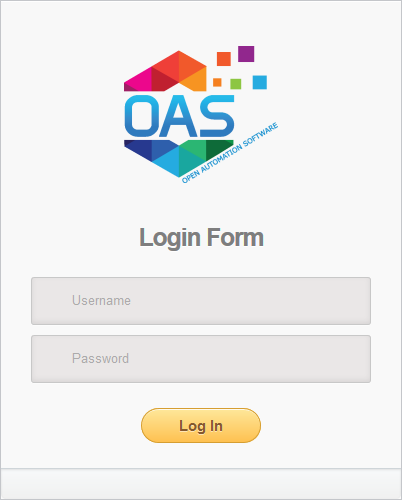
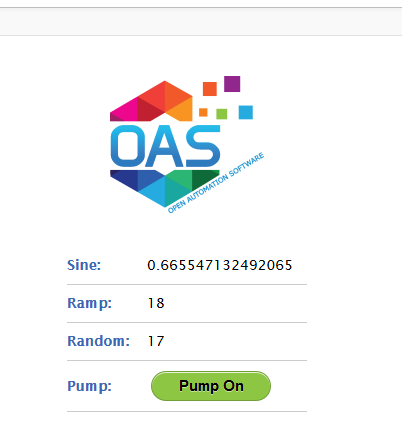
If a token was successfully created and the user has permissions to view tags, the display screen will look like this:
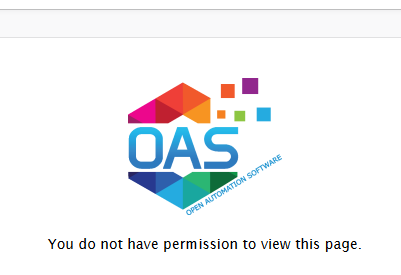
If they did not provide valid credentials, the screen they will see will look like this:
The OAS Service generates a token whether or not the user provides valid credentials. However, if the user has bypassed the login page, no token has been created. So here, check to for the existence of a token. If none exists, return them to the login page to authenticate. If one does exist, use the ASP.NET ScriptManager to programmatically write JavaScript to pass the token to the OAS Service on the client side.
Protected Sub Page_Load(ByVal sender As Object, ByVal e As System.EventArgs)
Handles Me.Load
  Dim token As String = Session("token")
  If token = "" Then
    Response.Redirect("login.aspx")
  Else
    Dim server As String = Session("OASServer")
    ScriptManager.RegisterStartupScript(Page, Me.GetType(), "OASWebToken",
      "OAS_config = {token:'" + token + "',serverURL:'" + server + "'};", True)
  End If
End Sub
JavaScript Authentication
Next, let’s look at how to do this entirely from the client side using JavaScript.
At the top is the OAS_config tag, set with a dummy token and the OAS Service URL. I also have a watch_tags call in it so that it is talking to the OAS Service and am specifying a function, updateStuff(), in the refresh_callback. In the updateStuff() function, I first check to see if if a new token has been created in the submit function above. If it has been, I add it to window object’s localStorage so that I access it from subsequent pages. I then, redirect the user to the next page. There, the submit function takes the username and password and calls OAS.authenticate to validate the user and retrieve the new token. The event.preventDefault() stops the form from submitting and allow the updateStuff() to handle it.
JavaScript for Login Page
<script type='text/javascript'>
  OAS_config = {
    token:'-481d-4551-b24b-7e61b230ba9046e3d8f2',
    serverURL: 'http://localhost:58725',
    refresh_callback: updateStuff,
    watch_tags:["Sine.Value"]
  };

  $( document ).ready(function() {
    $( "#form1" ).submit(function( event ) {
      // on submit, get the
      // username and pw and authenticate
      var un = $("#username").val();
      var pw = $("#password").val();
      OAS.authenticate(un,pw);
      event.preventDefault();
    });
  });

  function updateStuff() {
    if (OAS.token != OAS_config.token) {
      //check to see if a new token was created
      localStorage.setItem('token', OAS.token);  //store the token in local storage
      location.href = "default.htm"; // redirect to main page
      console.log("Token Set:" + localStorage.getItem('token'));
    }
  }
</script>
JavaScript for Display Page
At the top of your display pages, you will need to include the following JavaScript as well. It retrieves the token from localStorage and puts in the OAS_config.
If the a token has been generated, the user is allowed to stay on the page. If authentication fails, the user should not be able to view anything; this can be accomplished by creating a Boolean tag in the OAS Configuration tool called FlagTrue. For organizational purposes, put it in a folder called SecurityDemoFlags. Set the default value of the flag to true. Surround the portion of the page that is not to be displayed to unauthorized users with a div tag. Use an OAS attribute on the tag to control visibility. If the user is not able to read tags, tags will come in with bad_q. Set the bad_q for the Boolean tag controlling visibility to false. With it set this way, unauthorized users will not be able to see this area of the page and authorized users will.
Below there is another div which displays the message: You do not have permission to view this page. Use the same flag to control visibility for this div. When an unauthorized user visits the page, OAS sends the false bad_q indicator to the tag that set above. This div has an OAS attribute of “trigger: on_false”.
In this demo, there are several tags and a button that toggles a pump on or off. If the user has read permissions only, the button would display the value of the pump but would not allow the user to change it. You can create different groups/users and control what the users are able to see and do.
How to browse remote Classic OPC Servers by IP Address?
Use the Configure-Options-Networking in the Configure OAS application to define a list of IP addresses in the Network Nodes field as shown in Networking OPC Data.
I am unable to browse and OPC Server or get good data quality for the OPC Items?
Following is where you can find the locations of the Open Automation Software options, license, and other default files.
Config Files Folder
The Config Files Folder is a specific folder in the operating where the OAS options, license, custom objects files are located.
Linux operating system there is a ConfigFiles sub-directory located in the directory you have deployed the OAS Engine.
Note: If moving the OAS Engine folder in Linux make sure all files in the ConfigFiles sub-directory are moved with the OAS Engine.
Windows operating system this is C:\ProgramData\OpenAutomationSoftware\ConfigFiles\
Note: ProgramData is by default a hidden directory in Windows and you can use Windows Explorer to show hidden folders.
To view ProgramData follow these steps.
open File Explorer options from Control Panel
Then to View Tab.
Uncheck “Hide protected Operating system files” and click on “Show hidden files and folders”
Press Yes and then OK.
OAS.Options
The OAS.Options file contains all settings defined under Configure-Options of the Configure OAS application.
OAS.License
The OAS.License file will be updated with an activation with the OAS Serial Number to enable product features and the number of tags in the license.
OAS.GUID
The OAS.GUID file will be generated the first time the OAS Engine starts on a new operating system. This contains a unique identifier for store and forward functionality after a system restart.
OAS.CustomObjects
The OAS.CustomObjects file is generated any time a custom object is programmatically assigned using the OASConfig or OPCSystems component. This is also the file that will persist all user changes for the Web HMI Dashboard.
OAS Options
All options can be set using the Configure OAS application with Configure-Options or programmatically with the OASConfig .NET component, OPCSystems .NET component, or REST API for OAS. All options are persisted in the OAS.Options file in the ConfigFiles sub-directory.
Default Configuration Files
Use the Configure OAS application with Configure-Options-Default Files to specify the default configuration files to load when the operating system restarts. The location of all configuration files will be in the ConfigFiles sub-directory. These settings are stored with the OAS.Options file.
System Logging
Use the Configure OAS application with Configure-Options-System Logging to specify the file path of the OAS System Errors, Communication Errors, and Transaction Logs. These settings are stored with the OAS.Options file.
Store and Forward Folder
Use the Configure OAS application with Configure-Options-Data Buffer to specify the folder to use for data logging and alarm logging store and forward feature. This setting is stored with the OAS.Options file.
Retain Values on System Restart
Use the Configure OAS application with Configure-Options-Retain Values to specify the file path to retain Values and Alarm Limit changes, Time On and Counts, Realtime Trending, and Realtime Alarms. These settings are stored with the OAS.Options file.
File Data Source
The ConfigFiles subdirectory is the location for files when Tags are set to a Data Source of File-Text, Binary, or XML.
OPC UA Trusted Certificates
If the OPC UA Server you are connecting to has security restriction using Certificates you can move the rejected certificates to the trusted certificates under following paths.
Linux operating system there will be a pki sub-directory created under the directory where the OAS Engine is located.
Windows operating system this is C:\ProgramData\OpenAutomationSoftware\pki\
For any Linux installation, general knowledge of Linux server configuration is required. This includes being comfortable with the following tasks:
managing user accounts
managing files and user permissions
transferring files between machines
networking configuration
configuring services (daemons in systemd)
While OAS is happy to support the OAS installation and any issues related to the product, support does not include managing Linux server configuration and administrative tasks.
Deployment
After downloading the Linux OAS Engine from the OAS Downloads page extract the contents of the .ZIP file (e.g. oas-linux.zip) to any directory of the Linux operating system. The contents can be copied to the target Linux machine directly, or you can copy the .ZIP archive and unzip on the Linux machine itself.
OAS Configuration Client
You can download the OAS Configuration Client from the same downloads page if you would like to configure your OAS instances from a Linux based operating system. To install the Configure OAS client see the Configure OAS Overview.
Installation Script
Note: Perform the installation on your Linux system using root access or with an account with sudo privileges.
The following are instructions for using the included installation script. This script has been thoroughly tested on Ubuntu, but may not work properly in all Linux distributions. For example some scripted operations are blocked on Debian and Debian variants such as Raspbian. If you experience issues running the script or if the OAS server does not start after running the script, we suggest using the Manual Installation method.
View the following video to view the following steps implemented with Ubuntu on a Raspberry Pi device.
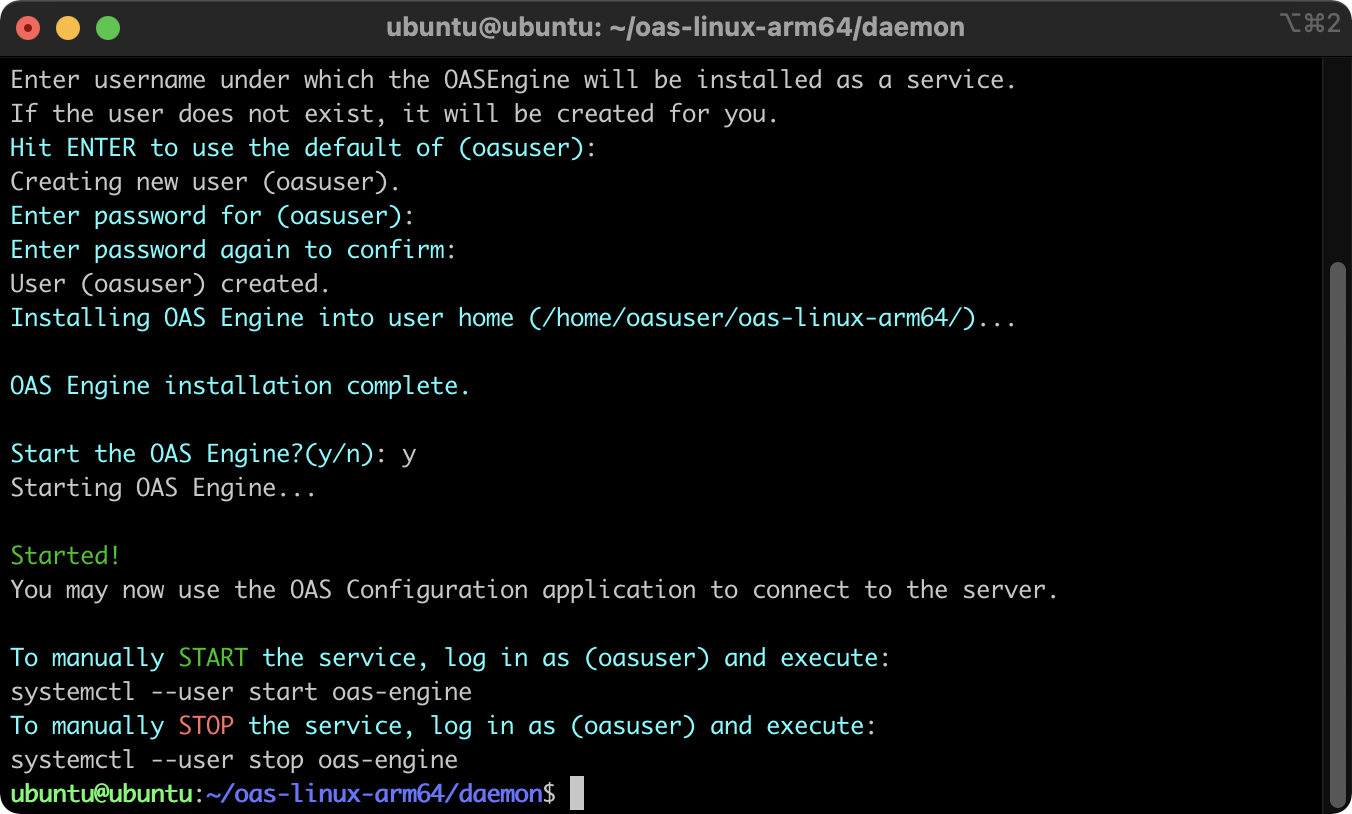
Run the installation script to properly configure the OASEngine
Log into your Linux machine with an account that has root or sudo permissions. Either connect to the machine from an SSH session, or open a terminal on the machine itself, if you’re using a GUI.
Navigate to the daemon directory within the installation path and locate the oas_install.sh script. In this example, we’re using the ARM64 installation on a Raspberry Pi 4 running Ubuntu, but the same instructions and commands apply to any Linux distribution.
Ensure the installation script is executable, then run the installation using the following commands:
NOTE: When you execute any script on Linux and receive an error such as “No such file or directory”, this may be resolved by converting the file to unix-type line breaks. This can be done with the command dos2unix which is installed using the following command on many Linux distributions:
sudo apt updatesudo apt install -y dos2unix
You will be prompted to enter the password for the root or administrator currently logged in if you don’t currently have sudo permissions.
The installation script will next walk you through the following:
Creating or selecting a user account for the OASEngine service. Using the defaults, an account called oasuser will be created.
Installing the service in the selected user’s account
Optionally starting the newly installed service
Step 1: run the installation and select a user account to host the OASEngine. If the user does not exist, you will be prompted to create a password for the new user.
Step 2: the installation completes and prompts to be started
Step 3: Installation completed and service started.rol
The OASEngine is now installed as a user service or daemon under the account selected or created (default: oasuser). This service is managed by systemd and can be controlled or monitored like any systemd service. By default, the OASEngine is now configured to start up when the machine reboots.
You can now use the Configure OAS application to configure the server. This can be done from any local or remote workstation or server using Windows or Linux. The Windows client is installed as part of the OAS platform. The Linux client can be downloaded and installed independently from the downloads page.
Ensure that the PC Firewall allows TCP communication on port 58727. For more information on configuring an OAS installation see the documentation for the Configure OAS application.
Manual Installation
Unless noted, all operations below must be performed under the root account, or using an account with sudo permissions.
Create a Service User Account
The following commands will create a user named oasuser, however you can use any valid username. If not using the default oasuser name, be sure to use that name in further instructions where oasuser is mentioned.
The passwd command will prompt you to enter and confirm a password for this user. Be sure to store this password securely as it will be needed for logging in and managing the OAS Service.
Copy OAS Service files to Service User’s home
Copy the unzipped installation directory to the OAS Service user’s home. Then set ownership of the installation directory and contents to the OAS Service user. In this example, the install directory is oas-linux, but depending on the version being used, this may also be oas-linux-arm or oas-linux-arm64.
Edit the oas-engine.service file located in the daemon directory within the installation path using nano, vi or your favorite text editor on Linux. Modify the file by changing references to oasuser to your OAS Service username if you have chosen another, and modify the oas-linux path to oas-linux-arm or oas-linux-arm64 if you are using either of those versions. Make all modifications necessary for the file to resemble the one below:
Included with the OAS installation script is an uninstaller, as well. This file is oas_uninstall.sh and located in the same directory as the installation script. Similarly, you will need to mark this file for execution before running it. Only use this script if the installation script was successful. Use the following commands to mark for execution and then start the uninstaller:
The uninstaller script will attempt to back out the installation by performing the following actions.
Stop the OASEngine service
Remove all installation files
Remove user account created for running the service (optional) When prompted to remove the OAS user account, you can choose ‘no’ to keep the account intact.
For manually uninstalling the OAS Service:
Log into the account created for running the OAS Service
Stop the OASEngine
systemctl --user stop oas-engine
Disable the systemd service
systemctl --user disable oas-engine
You can optionally remove the entire installation directory from the Service User account home or leave it in place if you plan on using OAS again at some point.
Service Control
Confirm that the service is running
Log into the Linux machine using the credential created during the installation. By default this is oasuser. Then, execute the following command to determine the oas-engine status:
systemctl --user status
This should return something similar to:
State: running
Jobs: 0 queued
Failed: 0 units
Since: Mon 2021-03-01 16:34:33 UTC; 3 weeks 6 days ago
CGroup: /user.slice/user-1001.slice/user@1001.service
├─oas-engine.service
│ └─2214 /home/oasuser/oas-linux-arm64/OASEngine
If you do not see the oas-engine.service listed as running, you can begin troubleshooting by attempting to run the OASEngine manually and checking for errors on startup in the console. To do this, locate the OASEngine executable within the installation directory for the user. This will be in the user’s home directory and named oas-linux, oas-linux-arm, or oas-linux-arm64 depending on the version installed. Within this directory, execute the following:
./OASEngine
This will directly start an instance of the service and output feedback on status. If any errors are reported on startup, make note of them and contact OAS Support for more information.
Managing the Service Installation
The installation script created a service configuration file that can be modified with any additional parameters, such as restart behavior. This is particularly useful if you want to automatically restart the OASEngine in the unlikely event that the process is killed or interrupted. You can locate the service configuration file on following path when logged in as the selected user:
~/.config/systemd/user/oas-engine.service
The contents of the file are the following, with the paths adjusted for the specific user and depending on the specific Linux distribution you are using:
Once you log into the Linux machine as the selected user, you can gracefully stop and start the service using the following commands:
Stop the service:
systemctl --user stop oas-engine
Start the service:
systemctl --user start oas-engine
Troubleshooting
The installation script throws errors or returns a ‘No such file or directory’ message
The file may contain incompatible line endings for Linux – see the instructions above for fixing this using the dos2linux command.
The Linux distribution you are using (e.g. Debian and variants) may be incompatible with the installation script. Follow the Manual Installation instructions.
The service does not start on reboot
Ensure that the service is enabled. Log into the server with the OAS Service account created or referenced during the installation – by default this is oasuser. Then execute the following command:
systemctl --user enable oas-engine
Also, be sure that the OAS Service user can run unattended and does not require a login session for services to run. Logged in as root or sudo user, execute the following command:
sudo loginctl enable-linger oasuser
Any other issues?
Contact support@oasiot.com and we will evaluate your configuration and determine the cause.
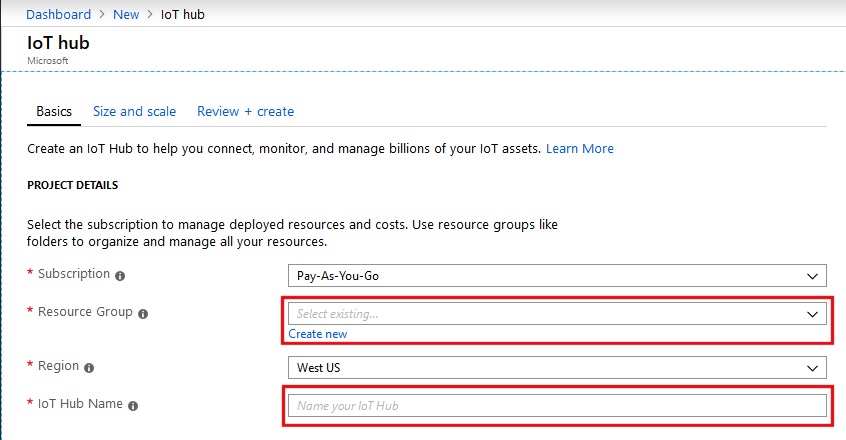
In Location, select the location to host your IoT hub.
Step 8
When you have chosen your IoT hub configuration options, click Create. It can take a few minutes for Azure to create your IoT hub. To check the status, you can monitor the progress on the Startboard or in the Notifications panel.
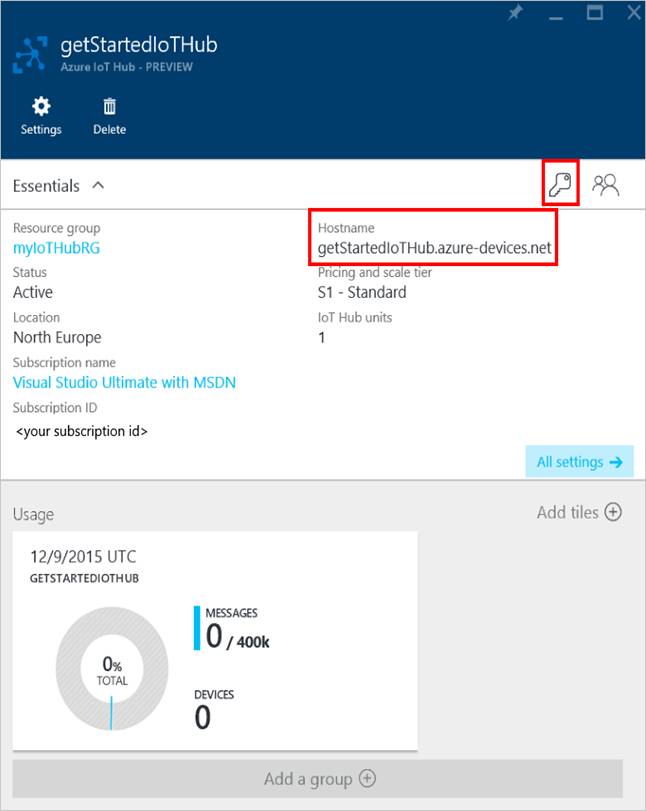
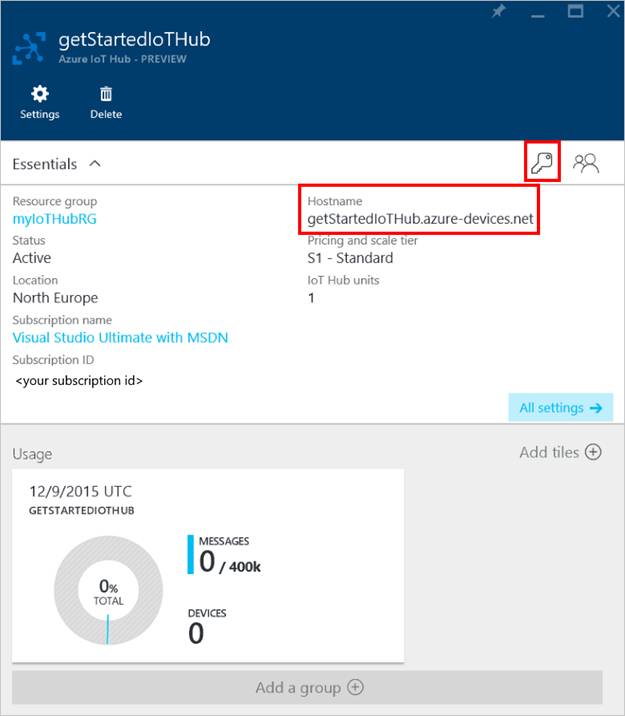
When the IoT hub has been created successfully, open the blade of the new IoT hub, make a note of the Hostname, and then click the Keys icon.
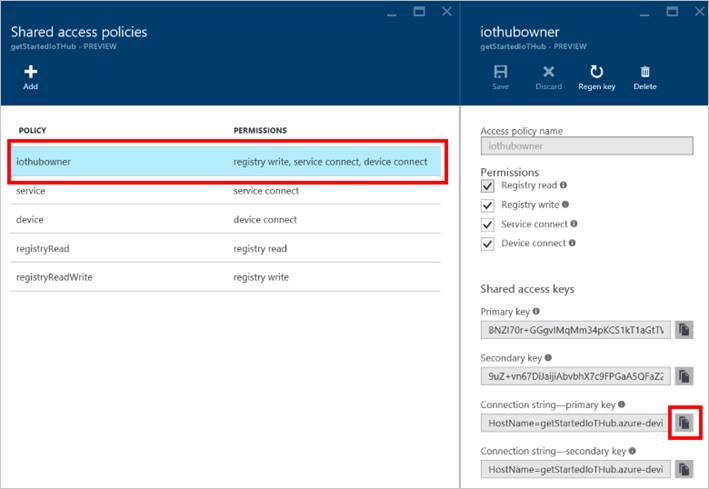
Step 9
Click theiothubowner policy, then copy and make note of the connection string in the iothubowner blade.
You have now created your IoT hub and you have the hostname and connection string you need to complete the rest of this tutorial.
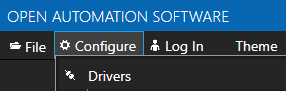
Create an IoT Driver
Step 1
Open Configure OAS
Step 2
Select Drivers
Step 3
Select your local or remote system
Step 4
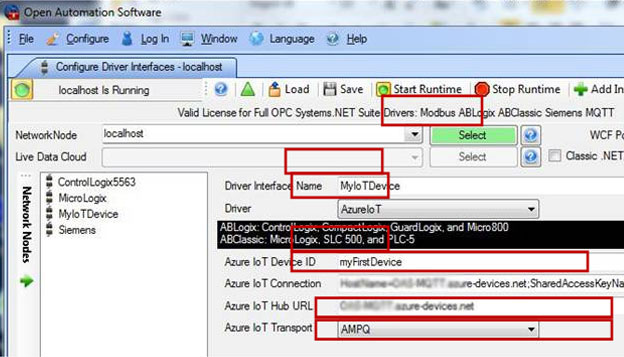
Enter the Driver Name you wish to use.
Step 5
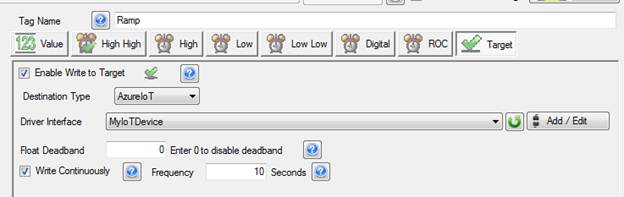
Select Azure IoT Driver from the combo box
Step 6
Enter the Azure IoT Device ID you want to use.
Step 7
Enter the Connection String from Step 5 of the previous section into the Azure IoT Hub Connection field.
Step 8
Enter the hostname from Step 4 of the previous section into the Azure IoT Hub URL Field.
Step 9
Select the preferred Azure IoT Transport.
Step 10
At the bottom Left of the configure application select Add.
The Raspberry Pi has quickly become a popular device used to prototype or become the core of an Internet of Things (IOT) component. Being a small, single board computing platform allows it to be used where conventional computers would either be too large or unable to withstand environmental forces. Yet, because it runs a variant of Linux, it is a fully functional general purpose computer.
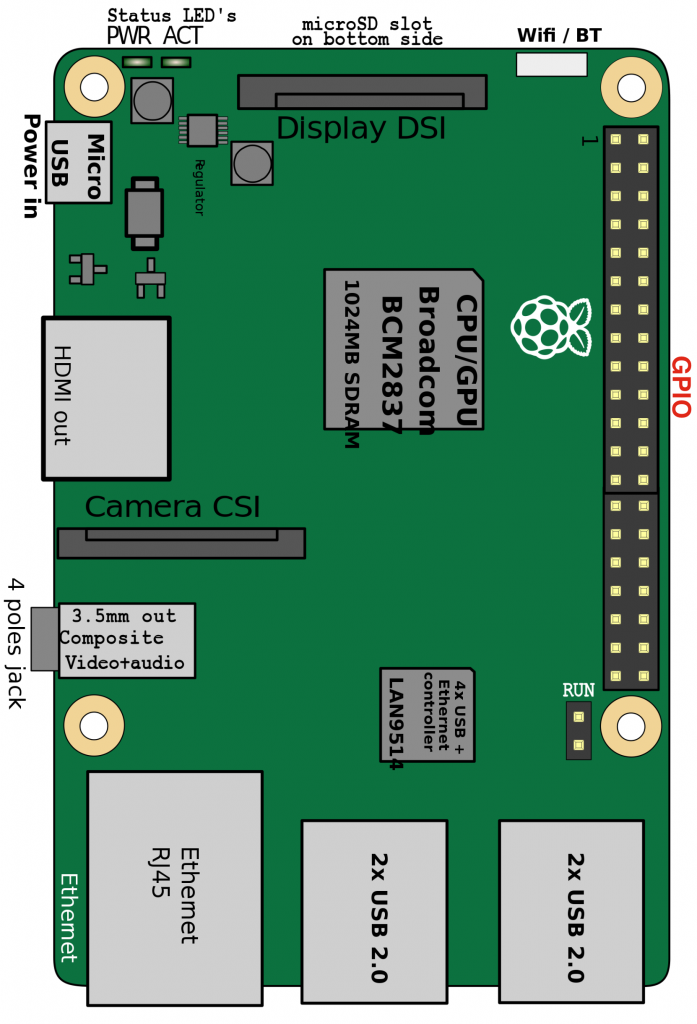
Pi devices were designed to be modified and expanded. As such each model includes many I/O ports as well as a bank of pins called the General Purpose I/O pins or GPIO. These pins are addressable, can be configured for either input or output, and in some cases can even support serial communication. The most common use is reading and writing boolean values.
In this diagram of a Raspberry Pi 3, you can see the bank of 40 GPIO pins on the right hand side. Older models only include 26 pins, and some models arrange them differently to fit on the PCB.
The Challenge
There are many open source libraries for reading and writing GPIO pin statuses in many different languages and operating systems. But rapidly prototyping an IoT device comes with many other challenges. So our goal was to produce a driver for the OAS Platform to allow an OAS server to communicate with a Pi device and access GPIO data, all without an admin or end-user needing to write code for each deployment. In short, we wanted to create a driver that behaves like existing OAS native drivers and is configurable through the OAS Configuration tools.
The Universal Driver Interface
With the release of the OAS Universal Driver Interface (UDI) SDK, developers can now create their own custom device or data drivers which act like and live side-by-side with existing native drivers such as our Allen Bradley or Siemens PLC drivers. In addition, UDI implementations can be deployed at the data source and be configured to communicate with a remote OAS server. This ensures that the data is captured reliably from the data source and transmitted to OAS as long as a network connection can be established.
The UDI for the Raspberry Pi GPIO acts as a conduit between the GPIO Data and OAS.
The technology that makes this possible is the .NET Core Framework, which can run on a Linux device.
Remote Driver Hosting
Built-in or “native” OAS Platform drivers such as the Allen Bradley and Siemens PLC drivers are part of the OAS services that run on a Windows server. But since the UDI libraries are based on the .NET 2.0 Standard, UDI drivers can be compiled to execute on any environment that supports the .NET Core runtime. This means you can host a custom driver on a remote device or server such as a Raspberry Pi, thus making data capture more efficient and distributing the load of your solution.
Tag Configuration
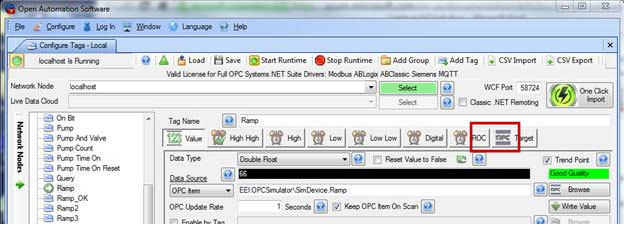
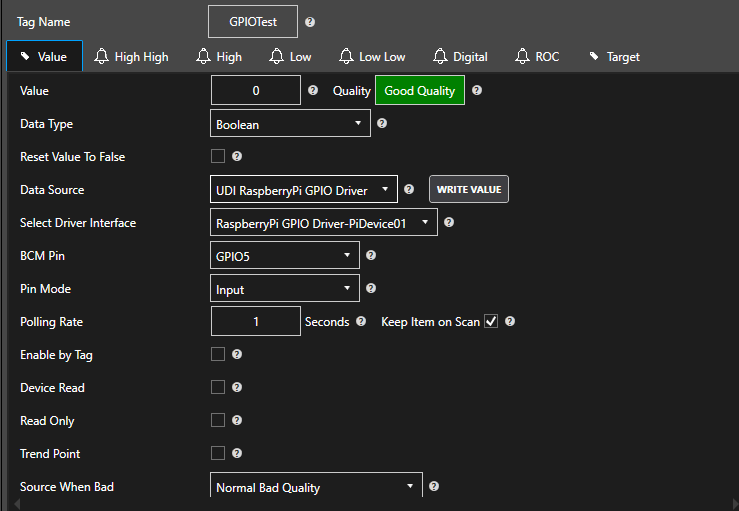
Another powerful feature of the UDI is the ability to define custom tag properties based on the driver. So when a Tag’s data source is selected as your UDI driver, your custom properties are displayed in the Tag configuration screen. In the case of the Pi GPIO UDI, we expose properties to control which GPIO Pin is mapped to a tag, and the data direction (input or output).
By changing the Pin Mode, this actually alters the Pin Mode within the the Pi device itself. Selecting the BCM Pin maps the Tag to the Pin using the BCM pin numbering scheme.
Output Pins: the tag value will be set to the pin value on the device
Input Pins: the tag value will be set to the current pin value on the device, and will also allow you to set the pin value on the device by setting the Tag to a boolean True or False.
Connection and Configuration on Startup
Each deployment of the Raspberry Pi UDI can be configured using an external file. This configuration file contains fields for uniquely identifying the device, as well as setting the remote OAS server address and port. When the driver spins up, it will make a network connection to the OAS server and begin transmitting data when an OAS Tag has been configured. Additionally, a UDI can be written to actually create and configure tags on a remote server, so that a deployment does not require any manual keying of Tag configuration fields, reducing errors and ensuring each follow on deployment can be completed with minimal effort.
The appsettings.json file:
ServiceNode: the remote OAS server address
PortNumber: OAS Server port
MachineName: the unique name for the device hosting the UDI Driver
Project Source Code
This UDI implementation for the Raspberry Pi is fully functional, but can be used as the basis of your own projects. Source code is available in C#, and requires the following:
Tags can be automatically set up using the One Click OPC UA feature, which browses OPC UA servers automatically and creates tags based on the nodes defined in the OPC UA server. You can then delete tags from the configuration that are unnecessary.
Note: You will need to be running Open Automation Software Version 12.0.0.9 or greater to support the One Click OPC UA feature. You can download the latest version from our Open Automation Software Download page.
Step 1 – Configure OPC UA Driver
NOTE: If you have already defined a driver as described in the Getting Started – OPC UA Server guide you can proceed to Step 2 – Configure OPC UA Tags.
Start Configure OAS application from the program group Open Automation Software.
Select Configure-Drivers.
NOTE: To configure remote OAS Engines enter the IP Address or node name in the Network Node field and click on Select.
Enter a meaningful Driver Interface Name that you will refer to this physical connection when defining Tags with an OPCUA Data Source.
Set the Driver type to OPC UA.
Define the Server Url property to the endpoint of the OPC UA server to connect to.
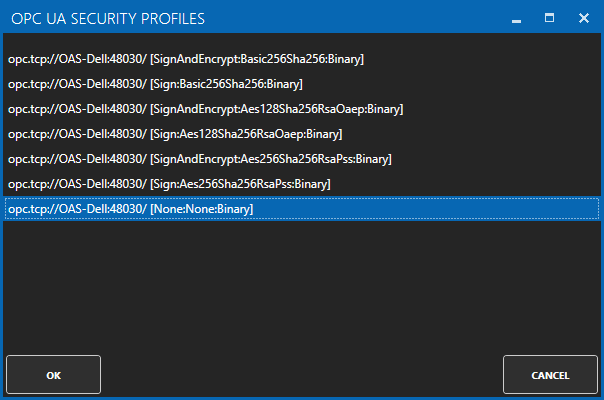
Use the BROWSE button of the Security Profile to select one of the security profiles. Use None:None:Binary for the fastest interface.
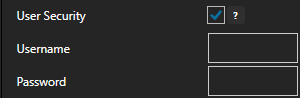
If the server requires user authentication enable the property User Security to define the Username and Password.
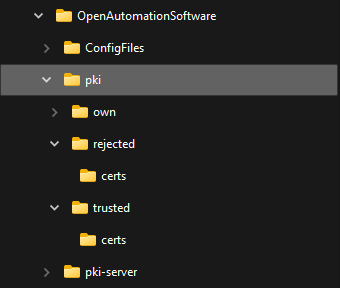
NOTE: The certificate path is C:\ProgramData\OpenAutomationSoftware\pki on Windows and /ConfigFiles/pki/ on Linux. You may need to move the server’s certificate from the rejected\certs folder to the trusted\certs folder.
Select the Add Driver button in the upper left of the window to add the Driver Interface as an available selection when defining Tags in the next step.
Step 2 – Configure OPC UA Tags
Select Configure-Tags.
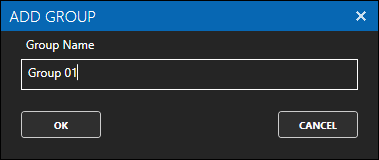
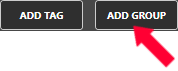
Select Add Group to add a group to place tags in.
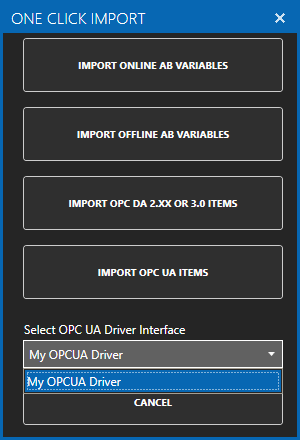
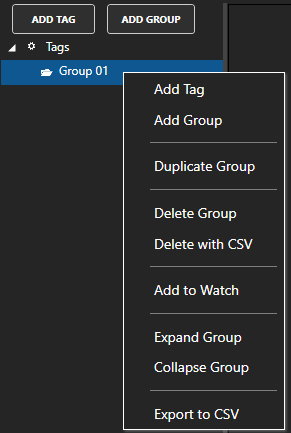
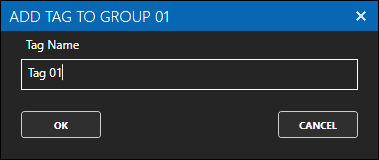
Select the Group 01 group, then click the One Click Import button on the top toolbar.
Select the OPC UA Driver Interface defined in Step 1 if there are multiple drivers defined.
Select the IMPORT OPC UA ITEMS button.
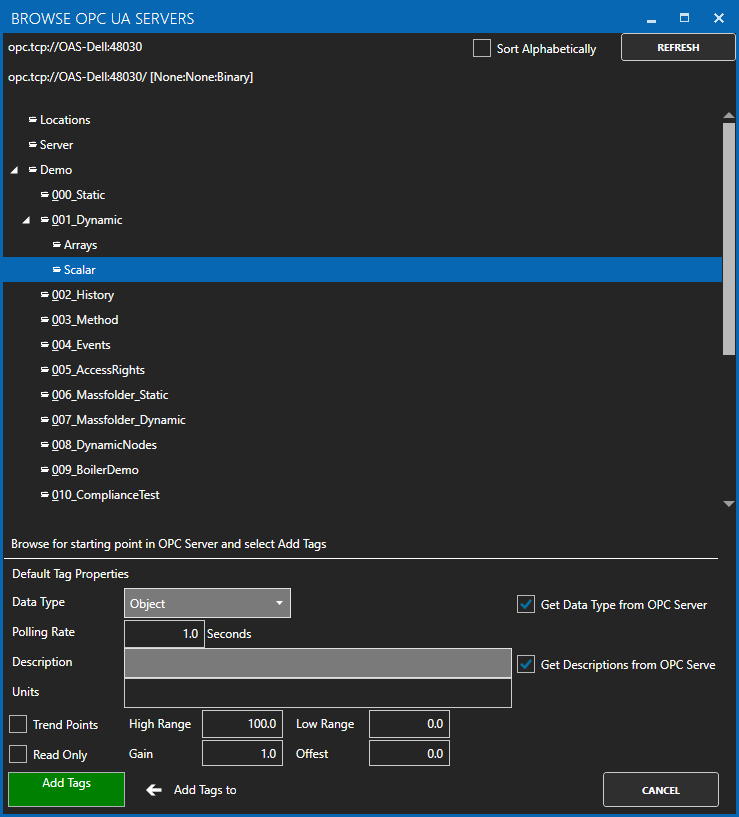
Browse and select the parent folder containing all nodes this parent folder and all sub folders to automatically add.
Select to enable the options to Get Data Type from OPC UA Server and optionally the Descriptions.
Select the green Add Tags button in the lower left to all all nodes in this selected folder and all of its sub folders.
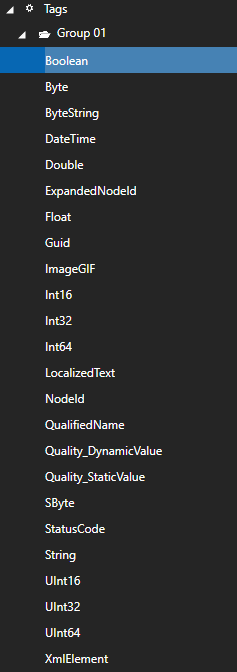
Optionally delete Tags and Groups you do not want to be included in the configuration that have been imported. Select the Save button on the toolbar at the top.
Step 3 – Save OPC UA Tags and Drivers
Select the Save button on the toolbar at the top.
Enter a file name to be saved in C:\ProgramData\OpenAutomationSoftware\ConfigFiles directory on Windows or ConfigFiles subdirectory on Linux.
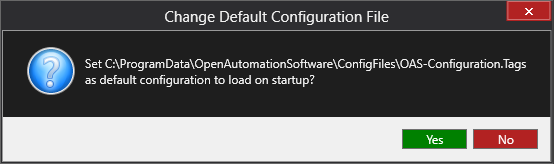
When prompted to set the file as the default configuration to load on startup select Yes.
NOTE: The tags and and drivers are both saved into one file.
Open Automation Software Tags can be defined to connect to Classic OPC Data Access 2.xx and 3.0 Servers with the built in OPC Interface.
View the following video to see how to connect to a classic OPC DA server.
The following steps can be used to setup communications with Classic Data Access OPC Servers.
Step 1 – Configure OPC DA Tags
Start Configure OAS application from the program group Open Automation Software.
Select Configure-Tags.
NOTE: To configure remote OAS Engines enter the IP Address or node name in the Network Node field and click on Select.
Select Add Group to add a group to place tags in.
NOTE: You can add organizational Groups as many levels deep as you prefer and add tags to groups. To do this first add a Group to the root level, then right click on the Group in the right window to add additional Groups or Tags.
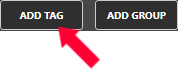
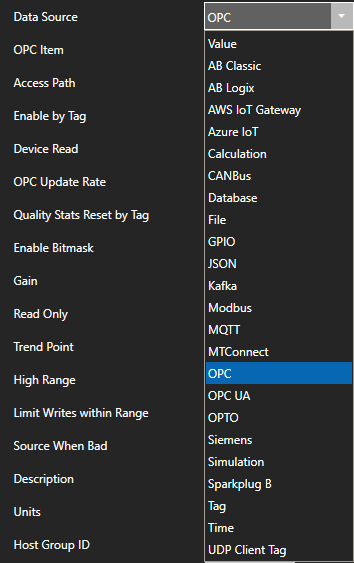
Select Add Tag to add a tag to the group selected.
Change the Data Source Tag property to OPC.
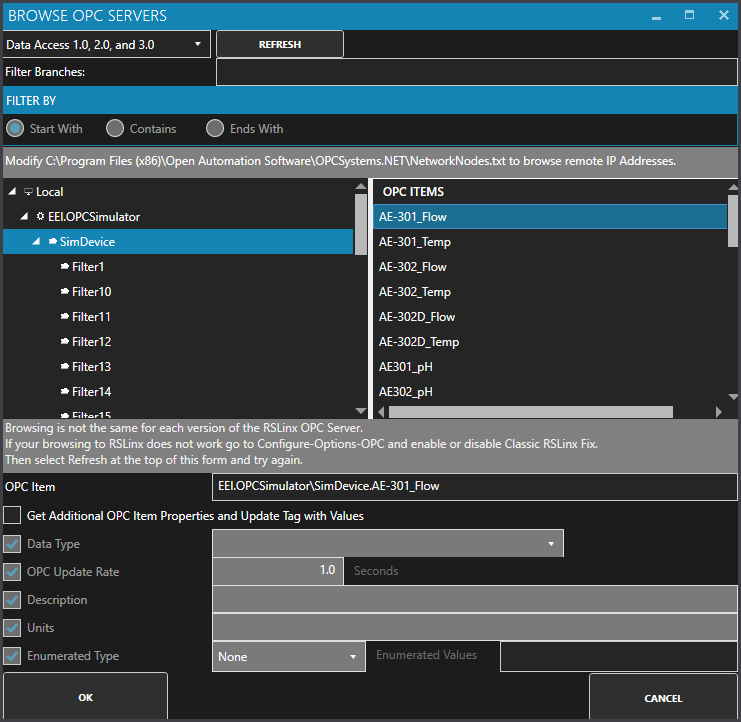
Use the Browse button to the right of the OPC Item to browse OPC Servers for the desired OPC Item.
Select Local, the desired OPC Server, branch within the OPC Server, and OPC Item and click OK.
Note: If you wish to browse remote OPC servers via IP address see Networking OPC Data.
Specify the desired OPC Update Rate for the Tag.
To disable communications to the device you can use Enable by Tag to control when communications is active. Leave this property disabled to establish communications at all times.
The Device Read property can be used to disable continuous polling and request data on event from the transition from false to true of a value of a Boolean tag. Leave this property disabled to establish communications at all times.
Select Apply Changes in the lower right to activate the communications for the OPC Item.
The value from OPC Server for the OPC Item selected will appear in the current Value field.
To define multiple tags use one of the following optional methods.
Use One Click OPC to automatically create tags from all OPC Items from a selected OPC Server or branch within an OPC Server. Then selectively delete the groups and tags that are not required.
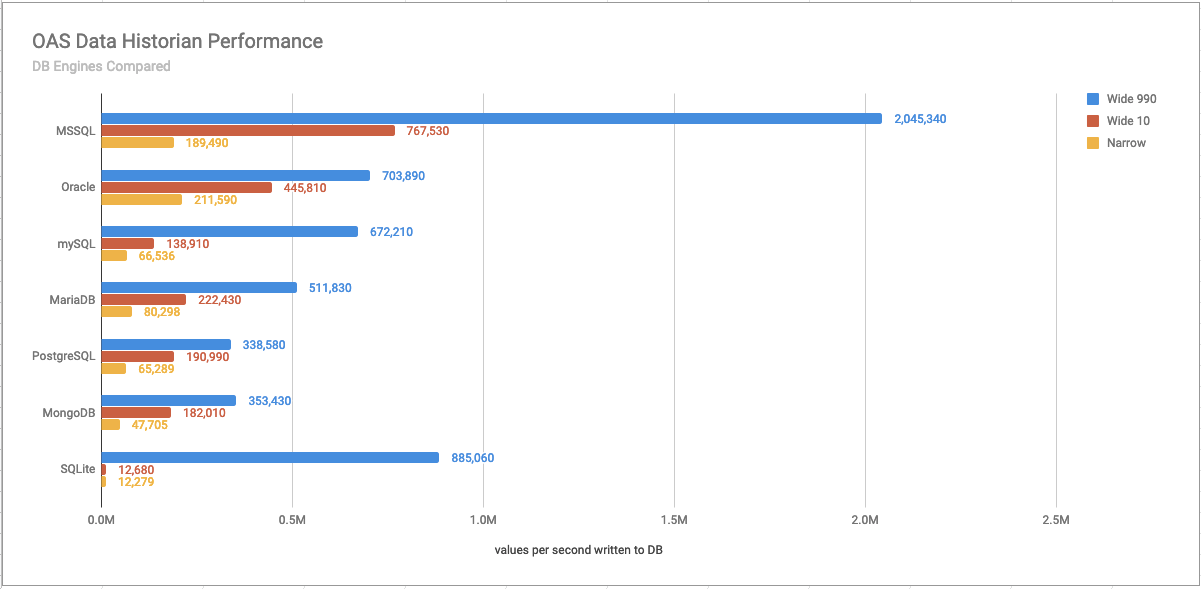
In an effort to help you decide which database engine to choose in your implementation, and how you can boost performance with an existing OAS configuration, we’ve performed extensive testing. On each of the database engines listed, we configured our Data Historian to log Tag Data in 3 different ways.
Narrow
In this configuration, a single value is written per table along with a timestamp for the logged value. This means each OAS Tag logged will result in a single database table.
Wide 10
Each table contains 10 OAS Tags arranged in a single row for each given timestamp. In this test we logged 10 OAS Tag values in a single table.
Wide 990
Using the same configuration as Wide 10, but logging 990 OAS Tags per timestamp.
Conclusions
From our testing, we’ve determined that the fastest overall DB engine is Microsoft SQL Server, even though it performed only slightly slower in the Narrow table test than the next fastest engine Oracle. But because of its dramatically superior performance in all other tests (>2M values per second!), we recommend using MS SQL Server for data logging where possible. Oracle and mySQL are the next fastest engines, and have similar performance numbers to each other, but are also extremely quick when using a Wide logging format.
Efficiency is boosted with logging multiple values per table in the Wide formats, and the fastest speeds can be achieved when increasing the number of values per record. Yet, because we log to an open format, you can still perform post-processing or data archiving that transforms this wide format into a normalized configuration for your own internal usage, while still getting the benefits of high-speed logging.