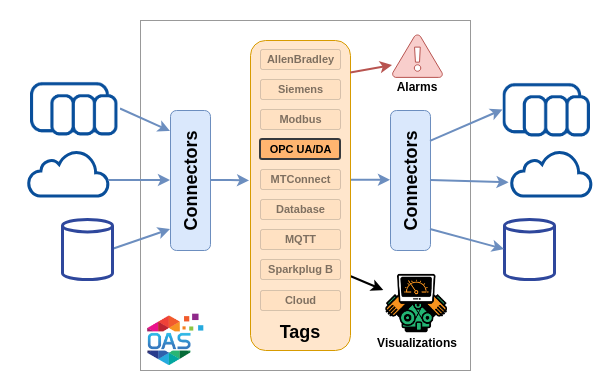
Getting Started – OPC Client

View the video demonstrating the OPC Client .NET feature for OPC DA.

Step 1 – Check OPC Client License

OAS

After installing Open Automation Software verify you have a license of OPC Client on all OAS Engines that you want to interface with.

Start Configure OAS application from the program group Open Automation Software.

Use the Configure OAS application and go to Configure-License.

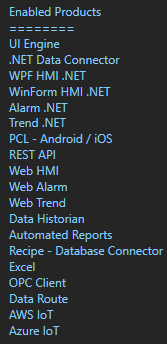
Check all OAS Engines that the OPC Client product appears in the Enabled Products list.

Enabled Products

Step 2 – Installation and Setup

From each system with a Classic OPC DA Client, install either the full installation of Open Automation Software or the Custom installation with OPC Client Connector – OPCClient.NET. The Classic OPC DA OPC Server OPCSystems.NET requires the .NET Framework 3.5 to be installed in the operating system before installation.

NOTE: When networking third-party OPC Clients to remote OAS Services, always install the OPCSystems.NET OPC Server on the same computers as the OPC Client. You will not need a license on the OPC Client PCs, just where the data source is located with the OAS Engines.

Security Setup

In order to browse and access OAS tags from OAS Engines that have security enabled modify the file DANSrv.exe.config in the installation directory of OAS, typically C:\Program Files\Open Automation Software\OAS\.

Set both the UserName and Password within the file that would provide access to browse tags, read tags, and write tags.

<add key=”UserName” value=””/>
<add key=”Password” value=””/>

Variable Browsing

To browse all 800+ variables of each tag set ValueOnlyBrowsing to False in the DANSrv.exe.config file.

Leave this settings as True to browse only the Value of each tag. (Recommended)

<add key=”ValueOnlyBrowsing” value=”True”/>

Network Setup

If the OPC Client is on a different computer than the OAS Service you are connecting to modify the file NetworkNodes.txt in C:\Program Files\Open Automation Software\OAS\ and add each IP Address, Network Node Name, or registered Domain Name you want to connect to the NetworkNodes.txt file.

Step 3 – Connect OPC Client

OAS is now ready to interface with a third-party OPC Client. In this example we will use the OPC Foundation Sample found under the program group Open Automation Software -Tools.

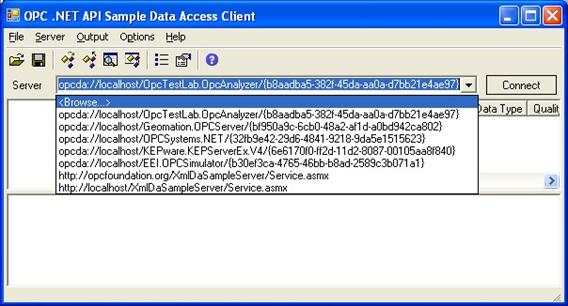
From the Server pull down list select Browse.

Getting Started-OPC Client 435

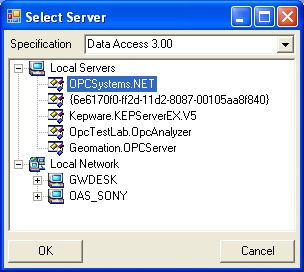
Select the local OPC Server OPCSystems.NET.

Getting Started-OPC Client 436

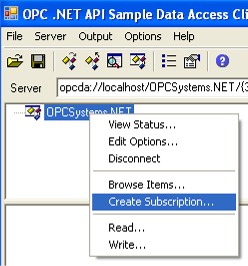
Create a group subscription by right clicking on the OPCSystems.NET OPC Server.

Getting Started-OPC Client 437

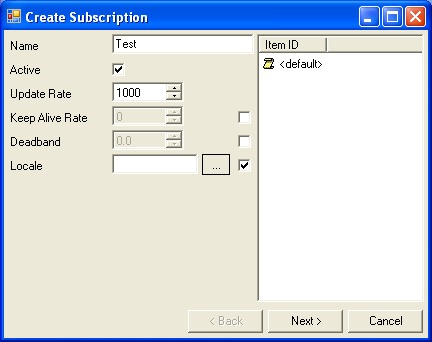
Enter a Name for the subscription and select Next.

Getting Started-OPC Client 438

Step 4 – Browse OAS Tags

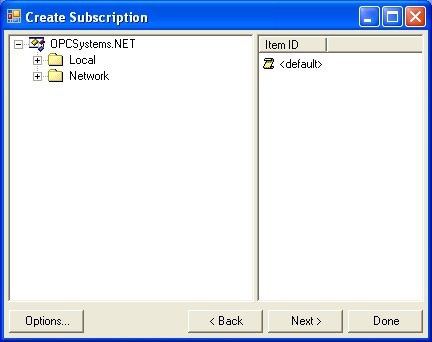
Browse either the Local service or a remote service under the Network branch.

Getting Started-OPC Client 439

Remote OPC Items use the following syntax for the remote OPC Item.

Network.<IP Address, domain name, or network node name>.Tag.Value.

Example: Network.192.168.0.1.Tag.Value.

NOTE: To browse remote OAS Engines modify the file NetworkNodes.txt as described in Step 1.

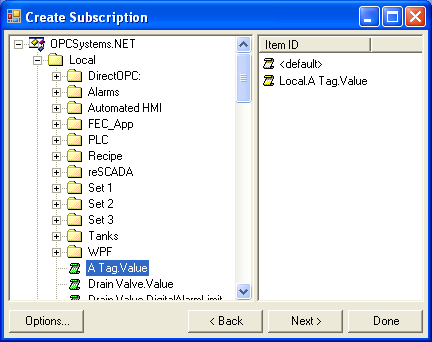
Browse for your OPC Item to add and double click on it.

Getting Started-OPC Client 440

Here you will see both Open Automation Software tags in the service you are browsing. DCOM is not used in remote connections. Networking is over TCP port 58727 and this port number is adjustable in the OAS Engine under Configure-Options-Networking and set in the DANSrv.exe.config file for each OPCSystems.NET OPC Server deployment.

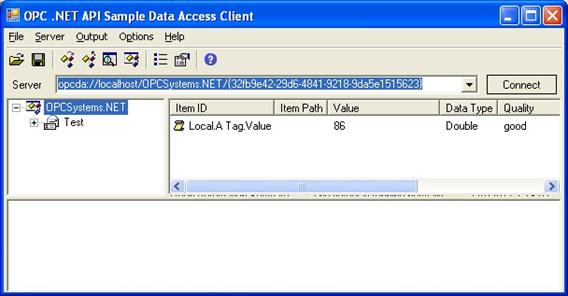
Select Next and then Done and the value of the remote item will appear.

Getting Started-OPC Client 441

Overview – 3rd Party OPC Client

The OPC Client Connector product enabled unlimited local and remote OPC Clients to communicate with a licensed OAS Engine. This design allows unlimited OPC Client connections while maintaining only one OPC connection to the local OPC Servers.  This is true for both OPC UA and OPC DA Clients.

All data sources of OAS support read and write access from Classic OPC DA Clients and OPC UA Clients.

This includes but is not limited to the following:

Networking to remote OAS Engines is also supported.

Any Open Automation Software Tag can be accessed by the Open Automation Software OPC Server. Each licensed Open Automation Software Service provides up to 10,000 OPC DA Client connections through up to 10,000 OPCSystems.NET OPC Servers.  The maximum number of OPC UA Client connections to each OAS OPC UA Server is 1,000.  Each OAS Engine can also connect to up to 10,000 from each OPC UA Client with built in networking.

Each Tag supports over 800 variables for access from OPC Clients, .Value is the most commonly used.

OPC DA

Classic OPC DA Client communications is provided by installing the OPCSystems.NET OPC Server on every system that has an OPC Client. The OPC Client connection is local to the OPCSystems.NET OPC Server, the OPC Server uses TCP communications to obtain an asynchronous connection with all licensed Open Automation Software Services.

For information on how to interface OPC DA Clients with OAS data, visit Getting Started – OPC DA Client.

OPC UA

Connections for OPC UA Clients is built into the OAS Engine to the endpoint opc.tcp://<Network Node>:58728.  An example opc.tcp://localhost:58728.  The port number is adjustable.

For information on how to interface OPC UA Clients with OAS data, visit Getting Started – OPC UA Client.

Frequently Asked Questions – Data Route

Do I need Data Route to write to OPC Servers?
No, the products WinForm HMI, Web HMI, WPF HMI, .NET Data Connector, Recipe Connector, and Excel Connector will all have the ability on their own to write to OPC Servers when a write occurs. The Data Source of the Tag will determine where the value will be written.
Can Data Route be used to transfer data over the Internet?
Yes, by installing the OAS Service at the data source and the destination the values can be setup to automatically transfer remotely.  At the destination set the Data Source of the Value as Tag and set define the data source tag Value, then in the Target tab defines either a local OPC Item or a local or remote Open Automation Software Tag if using a Driver Interface Tag as a destination.
Do I need a license of Data Route on the source and destination?
If transferring values directly to OPC Items, yes. If transferring values to remote Open Automation Software tags you only need a license on the source where the Target is being defined.
Can I use Data Route to transfer data from PLC to other PLCs without using OPC?
Yes, the following Driver Interfaces are incorporated directly into Open Automation Software:

Videos – Data Route

View the following video presentation on how to setup automated data transfer using the OAS Data Route feature.

Data Route

Transfer Industry 4.0 data automatically from one data source to another on-premise or over the Internet.

Tag to Tag Data Route

How to setup automatic data transfer from a Tag value to any other local or remote Tag , OPC Server, MQTT Broker, or Azure IoT Data Hub of Edge device locally or over on your LAN, WAN, and Internet.

Multiple Tag Data Route

Multiple Tag Data Route triggered from event, continuously, or from data change using fixed or dynamic values and optional time delay.

IoT Tag Publish

Tag Publish feature to Kafka Brokers, MQTT Brokers, Azure IoT, and AWS IoT Gateway.

Getting Started – Data Route

Use OAS Data Route when you need to transfer data from one OAS Tag value to another Tag, OAS Tag value or fixed value to many OAS Tags, or IoT Tag Publish to MQTT Broker, Azure IoT Data Hub, Azure Event Hubs, AWS IoT Gateway, or Kafka broker. The source tags Tags can be local or remote.  When a Tag is set as a Destination values will be written to the Data Source defined in that Tag, examples Modbus, Allen Bradley PLCs, Siemens S7 Controller, OPC UA and OPC DA servers, etc.

There are 3 methods for automated data transfer that is supported by the Data Route feature of OAS.

  • Tag to Tag transfer is implemented by defining a Target in a source tag
  • Multiple Tags transfer is implemented in a Data Route Configuration initiated by event trigger, data change, or continuously at a specified rate.  Each Data Route group configuration provides mapping to set multiple tags from a fixed value or value from another tag with optional time delay
  • IoT Tag Publish to AWS, Azure IoT, Azure Event Hubs, MQTT, and Kafka defined directly in the respective driver interface.

Overview – Data Route

In the OAS Platform, Tags can be configured with a Data Source parameter to read data from and write data to devices, other Tags, a calculation or other sources. Each Tag can only have one Data Source. This ensures the one-to-one relationship between the data source and its representation as a Tag. The Value parameter of the Tag will, and should, always match the latest state of its Data Source, or at least the last known source value.

However, there are situations where we want to have a Tag with one Data Source for reading data, but then also write this data to another Data Source type. For example, we might want to convert Modbus to Allen Bradley or read a Database Tag and write this using Siemens. We might even want to create a Modbus RTU to TCP bridge or create some intermediate Calculation Tags to do data processing and conversion. As mentioned previously, we can’t create one Tag to represent two Data Sources. We could create two Tags, one to represent the data being read and the other to represent the data being written, but then how do we make one Tag write to the other Tag?

This is where the Data Route feature comes in. The Data Route feature allows you to independently configure Tag-to-Tag targets and multi-Tag-to-Tag rules for the purpose of copying data between two tags. This is the perfect solution for moving data between Tags and it can be used to move data between Tags on the same OAS instance or to move data between local Tags and Tags on a remote OAS instance. As already alluded to before, the Data Route feature is great for protocol conversion, moving data between OT and IT networks using triggering rules, dynamically controlling data flow and creating redundancy architectures.

Data Route Types

There are three different types of Data Route configurations that you can use. Let’s look at a high level overview of each. You can follow the links in each section to go into more detail.

Tag-to-Tag

The Tag-to-Tag Data Route is applied at the individual Tag level. It allows you to point a Tag to any other local or remote Tag. A Tag can only have one Data Route target Tag. This type of Data Route is good for simple requirements where you just need to copy one or more Tag to another set of Tags with a one-to-one relationship. Any data writes on the source Tag will be written to the target Tag.

👉 To find out more: Tag to Tag – Data Route 🔗

Multiple Tags

The Multiple Tags Data Route allows you to create groups of Tag-to-Tag or source-destination pairs. Unlike the Tag-to-Tag method, which is applied at the individual Tag level, the Multiple Tags method is an independent configuration construct where individual Tag source-destination pairs are grouped together into Routes. Each route can be dynamically enabled or disabled by using the state of another tag and the trigger for copying data can be chosen based on your requirements. For example, you can have a Route that continuously copies data at a given rate, or one that copies data based on a rising or falling trigger, or one that copies data only if the source or destination changes. This is much more powerful than the Tag-to-Tag method and opens the door to many different use cases.

👉 To find out more: Multiple Tags – Data Route 🔗

IoT Publish

The IoT Publish method is a method that is defined at the driver level. As the name suggests, it applies to the message based IoT protocols such as MQTT, AWS IoT, Azure IoT and Kafka. Each of these drivers allows you to select a list of tags that should be monitored and published based on a configurable trigger condition. This method allows you to publish Tags to Cloud providers without having to create a second set of Tags. It is great for creating a bridge between protocols such as Modbus, OPC UA/DA, Siemens, Allen Bradley and MT Connect and Cloud providers such as AWS, Azure or other internal or third party systems that use MQTT or Kafka brokers.

👉 To find out more: IoT Publish – Data Route 🔗

FAQs – Excel

Can you access data over the Internet in a local Excel Spreadsheet?
Yes, for both reading and writing.  View the following networking video on how to network to remote data services: Easy Networking How to network all products to central service using a fixed IP Address or registered domain name for the Internet.
Can you protect remote data from being accessed from unauthorized use?
Yes, refer to the following Security video on how to setup user security. With the Excel Workbook use the OAS Excel Wizard with the Security option to add a security login function.  This is shown in Step 12 of the Excel - Getting Started section. Security Setup How to setup security for Open Automation Software in the service and in client applications.
Do I need a license for each remote Excel Workbook?
No, Open Automation Software is server based licensing and all licensing is enabled as the service to allow local and remote access for the number of concurrent licensed users activated.
I am running Microsoft Excel 2010, and I cannot get my data into the Excel Workbook.
Download the following Microsoft Hotfix for Excel 2010. https://support.microsoft.com/en-us/kb/2405840
What is the proper syntax for an RTD formula?
Use the OAS Excel Wizard found under the program group Open Automation Software. The following article describes RTD formulas in general: https://support.microsoft.com/en-us/kb/289150

Videos – Excel

Excel Connector

Read and write live data access for local and remote Excel workbooks.

Microsoft Excel

How to connect Microsoft Excel to any data source and share data with any product with local and remote Excel Workbooks.

Getting Started – Excel

Follow the steps below for a simple setup for read and write functions in Microsoft Excel or view the following video.

  • 00:00 – Introduction
  • 00:08 – Setting OAS Connector
  • 00:15 – Excel Configuration
  • 02:14 – OAS Excel Tag Browser configuration
  • 02:57 – Excel Formulas
  • 03:50 – Excel ThrottleInterval
  • 04:57 – Tag Browser
  • 05:12 – How to write to a tag from Excel
  • 06:19 – Tags Configuration
  • 06:46 – Security Enable
  • 07:30 – Deploy Excel
  • 07:57 – Further Questions

These steps can be followed after downloading and installing OAS from the Support-Downloads page.

Step 1

Add the OASExcel Add-In to the operating systems Excel Add-Ins.  You will only need to do this once on the operating system where the Excel Workbooks will be used.

You will first need to download the OASExcel Add-Ins from here: Download the Excel Add-Ins.

Right click on the zip file that you have downloaded. Check the Unblock checkbox for security as shown below.  Click Apply.
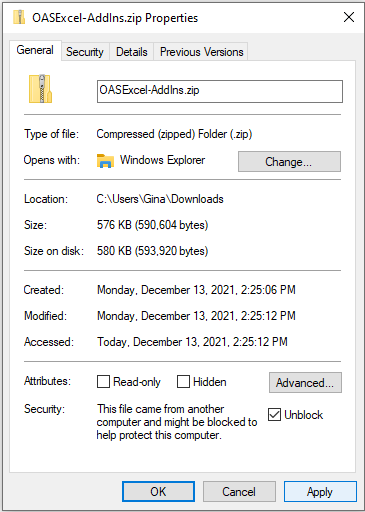
Excel Add-In

Unzip and place the files in any directory you choose except for the OAS installation directory.

Start Microsoft Excel. and open an existing Workbook or new Workbook.

Select File-Options to open the Excel Options window.
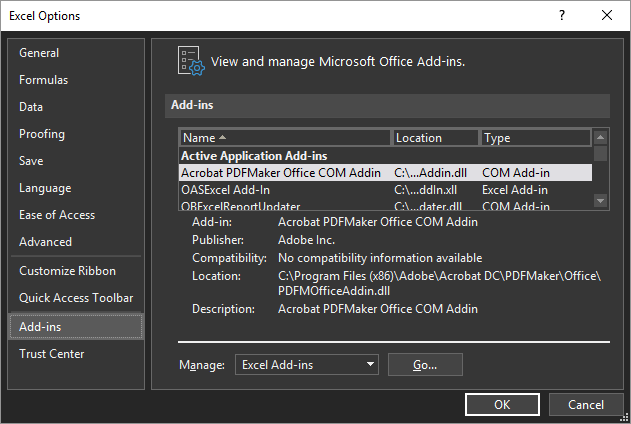
Select Add-ins in the lower left and then the Go… button to the right of Manage Excel Add-ins.
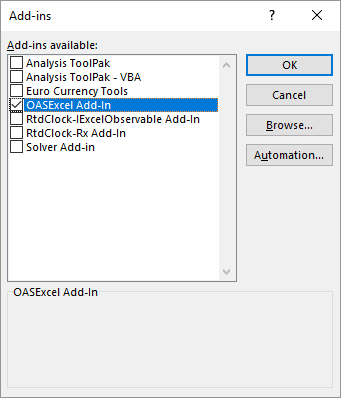
Select the Browse button and browse to the directory where you have placed the files to select OASExcel-AddIn.xll for 32 bit version of Excel or OASExcel-AddIn64.xll for 64 bit version of Excel and click OK.

You may need to: change some setting in your Trust Center configuration if you are having issues.

  1. Choose Options from the File menu. Choose Trust Center from the left menu, then click the Trust Center Settings button. Uncheck the top box for Require Application Add-ins to be signed by the Trusted Publisher.
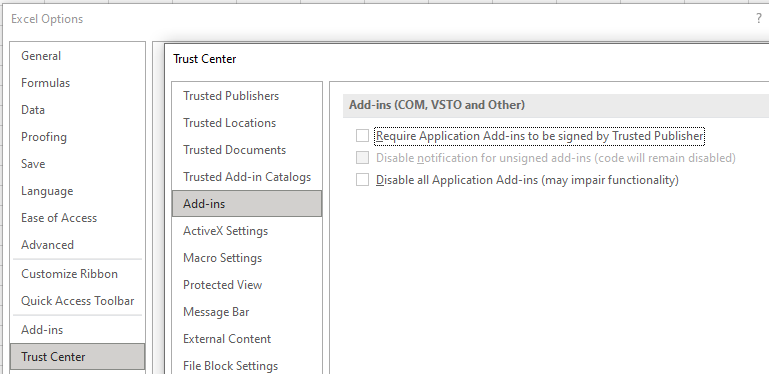
  2. Choose Trusted Locations from the left menu of the popup. Click the Add New Location button.  Enter C:\Program Files\Open Automation Software\OAS\ and also check the box for Subfolders of this location are also trusted.   Click Ok three times to exit popup.

Note: If you are uncertain which version of Excel you are running select File-Account and select the button labeled About Excel and you see either 32-bit or 64-bit at the top.  Also if the OASExcel formulas do not appear in the next steps you most likely need to select the alternative xll file.

You are now ready to use the OASExcel formulas to read and write tag values to any local or remote OAS Engine with a license of OAS Excel.

The Excel ThrottleInterval by default runs at 2 seconds in Excel.  We recommend to change this default ThrottleInterval.

Copied from https://news.cqg.com/blogs/2011/04/adjusting-rtd-interval-throttle-microsoft-excel

  1. In Excel, go to the Visual Basic Editor by pressing ALT + F11.
  2. On the Immediate Window at the bottom of the display, type this code:
    Application.RTD.ThrottleInterval=0
    (Note: If the Immediate Window is not open, press CTRL + G to display the window.)
  3. Make sure your cursor is on the line that you just typed and then press ENTER.
  4. To verify that it is set correctly, type this line of code on the Immediate Window:
    ? Application.RTD.ThrottleInterval
  5. Make sure your cursor is at the end of this line and then press ENTER. The window should display 0; then you know that your throttle interval is set correctly.
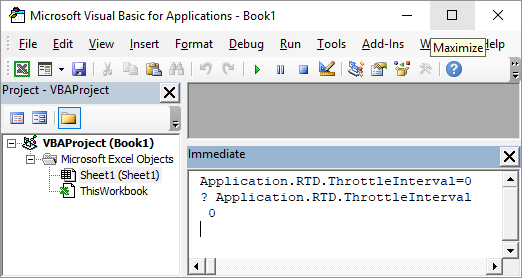
With the ThrottleInterval now set to 0 you will be able to achieve 30 millisecond updates from the OAS Engine.  You will only need to perform this once on the operating system.

Step 2

Use the OAS Excel Tag browse application to define read formulas to local and remote OAS Tags.

Start the OAS Excel tag browse application from the program group Open Automation Software.
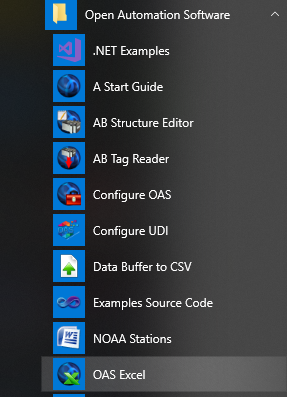
Select your Network Node in the Browse Tags window.  Then use the Tags Tree to select desired Tag and Variable.

If the Workbook will be deployed to a remote computer or the OAS Engine resides on another computer enter the IP Address, registered domain name, or network node name of the remote OAS Engine where the tag resides to read or write to and click on Select.  If self hosting OAS using Live Data Cloud networking select the Live Data Cloud node as well.

Value is the most commonly used Variable.  See Tag Variables for a complete list of all variables possible.

Local Tag

myGroup.myTag.Value

Basic Networking

\\192.168.0.1\myGroup.myTag.Value

Live Data Cloud Networking from local OAS Engine

RemoteSCADAHosting.myLiveDataCloudNode.myGroup.myTag.Value

Live Data Cloud Networking though remote OAS Engine

\\192.168.0.1\RemoteSCADAHosting.myLiveDataCloudNode.myGroup.myTag.Value

If on the same computer leave Network Node as localhost and click on Select.

A list of tags from the remote service will appear.
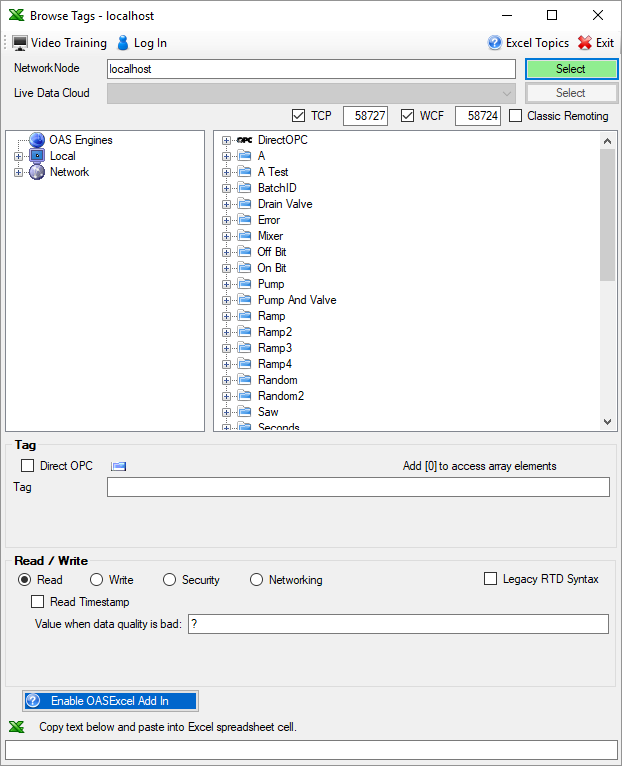
Select a tag you want to read or write to from the tag list.  In this example we will use OASRead function to read a tag Value.
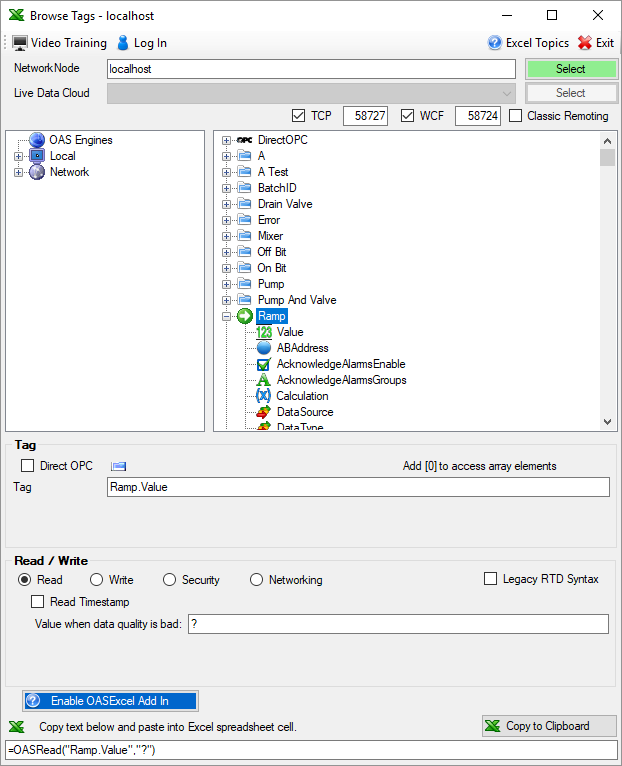
Notice that the formula =OASRead(“Ramp.Value”,”?”) appears at the bottom of the window.

Copy this formula and paste into a Cell in Excel to read a value continuously from the local or remote OAS Engine.

The value will appear if the local or remote tag has good quality.

Use Ramp2 tag as a simulated value that changes every 100 milliseconds or any other tag you like that is changing faster than 1 second to check the ThrottleInterval.

=OASRead(“Ramp2.Value”,”?”)

Step 3

Optionally write to OAS Tags from Excel.

If you want to write to an OAS Tag go back to the OAS Excel Tag browse application and select the local or remote tag you want to write to and select the Write radio button.  Enter either a fixed value in the Value to write field or enter a Cell location in the Data source cell location field.  In this example we will write the value from cell A1 to the tag Write Float.Value.
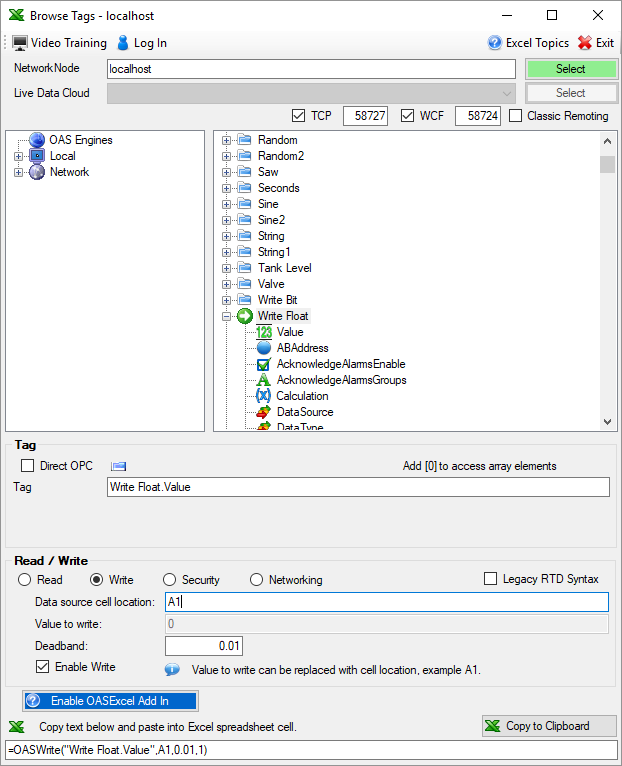
Note: You can specify a deadband value that will disable the write if the value read back is within the range specified.  This is useful when writing to single or double float values within a controller.  You can also use the last parameter of the OASWrite formula to enable or disable the write entirely.  This is useful to have all of the values preset in the workbook before writing the values to a controller, OPC Server, or other data source.

Copy the formula and paste into a Cell in Excel.  In this example it will be place in Cell B2.
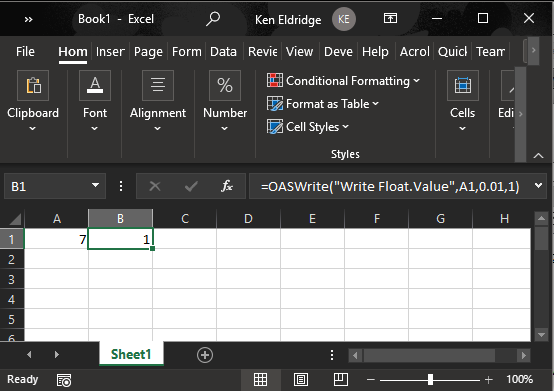
The OASWrite function automatically reads the OAS Tag value to determine if there is success in writing the value with full confirmation coming back from the Data Source of the Tag.

Following are the return values from the OASWrite function.

0 – Disabled
1 – Equal
2 – Value is being written
3 – Bad quality
4 – Cannot type cast value
5 – Unknown value to type cast

If the source value matches the value to be written a return value will be 1.

Step 4

Implement security login

If the service you are connected to has Security enabled for reading or writing to tags you can specify the Security option in the OAS Excel tag browser and specify the User Name and Password for the Log In option.
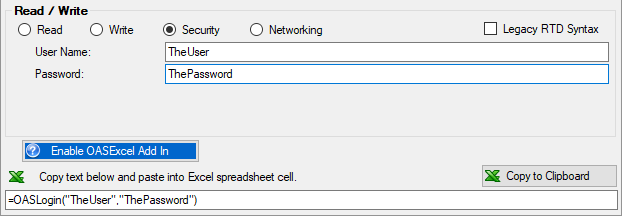
=OASLogin(“TheUser”,”ThePassword”)

The User Name and Password can come from other cells that can be made hidden in the Excel Workbook if you like.  In the following example the username and password would come from cells B10 and B11.

=OASLogin(B10,B11)

Step 5

Save the Excel Workbook.  Open anytime in the future and the read and write functions will perform.

Step 6

If you plan to run the Workbook on a different PC than the OAS Service include the Network Node Name, IP Address, or registered Internet domain name in the tag path.

Tag:

\\www.opcsystems.com\Ramp.Value

Formula:

=OASRead(“\\www.opcsystems.com\Ramp.Value”,”?”)

To run the Workbook remotely you will need to repeat the steps to copy the files from the OAS Excel Add-In download Step 1 above to register the OASExcel-AddIn on that PC.

You only need a license of OAS Excel Connector on the data source PC where the OAS Service is running so you can run the Excel Workbooks remotely with an OAS Network License.

Excel

The OAS Excel Connector product provides connectivity to Microsoft Excel Workbooks for both read and write functionality.

It is deployed as an Excel Add-In and easy to register following the Getting Started Excel page.

The OAS Excel Connector can achieve data update rates into Excel at 30 milliseconds for multiple tag values in the same or different Worksheets and Workbooks.

OAS Excel Connector can interface with all versions of Microsoft Excel from 2003 and up.  The latest version at the time of this posting is Excel 2019.

Use the OAS Excel wizard application to define the formulas to paste into any cell.  Select Start-All Programs-OAS Excel.

Each licensed service for OAS Excel Connector can support unlimited local and remote Excel Workbooks. You can even have Excel Workbooks access data from PLCs, controllers, OPC UA Servers, and OPC Classic Servers over the Internet. All other data sources with their respective product features are also supported like MQTT, Azure IoT, AWS IoT, OPC Clients, databases, REST API, and .NET applications.