
Getting Started with oBIX
This page takes an oBIX connection from nothing to tags reading points. It uses the oBIX server built into the OAS engine as the server, so that there is no station to set up. A Niagara station or any other oBIX server differs only in its Lobby URL and credentials.
Info
oBIX is a licensed option, on OAS 22.2.0.3 or later. Open Configure OAS and check that oBIX appears in the licensed drivers list.
Before you start
The guide reads from the OAS engine's own oBIX server. Select Options in the sidebar, open the oBIX Server section and check that Enable is on and the status panel shows the server running on HTTP port 58740. If it is off, turn it on and click on the Apply changes button. The oBIX Server page covers each option.
The driver signs in to the server with a user name and password. The OAS oBIX server checks them against the OAS users, so use an OAS user whose security group can browse and read tags.
Configure the oBIX driver
In the following steps you will create and configure an oBIX driver interface that connects to the server's Lobby.
Select Drivers in the sidebar.
Click + Add, enter a meaningful Name for this driver interface instance (for example oBIX Station), and click Create. Once created, the driver interface name should appear in the list of drivers.
Ensure the following parameters are configured:
- Driver: oBIX
- Lobby URL: http://localhost:58740/obix/
- User Name and Password: an OAS user that can read tags
- Timeout: 5000 Milliseconds
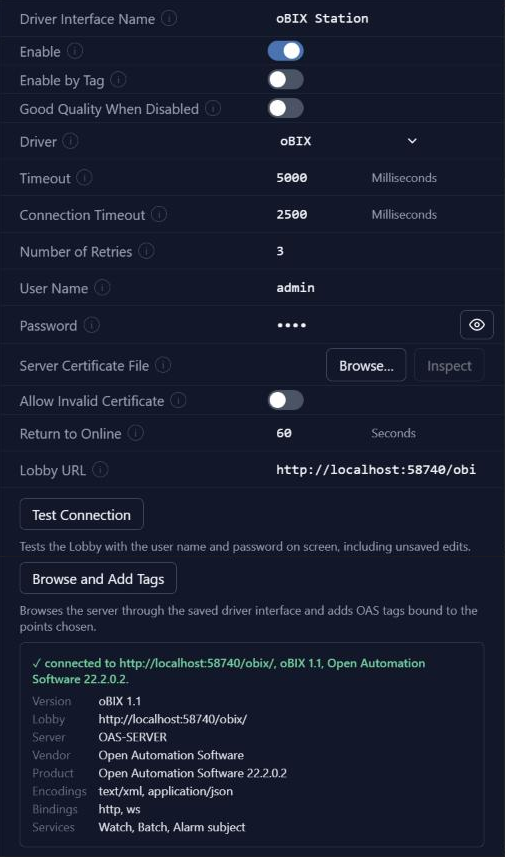
The default Timeout is 1000 milliseconds. A remote station, and the first read of a large watch, usually needs 5000 or more. Each field is listed under Connection.
Tips
An
httpLobby URL works, but the user name, password and values travel in clear text and a warning is logged. Use the server'shttpsLobby URL wherever the server offers one. If the server has a self-signed certificate, set Server Certificate File to it rather than turning on Allow Invalid Certificate.Click on Test Connection. It tests the Lobby with the user name and password on screen, including unsaved edits, and lists what the server offers: the oBIX version, vendor and product, and the encodings, bindings and services it supports. A green tick shows the connection worked.
Leave the oBIX settings below the connection at their defaults. oBIX Version, Encoding and Read Mode set to Auto take what the Lobby offers. See oBIX settings.
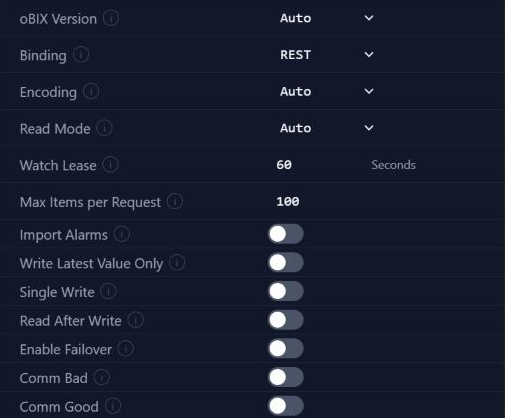
Turn on Enable and click on the Apply changes button. The driver interface is not active until it is enabled and the changes are applied.
Import points as tags
Browse and Add Tags browses the server through the saved driver interface and adds OAS tags bound to the points you choose. Apply the driver interface first, as in the previous section.
In the Drivers screen, select the oBIX driver interface and click on Browse and Add Tags. The One Click Import window opens on the server's tree.
Expand the tree to the points you want. On the OAS oBIX server, the tags are under tags. Check each point to add it, or click Find points on an object to list the points below it, to the Depth set at the top. Find points below the Lobby searches the whole server.
The points you check are listed under chosen. Each row shows the Tag that will be made, the Point it reads and its Kind. Edit a name in the Tag column to change it.
Enter a Group for the new tags (for example oBIX), or leave it blank to make them at the top. Turn on Status tags to also make a String tag holding each point's oBIX status, named after the point's tag with
_Status.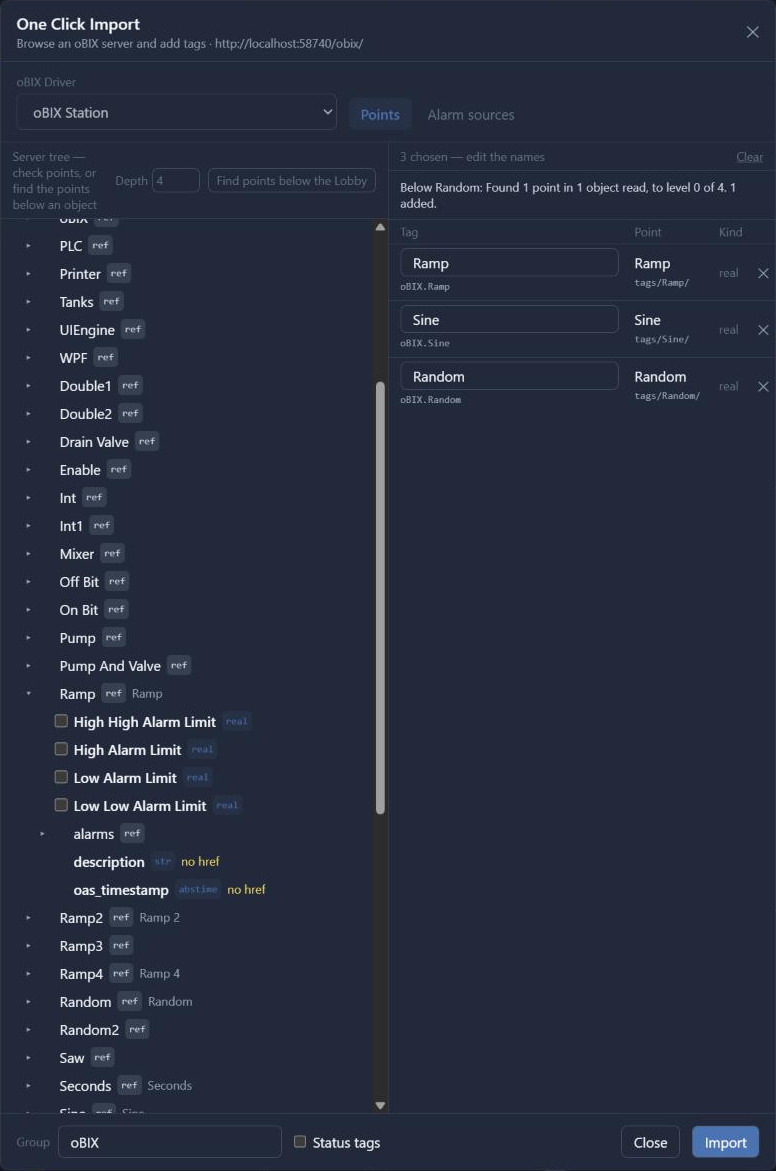
Click on Import. The window reports how many tags it made, added and updated. Click on Close.
Check the tag values
Select Tags in the sidebar, open the group you imported into and select one of the new tags.
Check that its quality is Good and its value follows the point on the server. A point the server reports as fault, down or disabled reads Bad. The import has set:
- Data Source: oBIX
- Select Driver Interface: oBIX Station
- Href: the point, relative to the Lobby (for example tags/Ramp/)
- Field: Value
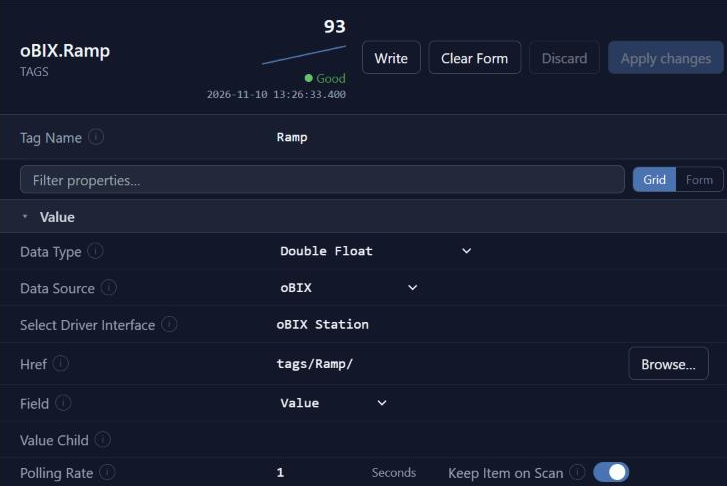
To point a tag at another object, click the Browse... button beside Href, select the object in the Browse for oBIX object window and click on Use this object.
Value Child names the child that holds the value when the object is not itself a value, as on Niagara points, where it is
out. It defaults tooutand is blank on the tags imported from the OAS server, whose points are values themselves. Each tag property is listed under Tag properties.
Write to a point
A write to an oBIX tag goes back to its point. With Write Method at Auto, the driver uses the point's writePoint operation when it is a writable point, and otherwise a PUT of the value when the object is writable.
The OAS oBIX server refuses writes until Allow Writes is turned on under Options, and even then a write needs the write permission of the user's security group. A Niagara station decides with its own permissions. To write through a named operation such as Niagara's override, set Write Method to Operation and name it in Write Operation. See Tag properties.
Import alarms
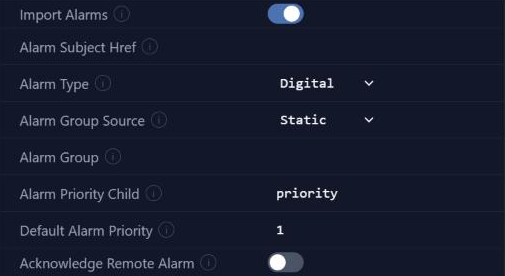
To merge the server's alarms into the OAS real-time alarms, turn on Import Alarms on the driver interface and click on the Apply changes button. The alarm fields appear below it; their defaults import every alarm of the first alarm subject the driver finds.
Warning
Do not import the alarms of the engine's own oBIX server into the same engine. Every OAS alarm would come back as a second, merged alarm.
The Alarm sources tab of One Click Import lists the sources the driver has seen alarms from, and makes each one an AlarmRecord tag. Each field is listed under Alarms.
Save the configuration
Apply changes updates the running configuration; it does not write it to disk. Click Save to write the tag configuration file, and set it as the default under Options so that it loads again when the service restarts.
Where next
- Config Reference - every parameter on the driver and on an oBIX tag.
- oBIX Server - serving OAS tags, alarms and histories to oBIX clients.