The OAS REST API is a programmatic interface that allows you to read and write Allen Bradley data via JSON over HTTP. This tutorial walks you through downloading and installing OAS, configuring an Allen Bradley driver, configuring tags and using the REST API to transfer your Allen Bradley Data. We will build a sample JavaScript Web Interface to demonstrate reading, writing and displaying Allen Bradley tag data.
Step 1. Download and Install the Open Automation Software and Start the OAS Service
If you have not already done so, you will need to download and install the OAS platform. Fully functional trial versions of the software are available for Windows, Windows IoT Core, Linux, Raspberry Pi and Docker on our downloads page.
On Windows run the downloaded Setup.exe file to install one or more of the Open Automation Software features. Select the default Typical installation if you are not sure what features to use or the Custom installation if you want to save disk space on the target system. When prompted agree to the End User License Agreement to continue the installation.
For more detailed instructions and video tutorials, visit the installation guide for your system:
Windows Installation | Linux Installation | Raspberry Pi Installation | Dockers Installation
The OAS Service Control application will appear when the installation finishes on Windows. Use this application to start the 3 Services. Run the Configure OAS application on Windows and select Configure-Tags; if the first time running, the AdminCreate utility will run to create an Administrator login as shown in Step 1 of Getting Started – Security.
Step 2. Configure Your Allen Bradley Data Source
- First, you will need to open the Configure OAS application from the program group Open Automation Software.
- Select Configure >> License from the top menu and verify that Allen Bradley is one of the available Drivers in the lower left of the form. The demo license will have this by default. If you do not see Allen Bradley available, contact support@openautomationsoftware.com to update your license.
- Select Configure >> Drivers from the top menu.
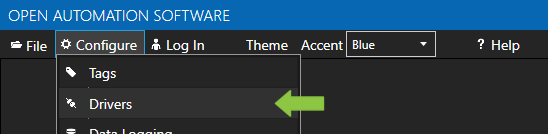
- Select localhost or the remote service you wish to modify with the Select button to the right of the Network Node list.

- The Configure Drivers Screen will appear. Select either AB Classic for MicroLogix, SLC 500, and PLC-5 or AB Logic for ControlLogix, CompactLogix, GuardLogix, and Micro800 from the Driver dropdown box.
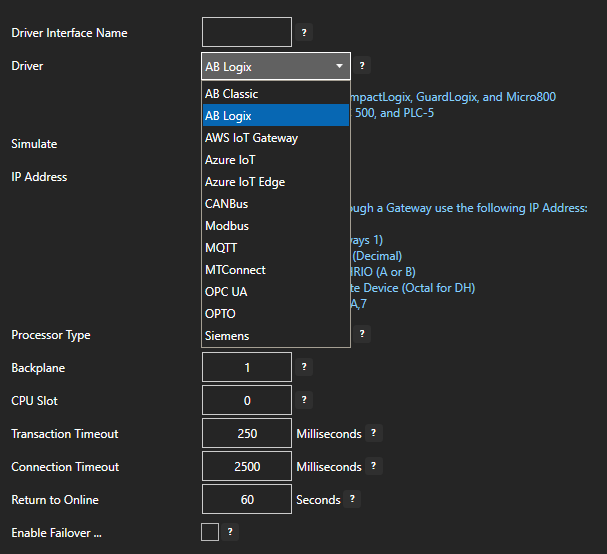
- Enter a meaningful Driver Interface Name that you will refer to this physical connection when defining Tags with an Allen Bradley Data Source.
- Define the properties for the desired physical connection.
- Click the Add Driver button above the Driver list in the left pane to add the Driver Interface as an available selection when defining Tags in the next step.
For more detailed instructions on configuring your Allen Bradley data source, click here to see our Getting Started Allen Bradley tutorial.
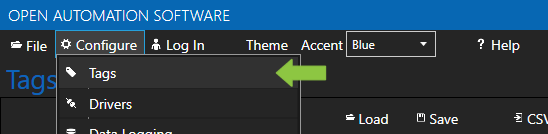
Step 3. Configure Your Tags
OAS provides multiple ways to add and define tags:
- Manually add and define Tags using the Configure OAS application. …learn more…
- CSV Import and Export …learn more…
- Programatically …learn more…
- One Click Allen Bradley …learn more…
- One Click OPC …learn more…
To add a Tag manually:
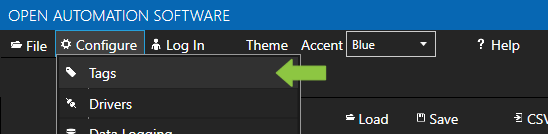
- In the OAS Configure Application, select Configure >> Tags from the top menu.
- Select localhost or the remote service you wish to modify with the Select button to the right of the Network Node list.
- Click on the Add Tag button located at the top of the Tag browser on the left portion of the screen.

- A dialog box will appear. Enter a name for your new tag and click ok.
- A configuration screen will appear for your new tag. Select your data source type in in the Data Source dropdown box.

- Specify the correct data type in the Data Type dropdown box.
- Click Apply Changes at the bottom right of the window.
For more detailed instructions on configuring your tags, click here to see our Getting Started Tags tutorial.
Step 4. Access Data with the OAS REST API

We are going to discuss how to read and write live data with the OAS REST API. The interface below is what we will be building. You can see the live version of it here: http://www.opcweb.com/examples/restexamples/realtimedata.htm.
Getting Started
To use the OAS REST API you must make sure that the OAS HTTP service is listening on the correct port. To do this, open the OAS Configuration application and select Configure > Options, then select the network node (localhost if working on the local machine) and click Select. Under the Networking tab, locate the field for REST API/WebHMI Port Number. The default is 58725 but can be changed. If you are accessing the server from a remote client, you will also need to make sure your machine and/or company firewalls allow TCP traffic on the selected port.
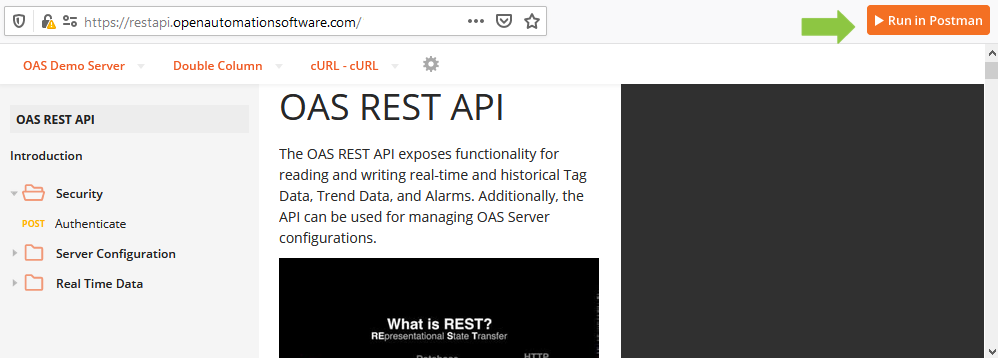
You can find full documentation for the OAS REST API here: https://restapi.openautomationsoftware.com as well as a link to open it in Postman.
Setting up the Page
<!DOCTYPE html>
<html lang="en">
<head>
<meta charset="utf-8"/>
    <title>REST Example | Real Time Data</title>
    <link rel="stylesheet" href="client.css">
    <script src="https://code.jquery.com/jquery-3.1.1.min.js"></script>
    <script type="text/javascript">
Above is the start of the head tag and a link to the jQuery library. We will be using jQuery for this tutorial.
        var networkNode = "http://www.opcweb.com:58725";
        var clientid =  ""; // holds the client id from authorization
        var token =  "";    // holds the token from authorization
        var drawheader = true; // flag for whether the table header needs to be drawn
        var polling = null; // variable for setInterval function
        var pumpval = null; // holds the last pump value
        var currentlist = {
            "tags":[
                {"path": "Pump.Value"},
                {"path": "Ramp.Value"},
                {"path": "Sine.Value"}
            ]
        };
Next we declare some variables that we will use later. The networkNode is the URL for where the OAS Service you are calling is located. The clientid and the token are variables that we will use to hold the authentication credentials that will be returned in our first call. Next, polling is a variable we will use to hold the setInterval function for our repeat calls to the API to get the tag data. The pumpval boolean holds the pump tags value on the page so that we can update it without asking for it’s current value first. The currentlist object starts out with the tag array that we are going to send in the requests to create and update the tag list, we will add to it later.
        // function to clear out variables for a reset
        function clearvariables(){
            delete currentlist.id;
            clearInterval(polling);
            polling = null;
            $('#diverror').empty();
            $('#divtaglistid').empty();
            $('#displaythis').empty();
            $("#createtaglist").prop("value", "Create Tag List");
            $("#dopolling").prop("value", "Start Polling");
        }
The clearvariables() function above does just that. We will call it later in our application to reset our button text and reset our variables when needed.
        // function to display error messages
        function displaymessage(mess, fnc){
            clearInterval(polling); // in the event of an error we stop the polling
            switch(mess) {
                case 401:
                    $('#diverror').html("Authentication required.");
                    break;
                case 404:
                    if((fnc == "delete")||(fnc == "update")){
                        $('#diverror').html("Tag List not found.");
                    }else{
                        $('#diverror').html("404");
                    }
                    break;
                default:
                    $('#diverror').html(mess);
                }
        }
The displaymessage() function is called when our API request returns with an error. It will display the message on the page.
Authenticate
$("#doauth").click(function(){ // click funtion for authenticatation
    clearvariables(); // clear out the old variables, we are starting over
    // api call for authenticatation
    $.ajax({
        url: networkNode + "/OASREST/v2/authenticate",
        type: "POST",
        contentType: "application/json; charset=utf-8",
        crossDomain: true,
        dataType: "json",
        data: '{"username": "", "password": ""}',
        success: function(r) {
            clientid = r.data.clientid; // store the client id for later calls
            token = r.data.token;  // store the token for later calls
            $('#divid').html(clientid); // display the client id
            $('#divtoken').html(token); // display the token
        },
        error: function (e) {
            displaymessage(e.status, "auth"); // in case of error, display the error
        }
    });
});
The first call you will always need to make is to Authenticate. This will create a session and return a clientid and token that you will send in the header of all of your subsequent calls. The API call above is inside of a click function that handles the click event for the Authenticate button. The first thing we do is call the clearvariable() function in case the user has been using the application already. When the session is created it creates a new clientid and token. Anything that may have been done previously on the page will be tied to the old session and no longer be accessible so we clear out the old display as well.
We are using the jQuery ajax() method to send an asynchronous HTTP request to the server. The first parameter url specifies the address we are sending our request to. The networkNode we set above is used here. The Authenticate call is a POST which we specify in the type parameter. Next, contentType: application/json; charset=utf-8 designates the content to be in JSON format, encoded in the UTF-8 character encoding. The crossDomain parameter is set to true, allowing us to send our request to a resource that is outside of our own domain. The dataType parameter is set to “json”, letting the server know we expect the response to come back in JSON format. In out data parameter, what we are sending to the server, we have two variables: username and password. In this example, they are empty strings which will allow us to create a session in the default security group. For more information about security groups, see the Getting Started – Security tutorial in our knowledge base.
If we were to run the Authenticate function successfully here is what would be returned:
{
    "status": "OK",
    "data": {
        "clientid": "e90c8ae8-6b12-4690-a02b-f35ad03b3d2d",
        "token": "f16c3098-b295-4572-9a6b-f53ee984d21b"
    },
    "messages": [
        "Default credential provided - access to data and operations may be limited"
    ]
}
In which case, we process the return inside of our success function. We set the clientid page variable to the clientid property of the data object of the return object and the token page variable to the token property. If an error were to be returned, we handle it in our error function where we send the message to the displaymessage() function.
Create and Delete the Tag List
// click function to create or delete tag list
$("#createtaglist").click(function(){
    // if there is no id, create one
    if (!currentlist.id){
        // api call to create the tag list
        $.ajax({
            url: networkNode + "/OASREST/v2/taglists",
            type: "POST",
            contentType: "application/json; charset=utf-8",
            crossDomain: true,
            dataType: "json",
            headers: {"clientid": clientid, "token": token},
            data: JSON.stringify(currentlist),
            success: function(r) {
                currentlist.id = r.data.id;
                $('#diverror').empty();
                $('#divtaglistid').html(currentlist.id);
                $("#createtaglist").prop("value", "Delete Tag List"); // toggle button
            },
            error: function (e) {
                displaymessage(e.status, "create"); // in case of error, display the error
            }
        });
    // if there is an id, delete it
    }else{
        clearInterval(polling); // stop the polling and clear out the variable
        polling = null;
        $("#dopolling").prop("value", "Start Polling"); // toggle polling button
        // api call to delete the tag list
        $.ajax({
            url: networkNode + "/OASREST/v2/taglists/" + currentlist.id,
            type: "DELETE",
            contentType: "application/json; charset=utf-8",
            crossDomain: true,
            dataType: "json",
            headers: {"clientid": clientid, "token": token},
            success: function(r) {
                if(currentlist.tags.some(el => el.path === "Random.Value")){  // if the random tag has been added, remove it to reset to original list
                    currentlist.tags.pop();
                }
                delete currentlist.id;
                $('#divtaglistid').empty();  //empty the displays
                $('#displaythis').empty();
                $("#createtaglist").prop("value", "Create Tag List"); // toggle button
            },
            error: function (e) {
                displaymessage(e.status, "delete"); // in case of error, display the error
            }
        });
    }
});
Next we have a click function, $(“#createtaglist”).click(function(), that handles creating and deleting the tag list. We will toggle it’s value back and forth based on the existence of the currentlist.id that we will add to our data object variable after it is returned from our API call.
Let’s look first at the Create Tag List call, it is also a “POST”. In this call we have added a header parameter, which passes in our clientid and token. In the data parameter, we pass in the tag list array that we created at the top of the page in our currentlist object. Before we pass the tag array in, we format it with the JSON.stringify() method that converts a JavaScript object or value to a JSON string. In the function that handles a successful call, we set the currentlist.id to the returned tag list id, display it on the page, clear out the error display since we were successful and toggle the button text.
If a tag list already exists, the click function will delete it. First we stop the polling of the data, set the polling variable to null and toggle the button text. In the Delete Tag List call, we add the currentlist.id to the end of the url so the API knows which list we want to delete. The type is changed to “DELETE” here. Again, we pass the clientid and token in the header. In the success function, the first the we do is check to see the Random tag has been added to our list via the Add Random button. If it has, we want to delete it with currentlist.tags.pop() so that our list is back to it’s original state and it doesn’t get added twice. Next, we delete the currentlist.id from our object with delete currentlist.id. Finally, we clear out the displays and toggle the button text. In the event of an error, we display the message.
Get Tag List
// api call to get the latest tag values for the list
function getthetags(){
    $.ajax({
        url: networkNode + "/OASREST/v2/taglists/" + currentlist.id,
        type: "GET",
        contentType: "application/json; charset=utf-8",
        crossDomain: true,
        dataType: "json",
        headers: {"clientid": clientid, "token": token},
        success: function(r) {
            pumpval = r.tags[0].value; // hold onto the pump value so we can update it
            $('#displaythis').empty(); // empty out old display
            $.each(r.tags, function(key,tag) {
                $('#displaythis').append(tag.path + ': ' + tag.value + "<br>");
            });
        },
        error: function (e) {
            displaymessage(e); // in case of error, display the error
        }
    });
}

// click event to toggle polling
$("#dopolling").click(function(){
    if (!currentlist.id){  // if no list exists, display message, exit
        displaymessage("Tag List not found", "poll");
        return;
    }
    if (polling == null){ // if polling exists, stop it
        polling = setInterval("getthetags()", 1000);  // start the polling
        $("#dopolling").prop("value", "Stop Polling"); // toggle button
    } else { //if polling doesn't exist, start it
        clearInterval(polling);  // stop the polling and clear the variable
        polling = null;
        $("#dopolling").prop("value", "Start Polling"); // toggle button
    }
});
Now that we have created the tag list, we want to get the tag data. We will also use the JavaScript setInterval function to repeatedly poll the data. When the user clicks the Start Polling button the $(“#dopolling”).click(function() fires. First we check to see if a tag list exists, if it doesn’t we display an error message and exit the function. Next, we check to see if we are already polling. If we are, we know the user has clicked the Stop Polling button. In this case, we clear use clearInterval(polling) to stop the polling, set it to null and toggle the button text. If we aren’t already polling we know the user has clicked the Start Polling button. In this case, we use the setInterval function to call our getthetags() function once every second and then toggle the button text.
In the getthetags() function, we launch our API call. At the end of the url we add the currentlist.id so the server knows which tag list we want. The request type is “GET” and we send the clientid and token in the header. Below is the data that comes back:
{
    "id": "664c93ed-2f29-460c-9691-f4730c04ce40",
    "tags": [
        {
            "path": "Pump.Value",
            "value": "False",
            "quality": true,
            "type": "boolean"
        },
        {
            "path": "Ramp.Value",
            "value": "37",
            "quality": true,
            "type": "float"
        },
        {
            "path": "Sine.Value",
            "value": "-0.296687960624695",
            "quality": true,
            "type": "float"
        }
    ]
}
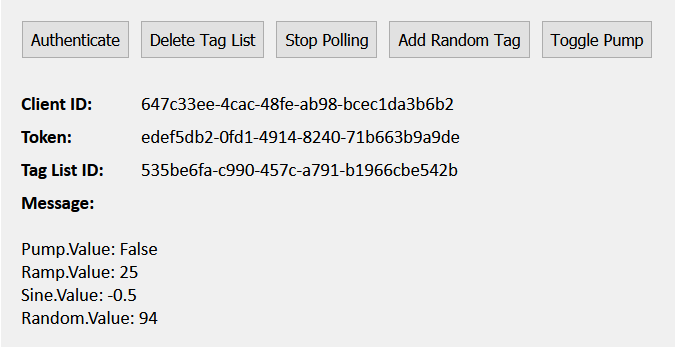
In our success function, we set the pumpval page variable to r.tags[0].value which is the value of the Pump tank as it is the first tag in our tag list array. We are storing the value in case the user clicks the Toggle Pump button. Next we use the jQuery .each() function to iterate through the returned tags array to display the data on the page. In case of error, we display the error message.
Update Tag List
// click event for adding random tag
$("#updatetaglist").click(function(){
    if (currentlist.id == ""){ // if no list exists, exit
        displaymessage("Tag List not found", "update");
        return;
    }
    if(!currentlist.tags.some(el => el.path === "Random.Value")){  // check to see if it is already there, if it's not add it
        currentlist.tags.push({"path": "Random.Value"});
        // api call to update the tag list
        $.ajax({
            url: networkNode + "/OASREST/v2/taglists",
            type: "PUT",
            contentType: "application/json; charset=utf-8",
            crossDomain: true,
            dataType: "json",
            headers: {"clientid": clientid, "token": token},
            data: JSON.stringify(currentlist),
            success: function(r) {
            },
            error: function (e) {
                displaymessage(e.status, "update");  // in case of error, display the error
            }
        });
    }
});
The Update Tag List call is inside of our $(“#updatetaglist”).click(function() and fired when the user clicks the Add Random button. Again, we check to make sure the currentlist.id exists and exit the function if it does not. Next we check the tags array to see if the Random tag has been added previously, we don’t want to add it twice. If it is there, we skip over this function, otherwise, we add it to the array and make our API call. The request type is “PUT” and we pass the clientid and the token in the header. In the data parameter we use the JSON.stringify function to format our current list object which now includes the currentlist.id and the Random tag as a JSON string. This tells the server to use this updated tag list for the tag list we have already created. We don’t have to do anything in our success function here, we are already polling and our getthetags() function can handle the addition. In case of error, we display the error.
Set Tag Values
// click event to toggle the pump value
$("#togglepump").click(function(){
    if (currentlist.id == ""){ // if no list exists, exit
        displaymessage("Tag List not found", "toggle");
        return;
    }
    var flagpump = false;
    if (pumpval == "False"){ // see what the current stored pump value is and flip it
        flagpump = true;
    }
    // api call to update the pump value
    $.ajax({
        url: networkNode + "/OASREST/v2/taglists/set",
        type: "POST",
        contentType: "application/json; charset=utf-8",
        crossDomain: true,
        dataType: "json",
        headers: {"clientid": clientid, "token": token},
        data: '{"values":[{"path": "Pump.Value", "value": "' + flagpump + '"}]}',
        success: function(r) {
        },
        error: function (e) {
            displaymessage(e.status, "update");  // in case of error, display the error
        }
    });
});
The Toggle Pump button fires the click $(“#togglepump”).click(function(). Inside of this function, we first check to see if the currentlist.id exists. If it does not, we exit the function. Otherwise, we get evaluate our current pumpval page variable and flip it. Our API call here is a “POST” and we send the clientid and the token in the header. Our data parameter contains an array of objects containing the path to the tag and parameter we want to update, along with the new value. Our array has only one object, the Pump, but we could send in multiple tags to update with this call. Again we don’t have to do anything in our success function here, we are already polling. In case of error, we display the error.
An optional parameter that can be sent in this call is timestamp. Use this method if implementing a custom data source. The timestamp field is a numeric representation of the number of ticks since 1/1/1970. In JavaScript this can be retrieved from a Date object using the .GetTime() method. It would look like this:
{ "values":
    [
    { "path": "Pump.Value", "value": true, "timestamp": 1490110444474 },
    { "path": "Ramp.Value", "value": 37, "timestamp": 1490110444474 }
    ]
}
All Together Now…
<!DOCTYPE html>
<html lang="en">
<head>
<meta charset="utf-8"/>
    <title>REST Example | Real Time Data</title>
    <link rel="stylesheet" href="client.css">
    <script src="https://code.jquery.com/jquery-3.1.1.min.js"></script>
    <script type="text/javascript">

        var networkNode = "http://www.opcweb.com:58725";
        var clientid =  ""; // holds the client id from authorization
        var token =  "";    // holds the token from authorization
        var polling = null; // variable for setInterval function
        var pumpval = null; // holds the last pump value
        var currentlist = {
            "tags":[
                {"path": "Pump.Value"},
                {"path": "Ramp.Value"},
                {"path": "Sine.Value"}
            ]
        };

        // function to clear out variables for a reset
        function clearvariables(){
            delete currentlist.id;
            clearInterval(polling);
            polling = null;
            $('#diverror').empty();
            $('#divtaglistid').empty();
            $('#displaythis').empty();
            $("#createtaglist").prop("value", "Create Tag List");
            $("#dopolling").prop("value", "Start Polling");
        }

        // function to display error messages
        function displaymessage(mess, fnc){
            clearInterval(polling); // in the event of an error we stop the polling
            switch(mess) {
                case 401:
                    $('#diverror').html("Authentication required.");
                    break;
                case 404:
                    if((fnc == "delete")||(fnc == "update")){
                        $('#diverror').html("Tag List not found.");
                    }else{
                        $('#diverror').html("404");
                    }
                    break;
                default:
                    $('#diverror').html(mess);
                }
        }

        // api call to get the latest tag values for the list
        function getthetags(){
            $.ajax({
                url: networkNode + "/OASREST/v2/taglists/" + currentlist.id,
                type: "GET",
                contentType: "application/json; charset=utf-8",
                crossDomain: true,
                dataType: "json",
                headers: {"clientid": clientid, "token": token},
                success: function(r) {
                    console.log(r);
                    pumpval = r.tags[0].value; // hold onto the pump value so we can update it
                    $('#displaythis').empty(); // empty out old display
                    $.each(r.tags, function(key,tag) {
                        $('#displaythis').append(tag.path + ': ' + tag.value + "<br>");
                    });
                },
                error: function (e) {
                    displaymessage(e); // in case of error, display the error
                }
            });
        }

        $(document).ready(function() {

            $("#doauth").click(function(){ // click funtion for authorization
                clearvariables(); // clear out the old variables, we are starting over
                // api call for authorization
                $.ajax({
                    url: networkNode + "/OASREST/v2/authenticate",
                    type: "POST",
                    contentType: "application/json; charset=utf-8",
                    crossDomain: true,
                    dataType: "json",
                    data: '{"username": "", "password": ""}',
                    success: function(r) {
                        clientid = r.data.clientid; // store the client id for later calls
                        token = r.data.token;  // store the token for later calls
                        $('#divid').html(clientid); // display the client id
                        $('#divtoken').html(token); // display the token
                    },
                    error: function (e) {
                        displaymessage(e.status, "auth"); // in case of error, display the error
                    }
                });
            });

            // click function to create or delete tag list
            $("#createtaglist").click(function(){
                // if there is no id, create one
                if (!currentlist.id){
                    // api call to create the tag list
                    $.ajax({
                        url: networkNode + "/OASREST/v2/taglists",
                        type: "POST",
                        contentType: "application/json; charset=utf-8",
                        crossDomain: true,
                        dataType: "json",
                        headers: {"clientid": clientid, "token": token},
                        data: JSON.stringify(currentlist),
                        success: function(r) {
                            currentlist.id = r.data.id;
                            $('#divtaglistid').html(currentlist.id);
                            $('#diverror').empty();
                            $("#createtaglist").prop("value", "Delete Tag List"); // toggle button
                        },
                        error: function (e) {
                            displaymessage(e.status, "create"); // in case of error, display the error
                        }
                    });
                // if there is an id, delete it
                }else{
                    clearInterval(polling); // stop the polling and clear out the variable
                    polling = null;
                    $("#dopolling").prop("value", "Start Polling"); // toggle polling button
                    // api call to delete the tag list
                    $.ajax({
                        url: networkNode + "/OASREST/v2/taglists/" + currentlist.id,
                        type: "DELETE",
                        contentType: "application/json; charset=utf-8",
                        crossDomain: true,
                        dataType: "json",
                        headers: {"clientid": clientid, "token": token},
                        success: function(r) {
                            if(currentlist.tags.some(el => el.path === "Random.Value")){  // if the random tag has been added, remove it to reset to original list
                                currentlist.tags.pop();
                            }
                            delete currentlist.id;
                            $('#divtaglistid').empty();  //empty the displays
                            $('#displaythis').empty();
                            $("#createtaglist").prop("value", "Create Tag List"); // toggle button
                        },
                        error: function (e) {
                            displaymessage(e.status, "delete"); // in case of error, display the error
                        }
                    });
                }
            });

            // click event for adding random tag
            $("#updatetaglist").click(function(){
                if (currentlist.id == ""){ // if no list exists, exit
                    displaymessage("Tag List not found", "update");
                    return;
                }
                if(!currentlist.tags.some(el => el.path === "Random.Value")){  // check to see if it is already there, if it's not add it
                    currentlist.tags.push({"path": "Random.Value"});
                    // api call to update the tag list
                    $.ajax({
                        url: networkNode + "/OASREST/v2/taglists",
                        type: "PUT",
                        contentType: "application/json; charset=utf-8",
                        crossDomain: true,
                        dataType: "json",
                        headers: {"clientid": clientid, "token": token},
                        data: JSON.stringify(currentlist),
                        success: function(r) {
                        },
                        error: function (e) {
                            displaymessage(e.status, "update");  // in case of error, display the error
                        }
                    });
                }
            });

            // click event to toggle the pump value
            $("#togglepump").click(function(){
                if (currentlist.id == ""){ // if no list exists, exit
                    displaymessage("Tag List not found", "toggle");
                    return;
                }
                var flagpump = false;
                if (pumpval == "False"){ // see what the current stored pump value is and flip it
                    flagpump = true;
                }
                // api call to update the pump value
                $.ajax({
                    url: networkNode + "/OASREST/v2/taglists/set",
                    type: "POST",
                    contentType: "application/json; charset=utf-8",
                    crossDomain: true,
                    dataType: "json",
                    headers: {"clientid": clientid, "token": token},
                    data: '{"values":[{"path": "Pump.Value", "value": "' + flagpump + '"}]}',
                    success: function(r) {
                    },
                    error: function (e) {
                        displaymessage(e.status, "update");  // in case of error, display the error
                    }
                });
            });

            // click event to toggle polling
            $("#dopolling").click(function(){
                if (!currentlist.id){  // if no list exists, display message, exit
                    displaymessage("Tag List not found", "poll");
                    return;
                }
                if (polling == null){ // if polling exists, stop it
                    polling = setInterval("getthetags()", 1000);  // start the polling
                    $("#dopolling").prop("value", "Stop Polling"); // toggle button
                } else { //if polling doesn't exist, start it
                    clearInterval(polling);  // stop the polling and clear the variable
                    polling = null;
                    $("#dopolling").prop("value", "Start Polling"); // toggle button
                }
            });

        });


    </script>
</head>
    <body>
        <div class='main'>
            <input type='button' id='doauth' class='button' value='Authenticate'><input type='button' id='createtaglist' class='button' value='Create Tag List'>
            <input type='button' id='dopolling' class='button' value='Start Polling'><input type='button' id='updatetaglist' class='button' value='Add Random Tag'>
            <input type='button' id='togglepump' class='button' value='Toggle Pump'><br><br>
            <div class='outer'><div class='label'>Client ID:</div><div  id='divid' class='value'></div></div>
            <div class='outer'><div class='label'>Token:</div><div id='divtoken' class='value'></div></div>
            <div class='outer'><div class='label'>Tag List ID:</div><div id='divtaglistid' class='value'></div></div>
            <div class='outer'><div class='label'>Message:</div><div  id='diverror' class='value'></div></div><br>
            <div id='displaythis'></div>
        </div>
    </body>
</html>>
To download the source code for this tutorial, click here.