Videos – Data Logging

Data Historian

Data logging for IIoT data to SQL Server, Oracle, Access, mySQL, SQL Azure, MongoDB, MariaDB, SQLite, PostegreSQL, Cassandra, and CSV files.

Getting Started Data Logging

How to setup data logging for all Open Automation Software logging types.

  • 00:00 – Introduction
  • 01:30 – Getting Started
  • 03:00 – Continuous Logging
  • 04:15 – SQL Server
  • 06:25 – Save Changes
  • 07:00 – Continuous Narrow Logging
  • 09:30 – Event Driven
  • 11:20 – Handshake Confirmation
  • 12:45 – High Speed Logging
  • 15:00 – Log to Stored Procedure
  • 15:25 – Triggers
  • 16:30 – Event Narrow Logging
  • 18:00 – Timestamps
  • 20:30 – Snapshot Logging
  • 21:45 – Specific Time of Day Logging
  • 22:50 – Data Change Row Logging
  • 25:15 – Data Change Narrow Logging
  • 26:45 – Networking
  • 31:55 – Store and Forward
  • 37:30 – Disable Store and Forward
  • 40:15 – Update Records
  • 40:50 – Dynamic Server, Database, and Table
  • 41:10 – Automatic Deletion
  • 41:40 – CSV File Logging
  • 45:30 – Programmatic Interface
  • 46:45 – CSV Export / Import
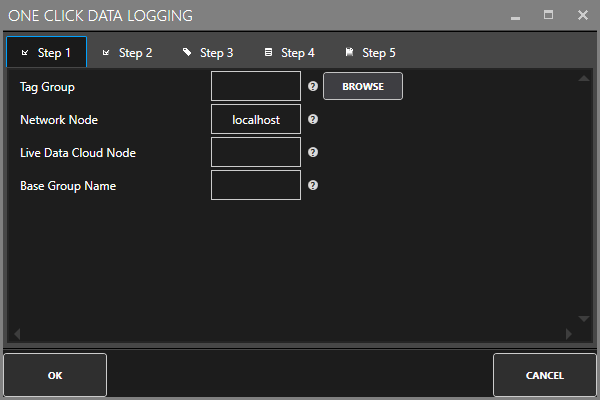
  • 48:20 – One Click Automation
  • 52:20 – Transaction Logging
  • 54:25 – System Errors
  • 56:00 – Contact Us
  • 56:50 – Read Database Data

10 Things Your Data Historian Should Do

How to implement data logging automated features for local and networked data logging demonstrating data buffering.

Data Accuracy

See how OAS transfers all values over a network with 100 nanoseconds resolution and log with store and forward to MS SQL Server.

OAS Performance

See 100,000 Open Automation Software tags running on a Raspberry Pi 4 all updating once per second and logged to a SQL Server database over a network.

One Click Database

Automatically setup data logging to SQL Server of all data from Kepware OPC Server in one step.

Log Buffered PLC Data

Log high speed buffered data from a controller at 1 millisecond per sample.

Logging Data from ControlLogix at High Speed

Quick demonstration of logging high speed data from an Allen Bradley ControlLogix processor to SQL Server.

Update Records

How to setup Data Logging to update existing records based on dynamic query Tag.

High Speed Data Logging

How to log data with 100 nanosecond resolution for up to 1,000,000 records per second to SQL Server from a .NET application.

Store and Forward

How to setup data logging so there is no data loss on a network or database engine failure.

Data Logging High Speed Data from Visual Studio Applications

Open Automation Software will support data logging from Visual Studio application with resolution to 100 nanoseconds.

View the following video for a quick tutorial on high speed data logging and automated setup:

In order to log values directly from a Visual Studio application you will need to implement the .NET Data Connector as demonstrated in the WinForm Example Code under FormDataLogging.

You can log values just as if the values were from an OPC Server, just setup Tags with a data source of Value, the desired data type, and then from your Visual Studio application use the WriteTags method of the OPC Systems Data Connector component.

If you also include TimeStamps array in the WriteTags method the service will use the TimeStamps you write instead of the CPU clock time when writing values to the database.

You can also setup data logging groups to be triggered based on event and assign a Boolean Tag as the Trigger Tag. From your Visual Studio application your code in simple form would look like the following:

 Dim sourceTimeStamps(2) As Date
        Dim timeNow As Date = Now
        sourceTimeStamps(0) = timeNow
        timeNow = timeNow.AddTicks(1)
        sourceTimeStamps(1) = timeNow
        timeNow = timeNow.AddTicks(1)
        sourceTimeStamps(2) = timeNow
        Dim TagsToWrite(14) As String
        Dim ValuesToWrite(14) As Object
        Dim TimeStampToWrite(14) As Date
        TagsToWrite(0) = "Value01.Value"
        ValuesToWrite(0) = 1
        TimeStampToWrite(0) = sourceTimeStamps(0)
        TagsToWrite(1) = "Value02.Value"
        ValuesToWrite(1) = 1
        TimeStampToWrite(1) = sourceTimeStamps(0)
        TagsToWrite(2) = "Value03.Value"
        ValuesToWrite(2) = 1
        TimeStampToWrite(2) = sourceTimeStamps(0)
        TagsToWrite(3) = "Trigger.Value"
        ValuesToWrite(3) = True
        TimeStampToWrite(3) = sourceTimeStamps(0)
        TagsToWrite(4) = "Trigger.Value"
        ValuesToWrite(4) = False
        TimeStampToWrite(4) = sourceTimeStamps(0)
        TagsToWrite(5) = "Value01.Value"
        ValuesToWrite(5) = 2
        TimeStampToWrite(5) = sourceTimeStamps(1)
        TagsToWrite(6) = "Value02.Value"
        ValuesToWrite(6) = 2
        TimeStampToWrite(6) = sourceTimeStamps(1)
        TagsToWrite(7) = "Value03.Value"
        ValuesToWrite(7) = 2
        TimeStampToWrite(7) = sourceTimeStamps(1)
        TagsToWrite(8) = "Trigger.Value"
        ValuesToWrite(8) = True
        TimeStampToWrite(8) = sourceTimeStamps(1)
        TagsToWrite(9) = "Trigger.Value"
        ValuesToWrite(9) = False
        TimeStampToWrite(9) = sourceTimeStamps(1)
        TagsToWrite(10) = "Value01.Value"
        ValuesToWrite(10) = 3
        TimeStampToWrite(10) = sourceTimeStamps(2)
        TagsToWrite(11) = "Value02.Value"
        ValuesToWrite(11) = 3
        TimeStampToWrite(11) = sourceTimeStamps(2)
        TagsToWrite(12) = "Value03.Value"
        ValuesToWrite(12) = 3
        TimeStampToWrite(12) = sourceTimeStamps(2)
        TagsToWrite(13) = "Trigger.Value"
        ValuesToWrite(13) = True
        TimeStampToWrite(13) = sourceTimeStamps(2)
        TagsToWrite(14) = "Trigger.Value"
        ValuesToWrite(14) = False
        TimeStampToWrite(14) = sourceTimeStamps(2)
        NETDataConnector1.WriteTags(TagsToWrite, ValuesToWrite, TimeStampToWrite)

The result in the database for this one WriteTags method would be 3 records:

Data Logging High Speed Data

Database Security Login

When you receive an error for Data Logging, Alarm Logging, or Recipe that there is a problem with the login security to the database engine in trying to open it or create it follow these steps which are shown for SQL Server, and would be similar to the other database engines.

Step 1

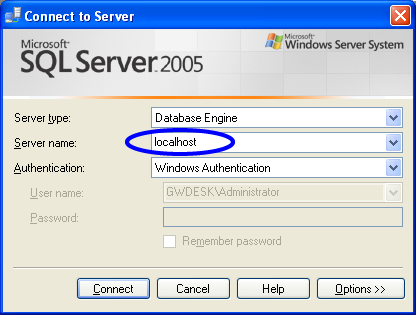
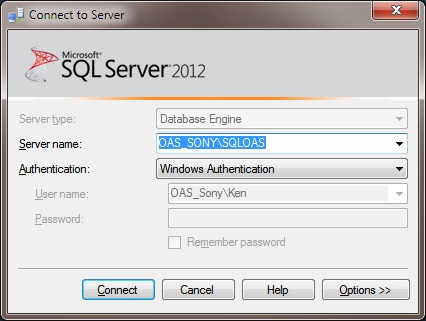
Start SQL Server Management Studio and connect to the database engine.

Database Security Login 1

Step 2

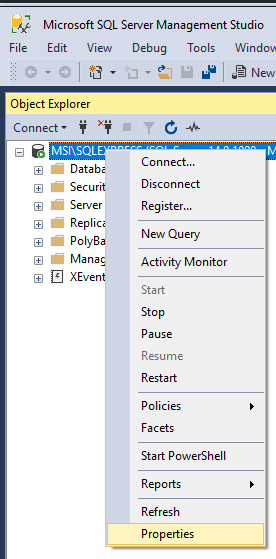
Select the database engine in the Object Explorer and right click to select Properties.

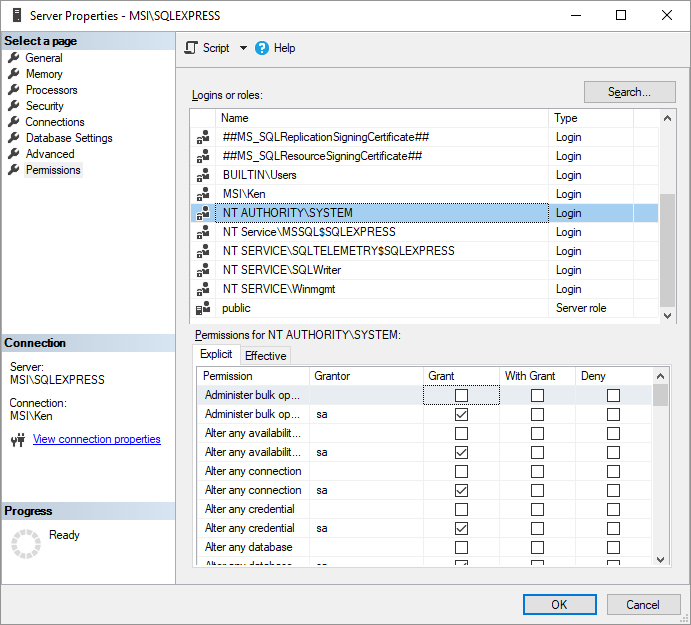
Select Permissions on the left and choose NT AUTHORITY\SYSTEM or the user you are using with SQL login and Grant all permissions.

Note: NT AUTHORITY\SYSTEM is the account that the OAS Engine runs under by default and would be used when the Data Logging Group, Alarm Logging Group, or Recipe Group is using Windows Authentication for login.  If it is a remote database engine choose the Name of the system where OAS is running.

Select OK

Step 3

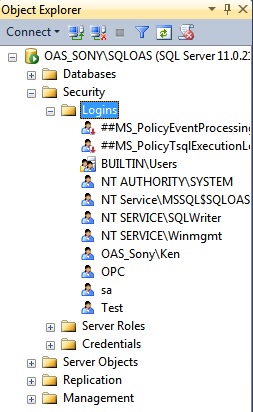
Select Security-Logins in the database engine tree.

Database Security Login 2

For Windows Authentication Login open the PC account that the OAS Database Service is running on this would be NT AUTHORITY\SYSTEM for the local system.

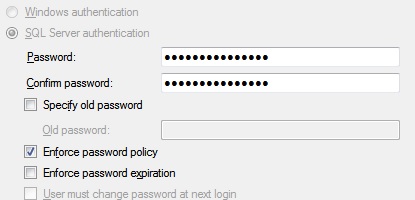
For SQL Server Login either add a new account or select an existing account where you know the password. For SQL Server login make sure the property to Enforce password expiration is disabled:

Database Security Login 3

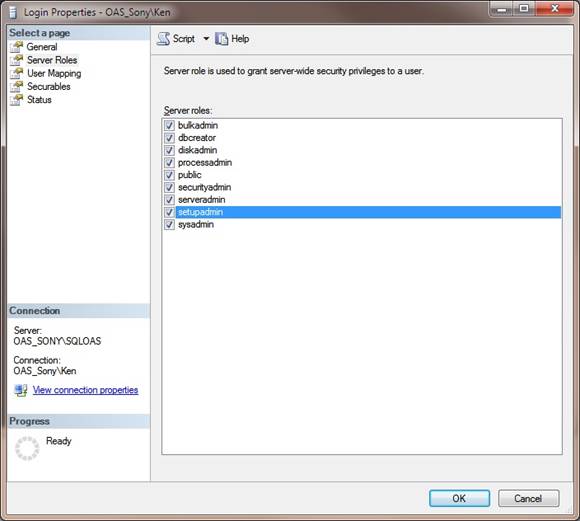
Under Server Roles enable all properties or at least sysadmin and public.

Database Security Login 4

Select OK and return to OAS to see if the Login error has been resolved.

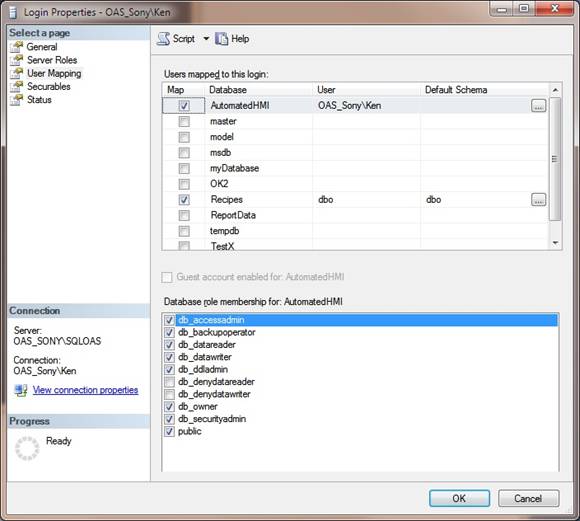
If you still encounter a security access error select User Mapping and select the database you want to access to enable all properties except db_denydatareader and db_denydatawriter.

Database Security Login 5

Export and Import CSV Data Logging

Export CSV Data Logging

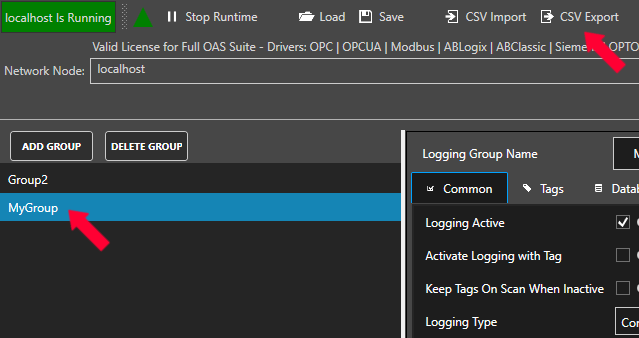
Select the Logging Group name from the list on the right and then click the CSV Export button in the top menu.  This will generate a base Comma Separated Variable file for all of the logging group’s properties and individual CSV files for each of the logging group’s fields.

The individual file names will include the base name with underscore following by the group name.

CSV Export Group

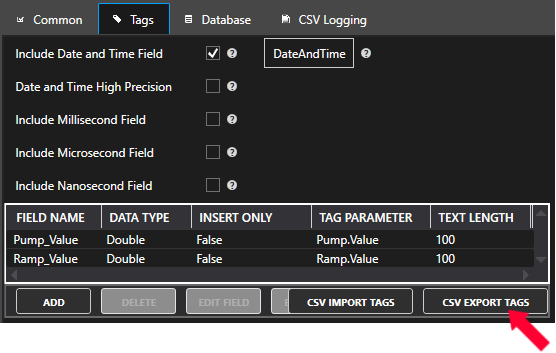
If you wish to export just the individual field names and not the Group information, select the Tags tab and click the CSV Export button below the tag list.

CSV Export Tags
You can then use Microsoft Excel or other CSV compatible application to add or modify data logging properties and fields. Use the Import CSV (see below) feature to then import the modified CSV files.

Note: You cannot have Excel open with the CSV file during the import as Excel will lock the file for exclusive use.  First close the file in Excel, and then proceed with the import.

Import CSV Data Logging

Select the OAS Service that you desire to import a CSV file to the Data Logging configuration and select Import CSV to import a Comma Separated Variable file.

If the same directory that has the base CSV file for all groups also contains the individual CSV files with the base name underscore group name then the fields will also be imported from each individual file matching the group names.

CSV Inport

If you wish to just import a data logging groups individual field list, select the Tags tab and click the CSV Import button below the tag list.

CSV Import Tags

Use the Export CSV (see above) feature to generate the CSV files.

Save and Load Data Logging

Save Data Logging

If modifications are made to the current Data Logging configuration for the Service, make sure to save the changes if you want the changes to be retentive when the Service restarts. Use Configure – Options to specify the default Data Logging configuration.

Load Data Logging

Use this selection to load a previously stored Data Logging configuration. Use Configure – Options to set the default Data Logging configuration to load when the Service first starts.

Logging Group CSV Logging Properties

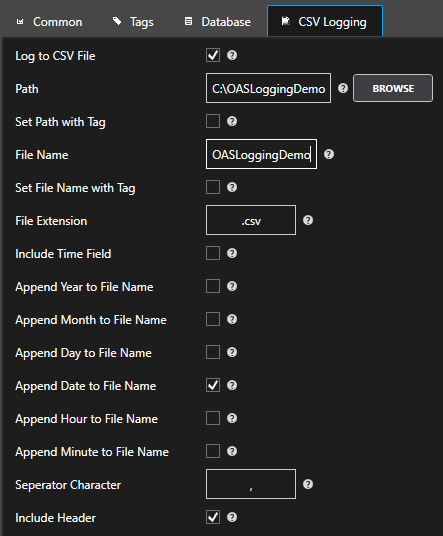
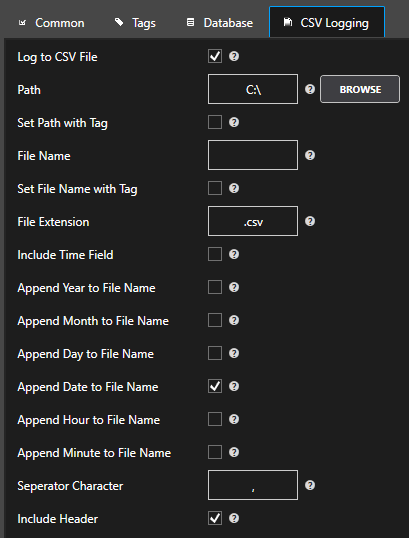
CSV Logging Properties

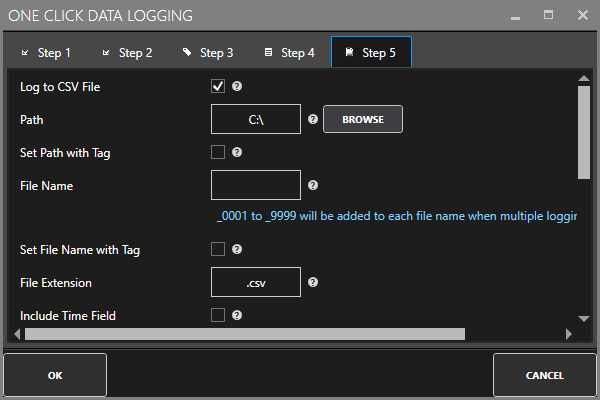
Log To CSV File

Enable Logging to a Comma Separated File. Logging Active must also be set to True.

Path

The directory path to log the CSV files to.  Make sure to include a backslash at the end of the Path.

Set Path with Tag

When enabled the Path (see above) can be dynamically set with a Tag Parameter value.

File Name

The base name of the CSV files to create and log to. You can also specify to append Date, Hour, and Minute (see below) to this base file name. If the file already exists data will be appended. If the file does not exist it will be created.

CSV File Extension

The extension to append to the end of the file name. Csv is the common extension name that Excel recognizes, but any extension can be used.

Set File Name with Tag

When enabled the base file name (see above) of the CSV file can be dynamically set with a Tag Parameter value. If the file already exists data will be appended. If the file does not exist it will be created.

Append Year to File Name

Append the year to the base file name in the form of YYYY to the end of the file name. If the file already exists data will be appended. If the file does not exist it will be created.

Append Month to File Name

Append the year to the base file name in the form of MM to the end of the file name. If the file already exists data will be appended. If the file does not exist it will be created.

Append Day to File Name

Append the year to the base file name in the form of DD to the end of the file name. If the file already exists data will be appended. If the file does not exist it will be created.

Append Date to File Name

Append the date to the base file name in the form of YYYYMMDD to the end of the file name. If the file already exists data will be appended. If the file does not exist it will be created.

Append Hour to File Name

Append the hour to the base file name in the form of HH to the end of the file name. If the file already exists data will be appended. If the file does not exist it will be created.

Append Minute to File Name

Append the minute to the base file name in the form of MM to the end of the file name. If the file already exists data will be appended. If the file does not exist it will be created.

Separator Character

The separator character to use. Most commonly it is a comma that is used for Comma Separated Variable files.

Logging Group Database Properties

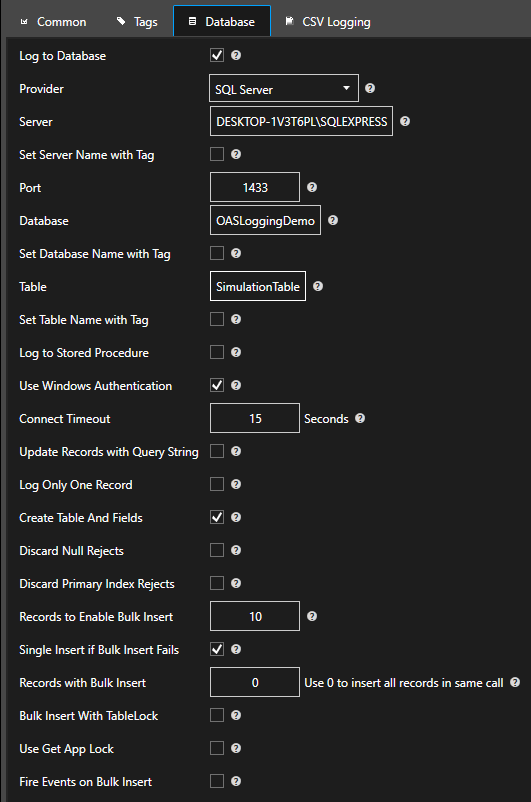
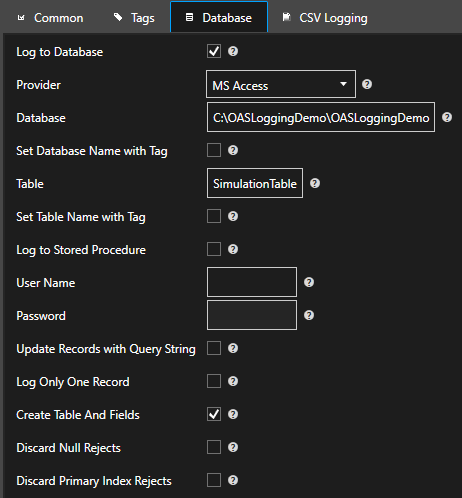
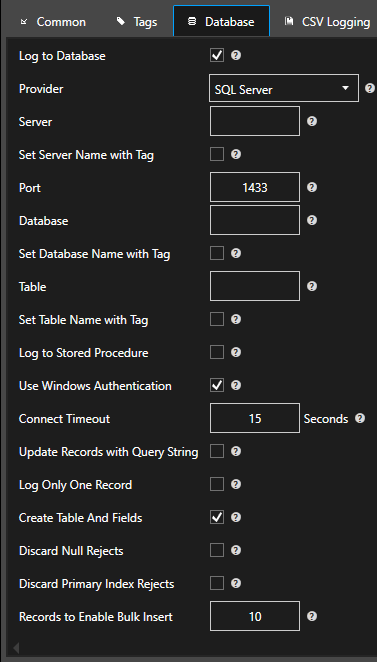
Logging Group Database Properties

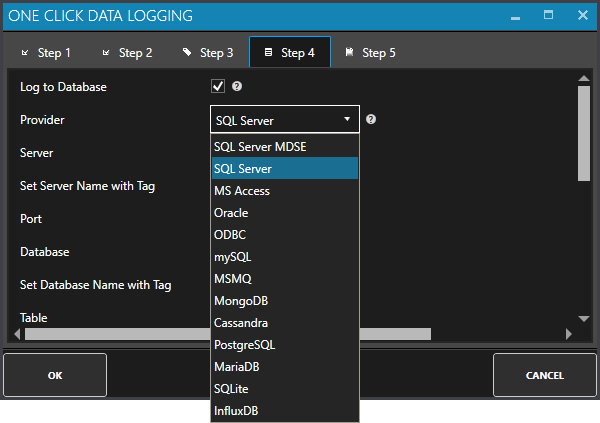
Log To Database

Enable Logging to a database table. Logging Active must also be set to True.

Provider

Database provider to use:

  • SQLServerDesktop_MSDE: Use SQL Server Desktop or MSDE database engine.
  • SQLServer: Use SQL Server or SQL Server Express.
  • MSAccess: Use Microsoft Access Jet Database engine.
  • Oracle: Use Oracle engine. Does not automatically create database. You must create the database schema first to use this provider.
  • mySQL: Use mySQL database engine.
  • ODBC: Use ODBC data source. Does not automatically create database, table, or field names. You must create database, table, and all fields with the proper names and data types first to use this provider.
  • MongoDB: Use MondgoDB NoSQL engine.

Server

The name of the Server to use when the Provider (see above) is set to SQL Server Desktop, SQL Server, or mySQL.

Set Server Name with Tag

When enabled the server (see above) name can be dynamically set with a Tag Parameter value when the Provider is set to SQL Server Desktop, SQL Server, or mySQL.

Database

The name of the Database to log to. When using Microsoft Access specify the full path of the database. Example: C:DatabaseName.mdb.

Set Database Name with Tag

When enabled the database name can be dynamically set with a Tag Parameter value.

Table

The name of the database Table to log to.

Set Table Name with Tag

When enabled the table  (see above) name can be dynamically set with a Tag Parameter value.

Log To Stored Procedure

Log values to stored procedure instead of a table.

Stored procedure must already exist.

Table name property will change to Stored Procedure name.

Database field names will be the stored procedure parameter names.

Use WinNT Authentication

Use Windows Logon Security Authentication when the provider is set to SQL Server Desktop or SQL Server.

User Name

User Name for database security.

Password

Password for database security.

Update Records with Query String

This will enable an update to the table instead of an insert. The records that match the Query String will all be updated. If no records are found to match the Query String then the record can be inserted if the option Insert if Records Do Not Exist from Query String (see below) is enabled.

Data Logging Query String

The query string to use to find matching records to update when the option Update Records with Query String is enabled.

Set Query String with Tag

When enabled the Query String (see above) will be dynamically set based on the value form a String Tag.

Insert if Records Do Not Exist from Query String

If the option Update Records with Query String is selected and the Query String value does not result in any matching records a new record will be added to the table if this option is selected.

Log Only One Record

When enabled and the Logging Type  is set to Continuous, Even Driven, Specific Time of Day, or Data Change Row all of the records in the table will be deleted except the latest one in the table.

When enabled and the Logging Type  is set to Data Change the existing records that have the matching tag alias name will be updated. If there are no matching records that exist then a new record will be added.

Automatically Create Table And Fields

If the table does not exist it will automatically be created with the fields defined under the Tags properties

If the table does exist each field will be verified to match data type and field name. Fields that do not exist in the table will be created. Fields that do exist and their data type does not match the data type defined will be converted to the defined data type.

When this option is disabled no attempt will be made to create the table or fields and the table must already exist with the correct field names and types.

Do Not Buffer When Nulls Are Not Allowed In Database

When this option is selected and one or more of the fields has been changed to not allow nulls and the data quality of the value is bad an error will occur in the logging that nulls are not allow. With this option selected the record will be ignored and will not be buffered for the field to be corrected, the record will be lost.

Do Not Buffer On Primary Index Failure

When this option is selected and an error indicating that the PRIMARY INDEX violation has occurred data will not be buffered to RAM or disk. With this option selected the record will be ignored and will not be buffered and the record will be lost.

Number of Records to Enable Multiple Write

The number of records to be logged that will cause the logging to use an optimized logging of multiple records in one call when using the SQL Server provider.

Try Single Write After Multiple Write Fail

When using SQL Server and the number of records to be logged exceed Number of Records to Enable Multiple Write (see above) and the optimized write fails try an individual stored procedure write.

Multiple Write With TableLock

When using SQL Server and the number of records to be logged exceed Number of Records to Enable Multiple Write the optimized write will be called with a TableLock.

Use Get App Lock

When using SQL Server and the number of records to be logged exceed Number of Records to Enable Multiple Write only one call at a time will be able to processed for all logging groups that have Use Get App Lock enabled. This will disable parallel processing to the database to only execute one data logging group to the database at a time when using SQL Server.  Does not apply to Oracle, Access, and mySQL.

Fire Events on Multiple Write

When using SQL Server and the number of records to be logged exceed Number of Records to Enable Multiple Write the optimized write will fire an event on each execution.

Number of Records to Write on Multiple Write

When using SQL Server and the number of records to be logged exceed Number of Records to Enable Multiple Write the optimized write will include this number of records in each batch write. This is a way to break up the network packet size to remote SQL Server nodes with large amounts of data to record. A value of 0 will write all records in one batch.

Logging Group Tags Properties

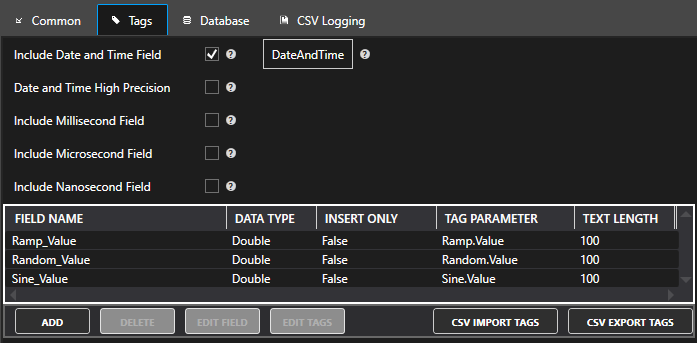
Logging Group Tags Properties

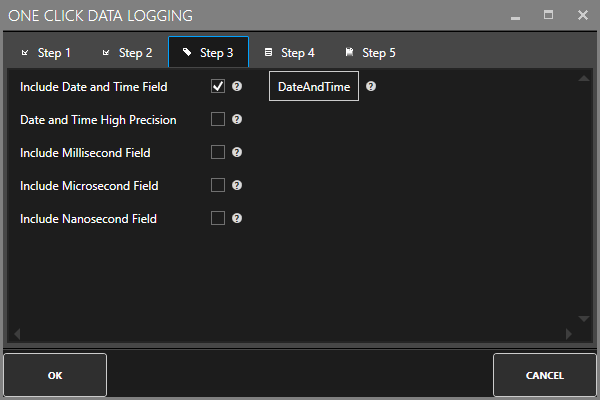
Include Date and Time Field

When enabled the Data and Time Field will be included as a column in the logging group.

Date Time Field Name

The field name to be created in the database table or CSV file header of the date and time stamp.

Note: Do not use a field name of DateTime or Date. These names are data types and have special meaning for SQL commands.

Note: To specify non-standard characters and spaces put [ in front of the field name and ] at the end of the file name.  Example: [my.field-name value].

Millisecond Field Name

The field name to be created in the database table or CSV file header of the millisecond field. Enable this field to maintain resolution faster than 3 milliseconds with SQL Server, 10 milliseconds with Oracle, or 1 second with CSV files.

Note: To specify non-standard characters and spaces put [ in front of the field name and ] at the end of the file name. Example: [my.field-name value].

Microsecond Field Name

The field name to be created in the database table or CSV file header of the microsecond field. Enable this field to maintain resolution faster than 1 millisecond.

Note: To specify non-standard characters and spaces put [ in front of the field name and ] at the end of the file name. Example: [my.field-name value].

Nanosecond Field Name

The field name to be created in the database table or CSV file header of the microsecond field.  Enable this field to maintain resolution faster than 1 microsecond.

Note: To specify non-standard characters and spaces put [ in front of the field name and ] at the end of the file name. Example: [my.field-name value].

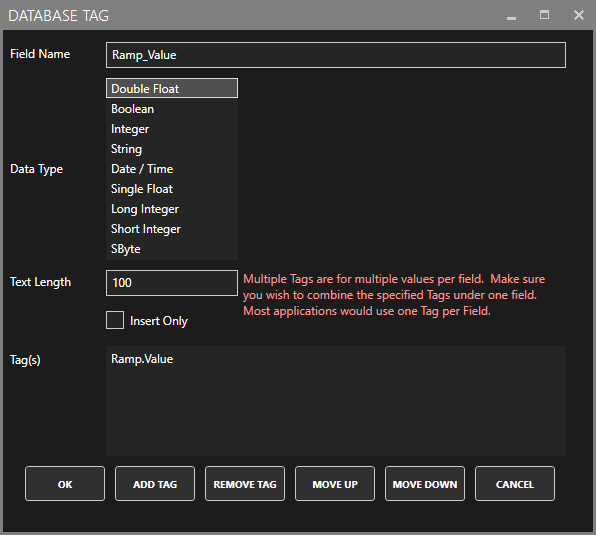
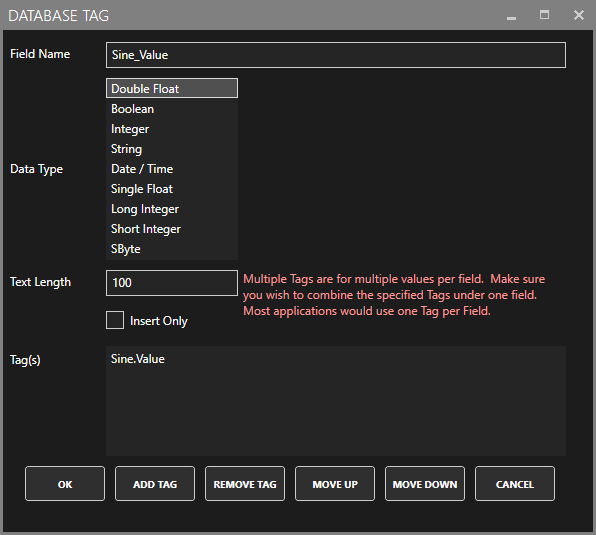
Data Logging Field Field Name

For each tag value that is logged with the wide table format each point will have a corresponding field name. Specify a field name up to 64 characters in length; do not use special characters or spaces that will be incompatible with other third party reporting systems.

Do not use the names DateTime or Date as these have special meaning for many database queries.

Note: To specify non-standard characters and spaces put [ in front of the field name and ] at the end of the file name. Example: [my.field-name value].

Data Logging Field Data Type

This is the data type in the database for the field.

Data Logging Field Text Length

This is the number of characters to allocate for the field when the Data Type is set to String.

Data Logging Field Insert Only

When the property to Update Records with Query String is selected this property will control if the value will be included in the update or will be only included when an insert is performed.

Data Logging Field Tags

Normally for the wide table format there is only one tag per field. The common parameter would be Tag Name.Value, but all tag parameters can be logged. It is possible to define multiple tags per field, but this is very rare and you should consider the Data Change narrow table format if you need to limit the number of fields in the table.

Data Logging Data Change Tag Field Name

With the Logging Type set to Data Change this is the field name for the tag name alias.

Note: To specify non-standard characters and spaces put [ in front of the field name and ] at the end of the file name. Example: [my.field-name value].

Data Logging Data Change Value Field Name

With the Logging Type set to Data Change this is the field name for the value that is logged. Do not use the name Value as this has special meaning for many database queries.

Note: Do not use a field name of Value. This name has special meaning for SQL commands and should not be used as a field name.

Note: To specify non-standard characters and spaces put [ in front of the field name and ] at the end of the file name. Example: [my.field-name value].

Data Logging Data Change Value Field Data Type

With the Logging Type set to Data Change this is the data type for the value field.

Data Logging Data Change Value Text Length

With the Logging Type set to Data Change this is the length of the value field when the data type for the value field is set to String.

Data Logging Data Change Tag Alias to Log

The string that is logged for each value when the Logging Type is set to Data Change.

Add Field

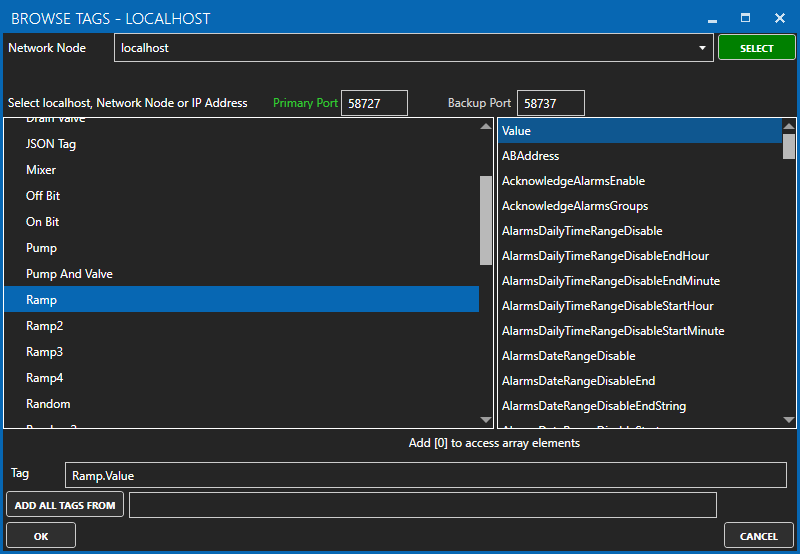
Add a data field and specify the Tag Parameter, field name, and field data type. Use the Add Field Button.

Add Delete Edit

Database Tag

Delete Field

Delete field(s) by selecting the field(s) and select the Delete button.

Edit Field

Edit a data field to specify the field name and field data type. Use the Edit Field Button..

Field CSV Import/Export

Use the CSV Import Tags Button to export one or more Tags in the list, or CSV Import Button to add/modify fields in the existing list.

CSV Import Tags CSV Export Tags

Logging Group Common Properties

Common Properties Tab

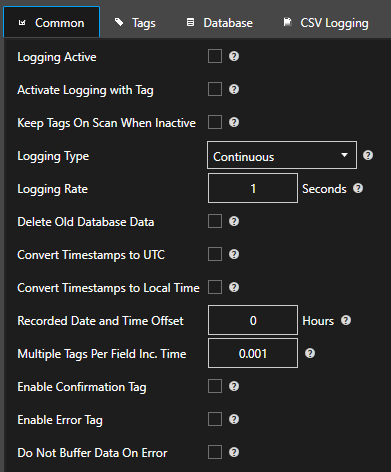
Logging Group Name

The name that identifies the Logging Group in the Data Logging configuration. This name appears in System Alarms if there is a failure with the data logging.

Logging Active

Enable or Disables the Logging. This can be controlled with a Tag Parameter value if Activate Logging with Tag is specified.

Activate Logging With Tag

When enabled the Logging Active (see above) selection is controlled with the specified Tag and Parameter that is specified. When the value of the Tag Parameter is True the logging is set to Active, and when the value is False the logging is set to Inactive.

Keep Items On Scan When Logging is not Active

When enabled and the logging groups is disabled the group keeps the Tags on scan to the logging group. This is helpful when using Tags or DirectOPC Items that have the Keep OPC Item On Scan set to false and you would like to keep the items on scan with the OPC Server.

Disable Logging Initial Values On Active

When logging is first made active and Data Change Logging Type (see below) is selected this option will reject the initial current values from being logging. Only new changes will be logged after the logging is active when this option is selected.

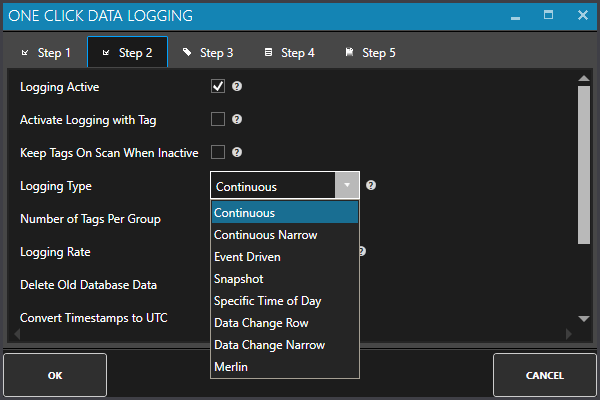
Logging Type

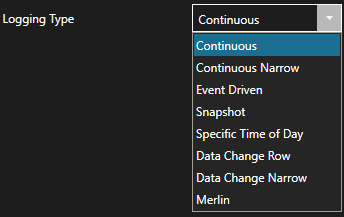
  • Continuous: Log data at the specified Logging Rate (see below). The minimum logging rate is 100 nanoseconds.
  • Event Driven: Log data when the Event Driven Logging Tag (see below) Parameter value transitions. The time resolution for this feature is 100 nanoseconds. The trigger can be a Boolean set to transition from False to True, True to False, or Both. The trigger can also come from an Integer tag that will trigger the logging anytime the value changes and the value is non-zero.
  • Snapshot: Log a collection of data that is buffered at the time set in Snapshot Time when the Event Driven Logging Tag Parameter value transitions.
    Specific Time Of Day: Logging occurs at the specific Time Of Day (see below).
  • Data Change Row: Will log a new row anytime one or more of the Tag values changes.
  • Data Change: Will log a new record for every tag any time they change. This logging type has a narrow table format logging the Date and Time, Tag Name Alias, and Value for each value. This logging type has the benefit of being able to specify more than 1,000 tags in a logging group, but can use up more disk space in the database engine if all of the values are changing frequently.
  • Merlin: This a special type of logging group designed specifically for an OEM customer. This type is not applicable for logging.

Logging Rate

The rate of logging when the Logging Type (see above) is set to Continuous or Snapshot. The minimum logging rate is 100 nanoseconds. Logging Active (see above) must also be set to True.

Snapshot Time

When the Logging Type is set to Snapshot this is the time to hold in a buffer at the rate specified by Logging Rate to then log when the Event Driven Logging Tag transitions.

Event Driven Logging Tag

With the Logging Type is set to Event Driven or Snapshot this is the Tag Parameter that will cause the logging to occur when the value transitions.  The trigger can be a Boolean set to transition from False to True, True to False, or Both.  The trigger can also come from an Integer tag that will trigger the logging anytime the value changes and the value is non-zero. Logging Active must also be set to True.

Digital Log Type

With the Logging Type is set to Event Driven and the Event Driven Logging Tag is specified as a Boolean Tag this will determine this is the Tag Parameter that will cause the logging to occur when the value transitions.

The trigger can be a Boolean set to transition from False to True, True to False, or Both. The trigger can also come from an Integer tag that will trigger the logging anytime the value changes and the value is non-zero. Logging Active must also be set to True.

Perform OPC Device Read

When the Logging Type is set to Event Driven this will perform a Device Read to OPC Servers on all OPC Items and synchronous read on all Open Automation Software Tags that are not defined and OPC Items.

Once all of the values are received from the synchronous blocking calls the values will be recorded.

Time Of Day

With the Logging Type set to Specific Time Of Day this will be the time that the logging will occur. Logging Active must also be set to True.

Data Change Deadband

With the Logging Type (see above) set to Data Change Row or Data Change this is the amount in engineering units for floating point values to change by in order for a new record to be recorded. A value of 0 disables the deadband and all value changes will be recorded. Logging Active must also be set to True.

Disable New Time Stamp Check

With the Logging Type (see above) set to Data Change Row or Data Change and a value does not change, but the time stamp does normally a new record will be recorded.  With this option selected a change in the time stamp alone will not cause a new record to be recorded.

Set Date and Time to Previous Day 11:59:59 PM

Works well with Event Driven (see above) or Specific Time Of Day (see above) logging to set the logged time stamp to the previous day date and the time at 11:59:59.000.  This helps with report queries by rolling back the date to the previous day just before midnight. Often used in end of day reporting that has to occur after midnight.

Write Data Immediately

For Continuous and Snapshot logging type’s data is normally buffered for up to 10 seconds at a time and written to the database as a bulk insert.  When the property Write Data Immediately is enabled the buffering feature is not used and data is written immediately to the database for any new records.

Create Primary Index when Table is Created

With Logging Type (see above) set to Event Driven, Data Change Row, or Data Change this option will create a primary index on the Date and Time field together with the Millisecond, Microsecond, and Nanosecond fields if they are specified. If you use this option make certain that all of the records will have a unique Date and Time for each record.

Recorded Date and Time Offset

This will offset the Date and Time recorded to the database by the offset specified.  Used commonly to change the Date and Time to a different time zone time that what the OPC Server is in.

If you prefer to use Universal Time Code select the option Use UTC TimeStamp under Configure – Options.

Delete Old Database Data

Enable to automatically delete data from the current specified database table.  When enabled specify the amount of days to keep. This feature is not available for CSV logging.

Enable Confirmation Tag

The Confirmation Tag can be set to a Boolean Tag to give feedback that the data logging has succeeded. The Tag value will be set to False when one or more records is to be recorded, then when the record has been successfully logged to the database the value of the Tag will be set to True.

Following is a common sequence of operation in the PLC:

  1. Set the confirmation bit and trigger bit in the PLC to False.
  2. Set the values to be logged.
  3. Wait for trigger bit feedback using Target of OPC Tunnel to confirm trigger has been received as False.
  4. Set the Trigger bit high.
  5. Wait for the confirmation bit to be True or the Error Integer feedback to be non-zero if there is an error.
  6. If confirmation received repeat again starting with step 1.

With the property Confirm With Success Immediately Before Database Write (see below) enabled the Confirmation Tag value will be set to True immediately unless the data quality of one or more of the values to be recorded is bad.

Enable Error Tag

The Error Tag can be set to an Integer Tag to give feedback that the data logging has failed due to 1 of 16 different reasons. The Tag value will be set to 0 when one or more records is to be recorded, then when the record has been successfully logged to the database the value of the Confirmation Tag will be set to True.

If there is an error in the recording the Error Tag value will be set to non zero for one of the following causes:

  •     ‘ 0 = No Error
  •     ‘ 1 = OAS Data Log is not licensed
  •     ‘ 2 = Error opening database connection
  •     ‘ 3 = Error opening database connection after creation
  •     ‘ 4 = Error creating database
  •     ‘ 5 = Error accessing open connect during table creation
  •     ‘ 6 = Error creating table
  •     ‘ 7 = Error creating fields
  •     ‘ 8 = Error creating stored procedure
  •     ‘ 9 = Error writing to database, command is not setup
  •     ‘ 10 = Error picking up values to write
  •     ‘ 11 = Error writing values, failed both stored procedure and udpate method
  •     ‘ 12 = Error writing values, connection is not open
  •     ‘ 13 = Error creating CSV file
  •     ‘ 14 = Error opening CSV file to append
  •     ‘ 15 = Error writing to CSV file
  •     ‘ 16 = Error in data quality, bad OPC quality or null value.

Following is a common sequence of operation in the PLC:

  1. Set the confirmation bit in the PLC to False.
  2. Set the values to be logged.
  3. Wait for trigger bit feedback using Target of OPC Tunnel to confirm trigger has been received as False.
  4. Set the Trigger bit high.
  5. Wait for the confirmation bit to be True or the Error Integer feedback to be non-zero if there is an error.
  6. If confirmation received repeat again starting with step 1.  If Error Tag value is non zero report as an alarm and try again with the same values.

With the property Confirm With Success Immediately Before Database Write (see below) enabled only error 16 on bad data quality will be used for the confirmation.

Confirm With Success Immediately Before Database Write

With this property enabled the Confirmation Tag value will be set to True immediately unless the data quality of one or more of the values to be recorded is bad.  If this property is used make sure to enable the Store Data Logging Buffer to Disk property under Configure-Options to True so there is no data loss if there is a database engine failure.

Do Not Buffer On Error

When this property is enabled no data buffering occurs if there is an error in writing values to the database engine or CSV file.