Logging Group Name
The name that identifies the Logging Group in the Data Logging configuration. This name appears in System Alarms if there is a failure with the data logging.
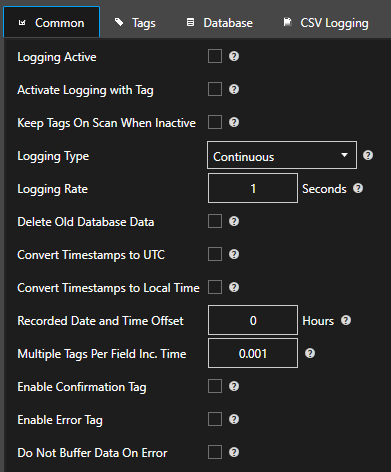
Logging Active
Enable or Disables the Logging. This can be controlled with a Tag Parameter value if Activate Logging with Tag is specified.
Activate Logging With Tag
When enabled the Logging Active (see above) selection is controlled with the specified Tag and Parameter that is specified. When the value of the Tag Parameter is True the logging is set to Active, and when the value is False the logging is set to Inactive.
Keep Items On Scan When Logging is not Active
When enabled and the logging groups is disabled the group keeps the Tags on scan to the logging group. This is helpful when using Tags or DirectOPC Items that have the Keep OPC Item On Scan set to false and you would like to keep the items on scan with the OPC Server.
Disable Logging Initial Values On Active
When logging is first made active and Data Change Logging Type (see below) is selected this option will reject the initial current values from being logging. Only new changes will be logged after the logging is active when this option is selected.
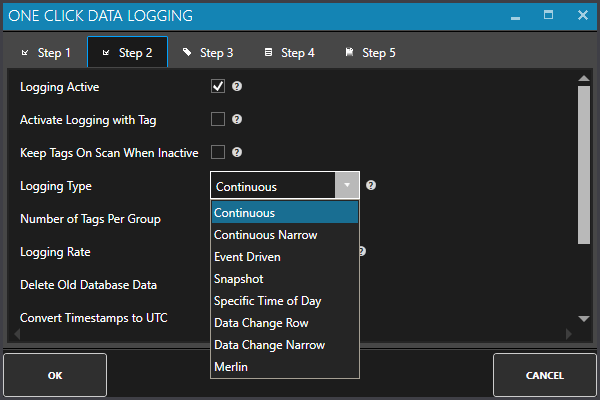
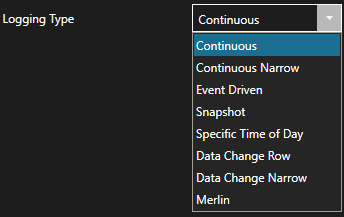
Logging Type
- Continuous: Log data at the specified Logging Rate (see below). The minimum logging rate is 100 nanoseconds.
- Event Driven: Log data when the Event Driven Logging Tag (see below) Parameter value transitions. The time resolution for this feature is 100 nanoseconds. The trigger can be a Boolean set to transition from False to True, True to False, or Both. The trigger can also come from an Integer tag that will trigger the logging anytime the value changes and the value is non-zero.
- Snapshot: Log a collection of data that is buffered at the time set in Snapshot Time when the Event Driven Logging Tag Parameter value transitions.
Specific Time Of Day: Logging occurs at the specific Time Of Day (see below). - Data Change Row: Will log a new row anytime one or more of the Tag values changes.
- Data Change: Will log a new record for every tag any time they change. This logging type has a narrow table format logging the Date and Time, Tag Name Alias, and Value for each value. This logging type has the benefit of being able to specify more than 1,000 tags in a logging group, but can use up more disk space in the database engine if all of the values are changing frequently.
- Merlin: This a special type of logging group designed specifically for an OEM customer. This type is not applicable for logging.
Logging Rate
The rate of logging when the Logging Type (see above) is set to Continuous or Snapshot. The minimum logging rate is 100 nanoseconds. Logging Active (see above) must also be set to True.
Snapshot Time
When the Logging Type is set to Snapshot this is the time to hold in a buffer at the rate specified by Logging Rate to then log when the Event Driven Logging Tag transitions.
Event Driven Logging Tag
With the Logging Type is set to Event Driven or Snapshot this is the Tag Parameter that will cause the logging to occur when the value transitions. The trigger can be a Boolean set to transition from False to True, True to False, or Both. The trigger can also come from an Integer tag that will trigger the logging anytime the value changes and the value is non-zero. Logging Active must also be set to True.
Digital Log Type
With the Logging Type is set to Event Driven and the Event Driven Logging Tag is specified as a Boolean Tag this will determine this is the Tag Parameter that will cause the logging to occur when the value transitions.
The trigger can be a Boolean set to transition from False to True, True to False, or Both. The trigger can also come from an Integer tag that will trigger the logging anytime the value changes and the value is non-zero. Logging Active must also be set to True.
Perform OPC Device Read
When the Logging Type is set to Event Driven this will perform a Device Read to OPC Servers on all OPC Items and synchronous read on all Open Automation Software Tags that are not defined and OPC Items.
Once all of the values are received from the synchronous blocking calls the values will be recorded.
Time Of Day
With the Logging Type set to Specific Time Of Day this will be the time that the logging will occur. Logging Active must also be set to True.
Data Change Deadband
With the Logging Type (see above) set to Data Change Row or Data Change this is the amount in engineering units for floating point values to change by in order for a new record to be recorded. A value of 0 disables the deadband and all value changes will be recorded. Logging Active must also be set to True.
Disable New Time Stamp Check
With the Logging Type (see above) set to Data Change Row or Data Change and a value does not change, but the time stamp does normally a new record will be recorded. With this option selected a change in the time stamp alone will not cause a new record to be recorded.
Set Date and Time to Previous Day 11:59:59 PM
Works well with Event Driven (see above) or Specific Time Of Day (see above) logging to set the logged time stamp to the previous day date and the time at 11:59:59.000. This helps with report queries by rolling back the date to the previous day just before midnight. Often used in end of day reporting that has to occur after midnight.
Write Data Immediately
For Continuous and Snapshot logging type’s data is normally buffered for up to 10 seconds at a time and written to the database as a bulk insert. When the property Write Data Immediately is enabled the buffering feature is not used and data is written immediately to the database for any new records.
Create Primary Index when Table is Created
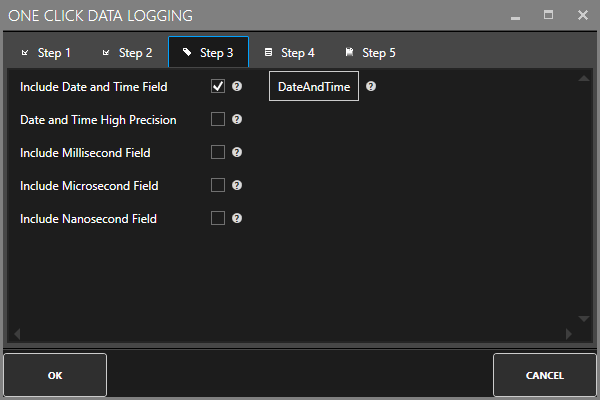
With Logging Type (see above) set to Event Driven, Data Change Row, or Data Change this option will create a primary index on the Date and Time field together with the Millisecond, Microsecond, and Nanosecond fields if they are specified. If you use this option make certain that all of the records will have a unique Date and Time for each record.
Recorded Date and Time Offset
This will offset the Date and Time recorded to the database by the offset specified. Used commonly to change the Date and Time to a different time zone time that what the OPC Server is in.
If you prefer to use Universal Time Code select the option Use UTC TimeStamp under Configure – Options.
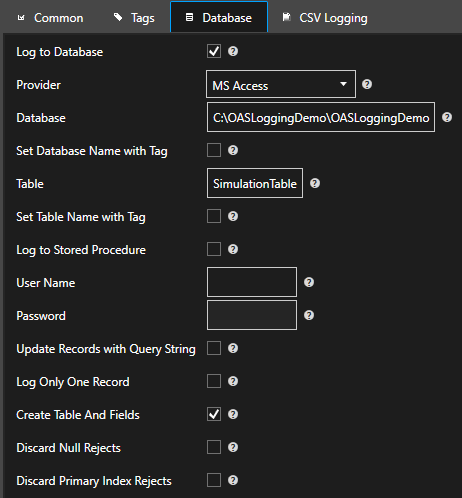
Delete Old Database Data
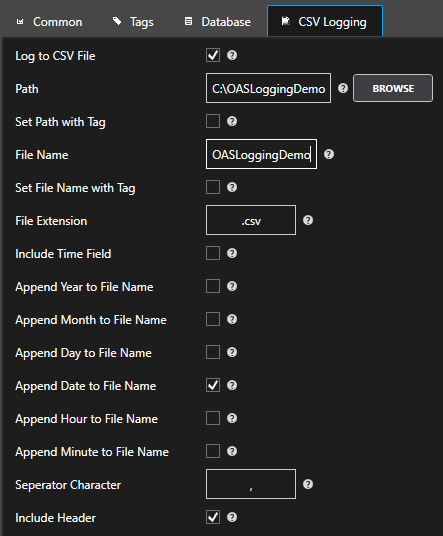
Enable to automatically delete data from the current specified database table. When enabled specify the amount of days to keep. This feature is not available for CSV logging.
Enable Confirmation Tag
The Confirmation Tag can be set to a Boolean Tag to give feedback that the data logging has succeeded. The Tag value will be set to False when one or more records is to be recorded, then when the record has been successfully logged to the database the value of the Tag will be set to True.
Following is a common sequence of operation in the PLC:
- Set the confirmation bit and trigger bit in the PLC to False.
- Set the values to be logged.
- Wait for trigger bit feedback using Target of OPC Tunnel to confirm trigger has been received as False.
- Set the Trigger bit high.
- Wait for the confirmation bit to be True or the Error Integer feedback to be non-zero if there is an error.
- If confirmation received repeat again starting with step 1.
With the property Confirm With Success Immediately Before Database Write (see below) enabled the Confirmation Tag value will be set to True immediately unless the data quality of one or more of the values to be recorded is bad.
Enable Error Tag
The Error Tag can be set to an Integer Tag to give feedback that the data logging has failed due to 1 of 16 different reasons. The Tag value will be set to 0 when one or more records is to be recorded, then when the record has been successfully logged to the database the value of the Confirmation Tag will be set to True.
If there is an error in the recording the Error Tag value will be set to non zero for one of the following causes:
- ‘ 0 = No Error
- ‘ 1 = OAS Data Log is not licensed
- ‘ 2 = Error opening database connection
- ‘ 3 = Error opening database connection after creation
- ‘ 4 = Error creating database
- ‘ 5 = Error accessing open connect during table creation
- ‘ 6 = Error creating table
- ‘ 7 = Error creating fields
- ‘ 8 = Error creating stored procedure
- ‘ 9 = Error writing to database, command is not setup
- ‘ 10 = Error picking up values to write
- ‘ 11 = Error writing values, failed both stored procedure and udpate method
- ‘ 12 = Error writing values, connection is not open
- ‘ 13 = Error creating CSV file
- ‘ 14 = Error opening CSV file to append
- ‘ 15 = Error writing to CSV file
- ‘ 16 = Error in data quality, bad OPC quality or null value.
Following is a common sequence of operation in the PLC:
- Set the confirmation bit in the PLC to False.
- Set the values to be logged.
- Wait for trigger bit feedback using Target of OPC Tunnel to confirm trigger has been received as False.
- Set the Trigger bit high.
- Wait for the confirmation bit to be True or the Error Integer feedback to be non-zero if there is an error.
- If confirmation received repeat again starting with step 1. If Error Tag value is non zero report as an alarm and try again with the same values.
With the property Confirm With Success Immediately Before Database Write (see below) enabled only error 16 on bad data quality will be used for the confirmation.
Confirm With Success Immediately Before Database Write
With this property enabled the Confirmation Tag value will be set to True immediately unless the data quality of one or more of the values to be recorded is bad. If this property is used make sure to enable the Store Data Logging Buffer to Disk property under Configure-Options to True so there is no data loss if there is a database engine failure.
Do Not Buffer On Error
When this property is enabled no data buffering occurs if there is an error in writing values to the database engine or CSV file.