See the Universal Driver Interface section under Data Sources on how to create and deploy an OAS driver with your own property definitions using Visual Basic .NET or C# .NET.
Getting started: OAS REST API and native iOS
Step 1
To read and write data between a native iOS app and OAS, you can use the OAS REST API. As a first step, register the HTTP listener with the OAS Service Control Manager under the section labeled “HTML HMI Registration”.
Define the exclusive Node Name and Port Number that is to be supported. The Node Name should be the registered domain name, IP address, or network node name that all clients will connect to from their browsers. If you are unsure of which node name to use, localhost will work in most cases.

NOTE: Before clicking “Register”, be sure to stop all services. If services are running, the Service Control app will prompt you to stop them.
Step 2
Start up all services, and be sure to include the Framework 4.5 Service as this houses the listener specific to the REST API.
Step 3
Test your API Service from your iOS device.
You will now ensure that your iPhone or iPad can communicate with OAS via the REST API. In this example, the OAS host is located at 192.168.0.101 on the local network, but you will have to replace this with the OAS host node on your network. The base URL you will use to connect to the REST API is http://{{node}}:{{port}}/OASREST/v2. Each operation performed against the REST API will use the specific operation name prepended with the base {{url}}. The first operation to complete is authentication. All sessions with the REST API must be authenticated. You can adjust the {{url}} in the following snippet and test authentication. In Xcode, create a new single-view iOS application, and choose Swift as the language. Add the following code to MainViewController.swift:
Authenticate Session (Swift):
import requests
import json

### base url is http://{{node}}:{{port}}/OASREST/v2/
url = 'http://192.168.0.101:58725/OASREST/v2'  # {{url}}
op = '/authenticate'                           # {{operation}}
data = '''{"username":"", "password":""}'''
headers = {'Content-Type':'application/json'}

### Authentication is completed via a POST request
response = requests.request("POST", url+op, data=data,
                             headers=headers)

print(response.text)

### Upon success, store your clientid and token for the remainder of the session
json_data = json.loads(response.text)
clientid = json_data["data"]["clientid"]
token = json_data["data"]["token"]
If this code is executed without error, the response will include a clientid and token. These will be included in the header for all other operations.
{
  "status":"OK",
  "data":{"clientid":"531041fa-e601-49d7-a02a-cf13f12eae28",
          "token":"919a303c-4537-4658-b4bf-242fc44e6493"},
  "messages":["Default credential provided"]
}
Here are some Python examples of basic HTTP requests you might wish to make via the REST API after having completed authentication. For additional information, see our REST API documentation.
Create a Tag (Python 3):
### code continues from above
### Create a Tag
headers.update({"clientid":clientid})
headers.update({"token":token})
operation = '/tags'
data = '''
{
   "path":"SomeDummyTag",
   "parameters": {
        "Value": {
            "DataType":"Double",
            "ParameterSource":"Value",
            "Value":"262.262"
        }
    }
}
'''
response = requests.request('POST', url+operation, data=data, headers=headers)
print(response.text)
Successful tag creation results in the following response from the OAS server:
{"status":"OK","messages":["CREATE COMPLETE"]}
Read a Tag (Python 3):
Reading a tag is accomplished with a GET request, using a simple query including the path to the Tag.
### Read a Tag
### operation = '/tags'
querystring= {'path':'SomeDummyTag'}
response = requests.request('GET', url+operation, params=querystring, headers=headers)
print(response.text)
A possible response from the OAS server:
[{"path":"SomeDummyTag","value":"262.262","quality":true,"type":"Float","timestamp":1521742596474}]
Update a Tag (Python 3):
Updating a tag is accomplished with a PUT request, using a payload including the path to the Tag, and the parameter(s) to be updated.
### Update a tag
### operation = '/tags'
data = '''
{
    "path":"SomeDummyTag",
    "parameters": {
        "Value": {
            "Value":"54.59"
        }
    }
}
'''
response = requests.request('PUT', url+operation, data=data, headers=headers)
print(response.text)
Update confirmation from the OAS server:
{"status":"OK","messages":["UPDATE COMPLETE"]}
Step 4
Write tag data from Raspberry Pi to OAS.
Now that you’ve established connectivity with the REST API, you can complete a Python script to write data from your device. Here is an example script which detects when a button is pushed, and forwards that data into OAS as a discrete tag value. An LED on the breadboard (see figure) indicates the current value, and the OAS server is polled at a frequency of 1 Hz to reflect the current state.
import RPi.GPIO as GPIO
import time
import requests
import json

### Define a function to toggle the state of PiBit
### (You will likely prefer to inject all dependencies in production code)
def toggleBit(state):
    data = '''{"path":"PiBit",
               "parameters":{
                   "Value":{
                       "Value":"'''+str(not state)+'''"
    }}}'''
    requests.request('PUT', url+operation, data=data, headers=headers)
    return not state

### read state of Boolean Tag
def readBooleanTag(tagName):
    querystring = {'path':tagName}
    response = requests.request('GET', url+operation, params=querystring, headers=headers)
    json_response = json.loads(response.text)
    test = json_response[0]["value"]
    return test == "True"

### Write a callback function to execute on event detection
def callback(input_pin):
    print("Input on pin",input_pin)
    current_state = GPIO.input(40)
    toggleBit(current_state)
    GPIO.output(40, not current_state)

### Authenticate session
url = 'http://192.168.0.101:58725/OASREST/v2'
operation = '/authenticate'
data = '''
{
    "username":"",
    "password":""
}
'''
headers = {"Content-Type":"application/json"}
response = requests.request('POST', url+operation, data=data, headers=headers)

### Update headers with clientid and token
json_data = json.loads(response.text)
clientid = json_data["data"]["clientid"]
token = json_data["data"]["token"]
headers.update({"clientid":clientid})
headers.update({"token":token})


### Create a tag to store a boolean
operation = '/tags'
data = '''
{
    "path":"PiBit",
    "parameters": {
         "Value": {
             "DataType":"Discrete",
             "ParameterSource":"Value",
             "Value":"False"
         }
    }
}
'''
response = requests.request('POST', url+operation, data=data, headers=headers)

### Setup Raspberry Pi IO board
GPIO.setmode(GPIO.BOARD)
GPIO.setup(36, GPIO.IN, pull_up_down=GPIO.PUD_UP)
GPIO.setup(40, GPIO.OUT)
GPIO.output(40, False)

### Detect when input voltage drops, and poll server for current state
GPIO.add_event_detect(36, GPIO.FALLING, callback=cb, bouncetime=100)
try:
    while True:
        time.sleep(1)
        print(readBooleanTag("PiBit"))
except KeyboardInterrupt:
    print("\nExiting\n")
    GPIO.cleanup()
For further help with the REST API, navigate to https://restapi.openautomationsoftware.com to open the REST API online documentation.
Writing data from Raspberry Pi using OAS REST API
Step 1
To write data into OAS from a Raspberry Pi, you will use the OAS REST API. As a first step, register the HTTP listener with the OAS Service Control Manager under the section labeled “HTML HMI Registration”.
Define the exclusive Node Name and Port Number that is to be supported. The Node Name should be the registered domain name, IP address, or network node name that all clients will connect to from their browsers. If you are unsure of which node name to use, localhost will work in most cases.
NOTE: Before clicking “Register”, be sure to stop all services. If services are running, the Service Control app will prompt you to stop them.
Step 2
Start up all services, and be sure to include the Framework 4.5 Service as this houses the listener specific to the REST API.
Step 3
Test your API Service from your Raspberry Pi.
You will now ensure that the Raspberry Pi can communicate with OAS via the REST API. In this example, the OAS host is located at 192.168.0.101 on the local network, but you will have to replace this with the OAS host node on your network. The base URL you will use to connect to the REST API is http://{{node}}:{{port}}/OASREST/v2. Each operation performed against the REST API will use the specific operation name prepended with the base {{url}}. The first operation to complete is authentication. All sessions with the REST API must be authenticated. You can adjust the {{url}} in the following snippet and test authentication.
Authenticate Session (Python 3):
import requests
import json

### base url is http://{{node}}:{{port}}/OASREST/v2/
url = 'http://192.168.0.101:58725/OASREST/v2'  # {{url}}
op = '/authenticate'                           # {{operation}}
data = '''{"username":"", "password":""}'''
headers = {'Content-Type':'application/json'}

### Authentication is completed via a POST request
response = requests.request("POST", url+op, data=data,
                             headers=headers)

print(response.text)

### Upon success, store your clientid and token for the remainder of the session
json_data = json.loads(response.text)
clientid = json_data["data"]["clientid"]
token = json_data["data"]["token"]
If this code is executed without error, the response will include a clientid and token. These will be included in the header for all other operations.
{
  "status":"OK",
  "data":{"clientid":"531041fa-e601-49d7-a02a-cf13f12eae28",
          "token":"919a303c-4537-4658-b4bf-242fc44e6493"},
  "messages":["Default credential provided"]
}
Here are some Python examples of basic HTTP requests you might wish to make via the REST API after having completed authentication. For additional information, see our REST API documentation.
Create a Tag (Python 3):
### code continues from above
### Create a Tag
headers.update({"clientid":clientid})
headers.update({"token":token})
operation = '/tags'
data = '''
{
   "path":"SomeDummyTag",
   "parameters": {
        "Value": {
            "DataType":"Double",
            "ParameterSource":"Value",
            "Value":"262.262"
        }
    }
}
'''
response = requests.request('POST', url+operation, data=data, headers=headers)
print(response.text)
Successful tag creation results in the following response from the OAS server:
{"status":"OK","messages":["CREATE COMPLETE"]}
Read a Tag (Python 3):
Reading a tag is accomplished with a GET request, using a simple query including the path to the Tag.
### Read a Tag
### operation = '/tags'
querystring= {'path':'SomeDummyTag'}
response = requests.request('GET', url+operation, params=querystring, headers=headers)
print(response.text)
A possible response from the OAS server:
[{"path":"SomeDummyTag","value":"262.262","quality":true,"type":"Float","timestamp":1521742596474}]
Update a Tag (Python 3):
Updating a tag is accomplished with a PUT request, using a payload including the path to the Tag, and the parameter(s) to be updated.
### Update a tag
### operation = '/tags'
data = '''
{
    "path":"SomeDummyTag",
    "parameters": {
        "Value": {
            "Value":"54.59"
        }
    }
}
'''
response = requests.request('PUT', url+operation, data=data, headers=headers)
print(response.text)
Update confirmation from the OAS server:
{"status":"OK","messages":["UPDATE COMPLETE"]}
Step 4
Write tag data from Raspberry Pi to OAS.
Now that you’ve established connectivity with the REST API, you can complete a Python script to write data from your device. Here is an example script which detects when a button is pushed, and forwards that data into OAS as a discrete tag value. An LED on the breadboard indicates the current value, and the OAS server is polled at a frequency of 1 Hz to reflect the current state.
import RPi.GPIO as GPIO
import time
import requests
import json

### Define a function to toggle the state of PiBit
### (You will likely prefer to inject all dependencies in production code)
def toggleBit(state):
    data = '''{"path":"PiBit",
               "parameters":{
                   "Value":{
                       "Value":"'''+str(not state)+'''"
    }}}'''
    requests.request('PUT', url+operation, data=data, headers=headers)
    return not state

### read state of Boolean Tag
def readBooleanTag(tagName):
    querystring = {'path':tagName}
    response = requests.request('GET', url+operation, params=querystring, headers=headers)
    json_response = json.loads(response.text)
    test = json_response[0]["value"]
    return test == "True"

### Write a callback function to execute on event detection
def callback(input_pin):
    print("Input on pin",input_pin)
    current_state = GPIO.input(40)
    toggleBit(current_state)
    GPIO.output(40, not current_state)

### Authenticate session
url = 'http://192.168.0.101:58725/OASREST/v2'
operation = '/authenticate'
data = '''
{
    "username":"",
    "password":""
}
'''
headers = {"Content-Type":"application/json"}
response = requests.request('POST', url+operation, data=data, headers=headers)

### Update headers with clientid and token
json_data = json.loads(response.text)
clientid = json_data["data"]["clientid"]
token = json_data["data"]["token"]
headers.update({"clientid":clientid})
headers.update({"token":token})


### Create a tag to store a boolean
operation = '/tags'
data = '''
{
    "path":"PiBit",
    "parameters": {
         "Value": {
             "DataType":"Discrete",
             "ParameterSource":"Value",
             "Value":"False"
         }
    }
}
'''
response = requests.request('POST', url+operation, data=data, headers=headers)

### Setup Raspberry Pi IO board
GPIO.setmode(GPIO.BOARD)
GPIO.setup(36, GPIO.IN, pull_up_down=GPIO.PUD_UP)
GPIO.setup(40, GPIO.OUT)
GPIO.output(40, False)

### Detect when input voltage drops, and poll server for current state
GPIO.add_event_detect(36, GPIO.FALLING, callback=callback, bouncetime=100)
try:
    while True:
        time.sleep(1)
        print(readBooleanTag("PiBit"))
except KeyboardInterrupt:
    print("\nExiting\n")
    GPIO.cleanup()
For further help with the REST API, navigate to https://restapi.openautomationsoftware.com to open the REST API online documentation.
Web HMI Dashboard Modules
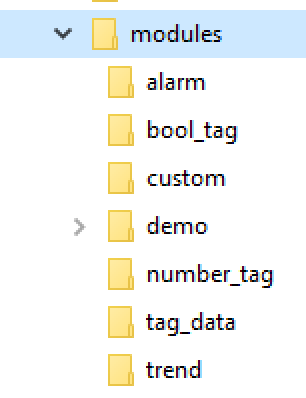
Modules are each self-contained, and files relative to each can be found in the installation directory under the modules folder.
At a minimum, under each module folder you fill find a module.js file and a style.css file. The module.js file is the core module executable, and the style.css contains specific stylesheet rules used by the module. Some modules may contain other assets, such as the Demo Module.
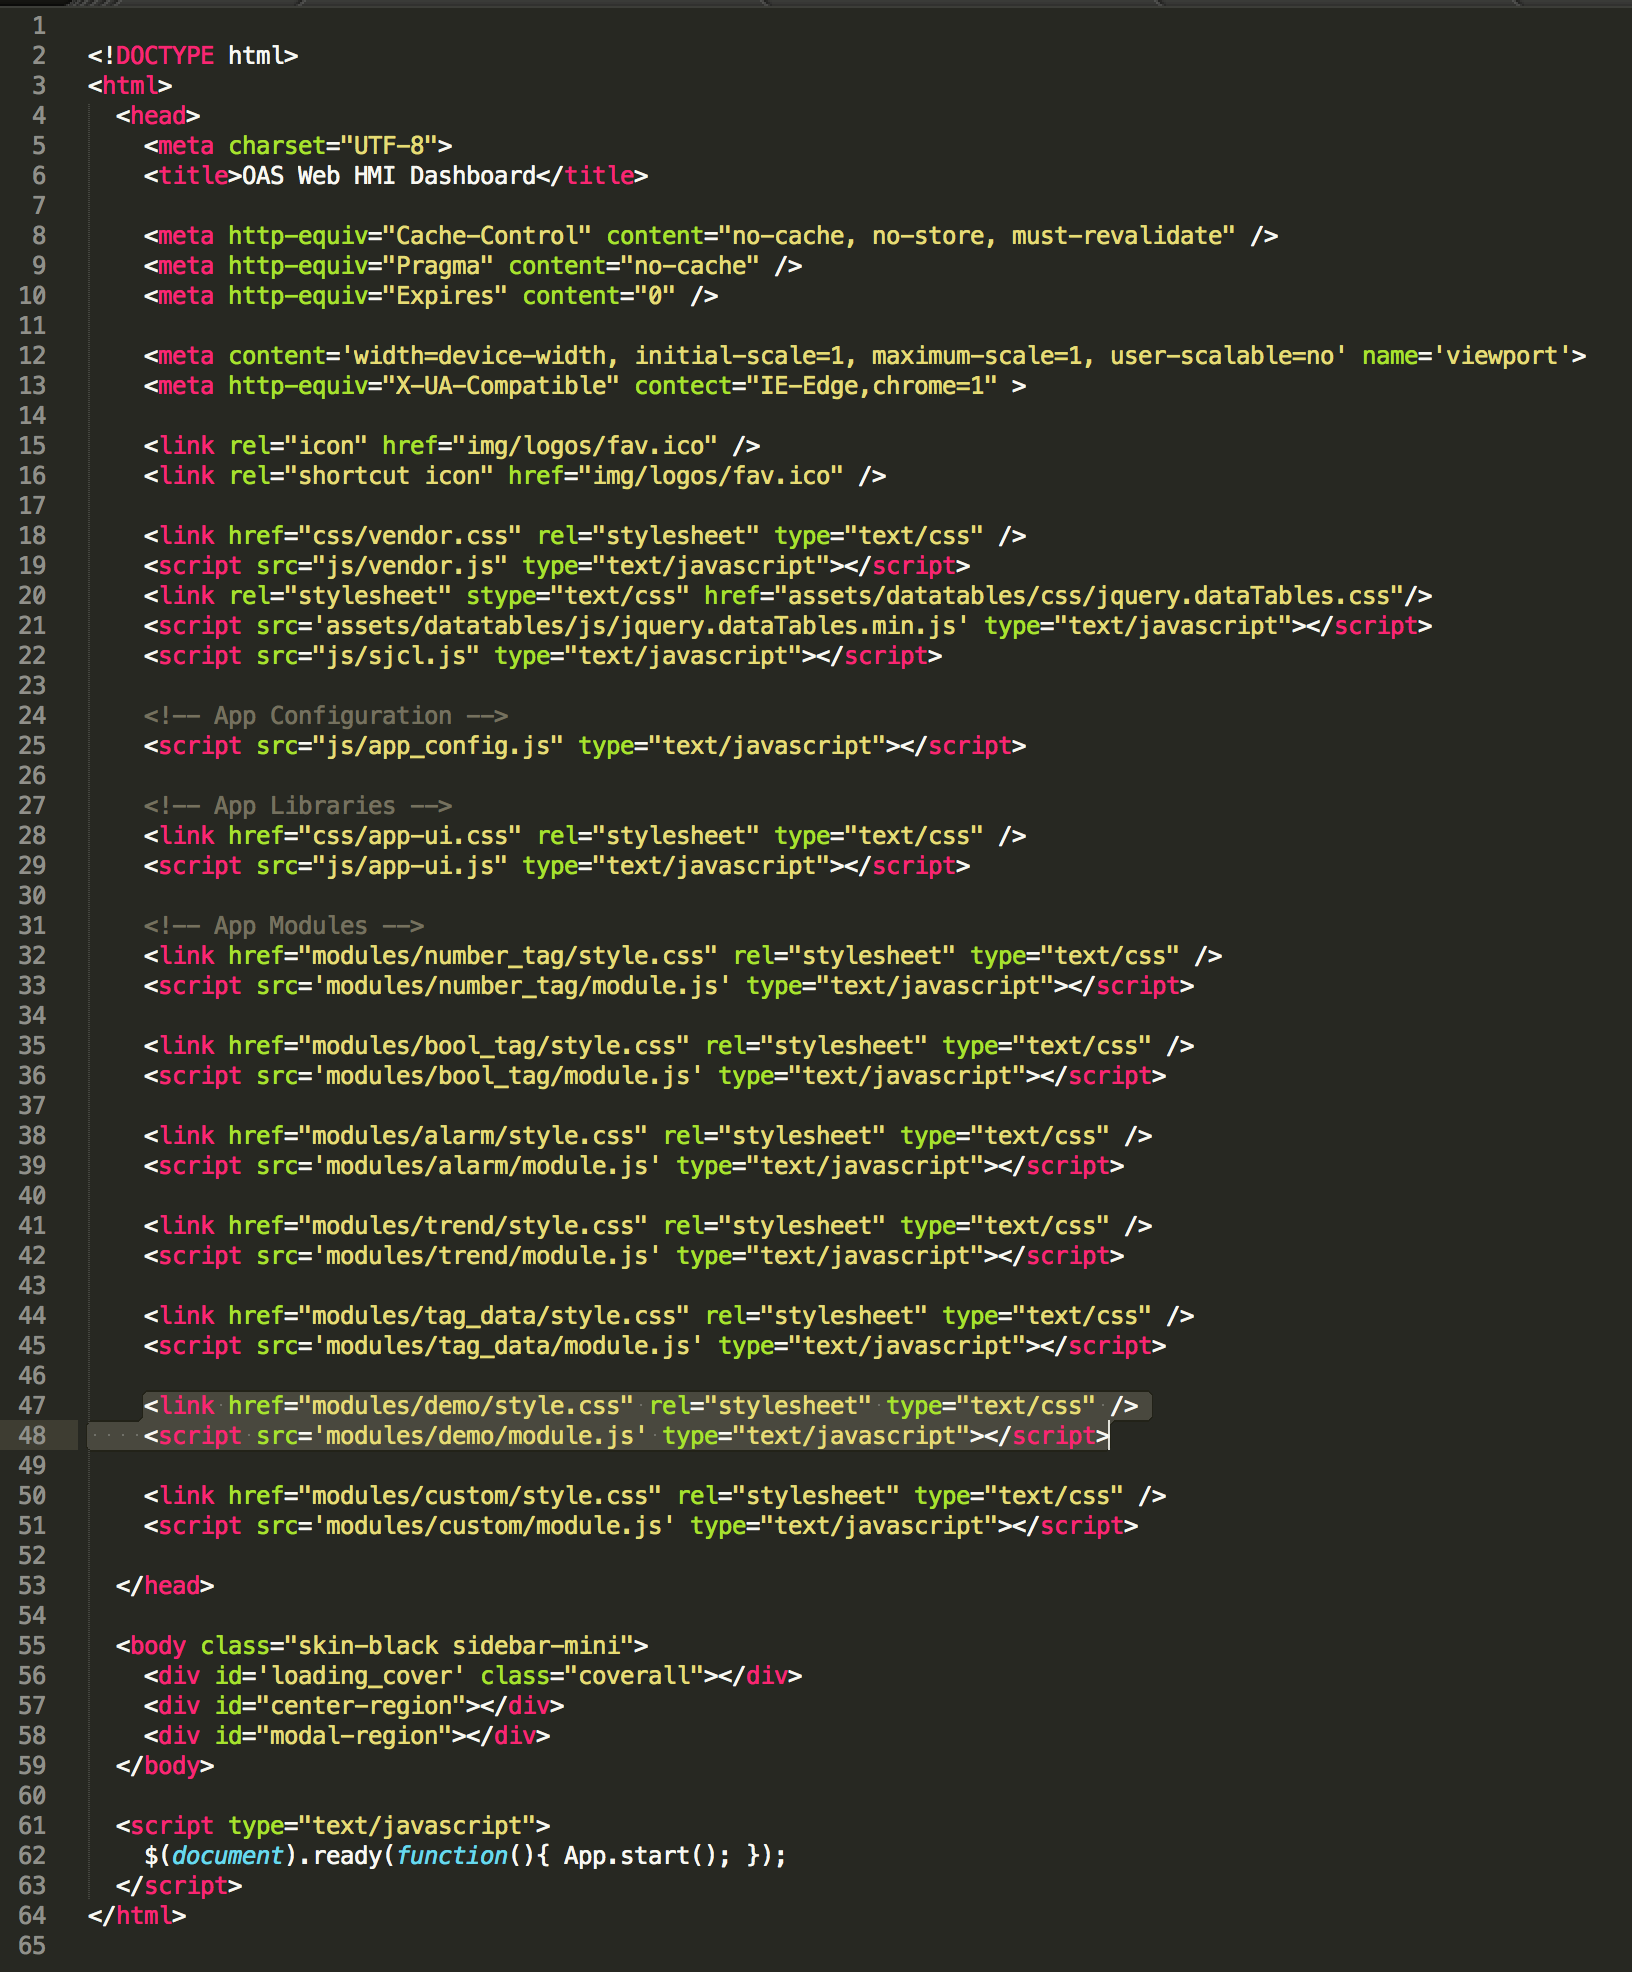
Removing Modules
To remove a module from the application, you simply need to remove the reference to the module script and stylesheet within the index.html file. These references are found in the <head> element of the index.html file. Once you remove these references, the module will no longer appear in the list of of modules for users to select.
See lines 31 – 51 in the code below to locate the module references.
If you are interested in modifications to the Web HMI Dashboard, or would like to speak with us about creating a module specific to your application, Contact Us today!
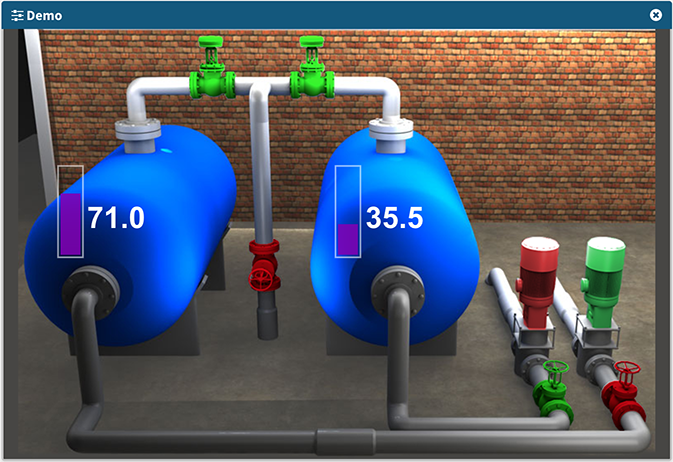
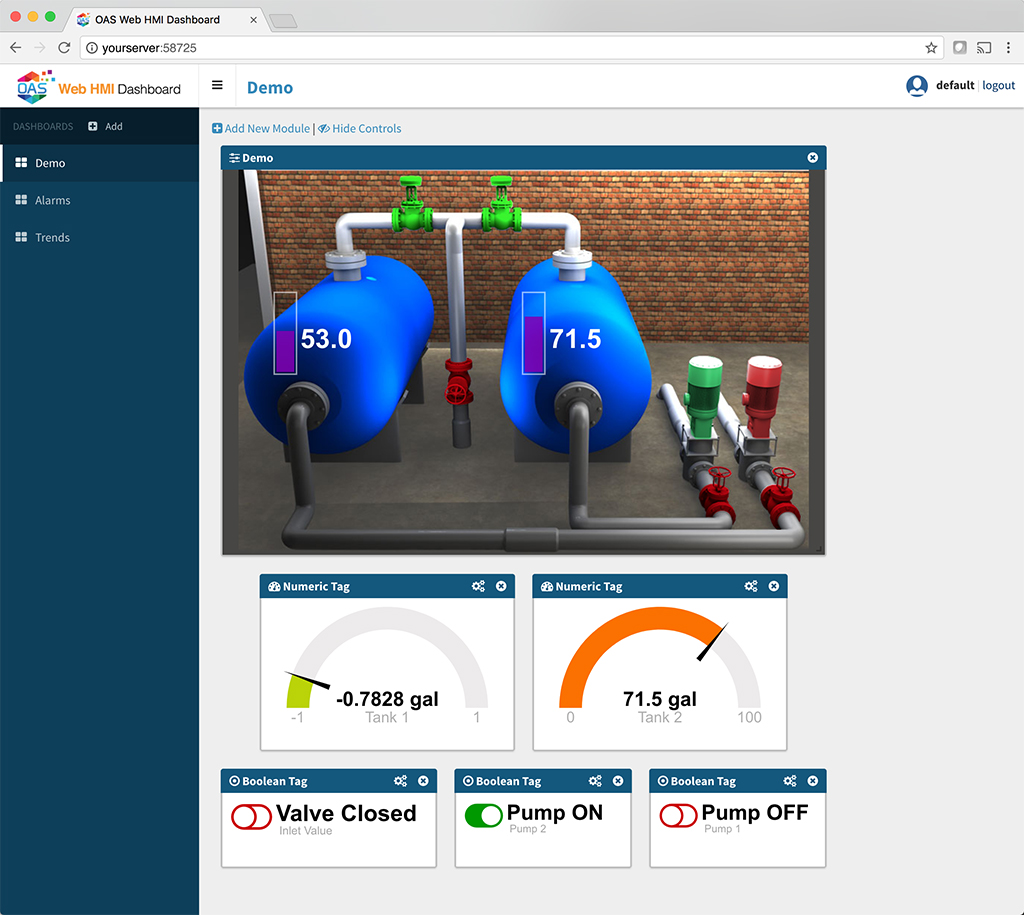
Demo Module
The Demo Module is an example of an interactive, visual representation of a physical system, with pumps, valves, and fluid level sensors. You can click or tap on each of the valves and pumps to simulate fluid flowing into or out of the two tanks. The corresponding tags in the OAS server can be found under the WPF/New Tanks Demo structure that is present in the demo tags included with each installation.
Numeric Tag Module
This module allows you to display a real time numeric value rendered as a gauge. As values change, the needle will animate, indicating the current value.can be configured
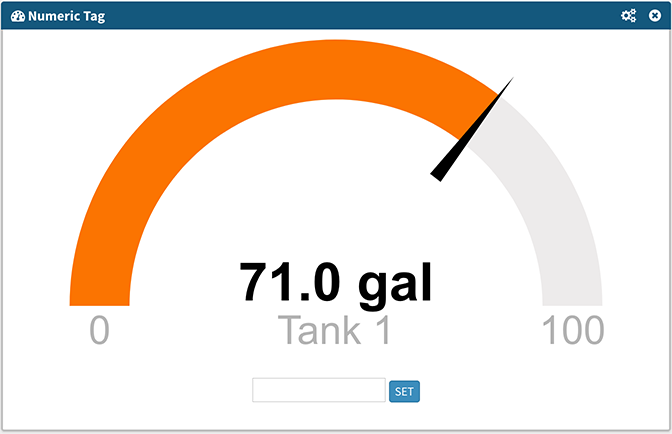
Configuration settings

Tag Name: the tag to be visualized – click the icon to browse or manually enter the tag
Label: the text label displayed below the current value
Min/Max: the range that determines the needle position (default: 0/100)
Gain/Offset: optional multiplier and value offset applied to the raw value
Decimals/Units: number of decimal places to display, and unit suffix added to the value
Read/Write: when checked, displays an input field, allowing users to set the tag’s value
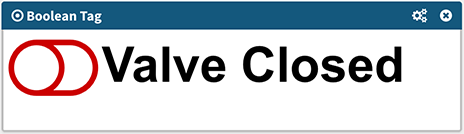
Boolean Tag Module
This module displays the current live value of a Boolean Tag. When configured to allow for read/write access, the display icon becomes a switch. If the switch is clicked or tapped, the server value will be toggled between True and False. The display can also be customized so that True and False text can be replaced with text of your choosing.
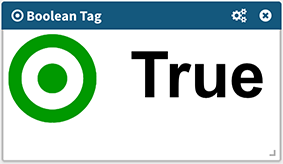
Configuration settings
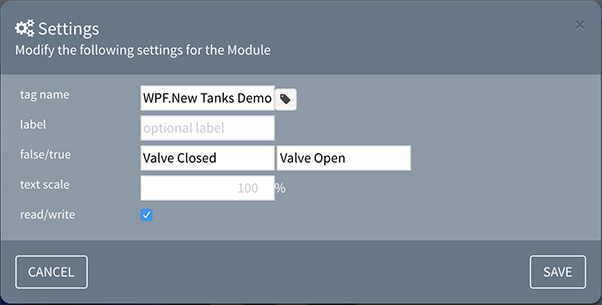
Tag Name: the tag to be visualized – click the icon to browse or manually enter the tag
Label: the text label displayed with the current value
False/True: optional text to display when the value is false or true, respectively
Gain/Offset: optional multiplier and value offset applied to the raw value
Text Scale: optional scaling % applied to text
Read/Write: when checked, changes the indicator to a switch icon and allows the user o toggle the value
Tag Data Module
This modules allows for the display of multiple server Tags along with their data type and real time values. This is very useful for checking the raw data coming from the server within a single tabular format. This module also allows the end user to modify Tag values when the Read/Write option is enabled.
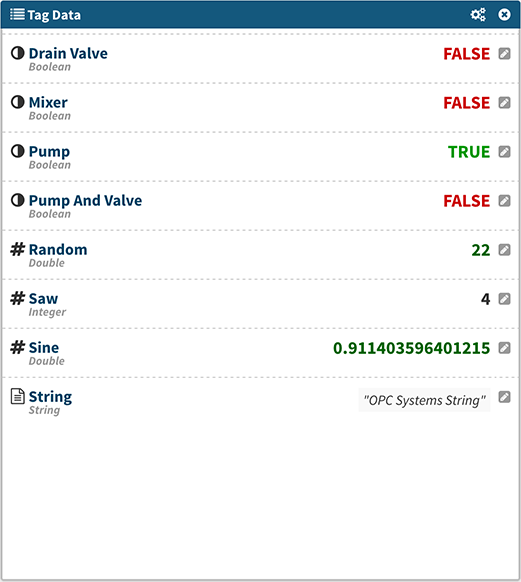
Configuration settings
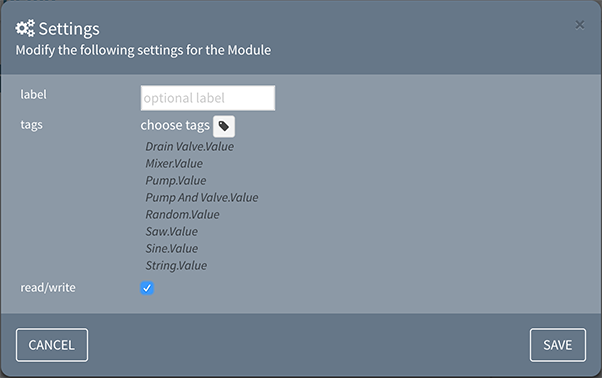
Label: the text label displayed above the grid
Tags: the list of tags to display – click the icon to choose one or more tags
Read/Write: when checked, adds an edit button next to each tag, allowing the user to set the tag’s current value
Alarm Module
This module encapsulates the Web Alarm viewer and allows the end-user to configure it to display the columns desired. It also allows users to configure the viewer to filter alarms by type, group, status, and priority. Because it is based on the Web Alarm product, it retains all functionality. See the following for more information on Web Alarm.
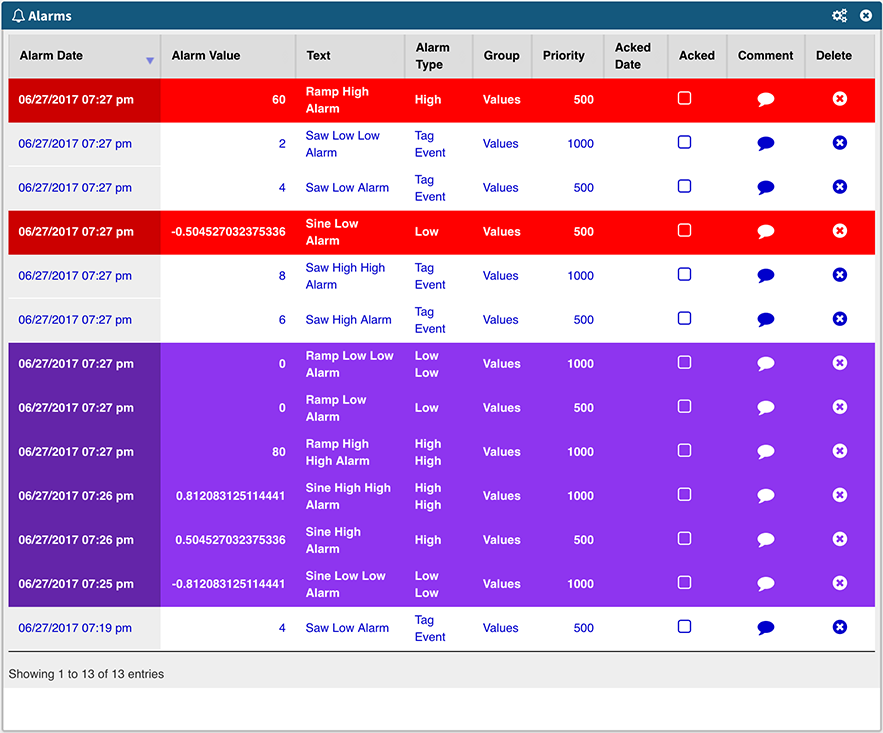
Configuration settings
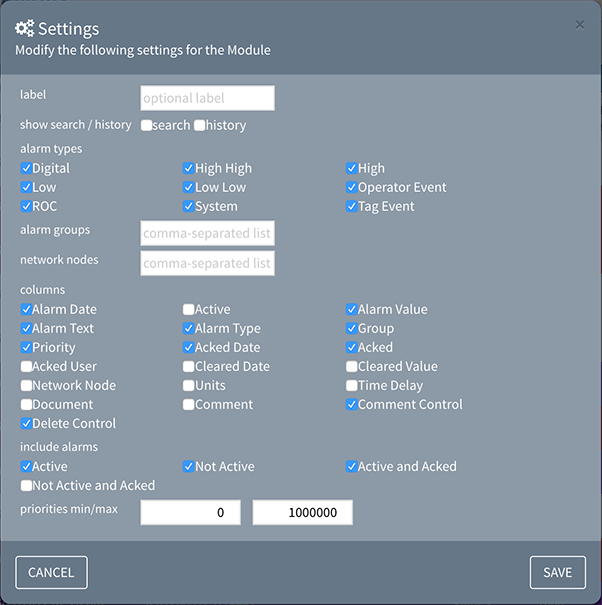
Label: the text label displayed above the alarms
Show Search/History: when checked, display the inline search and historical input fields
Alarm Types: list of Alarm Types to include in the display
Alarm Groups: a comma-delimited list of Alarm Groups to include in the display, defaulting to all if left blank
Network Nodes: a comma-delimited list of Network Nodes to include in the display, defaulting to localhost if left blank
Columns: list of Alarm fields to display in the grid
Include Alarms: list of Alarm statuses to include in the display
Priorities: the min and max priorities to include in the display
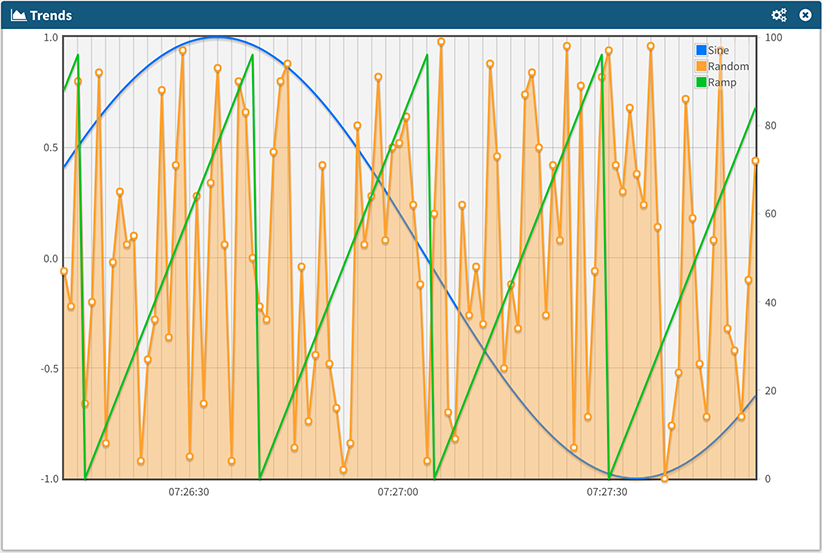
Trend Module
This module encapsulates the Web Trend viewer and allows the end-user to configure it to display a chart plotting both real time and historical trends. Because it is based on the Web Trend product, it retains all functionality, but requires no programming to configure. See the following for more information on Web Trend.
Configuration settings

Label: the text label displayed above the chart
Sample Rate: the frequency (in seconds) for each data point to be acquired
Timeframe: the number of seconds in the initial data set
Retain: The number of data points to retain in client memory – as more data is received, the chart will animate as it flushes non-retained values
History Data: when checked, allows users to select start and end dates for displaying historical data
Pens: click Add Tag to add a pen linked to a server tag. Each tag will include settings for Name, Label, Line style, and Y-axis range and position
Custom Module
This module allows you to specify any web URL so you may embed your custom code into the Web HMI Dashboard. You can either host the contents of a Custom module on any web server, or you may also add it to the modules folder in the application itself.
The module has a single parameter of a URL. When you use an absolute URL (containing the full URL such as “http://someurl.com/page”), the module will load from the source. If you use a relative URL (e.g. “somepage.html”) it will be loaded from the Web HMI Dashboard root folder.
This folder is located in the OAS installation directory under /webapps/webhmi.
Note: previous versions of the OAS server located these files within a www directory in the installation directory.
For example, if you create an HTML page titled index.html and you put it in a folder titled “newModule” under the modules folder, set the URL parameter to “modules/newModule/index.html”.
If you are interested in modifications to the Web HMI Dashboard, or would like to speak with us about creating a module specific to your application, Contact Us today!
Web HMI Dashboard Deployment
Default installation – No web server required
Once you have configured the Web HMI Registration host and port within the steps defined in Getting Started, you can now access the Web HMI Dashboard from your browser.
Open a browser to the Web HMI Dashboard at the following address:
http(s)://<server>:<port>/app/home
For example, if you are on the same machine as the OAS Service installation, you are not using SSL, and you are using the default port, the URL will be:
http://localhost:58725/app/home
By default, the Web HMI Dashboard will run in Demo Mode which will do the following:
- All logins no matter the credentials, will be allowed to log into the application and be provided individual dashboard settings
- New logins will be pre-populated with demo dashboards
To alter any application configurations, locate the Web HMI Dashboard directory located in the installation directory for Open Automation Software. This is typically:
C:\Program Files\Open Automation Software\OAS
The Dashboard folder is located in the OAS installation directory under /webapps/webhmi.
Note: previous versions of the OAS server located these files within a www directory in the installation directory.
Within this directory, look in the “js” directory and locate the file app_config.js. This is a JSON file containing application settings.
oas_url : optional hard-coded URL of the OAS server location. Omit this setting and the application will assume the server:port used to connect to the app
show_login_url : <true | false> determines if the OAS url can be supplied by the user in the login screen to point the application to a specific OAS service
session_timeout : <integer> number of minutes of inactivity before the user session is ended and the login screen is displayed
demo_mode : <true | false> enables or disables demo mode, enabling logins with any credential and enabling the refresh button to reset all dashboard modifications to the defaults
demo_dashboards : a JSON representation of the demo dashboards pre-populated for new users in demo_mode
Standalone web server deployment
If you choose to host the Web HMI Dashboard on your own web server, simply copy the contents of the www directory (described above) to the web server like any other static files. Be sure to include all files and folders within the www directory.
NOTE: when hosting the Dashboard on a separate server, you must alter the app_config.js setting for oas_url. This must be the server:port of the OAS server hosting the live data. This setting must be in the form:
http(s)://<server>:<port>
Getting Started – Web HMI Dashboard
NOTE: The OAS Open UIEngine is a more feature-rich, no-code HMI and application development platform for your automations than the Web HMI Dashboard, which is a basic set of tools for visualization.
See the UIEngine Documentation to learn more.
- 00:00 – Features of a WEB HMI Dashboard
- 01:33 – Alarm Dashboard
- 01:39 – Trend Dashboard
- 01:55 – Add a Dashboard
- 02:04 – Add a Module
- 02:59 – Built-in Modules
- 03:04 – Numeric Tag Module Configuration
- 04:53 – Boolean Tag Module
- 05:56 – Display Multiple Tags with real time values
- 07:09 – Alarms Module
- 08:21 – Trends Module
- 10:28 – Custom Module
- 10:34 – Configuration
- 11:16 – Demo Module
- 11:43 – Getting Started
- 12:58 – Open OAS Configuration App
- 13:20 – Static Files
- 14:46 – Removing a Module
- 16:25 – Deploying to IIS
- 18:41 – Conclusion
Step 1
Configure Web Services within the OAS Platform. For instructions on how to accomplish this as well as optionally using SSL for secure communications, see the following article:
Configuring OAS Web Services
Step 2
Open a browser to the Web HMI Dashboard at the following address:
http(s)://<server>:<port>/app/home
For example, if you are on the same machine as the OAS Service installation, you are not using SSL, and you are using the default port, the URL will be:
http://localhost:58725/app/home
Step 3
Once presented with the Web HMI Dashboard login screen, enter in an OAS server credential, or leave blank to use the default server credential and click “Sign In“.
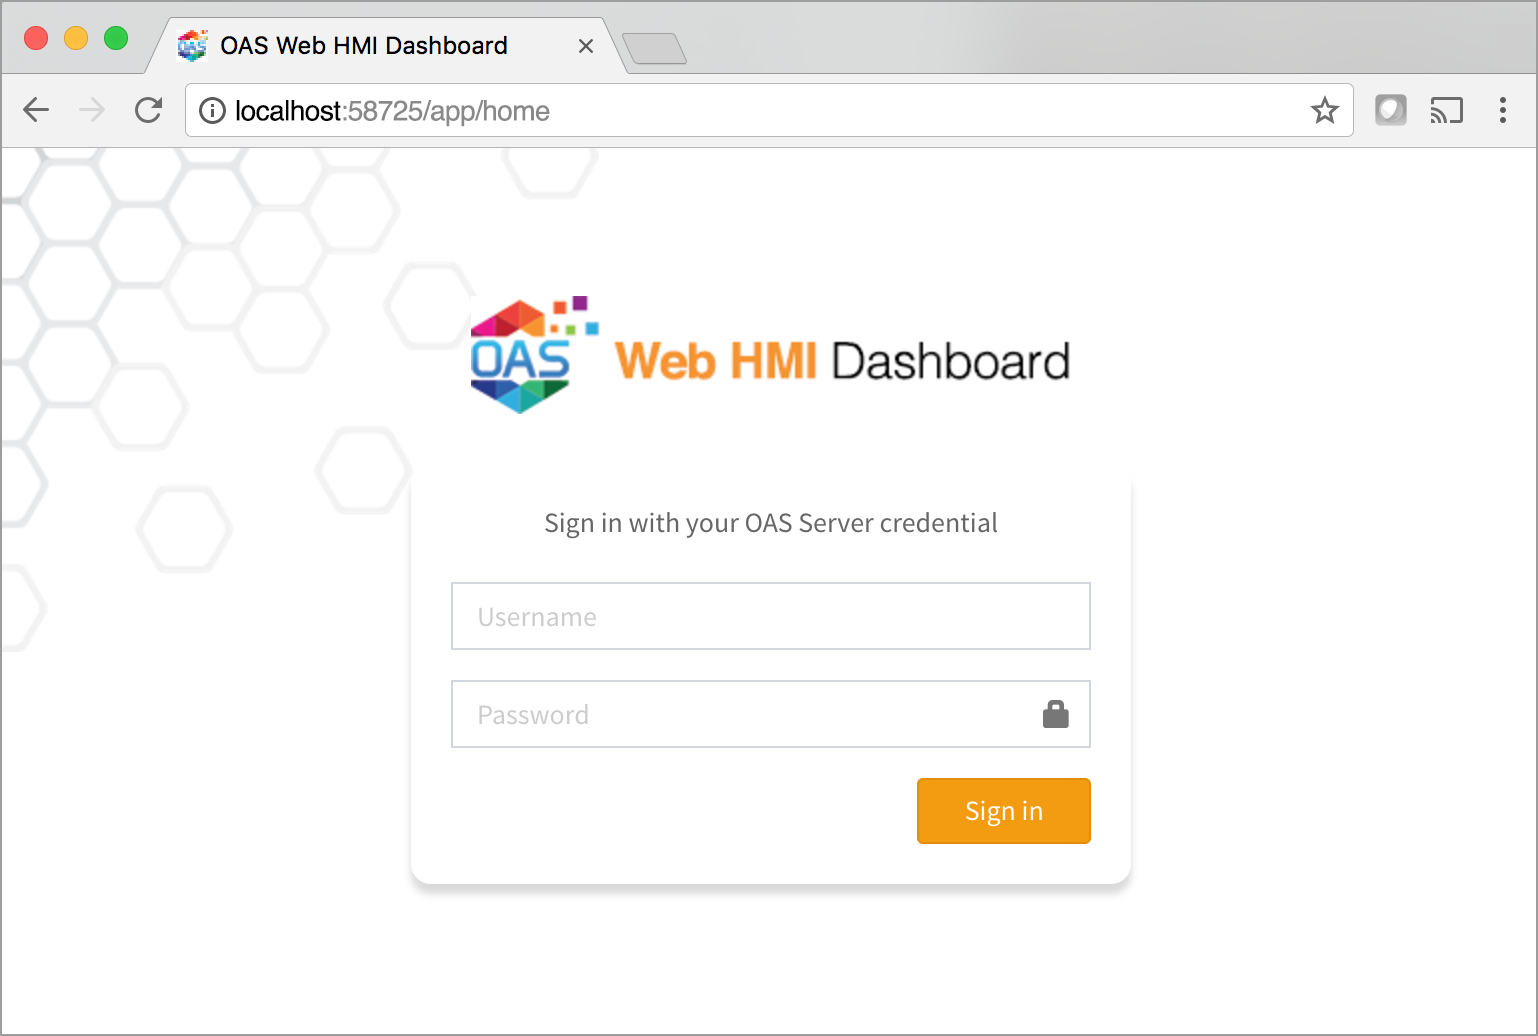
Upon successfully logging in, you will be presented with your personalized Web HMI Dashboard. If the application is in Demo Mode, you will be provided with some demo dashboards and you will see live data flowing into each module. All modifications to your dashboard will be saved within your login and remembered for your next session.
Additional Configuration Settings
By default, the Web HMI Dashboard will run in Demo Mode which will do the following:
- All logins no matter the credentials, will be allowed to log into the application and be provided individual dashboard settings
- New logins will be pre-populated with demo dashboards
To alter any application configurations, locate the Web HMI Dashboard directory located in the installation directory for Open Automation Software. This is typically in C:\Program Files\Open Automation Software\OAS. The Dashboard directory is labeled “www“.
Within this directory, look in the “js” directory and locate the file app_config.js. This is a JSON file containing application settings.
oas_url : optional hard-coded URL of the OAS server location. Omit this setting and the application will assume the server:port used to connect to the app
show_login_url : <true | false> determines if the OAS url can be supplied by the user in the login screen to point the application to a specific OAS service
session_timeout : <integer> number of minutes of inactivity before the user session is ended and the login screen is displayed
demo_mode : <true | false> enables or disables demo mode
demo_dashboards : a JSON representation of the demo dashboards pre-populated for new users in demo_mode
Overview – Web HMI Dashboard
NOTE: The OAS Open UIEngine is a more feature-rich, no-code HMI and application development platform for your automations than the Web HMI Dashboard, which is a basic set of tools for visualization.
See the UIEngine Documentation to learn more.
The Web HMI Dashboard is a an application that utilizes Web HMI, Web Trend, and Web Alarm and comes included at no cost with any of these products. It allows you to visualize real time and historical data from within desktop and mobile browsers without the need for any HTML coding to deploy it.
Since it is built upon the Web HMI product, it requires the installation and licensing of Web HMI. However, it can be accessed without the installation of an additional web server, or you are free to install it on a web server of your choosing.
If you wish to integrate data into an existing web interface or your own application please see Getting Started WEb HMI, Web HMI Wizard, Web Trend, and Web Alarm for full flexibility to update any HTML element dynamically based on OAS live and historical data.
Getting Started – REST API
The following guide demonstrates how to connect to the OAS REST API.
To see how to use the OAS Platform with an external REST API view the Moving Data to an External REST API Use Case.
- 00:00 – Introduction
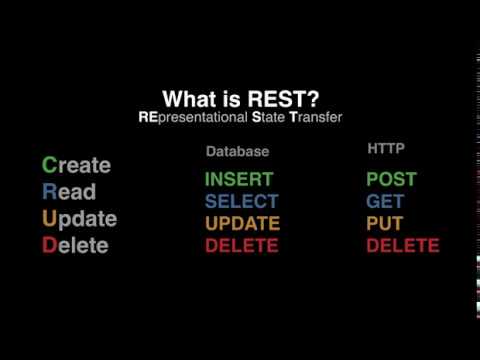
- 00:12 – What is REST API?
- 00:48 – What CRUD stands for?
- 00:52 – Database Terms for CRUD
- 01:00 – HTTP Parallel Methods
- 01:11 – Examples – Resources URLs
- 03:29 – What JSON stands for?
- 04:01 – Example – Difference between XML – JSON
- 04:22 – When to use OAS REST API
- 05:21 – REST Client Example Code
- 06:03 – Before using REST API
- 08:55 – REST Client Sample Code
- 10:03 – JavaScript
- 11:10 – Set HTTP Status
- 11:35 – Add Virtual Directory
- 12:12 – Sample Rest API Client
- 13:14 – Create a Tag List to Monitor
- 15:30 – Visual Studio
- 17:45 – Postman Application
- 21:08 – More Information
Step 1
To use the OAS REST API you must make sure that the OAS HTTP service is listening on the correct port. This is done within the OAS Configuration application.
Open the OAS Configuration application and select Configure > Options, then select the network node (localhost if working on the local machine) and click Select.
Under the Networking tab, locate the field for REST API/WebHMI Port Number. The default is 58725 but can be changed. If you are accessing the server from a remote client, you will also need to make sure your machine and/or company firewalls allow TCP traffic on the selected port.
Using SSL with REST API is fully supported.
Read more about Configuring OAS to use SSL for Web and REST API products.
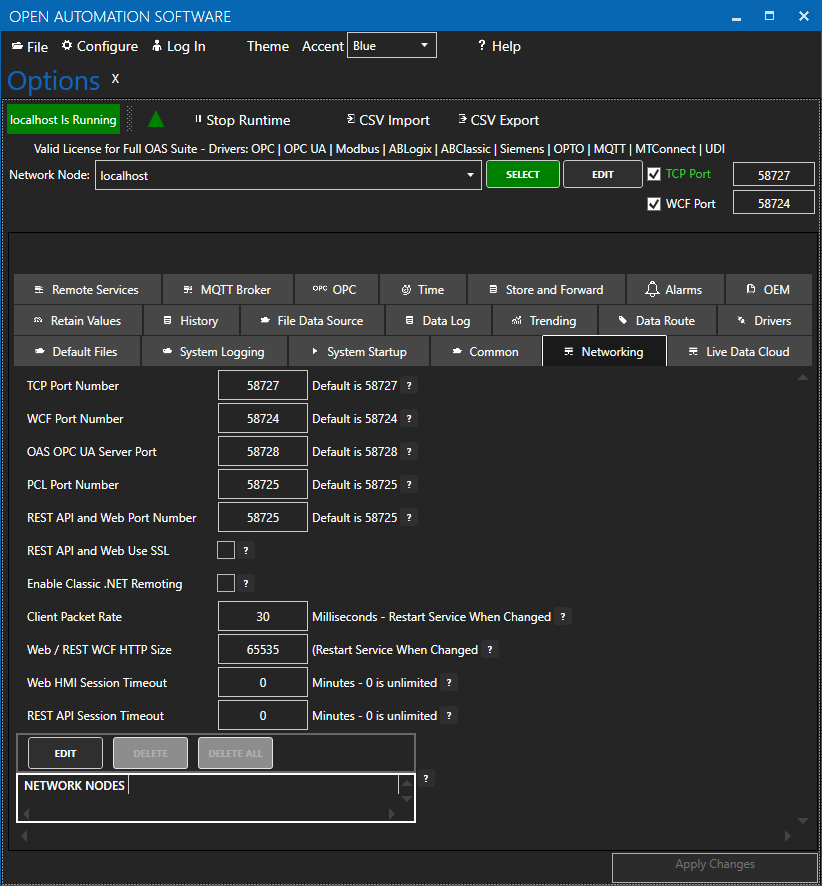
NOTE: Making any changes to the port numbers in this section of the configuration app will temporarily restart server processes and may cause a brief interruption in data processing.
Step 2
Install Postman
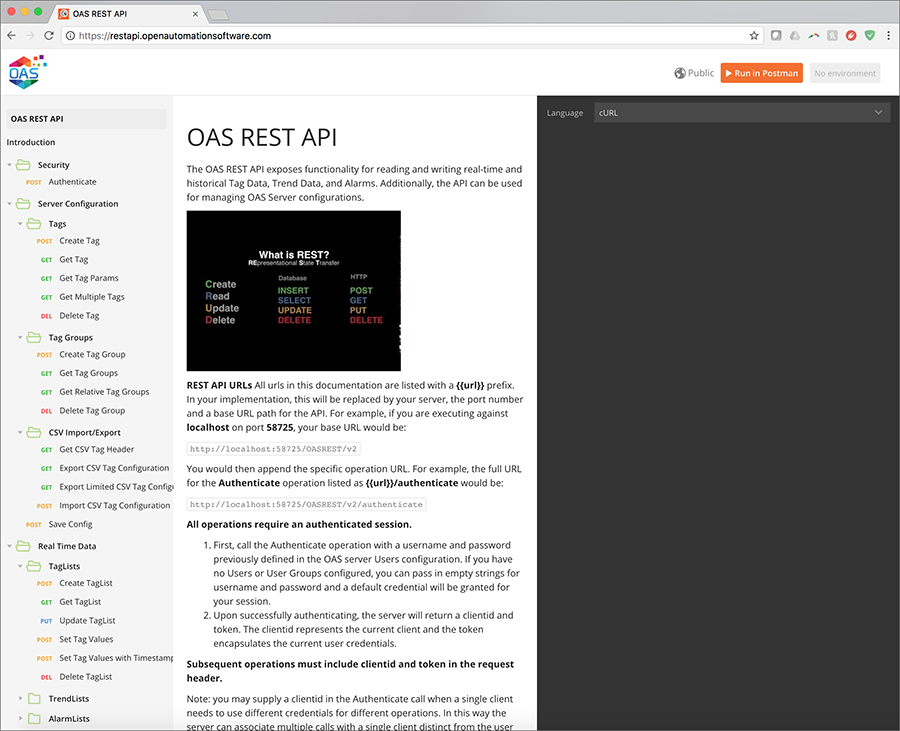
Navigate to https://restapi.openautomationsoftware.com to open the REST API online documentation.
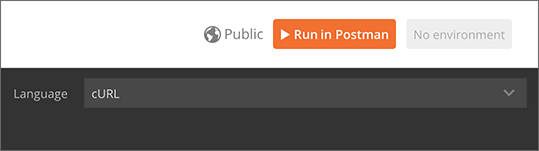
This documentation illustrates all of the operations available to any REST API client and can be tested using the Postman application client. In the upper right corner of the documentation, you will see a button to Run in Postman, which will install the API documentation into the Postman client for direct execution against any OAS server. Additionally, the documentation can be configured to display code samples in multiple languages including cURL, jQuery, and NodeJS. Feel free to browse the documentation at any time and to refer back to it while developing your applications.
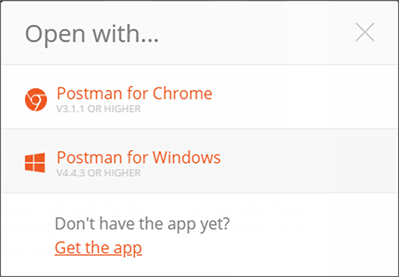
Clicking Run in Postman will pop up a dialog box to import the REST API into an existing installation of Postman, or you can choose to install the app for the first time. Postman is available for Windows and Mac desktops as well as in a Chrome extension.
Step 3
Test your API installation
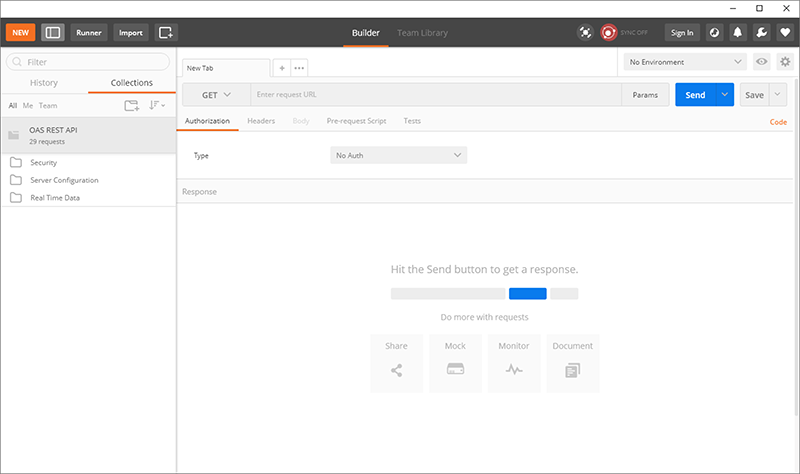
Once installed and the API has been downloaded into the app, you will see the following interface, with all operations on the left, organized identically to the online documentation:
The first operation to execute is the Authenticate call, which will generate a REST API session and returns a clientid and token to be used in all subsequent calls to the OAS server.
In the list of operations, expand and select Authenticate and you will see the following on the right side of the app:
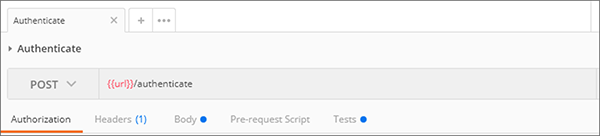
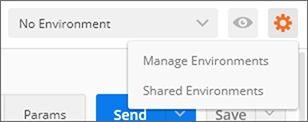
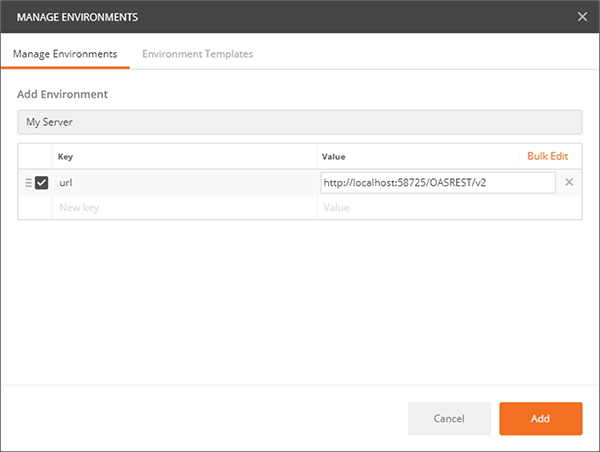
This shows that the Authenticate operation is executed as an HTTP POST against the /authenticate URL appended to the base {{url}}. This base URL is defined in your Environment here. Select Manage Environments to add new fields:
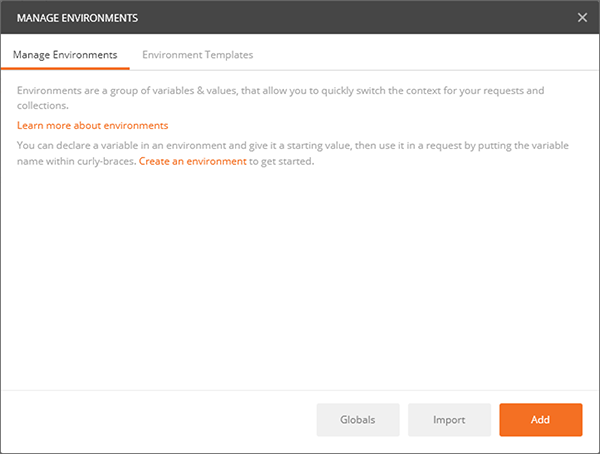
Add your server to the Environments list
Click ADD to create a new Environment which will hold environment variables:
Add a name for your environment, then add a key of url with a value of http://localhost:58725/OASREST/v2 and click ADD to create the new environment. You can also use your OAS server’s IP address instead of localhost, if you are connecting to it from a remote workstation.
Next, return to execute the the Authenticate operation.
Now under the Environments dropdown, select your new Environment. You should see the {{url}} turn orange, indicating that the environment variable is being used.

You can now click SEND to execute the post against your server. If successful, you should see a response body similar to the one below, containing the clientid and token fields.
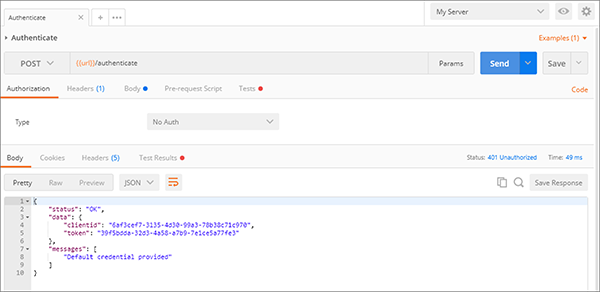
You can then use these fields in the header of all other operations using the Postman app to test your server.
Step 4
Accessing Tag Values
Once authenticated, you are now able to use the clientid and token in HTTP headers to make calls to configure Tags, access real time and historical Tag data, and even real time and historical Alarm and Trend data. When referencing Tags in any call, you it is assumed that you are accessing them on the OAS server being called in the REST API. However, you can also access remote Tags on any OAS server networked with the target server. Read more about the proper syntax for accessing Tags and Tag Variables.
Remote Access
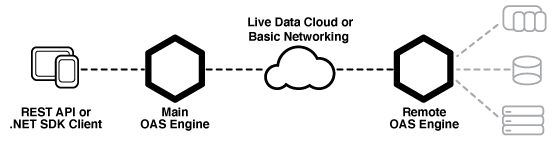
OAS servers can communicate with each other and pass along tag data. This allows for distributed network load as well as placing OAS servers behind firewalls so they cannot be accessed directly. This allows you to securely issue REST API calls against one server and read/write data within a remote OAS server that cannot be reached directly from the REST API client. This same concept applies whether you are calling the OAS REST API or using the .NET Data Connector for programmatic Tag access and configuration.
- Main OAS Engine : the server handling the REST API calls
- Remote OAS Engine : the server housing the tag data or configuration you would like to access
REST API URL
Set the url to OAS Engine that the REST API will be hosted from. This is the URL to the Main OAS Engine whether you are accessing tag data on the Main OAS Engine or on a Remote OAS Engine.
Localhost URL : will only work when accessing the Main OAS Engine on the same machine as the client.
http://localhost:58725/OASREST/v2
Explicit URL : use the IP Address or domain name of the Main OAS Engine, allowing you to access it from a remote client. This will also work on the same machine and is the best option for code flexibility.
http://192.168.0.1:58725/OASREST/v2
Tag Access
Main OAS Engine Tag – accessing tag data on the Main OAS Engine only requires referencing the tag path.
{
    "tags": [
      {"path":"TagName.Value"}
    ]
}
Remote OAS Engine Tag – To monitor real time data from Remote OAS Engines reference the tag path in the form \\<Remote OAS address>\<Tag Path>. Note in the example below that backslash characters are escaped within strings, changing \ to \\ and \\ to \\\\.
Basic Networking – Static IP or domain name
{
    "tags": [
      {"path":"\\\\192.168.0.2\\TagName.Value"},
      {"path":"\\\\192.168.0.3\\TagName.Value"},
      {"path":"\\\\myserver.com\\TagName.Value"}
    ]
}
Live Data Cloud Networking – Dynamic IP
Once you have registered named Live Data Cloud nodes on an OAS server, you can reference them in the form RemoteSCADAHosting.<Node Name>.<Tag Path>.
{
    "tags": [
      {"path":"RemoteSCADAHosting.LiveDataCloudNode01.TagName.Value"},
      {"path":"RemoteSCADAHosting.LiveDataCloudNode02.TagName.Value"},
      {"path":"RemoteSCADAHosting.LiveDataCloudNode03.TagName.Value"}
    ]
}
Remote Configuration Calls
To execute REST API Tag Configuration calls against Remote OAS Engines, you can use the networknode parameter to reference a static IP or domain name, or the ldc parameter to reference a Live Data Cloud node name. The example below demonstrates calls to the CSV Tag configuration calls using each of these methods.
Basic Networking – Static IP or domain name
http://192.168.0.1:58725/OASREST/v2/csvtags?columns=Tag,Value - Data Type,Value - Value,Last Column&networknode=192.168.0.2
Live Data Cloud Networking – Dynamic IP
http://192.168.0.1:58725/OASREST/v2/csvtags?columns=Tag,Value - Data Type,Value - Value,Last Column&ldc=LiveDataCloudNode01
Remote Security
Because your authentication call is always against the Main OAS Engine, that same credential will be passed to any networked OAS Engine when referencing remote Tags. So it is critical to make sure the same credential (username/password) exists on all networked OAS Engines and has been granted the appropriate access level for the command being executed.
Getting Started – Web HMI
The following content will get you started with Web HMI, building your own web user interfaces with real time data.
NOTE: If you want to visualize your data in a desktop or mobile browser with zero programming, you may be interested in the OAS Open UIEngine .
The UIEngine is a robust no-code web application and HMI builder for developing rich user interfaces in a browser-based development environment.
See the UIEngine Documentation to learn more.
For full reference information on Web HMI visit Programming Reference – Web HMI

- 00:00 – Introduction
- 00:07 – What’s HMI?
- 00:54 – Open Standards
- 01:03 – Web HMI utilizes a direct line of communication
- 01:23 – What can be built with Web HMI?
- 02:51 – Setting Up the server
- 02:57 – First Step – Registering a listener on the server
- 03:40 – Configure Tags
- 04:25 – Writing Code
- 05:47 – Text Editor
- 06:07 – HTML attributes
- 14:12 – Develop Same Functionality Programmatically
- 18:30 – More Information
Step 1
Configure Web Services within the OAS Platform. For instructions on how to accomplish this as well as optionally using SSL for secure communications, see the following article:
Configuring OAS Web Services
Step 2
Create a project directory. (Example C:\myWebHMI)
Step 3
Copy the 4 supplied files from C:\Program Files\Open Automation Software\OAS\HTML_HMI, js and css subdirectories to your project directory keeping the directory structure just the same.
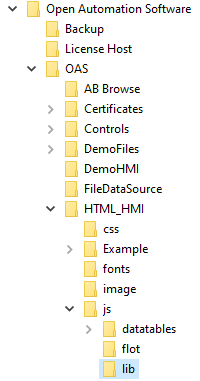
Directories
1. js/lib/jquery-1.8.3.min.js
2. js/lib/json2.js
3. js/opc-lib-min.js
4. css/opc-style.css
Note: You can use any version of jQuery as long as it is v1.8 or greater, and the json2 library is only necessary for older browsers such as IE 8.
Step 4
Open/create a new text document and add the following minimum code:
<!DOCTYPE html>
<html>
    <head>
        <script type="text/javascript" src="js/lib/jquery-1.8.3.min.js"></script>
        <script type="text/javascript" src="js/opc-lib-min.js"></script>
        <script type="text/javascript" src="js/lib/json2.js"></script>
        <link rel="stylesheet" stype="text/css" href="css/opc-style.css"/>
        <script type="text/javascript">
            OAS_config = {
                token:'7e61b230-481d-4551-b24b-ba9046e3d8f2',
                serverURL: 'http://localhost:58725'
            };
        </script>
    </head>
    <body>
    </body>
</html>
Networking
In the web page set the serverURL to the IP Address, Network Node Name, or registered domain name of the Linux or Windows devices where the OAS Engine located.
serverURL: 'http://192.168.0.1:58725'
Specify the tag names in the HTML code as local tags. The web browser can be run locally or remotely, it will communicate to the server specified in the serverURL as a relative path for the tag values. In this example the tags would be running on the same server as 192.168.0.1 and the content in the page would reference the tag as local even if the client browsers are running on remote devices.
Local Tag
myGroup.myTag.Value
If the tag is located on a different system than the serverURL or you want to host data from multiple OAS Engines use the Remote Tag Access syntax.
\\192.168.0.1\myGroup.myTag.Value
Live Data Cloud Networking from local OAS Engine
RemoteSCADAHosting.myLiveDataCloudNode.myGroup.myTag.Value
Live Data Cloud Networking though remote OAS Engine
\\192.168.0.1\RemoteSCADAHosting.myLiveDataCloudNode.myGroup.myTag.Value
Step 5
If you are new to HTML code use the HTML Wizard code generator at http://opcweb.com/wizard/ to generate the code for you.
In the body add the following code to display the Ramp tag value:
<div>Ramp Value = <label id="txt1" oas-tag-txt='{"tag":"Ramp.Value","config":{"formats":{"bad_q":"?????","float":"0.0"}}}' ></label></div>
Step 6
Below the Ramp code add the following code to display the Pump tag Value:
<div>Pump Value = <label id="txt2" oas-tag-txt='{"tag":"Pump.Value","config":{"formats":{"bad_q":"?????"}}}' ></label></div>
Step 7
Finally below the Pump code add the following to create a button that will allow you to “Toggle” the Pump Value.
<div><button id="tog2" oas-tag-set='{"tag":"Pump.Value","config":{"evt":"click","offset":0,"set":"toggle","set_src":""}}'>Toggle Pump</button></div>
NOTE: To be able to set a value (write to it) it must first be setup to read in the web application.
Step 8
Save your file as myWebHMI.html
Step 9
Deploy the your application to any web server. This can be IIS on Windows, or any HTTP server on Linux, and even cloud hosting services.
Step 10
To see the results open a browser to the location of your HTML file.
Full Source Code
Your final code should look like this:
<!DOCTYPE html>
<html>
    <head>
        <script type="text/javascript" src="js/lib/jquery-1.8.3.min.js"></script>
        <script type="text/javascript" src="js/opc-lib-min.js"></script>
        <script type="text/javascript" src="js/lib/json2.js"></script>
        <link rel="stylesheet" stype="text/css" href="css/opc-style.css"/>
        <script type="text/javascript">
            OAS_config = {
                token:'7e61b230-481d-4551-b24b-ba9046e3d8f2',
                serverURL: 'http://localhost:58725'
            };
        </script>
    </head>
    <body>
    <div>Ramp Value =  <label id="txt1" oas-tag-txt='{"tag":"Ramp.Value","config":{"formats":{"bad_q":"?????","float":"0.0"}}}' ></label></div>
    <div>Pump Value = <label id="txt2" oas-tag-txt='{"tag":"Pump.Value","config":{"formats":{"bad_q":"?????"}}}' ></label></div>
    <div><button id="tog2" oas-tag-set='{"tag":"Pump.Value","config":{"evt":"click","offset":0,"set":"toggle","set_src":""}}'>Toggle Pump</button></div>
    </body>
</html>
NOTE: To be able to set a value (write to it) it must first be setup to read in the web application.
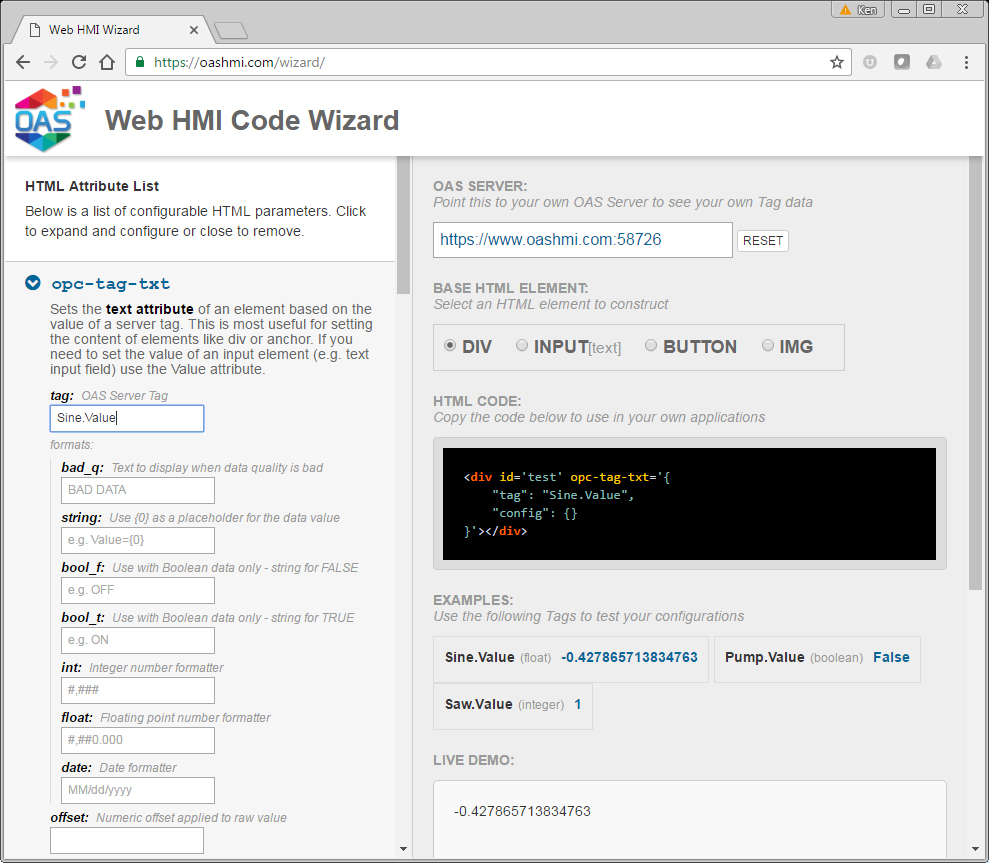
Open Automation Software provides a tool for automatically creating the HTML code to read and write to Open Automation Software Tags using the HTML HMI Wizard.