Overview – Database Connectors

The Open Automation Platform provides a number of connectors that give you the ability to interface with the most common database vendors on the market.
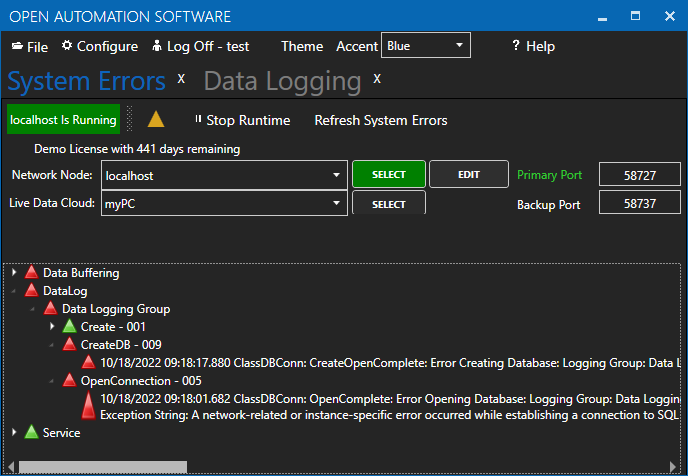
Data Logging

Best for: High-speed and resilient data logging and trending historian

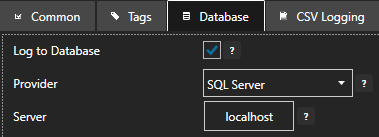
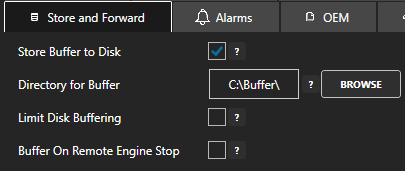
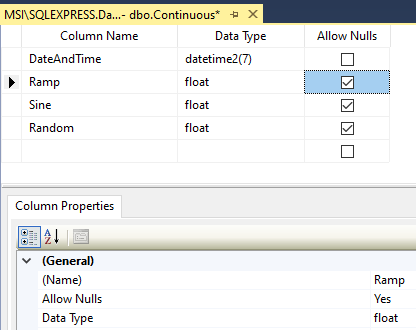
The Data Logging product, which is also known as the Data Historian, allows you to log Tag data to databases and CSV files. Database logging supports SQL Server, Oracle, Access, MySQL, PostgreSQL, Cassandra, MongoDB, MariaDB, SQLite, InfluxDB, SQL Azure, Amazon Aurora, Amazon RDS, Amazon Redshift and Google Firebase.

Database Tag

Best for: Sourcing Tag data from a specific database field and row based on a dynamic query

The Database Tag feature adds an additional type of Tag data source to OAS that allows you to integrate a Tag’s value with a database field. It supports many of the common database providers such as SQL ServerOracleMySQLCassandraPostgreSQLMariaDB, and SQLite

Recipes

Best for: Loading a row of data into a set of Tags and executing a batch process

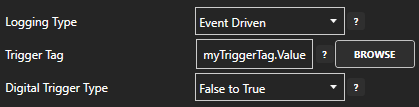
The OAS Recipe product allows you to source your Tag data from a table in a database using either a continuous, event driven or time of day execution method.

A common use case for the recipe feature is to allow a PLC to set a boolean Tag, which causes the next set of data to be loaded from the database. This data is then written back to the PLC for execution. The recipe feature also includes a confirmation tag and an error tag to indicate to the PLC whether the data is read or there was an error. This type of two-way feedback mechanism makes it easy for you to integrate your database data with any supported PLC protocol.

The recipe feature supports SQL Server, Oracle, Access, MySQL, PostgreSQL, Cassandra, MongoDB, MariaDB, SQLite, InfluxDB, Amazon Redshift and Google Firebase.

Data Logging Errors

Below are some helpful troubleshooting steps to resolve common data logging errors.

db-error

License

Use Configure-License to verify that the Data Historian product feature is enabled.

Menu Configure License

Licensed Features

System Errors

Select Configure-System Errors and expand any Data Log errors to see the details of the error.

Menu Configure System Errors

Data Log System Errors

The information provided can often help you determine the cause of data logging failure.

The history of all systems errors can be found in the OAS Error Log specified under Configure-Options-System Logging.

Menu Configure Options

Error Log Path

Log Data Logging Transactions

You can enable Log Data Logging Transactions under Configure-Options-System Logging to track and record all transactions for each logging group.

Menu Configure Options

Log Data Logging Transactions

Specify the location of where the transaction logs will be saved with the property Transaction Log Path further down in System Logging.

Transaction Log Path

All transactions will be recorded in the individual file for each logging group with the name of the file containing the logging group name.

The log will contain both any database errors and the values to be logged.

Example:

09:29:25.072 Tags and Values to be processed:
Tag: Ramp.Value
TimeStamp: 10/18/2022 09:29:25.000
Quality: True
Value: 65

Server

If the Server under the database tab is unreachable or incorrectly defined a System Error will indicate the database cannot be opened or created.

Menu Configure Data Logging

Data Log Server

Use the database admin tool like SQL Server Management Studio, pgAdmin4, or other appropriate database tool to see if it can connect to the local or remote database engine from the system OAS is running on.

If Set Server Name with Tag is enabled verify that the value of the string tag defined is the correct server name.  Try a static server name if so by disabling Set Server Name with Tag.

Security Access

Set the correct User Name and Password credentials from the database engine with access to create databases, tables, and field names along with the rights to insert and update records.

Menu Configure Data Logging

DB Windows Authentication

DB User Authentication

If logging to SQL Server see Database Security Login to define login access in the database engine.

Logging Active

The logging group needs to be active in order to process values to the database or CSV file.

Verify that Logging Active is enabled under the Common tab of the logging group.

Menu Configure Data Logging

Logging Active

If Active Logging with Tag is enabled verify that the Boolean tag defined is true and good quality.  Also verify that the tag and variable name is properly defined.

Event and Snapshot Trigger Tag

If the Logging Type is set to Event Driven, Event Driven Narrow, or Snapshot recording verify that the Trigger Tag is properly defined using the Browse button to an Integer or Boolean tag variable. 

Menu Configure Data Logging

Trigger Tag

Also verify that the value of the Trigger Tag is changing state using Configure-Tags.

Store and Forward

When there is an unresolved error data will be buffered to the Store and Forward directory specified under Configure-Options-Store and Forward. 

Menu Configure Options

Store and Forward

Check the directory specified for the store and forward location to see if any .dlb files are being buffered for the logging group.  If there are files being go to Configure-System Errors to see what Data Log error is causing the data buffering.

Data from the buffered files will be the first to be processed and must be resolved to move onto the next set of data, so current data will not be able to be logged until the store and forward buffered files can be processed.

You can extract the contents of any buffer file with the Data Buffer to CSV program under the Open Automation Software program group.

To discard the data within the buffer files and move onto the next record there are 3 options.

  1. Delete the oldest buffer file with the file name containing the data logging group name.
  2. If the System Error shows Null value being rejected see Null Value cause and resolution in the next cause.
  3. Enable the property Do Not Buffer Data On Error under the Common tab of the logging group.  Note: Enabling this property will disable the Store and Forward feature for the logging group.

Menu Configure Data Logging

Do Not Buffer Data On Error

Null Value

A null value will be recorded to the database or CSV file under one of the following conditions.

  1. The data quality of the tag to be logged is bad quality.  Use Configure-Tags to check the tag is good quality and contains a value that can be logged to the database field data type.
  2. The tag name is not correctly defined or does not exist. Check the Tag Parameter under the Tags tab of the logging group of each field if it exists and ends with one of the over 700+ Tag Variables such as .Value, .HighHighAlarmLimit, or .HighHighAlarmActive.

Note: Tag names are case sensitive.

Null Value Not Allowed

If one or more of the table columns has been modified to not allow null values in the field data will be buffered to the Store and Forward directory if the data quality of a tag to be logged is bad.

There are 2 solutions to resolve this conflict.

1. Change the field definition back to Allow Nulls.  First check with the database admin to why it was change to not allow null values in case there is a downstream report depending on the data.

Allow Null Values

2. Enable the property Discard Null Rejects under the Database tab of the logging group.

Menu Configure Data Logging

Discard Null Rejects

Create Table and Fields

If the table or field added is not automatically created in the database verify that Create Table and Fields is enabled under the Database tab of the logging group.

Menu Configure Data Logging

Create Table and Fields

Existing Table

If setting up logging to a table that already exists verify that the either all of the fields are correctly defined with the right data type or the fields that are not being logged to allow null values.

Database Triggers

If one or more database triggers is defined to a table note that the logging rate and reliability will be impacted by the trigger’s ability to complete.

If data is not being logged or slow to arrive in the database with no System Error reported check the table in the database engine if there are Triggers defined.  If there are Triggers check with the database admin if the triggers can be removed or revised to complete quickly and reliably.

DB Triggers

Note: If you need the Triggers to fire disable the bulk insert logging by setting the property Records to Enable Bulk Insert to 10000000.

Menu Configure Data Logging

Records to Enable Bulk Insert

Timestamps

The DateAndTime field will record the timestamp from the data source. If tags being logged from an OPC server and the time delivered is different than the local CPU time this can be overridden to use the local CPU clock at the data source of the Tag by setting the property Use TimeStamp from OPC Servers under Configure-Options-OPC to false.

Timestamp OPC Servers

To view the timestamp of any tag go to Configure-Tags and select the tag or parent group and select Add to Watch.  View the Watch Window article for an example of use.

Different Time Zones

It is not possible to log remote tag values from a different time zone using Continuous or Continuous Narrow with the local time.  In this configuration data must be logged with UTC time.  To enable UTC time enable the property Convert Timestamps to UTC under the Common tab.

Menu Configure Data Logging

Convert Timestamps to UTC

Another option is to set all tag values to UTC at the data source engine with the option Use UTC Timestamp under Configure-Options-Time.

Menu Configure Options

Use UTC Time

DateAndTime Field Resolution

By default the DateAndTime field defined under the Tags tab is set to High Resolution with 100 nanosecond resolution.  When logging to older versions of SQL Server, Oralce, or mySQL and the System Error Cannot find data type DateTime2 is reported uncheck the property High Precision under the Tags tab of the logging group.

Menu Configure Data Logging

Date Time High Precision

CSV File with Excel

When logging to a CSV file store and forward will be enabled when Excel opens the CSV file currently logged to.  Excel locks files for exclusive use when it has a file open.  There will be no data loss during this time and all data will be logged when Excel closes the file.

Troubleshooting – Visual Studio

WPF Properties Edit Ellipses Missing in VS 2022
Visual Studio 2022 design time properties no longer support custom property editors for WPF applications.  Use Visual Studio 2019 to develop WPF applications. The free Community Edition of Visual Studio 2019 can be download from https://visualstudio.microsoft.com/vs/older-downloads/. WinForm applications are still well supported in Visual Studio 2022.
Bad Data Quality in .NET Application.
Below are some possible reasons your .NET application is not able to read OAS tag values.

Data Source Quality

Use Configure-Tags to verify that the data quality of the source tags is "Good Quality". Menu Configure Tags
Quality Good

Security

The Default security group on either the local or remote OAS Engine may have Disable All Tags from Reading checked under the Read Tags Tab.  See Restrict Tag Access of Security setup to see how read, write, and browse access can be restricted. View how to Implement User Credentials in Client Applications to provide log in method for each user in the .NET application.

Network

.NET applications can be defined to communicate to remote OAS Engines.  See Network Communications Troubleshooting to verify that port 58727 is allowing both incoming and outgoing traffic through your firewall.

Tag Path

The full tag path would include the full tag name including its parent groups and the variable of the Tag.
MyGroup.MyTag.Value
Tag names are case sensitive and the current value of a tag would be .Value as the most common variable.
If the tag is from a remote OAS Engine see Basic Networking for standard remote tag syntax or Live Data Cloud Networking if the OAS Engine system has a dynamic IP address.
\\192.168.0.1\TagName.Value

License

Use Configure-License to verify that a product feature .NET Data Connector, WinForm HMI, or WPF HMI is enabled on the data source system where the tags are located. Menu Configure License
Enabled Products

Target Framework for WPF and WinForm Applications

The project type for WinForm and WPF applications should be set to include (.NET Framework) and target .NET Framework 4.6.1 or greater. WinForm Target Framework See the correct project type for WinForm above that is listed as Windows Forms App (.NET Framework) while Windows Forms App would not be the correct project type.

Assembly References

Visual Studio on some operating systems will assign a legacy assembly to the project causing an incompatibility due to an older version of the reference assembly.  A common assembly that can be incorrect is Newtonsoft.Json that has been registered in the GAC by another software product. Select Newtonsoft.Json under the Project References to verify the correct path and version as 13.0.0.0.
Newtonsoft.Json Assembly Reference If the Path does not reference the OAS installation directory remove the reference and select to Add Reference and browse for dll from the respective directory for the specific product feature. For .NET Framework applications include the .dlls located in C:\Program Files\Open Automation Software\OAS\Controls\NetFramework\. The Target Framework set for the VS project must be .NET Framework 4.6.1 or greater. For .NET Standard supporting the following targets include the. dlls located in C:\Program Files\Open Automation Software\OAS\Controls\NetStandard\. See a list of locations for the correct type in the troubleshooting type After updating to OAS Version 17 the project no longer compiles for a list of correct project reference paths for each type of Visual Studio Project.

.NET Assembly is Blocked

If you have copied an application or project to another computer you may need to Unblock one or more the .dll files. Right click on the .dll file that you have downloaded. Check the Unblock checkbox for security as shown in the example below, then click Apply or OK. Excel Add-In

Legacy .NET Application with OAS Version 17

 If the OAS .NET assemblies are from OAS version 16 or less contact support@oasiot.com for compatibility instructions.
Tag Browse in Visual Studio Missing
Microsoft Visual Studio 2022 no longer supports custom property editors to browse for tags. Use Visual Studio 2019 to develop WPF applications. The free Community Edition of Visual Studio 2019 can be download from https://visualstudio.microsoft.com/vs/older-downloads/. If you prefer Visual Studio 2022 with WPF application development use the OAS Excel Tag browser to browse for the full tag path of a remote or local tag and copy the full tag path from the Tag field and paste into the desired Tag property in Visual Studio.
After updating to OAS Version 17 the project no longer compiles

OAS version 17 implements an improved network interface which requires some additional assemblies.

All dependent .dlls are located in the relative subdirectory of the Controls directory of the OAS installation directory, typically C:\Program Files\Open Automation Software\OAS\Controls\.

To add a reference to a Visual Studio project right click on References in the Solution Explorer.

Add Reference

Select Browse to browse the directory for each application feature.

Browse Assemblies

Include all .dlls files in the respective directory for the specific product feature.

For .NET Framework applications include the .dlls located in C:\Program Files\Open Automation Software\OAS\Controls\NetFramework\.

The Target Framework set for the VS project must be .NET Framework 4.6.1 or greater.

For .NET Standard supporting the following targets include the. dlls located in C:\Program Files\Open Automation Software\OAS\Controls\NetStandard\.

  • .NET 5 or greater
  • .NET Core 2.0 or greater
  • .NET Framework 4.61 or greater
  • Xamarin.iOS 10.14 or greater
  • Xamarin.Android 8.0 or greater
  • UWP 1.0.0.16299 or greater

WPF HMI Assemblies

  • C:\Program Files\Open Automation Software\OAS\Controls\NetFramework\OPCWPFDashboard\

WinForm HMI Assemblies

  • C:\Program Files\Open Automation Software\OAS\Controls\NetFramework\OPCControls\

Alarm .NET Assemblies

  • C:\Program Files\Open Automation Software\OAS\Controls\NetFramework\OPCAlarmControl\
  • C:\Program Files\Open Automation Software\OAS\Controls\NetFramework\OPCAlarmDataOnly\
  • C:\Program Files\Open Automation Software\OAS\Controls\NetStandard\OASAlarms\

Trend .NET Assemblies

  • C:\Program Files\Open Automation Software\OAS\Controls\NetFramework\OPCTrendControl\
  • C:\Program Files\Open Automation Software\OAS\Controls\NetFramework\OPCTrendDataOnly\
  • C:\Program Files\Open Automation Software\OAS\Controls\NetStandard\OASTrends\

.NET Data Connector Assemblies

  • C:\Program Files\Open Automation Software\OAS\Controls\NetFramework\OPCSystemsDataConnector\
  • C:\Program Files\Open Automation Software\OAS\Controls\NetStandard\OASData\

Server Configuration Assemblies

  • C:\Program Files\Open Automation Software\OAS\Controls\NetFramework\OPCSystems\
  • C:\Program Files\Open Automation Software\OAS\Controls\NetStandard\OASConfig\
 
The .NET controls do not appear in the Toolbox after selecting to add them to the Toolbox.
If you right click Toolbox and Choose to Add Items and select the OPCWPFDashboard controls, yet they do not appear in the Toolbox you may have installed Visual Studio after Open Automation Software.  If so uninstall Open Automation Software and reinstall it.  It will then register correctly with Visual Studio for adding the controls.
After updating Open Automation Software with the incremental update the project no longer compiles or the application no longer works.
Make sure to Unblock the dlls before copying to C:\Program Files\Open Automation Software\OAS\Controls\NetFramework\ or C:\Program Files\Open Automation Software\OAS\Controls\NetStandard\.
To Unblock the files copy to a trusted location for your system, Desktop works well, then right click on the file and select Properties to select Unblock. Then copy from your Desktop to the correct directory in C:\Program Files\Open Automation Software\OAS\Controls\.
I get a thread exit message in Visual Studio 2013.
The thread exit message is a bug in Visual Studio 2013. https://connect.microsoft.com/VisualStudio/feedback/details/812144/vs2013-reports-incorrect-thread-exit-code Check to see if you have CTP 5 installed for up to date fixes. https://www.visualstudio.com/news/vs2013-update5
I receive an error stating that the Microsoft.Expression.Drawing.dll and Microsoft.Expression.Effects.dll is missing and not found.
These assemblies are included in the installation directory of Open Automation Software and can be included as a Reference in your project as local copy. Or you can install the Blend SDK from the following link that also includes these files. https://www.microsoft.com/downloads/details.aspx?displaylang=en&FamilyID=75e13d71-7c53-4382-9592-6c07c6a00207

Troubleshooting – Data Logging

Data Logging Errors

Below are some helpful troubleshooting steps to resolve common data logging errors.

db-error

License

Use Configure-License to verify that the Data Historian product feature is enabled.

Menu Configure License

Licensed Features

System Errors

Select Configure-System Errors and expand any Data Log errors to see the details of the error.

Menu Configure System Errors

Data Log System Errors

The information provided can often help you determine the cause of data logging failure.

The history of all systems errors can be found in the OAS Error Log specified under Configure-Options-System Logging.

Menu Configure Options

Error Log Path

Log Data Logging Transactions

You can enable Log Data Logging Transactions under Configure-Options-System Logging to track and record all transactions for each logging group.

Menu Configure Options

Log Data Logging Transactions

Specify the location of where the transaction logs will be saved with the property Transaction Log Path further down in System Logging.

Transaction Log Path

All transactions will be recorded in the individual file for each logging group with the name of the file containing the logging group name.

The log will contain both any database errors and the values to be logged.

Example:

09:29:25.072 Tags and Values to be processed:
Tag: Ramp.Value
TimeStamp: 10/18/2022 09:29:25.000
Quality: True
Value: 65

Server

If the Server under the database tab is unreachable or incorrectly defined a System Error will indicate the database cannot be opened or created.

Menu Configure Data Logging

Data Log Server

Use the database admin tool like SQL Server Management Studio, pgAdmin4, or other appropriate database tool to see if it can connect to the local or remote database engine from the system OAS is running on.

If Set Server Name with Tag is enabled verify that the value of the string tag defined is the correct server name.  Try a static server name if so by disabling Set Server Name with Tag.

Security Access

Set the correct User Name and Password credentials from the database engine with access to create databases, tables, and field names along with the rights to insert and update records.

Menu Configure Data Logging

DB Windows Authentication

DB User Authentication

If logging to SQL Server see Database Security Login to define login access in the database engine.

Logging Active

The logging group needs to be active in order to process values to the database or CSV file.

Verify that Logging Active is enabled under the Common tab of the logging group.

Menu Configure Data Logging

Logging Active

If Active Logging with Tag is enabled verify that the Boolean tag defined is true and good quality.  Also verify that the tag and variable name is properly defined.

Event and Snapshot Trigger Tag

If the Logging Type is set to Event Driven, Event Driven Narrow, or Snapshot recording verify that the Trigger Tag is properly defined using the Browse button to an Integer or Boolean tag variable. 

Menu Configure Data Logging

Trigger Tag

Also verify that the value of the Trigger Tag is changing state using Configure-Tags.

Store and Forward

When there is an unresolved error data will be buffered to the Store and Forward directory specified under Configure-Options-Store and Forward. 

Menu Configure Options

Store and Forward

Check the directory specified for the store and forward location to see if any .dlb files are being buffered for the logging group.  If there are files being go to Configure-System Errors to see what Data Log error is causing the data buffering.

Data from the buffered files will be the first to be processed and must be resolved to move onto the next set of data, so current data will not be able to be logged until the store and forward buffered files can be processed.

You can extract the contents of any buffer file with the Data Buffer to CSV program under the Open Automation Software program group.

To discard the data within the buffer files and move onto the next record there are 3 options.

  1. Delete the oldest buffer file with the file name containing the data logging group name.
  2. If the System Error shows Null value being rejected see Null Value cause and resolution in the next cause.
  3. Enable the property Do Not Buffer Data On Error under the Common tab of the logging group.  Note: Enabling this property will disable the Store and Forward feature for the logging group.

Menu Configure Data Logging

Do Not Buffer Data On Error

Null Value

A null value will be recorded to the database or CSV file under one of the following conditions.

  1. The data quality of the tag to be logged is bad quality.  Use Configure-Tags to check the tag is good quality and contains a value that can be logged to the database field data type.
  2. The tag name is not correctly defined or does not exist. Check the Tag Parameter under the Tags tab of the logging group of each field if it exists and ends with one of the over 700+ Tag Variables such as .Value, .HighHighAlarmLimit, or .HighHighAlarmActive.

Note: Tag names are case sensitive.

Null Value Not Allowed

If one or more of the table columns has been modified to not allow null values in the field data will be buffered to the Store and Forward directory if the data quality of a tag to be logged is bad.

There are 2 solutions to resolve this conflict.

1. Change the field definition back to Allow Nulls.  First check with the database admin to why it was change to not allow null values in case there is a downstream report depending on the data.

Allow Null Values

2. Enable the property Discard Null Rejects under the Database tab of the logging group.

Menu Configure Data Logging

Discard Null Rejects

Create Table and Fields

If the table or field added is not automatically created in the database verify that Create Table and Fields is enabled under the Database tab of the logging group.

Menu Configure Data Logging

Create Table and Fields

Existing Table

If setting up logging to a table that already exists verify that the either all of the fields are correctly defined with the right data type or the fields that are not being logged to allow null values.

Database Triggers

If one or more database triggers is defined to a table note that the logging rate and reliability will be impacted by the trigger's ability to complete.

If data is not being logged or slow to arrive in the database with no System Error reported check the table in the database engine if there are Triggers defined.  If there are Triggers check with the database admin if the triggers can be removed or revised to complete quickly and reliably.

DB Triggers

Note: If you need the Triggers to fire disable the bulk insert logging by setting the property Records to Enable Bulk Insert to 10000000.

Menu Configure Data Logging

Records to Enable Bulk Insert

Timestamps

The DateAndTime field will record the timestamp from the data source. If tags being logged from an OPC server and the time delivered is different than the local CPU time this can be overridden to use the local CPU clock at the data source of the Tag by setting the property Use TimeStamp from OPC Servers under Configure-Options-OPC to false.

Timestamp OPC Servers

To view the timestamp of any tag go to Configure-Tags and select the tag or parent group and select Add to Watch.  View the Watch Window article for an example of use.

Different Time Zones

It is not possible to log remote tag values from a different time zone using Continuous or Continuous Narrow with the local time.  In this configuration data must be logged with UTC time.  To enable UTC time enable the property Convert Timestamps to UTC under the Common tab.

Menu Configure Data Logging

Convert Timestamps to UTC

Another option is to set all tag values to UTC at the data source engine with the option Use UTC Timestamp under Configure-Options-Time.

Menu Configure Options

Use UTC Time

DateAndTime Field Resolution

By default the DateAndTime field defined under the Tags tab is set to High Resolution with 100 nanosecond resolution.  When logging to older versions of SQL Server, Oralce, or mySQL and the System Error Cannot find data type DateTime2 is reported uncheck the property High Precision under the Tags tab of the logging group.

Menu Configure Data Logging

Date Time High Precision

CSV File with Excel

When logging to a CSV file store and forward will be enabled when Excel opens the CSV file currently logged to.  Excel locks files for exclusive use when it has a file open.  There will be no data loss during this time and all data will be logged when Excel closes the file.

MS Access Error microsoft.ace.oledb.12.0 provider is not registered
MS Access Class not Registered System Error

For Office 2010, the following update will correct this issue.

https://www.microsoft.com/en-us/download/details.aspx?id=39664

For Office 365 (please note, by default Office365 installs the 32-bit version regardless of your system), use:

https://www.microsoft.com/en-us/download/details.aspx?id=54920

Data Logging System Error occurs with database engine error null values not allow.
The cause of this error is one or more of the database table columns has been modified  to not allow null values.  OAS creates the columns in the table to allow null values so when the data quality is bad for a tag value a null value will be inserted into the table.  The only column that should be set to not allow null values is the DateAndTime column.  There are 2 solutions to this error:
  1. Please review the columns in each table with the SQL Server Management Studio.  If they have been changed to not allow null values change them back to allow null values.
  2. Go to each logging group and enable the property Discard Null Rejects under the Database tab.  Keep in mind that with this property enabled the records to be logged that contain null values will be discarded and not logged.
Menu Configure Data Logging Discard Null Rejects
CSV Logging to a Remote Mapped Drive
Either enable the SYSTEM account to have read and write access to the mapped drive and directory, or set the OAS Engine Service LogOn to a user account that would have access to the remote mapped drive using these steps in setting the OAS Engine Service LogOn.
Logging to MS Access on a Remote Mapped Drive
Either enable the SYSTEM account to have read and write access to the mapped drive and directory, or set the OAS Reports Service LogOn to a user account that would have read and write access to the remote mapped drive.
Database Security Login
When you receive an error for Data Logging, Alarm Logging, or Recipe that there is a problem with the login security to the database engine in trying to open it or create it follow these steps which are shown for SQL Server, and would be similar to the other database engines.

Step 1

Start SQL Server Management Studio and connect to the database engine. Database Security Login 1

Step 2

Select the database engine in the Object Explorer and right click to select Properties.
Select Permissions on the left and choose NT AUTHORITY\SYSTEM or the user you are using with SQL login and Grant all permissions.
Note: NT AUTHORITY\SYSTEM is the account that the OAS Engine runs under by default and would be used when the Data Logging Group, Alarm Logging Group, or Recipe Group is using Windows Authentication for login.  If it is a remote database engine choose the Name of the system where OAS is running. Select OK

Step 3

Select Security-Logins in the database engine tree.
Database Security Login 2
For Windows Authentication Login open the PC account that the OAS Database Service is running on this would be NT AUTHORITY\SYSTEM for the local system. For SQL Server Login either add a new account or select an existing account where you know the password. For SQL Server login make sure the property to Enforce password expiration is disabled: Database Security Login 3
Under Server Roles enable all properties or at least sysadmin and public.
Database Security Login 4
Select OK and return to OAS to see if the Login error has been resolved.
If you still encounter a security access error select User Mapping and select the database you want to access to enable all properties except db_denydatareader and db_denydatawriter. Database Security Login 5

Setup Amazon RDS Database for IIoT

The Amazon Relational Database Service (AWS RDS) supports Amazon Aurora, Oracle, MariaDB, PostgreSQL, SQL Server and MySQL. Below are steps to create an AWS account and user if you don’t already have one, create a database on AWS and to configure it correctly for data logging. 

Step 1

Create AWS Account

If you don’t already have an AWS account, you will need to create one. See link below. AWS recommends that you create a separate IAM (AWS Identity and Access Management) user for using their RDS (Amazon Relational Database Service) services. See link below. You can, however, follow this tutorial using the root user account you create(d) during the AWS account setup.

Create AWS Account: https://portal.aws.amazon.com/billing/signup#/start
Create IAM Account: https://docs.aws.amazon.com/AmazonRDS/latest/UserGuide/CHAP_SettingUp.html#CHAP_SettingUp.IAM


Step 2

Create Database

Once you have logged into the AWS console, select Database >> RDS from the Services menu at the top. Next Click on the Create Database button.

AWS Create Database

Choose the Standard create option under the creation method. Under Engine options, choose your engine.

AWS DB Create

Under Settings, enter a DB instance identifier, a Master username and a Master password.

Note: For PostgreSQL and Aurora, the username can’t be admin, use postgres. For Oracle, database name must be DATABASE.

AWS DB

Under the Connectivity section, select Yes for Public access.

AWS MariaDB Public access

Click the Create Database button.

Step 3

Configure Database

Once your database is created, click on the DB identifier in the Database grid to view the details about your new database. Copy down the Endpoint, you will need this later.

AWS DB Endpoint

Under the Security group rules sections, click on the Security group whose Type is EC2 Security Group – Inbound.

AWS RDS Security

Click on Inbound rules and then Edit inbound rules.

Click Add rule. Change the Type to All traffic in the dropdown and the Source to My IP. Click Save rules.

Note: for SQL Server and PostgreSQL, you don’t have to create the database first. For MariaDB you need to ‘GRANT ALL PRIVILEGES’ to the admin user after you have created the database.

How to Configure Data Logging

The OAS Data Historian can log data to SQL Server, Oracle, Access, MySQL, PostgreSQL, Cassandra, MongoDB, MariaDB, SQLite, InfluxDB, SQL Azure, Amazon Aurora, Amazon RDS, Amazon Redshift, Google Firebase, and CSV files based on event, continuously, time of day, or on data change.  The articles below will help you configure data logging for your needs.

Data Logging System Error occurs with database engine error null values not allow.

The cause of this error is one or more of the database table columns has been modified  to not allow null values.  OAS creates the columns in the table to allow null values so when the data quality is bad for a tag value a null value will be inserted into the table.  The only column that should be set to not allow null values is the DateAndTime column.  There are 2 solutions to this error:

  1. Please review the columns in each table with the SQL Server Management Studio.  If they have been changed to not allow null values change them back to allow null values.
  2. Go to each logging group and enable the property Discard Null Rejects under the Database tab.  Keep in mind that with this property enabled the records to be logged that contain null values will be discarded and not logged.

Menu Configure Data Logging

Discard Null Rejects