Recipe Common Properties


Recipe Configuration

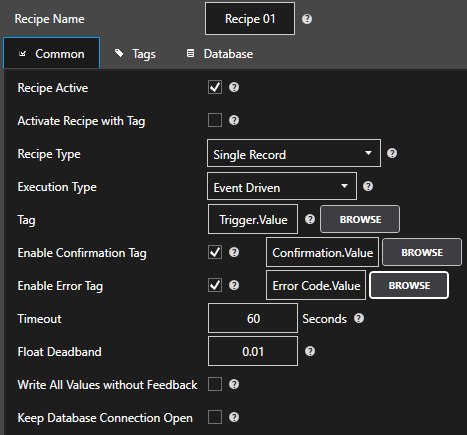
Recipe Name

The name that identifies the Recipe in the Recipes configuration. This name appears in System Alarms if there is a failure with the Recipe.

Recipe Active

Enables or Disables the Recipe. This can be controlled with a Tag Parameter value if Activate Recipe With Tag (see below) is specified. This does not initiate the execution, simply enables or disables the ability to execute the Recipe.

Activate Recipe With Tag

When enabled the Recipe Active selection is controlled with the specified Tag and Parameter that is specified. When the value of the Tag Parameter is True the Recipe is set to Active, and when the value is False the Recipe is set to Inactive.

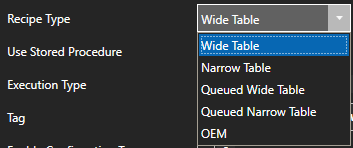
Recipe Type

Recipe Types:

  • Wide Table:  Database fields are mapped to Tags to update in the Tags tab of the recipe group.  When the recipe executes the TOP record values are transferred to the defined tags.
  • Narrow Table: The Tag names and values are all defined directly in the database table. The field names for the Tag names and values are set in the Tags tab.  When the recipe executes the multiple records returned will contain the tag names and the values to write.
  • Queued Wide Table: Database fields are mapped to Tags to update in the Tags tab of the recipe group. When the recipe executes the TOP record values are transferred to the defined tags.  When the recipe execution completes successfully the records are deleted.
  • Queued Narrow Table: The Tag names and values are all defined directly in the database table. The field names for the Tag names and values are set in the Tags tab.  When the recipe executes the multiple records returned will contain the tag names and the values to write.  When the recipe execution completes successfully the records are deleted.
  • OEM: Custom recipe routines are executed that are defined by the OEM Code. Not applicable unless your company is working with Open Automation Software directly for the custom recipe type.

Execution Type

Execution types:

  • Continuous: Transfer data at the specified Execution Rate. The minimum execution rate is 1 second.
  • Event Driven: Transfer data when the Event Driven Execution Tag Parameter value transitions from False to True. The time resolution for this feature is 1 second as the Tag Parameter can be specified from a remote OAS Service.
  • Specific Time Of Day: Transfer occurs at the specific Time Of Day.

Execution Rate

The rate of desired data transfer when the Execution Type is set to Continuous. The minimum execution rate is 1 second and the actual data transfer will depend also on the time that the database table can be queried to return the data. Recipe Active must also be set to True.

Tag to Execute Recipe

With the Execution Type is set to Event Driven this is the Tag Parameter that will cause the transfer to occur when the value transitions from False to True.  The time resolution for this feature is 1 second as the Tag Parameter can be specified from a remote OAS Service. Recipe Active must also be set to True.

Time Of Day

With the Execution Type set to Specific Time Of Day this will be the time that the transfer will occur. Recipe Active must also be set to True.

Enable Confirmation Tag

When enabled a Boolean Tag can be specified to receive confirmation of a successful Recipe execution. The specified Tag value will be set to false when Recipe first executes and will be set to True after all of the values to transfer have been successfully confirmed to be transferred.

Enable Error Tag

When enabled a Boolean Tag can be specified to receive an integer value with error codes to show what failure if any occurred. The specified Tag value will be set to 0 when Recipe first executes and will be set to a positive number if an error occurs.

0 = No error has occurred.

1 = No records to transfer.

2 = Database error in connection or table read.

3 = Timeout of values, one or more of the Tags did not report the same value back that was written within the Timeout (see below) period.

4 = Unable to delete Queued Record after the transfer was completed.

5 = OAS Recipe is not licensed.

6 = One or more of Tags has Bad Quality

7 = One or more of the Database Read Fields was Bad Quality

8 = One or more of the Tags was not setup to write.

Timeout

This is the amount of time the system will wait for a successful completion of data transfer before giving up and alarming the execution as a failure. If a failure of database connection occurs the failure will be reported immediately.

Float Deadband

When comparing database values written to Tags against the actual feedback values this is the allowable deadband for all values of Float type. This feature is useful for OPC values from PLCs for different resolutions than a 64 bit Double Float.

As long as the values are within the deadband no timeout will occur and the confirmation bit will be set.

To disable this feature for exact comparison on all float values set the value to 0.

Add, Delete & Modify Recipe

Add Recipe

Add Recipe

To add a Recipe to the Service enter a unique Recipe Name and specify all other parameters as desired, they can be modified later. Use the Add Recipe button at the top of the left pane in the Recipe Window.

Delete Recipe

Delete Recipe

To delete a Recipe of the selected Service, select the desired Recipe from the left pane in the Recipe Window and use the Delete Recipe Button at the the top of the pane.

Modify Recipe

Apply Changes

To modify an existing Recipe simply select the desired Recipe and make the modifications in the window followed by Apply Changes in the lower right corner.

Getting Started – Recipe

View the following video for a step by step tutorial on setting up data transfer from a database:

Recipes are used to transfer values from a database to Open Automation Software Tags. If the Tags Data Source is set device data or IoT Cloud systems the values will also be written to the source the Tag is defined to. The most common implementation is to have a variable in a PLC trigger the recipe execution.

The PLC will then wait for either the Confirmation or Error Code to be written to the PLC to indicate if the recipe execution has completed. If in Error the PLC can then retry the Trigger.

Follow the steps listed below or view the video on defining recipes.

For a complete list of all Recipe properties refer to the Recipe Properties section in this help file.

Step 1

OASStart Configure OAS application if it is not already running.

Step 2

Select Configure Tags to add some Tags to use with the Recipe execution.
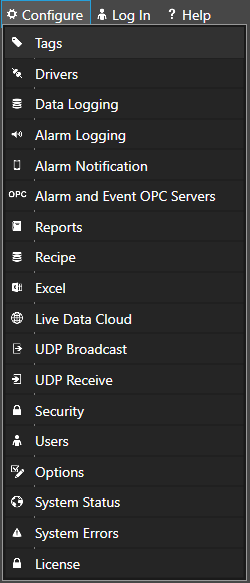
Configure Tags

Step 3

Select the Local OAS Service by selecting the Select button next to the Network Node dropdown.

Network Node

Step 4

If you are working on an existing Tag configuration you want to keep save it now.

Right Click on the Tags Group at the root level of the Tag Tree and select Delete All to clear all Tags.
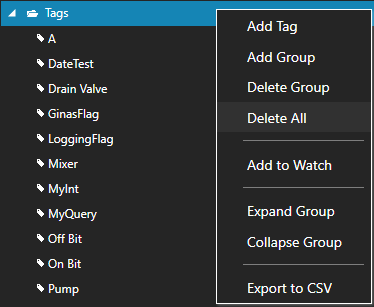
Delete All

Step 5

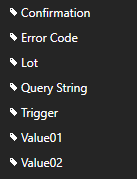
Add the following Tags with the specific Data Types:

Trigger as a Boolean

Value01 as an Integer

Value02 as an Integer

Lot as a String with the Value A

Confirmation as a Boolean

Error Code as an Integer

Query String as a String with Data Source of Calculation
“WHERE Lot = ” & “‘” & [Lot.Value] & “‘”
Step 6

Select the Save button on the toolbar at the top and use the file name Recipe Tags.

Save Button

Step 7

Use Microsoft SQL Server, Oracle, Access, mySQL, PostgreSQL, Cassandra, or MongoDB to create the following Table.

Create a Database called OASDemoRecipes

Create a Table called RecipeValues with the following structure.

Recipe

Enter the following values to the Table RecipeValues.

Recipe

Step 8

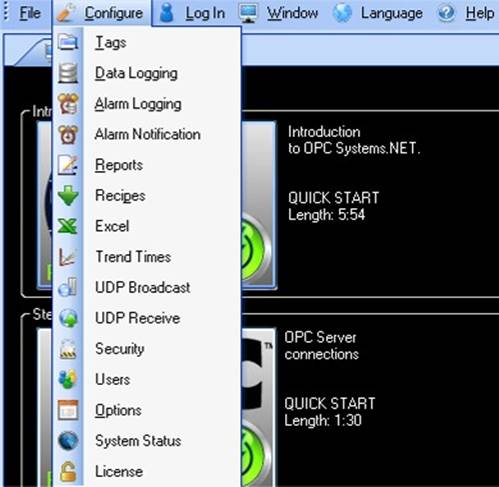
With the Configure OAS application select Configure-Recipes.
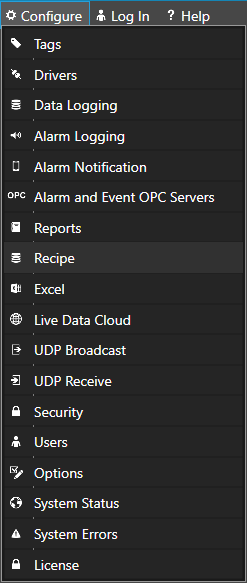
Configure Recipes

Step 9

Select the Local OAS Service by selecting the Select button next to the Network Node dropdown.

Network Node

Step 10

Enter the Recipe Name Recipe 01.

Recipe Name

Set the Recipe Active.  You also have he option to Activate the Recipe with a Tag.  For this tutorial just check the Recipe Active box.

Recipe Active

Set the Recipe Type to Wide Table.

Recipe Type

  • A Wide Table type allows you to map the database fields to read to the OAS tags in the Tags tab of the recipe group.
  • A Queued Wide Table type performs the same as Wide Table type and will delete the top record if the recipe execution is successful.
  • A Narrow Table has only 2 fields, one for the Tag Name to set and one for the Value to write to the Tag.  Using this type you can define the Tags to write to in the database table along with the values.
  • A Queue Narrow Table type performs the same as Narrow Table type and will delete the records obtained if the recipe execution is successful.

Set the Tag to Execute Recipe as Trigger.Value.

Enable Confirmation Tag as Confirmation.Value.

Enable Error Tag as Error Code.Value.
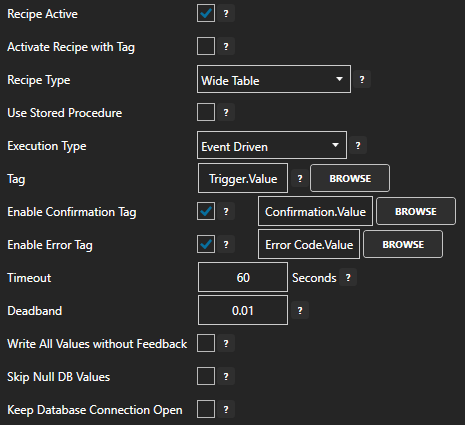
Recipe Properties

When a recipe is executed it will only write to Tags where the desired value from the database is different than the current value of the Tag.  For floating point values use the Float Deadband property under the Common tab to define what is the allowable range to determine if a value is the same or different.

The Timeout property is the amount of time the recipe execution will wait for all values to be returned from the Tags.  If one or more of the values does not read back from the data source the recipe execution will end with an Error Code of Timeout.

The property Write All Values Without Feedback will not wait for the values to be returned and will write all database values to all defined Tags.  This is preferred for a faster execution when using the Execution Type Continuous.

Step 11

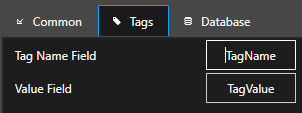
Select the Tags Tab

Tags Tab

With the Tags properties you can assign the database table fields to Open Automation Software Tags to write to when the recipe executes.

All OAS Tag Variables that are write capable including configuration parameters can be updated.

If the Data Source of the Open Automation Software Tag is defined to a device or IoT cloud server a write to the Value variable will it will automatically write the database value to the source.

Select the Add Field button.

Add Tags

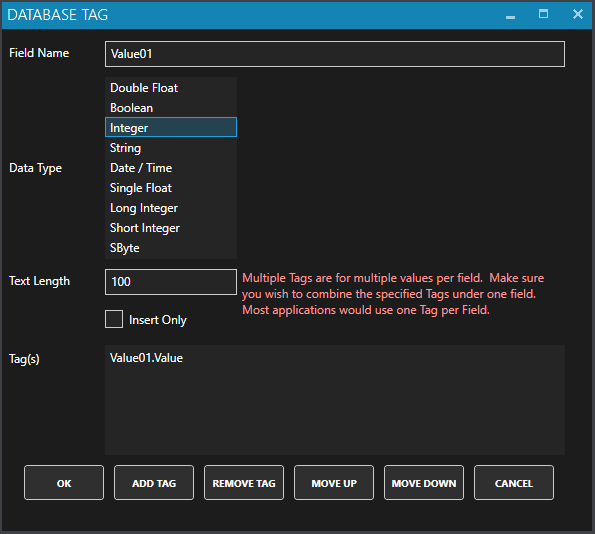
Select the Tag and Parameter Value01.Value.

Change the Field Name to Value01.

Change the Data Type to Integer.
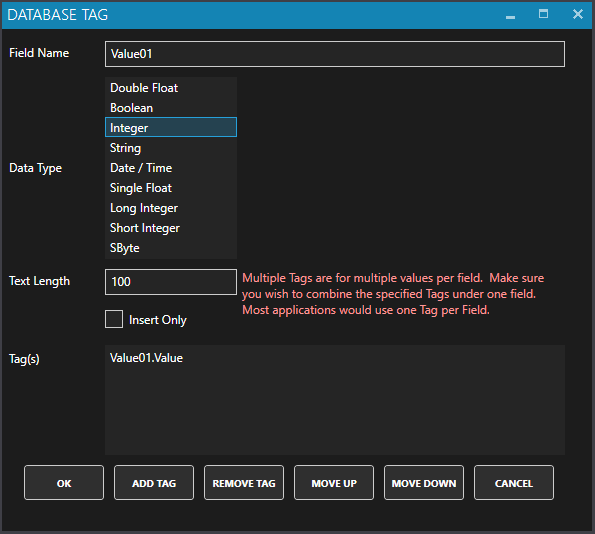
Recipe Value01

Select OK.

Select the Add Field button.

Add Tags

Select the Tag and Parameter Value02.Value.

Change the Field Name to Value02.

Change the Data Type to Integer.
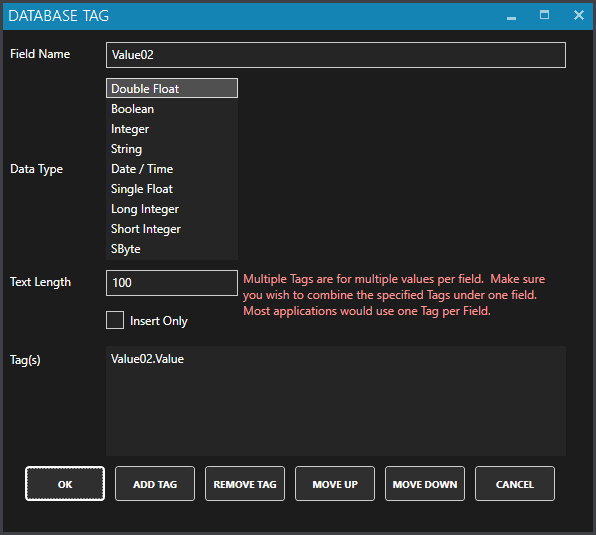
Recipe Value02

Select OK.

Aggregate SQL Functions

You can use aggregate functions MIN, MAX, AVG, SUM, COUNT, STDEV, STDEVP, VAR, VARP, COUNT_BIG, GROUPING, GROUPING_ID, and CHECKSUM_AGG.
Set the Field Name to the function with the table field. Example = MIN(FieldName)

Dynamic Tag Aliasing

Dynamic Tag Name Aliasing is possible with one or more of the 3 alias types. This is typically used with queries that will return multiple rows, but can used also with just a single row returned.
The alias definition is encapsulated with # and is replaced entirely with the value for the database, zero based row number, or field name.

DB-Value: Changes the Tag Name based on the field value returned for the column name and data type specified.
#DB-Value:FieldName:DBType:TextFormat#
DBType = Integer, Double, Boolean, Date/Time, Single, Long, Short, SByte, String, NChar, Varchar, or NVarchar
TextFormat is optional and is used to convert the native value from the database to a text string
Example = #DB-Value:FieldName:Integer:0000#

DB-Row: Changes the Tag Name based on the zero row number returned from the query.
#DB-Row:TextFormat#
Example = #DB-Row:0000#

DB-Field: Changes the Tag Name based on the field name defined.
#DB-Field#

TAG-Value: Changes the Tag Name based on the tag value of a local tag. Please note this feature does not currently support remote network tags.
#TAG-Value:TagName.Variable:TextFormat#
TextFormat is optional and is used to format the conversion the native tag value to a text string
Example = #TAG-Value:TagName.Value:0000#

Full example using dynamic tag aliasing: #DB-FIELD#Row#DB-ROW:0000#id#DB-VALUE:id:Integer:0000#.Value
The tag name will be changed to Value1Row0000#id1234.Value for row 0 if the field name is Value1, and the value of Integer id column is 1234
The tag name will be changed to Value1Row0001#id5678.Value for row 1 if the field name is Value1, and the value of Integer id column is 5678

Stored Procedures

When obtaining values from Stored Procedure set the Field Name to the Stored Procedure Return Name.

Step 12

Select the Database Tab.

Database Tab

Define the proper database connection.

Enable the property Set Query String with Tag and set to Query String.Value.
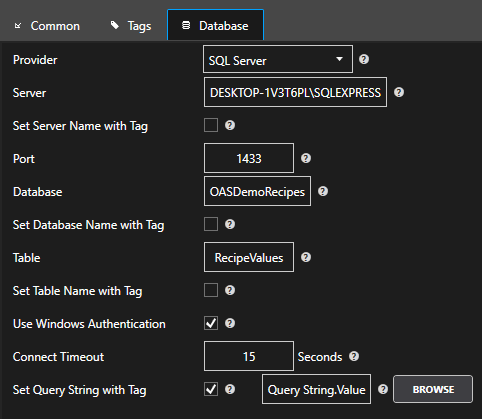
Recipe Database Configuration

Note: A View can be used in replace of the Table.

Step 13

Select the Add button in the lower left to add the Recipe.

Add Recipe

Step 14

Select the Save button on the toolbar at the top.

Save

Save the file RecipeExample.Recipes in the directory OASDemo.

Go to Configure-Options and select the Default Files tab and set the default Recipe Configuration file to the file you just saved.

To track details of recipe execution go to Configure-Options and select the System Logging tab to enable Log Recipe Transactions and specify where the recipe transactions will be save.

Step 15

At this point you are ready to execute the recipe which you can do with Configure-Tags to set the Lot to A, B, or C, then set the Trigger Value from False to True.

You can then see that the Confirmation Tag will be set to True and Value01 and Value02 update if the Recipe is successful or the Error Code Tag will be a positive number if there is an error. Review the Recipe Transaction Log for details of the transaction.
Overview – Recipe

The OAS Recipe product allows you to source your Tag data from a table in a database using either a continuous, event driven or time of day execution method.

A common use case for the recipe feature is to allow a PLC to set a boolean Tag, which causes the next set of data to be loaded from the database. This data is then written back to the PLC for execution. The recipe feature also includes a confirmation tag and an error tag to indicate to the PLC whether the data is read or there was an error. This type of two-way feedback mechanism makes it easy for you to integrate your database data with any supported PLC protocol.

💡
The recipe feature is designed as a read-only method of sourcing Tag data from a database. To connect your Tags to a database as a data source with both read and write capabilities, see the Database Tag feature.

A Recipe configuration supports writing to local tags as well as tags on a remote OAS instance. When using OPC protocol, a remote OAS instance can help simplify security connections as there will be no remote DCOM setup necessary as all OPC Servers can be connected to the a local instance. The database and Recipe server can be on a different instance for security reasons.

The execution of a Recipe can be continuous at up to one execution per second, event driven based on another boolean Tag, or at a specific time of day.

The database providers can be SQL Server, Access, Oracle, MySQL, PostgreSQL, Cassandra, MariaDB, SQLite, MongoDB, InfluxDB, Redshift or Firebase.

There are two basic database table structures that can be used as a data source.

Narrow Table

The narrow table method, also sometimes referred to as the multiple records method, only uses two fields in a database table. The first field stores the path of the Tag where the value is to be written and the second stores the value itself. This is called a narrow format, because rather than storing each tag as a separate field, Tag data is stored in individual rows.

Wide Table

The wide table method, also sometimes referred to as the single record method, defines the mapping between each table field and a corresponding Tag path. This is a single record method because all the Tag values in your query are returned in a single row. The Recipe will always return the TOP 1 result, so you can define the WHERE and and ORDER BY statements using the Query String configuration parameter.

Queued Tables

Both the wide and narrow table structures support a Queued type, which will have the same behavior as explained in the previous sections, but after the Tag values have been successfully written to the Tags, the database row is deleted. This allows you to create a data queue. Your integration between the Recipe feature and a PLC, for example, will be able to consume the data as it comes in.

Confirmation Tag

The Confirmation Tag can be set to a Boolean Tag to give feedback that the recipe has succeeded.

The Tag value will be set to False when the execution of the Recipe starts, then when the values have been successfully read from the database and transferred to the Tags the value of the Confirmation Tag will be set to True.

As part of the confirmation process, OAS will compare the loaded Tags with the values in the database. If they match then the Confirmation Tag will be set to True. Any floating point values are considered to be equal if within range of the configured Deadband setting.

If the Write All Values Without Feedback setting is enabled, then the confirmation is set immediately after writing to the Tags, but does not wait for the verification of the values.

Error Tag

The Error Tag can be set to an Integer Tag to give feedback when a recipe has failed to execute. The Error Tag will be set to a positive integer with a range of 1 to 8 to indicate an error reason. The Tag value will be set to 0 when the recipe first executes, then when the transfer has been successfully completed the value of the Confirmation Tag will be set to True and the Error Tag should remain at 0.

You can get more information about the error codes on the Recipe Common Properties page.


Refer to Getting Started – Recipe section for a step by step example of using the Recipe feature.

For description of all properties of the recipe configuration refer to the Recipe Properties section.

Recipes

Getting Started-Data Logging 15The OAS Recipe product provides data transfer from databases to OPC data. The data target can be from local or remote OAS Services of Tag Parameter Values.  The execution can be continuous up to 1 second speed, event driven from a Tag Parameter value, or at a specific time of day.

The database providers can be SQL Server, SQL Server Desktop (MSDE), Access, Oracle, mySQL, or ODBC.

There are three (3) basic table structures that can be used as a data source:

  1. Multiple Records allows you to define one column for the target Open Automation Software Tag names and one column containing the values to write.
  2. Single Record allows you associate Field Names with Open Automation Software Tags. During execution the values in first record returned are sent to the tags.
  3. Queued allows you associate Field Names with Open Automation Software Tags. During execution the values in first record returned are sent to the tags and then after all values are confirmed to be successfully sent the record is deleted.

Using remote OAS Services helps simplify security connections as there will be no remote DCOM setup necessary as all OPC Servers can be connected as local.

Refer to Getting Started Configure Recipes section for a step by step simple example of using OAS Recipe.

For description of all properties of the recipe configuration refer to the OAS Configuration – Recipes section.

Overview

You can read values from SQL Server, Oracle, Access, and MySQL based on event, continuously, or time of day with a dynamic query to filter what data is returned.

The values are then written to Open Automation Software Tags and on to OPC Items if desired with full confirmation that the values in the database are successfully transferred to the device or software application that is the destination.

By using the product OAS Recipe this is easy to setup.

View Getting Started section on Configure Recipes to follow simple steps and also the Recipe Properties section for all property attributes for Configure-Recipes.

Other resources for recipe applications: Programmatically Access Recipe Groups

Note: If you just want to read the data values or alarms from a database to your .NET application you can use the OPC Trend and OPC Alarm controls with the GetTrendDataTable and GetAlarmDataTable methods along with the HistorySelect methods.

Overview – Reports

The OAS Report product provides the Report Designer for easily creating reports from data logged with OAS Data Log or OAS Alarm .NET. These reports are then executed from selectable execution types such as event driven from a Tag, continuous as a specified frequency, hourly, daily, weekly, or monthly.

Filter constraints can be added for filtering data to previous  hour, current hour, previous day, current day, previous week, current week, previous month, current month, or custom time frame.

You can also use an Open Automation Software Tag value with a string data type as a dynamic query string to filter based on any live data values.

Reports can then generate files for HTML web pages, Acrobat Reader PDF files, Microsoft Word RTF files, Graphic TIF files, text files, or even directly to the default system printer.

Refer to the Report Designer application help on how to create a report.

Refer to the Videos – Reports Section for a walk through of the Report Designer and setup of sample report.

Report Designer

The Report Designer can import Crystal Reports, and Microsoft Access Reports, and has an easy to use editor and wizards for creating reports in just a few minutes.

Use the Calculated Fields like Avg, Min, or Max for performing statistics on the data.

The OAS Automated Report engine uses Grape City’s Active Reports 13 product.  Visit the following for reference to all Report Designer functions. http://help.grapecity.com/activereports/webhelp/AR13/webframe.html#PageReportorRDLReportConcepts%20.html

Configure-Reports

To open a new window for assigning Report execution methods, select Configure-Reports or Alt-C-R.

Select a Windows Service to modify, the node with the green arrow is the current Service being modified. Refer to Selecting Service for more information on selecting an OAS Service.

Add Report

To add a Report to the Service enter a unique Report Name and specify all other parameters as desired, they can be modified later. Use the Add Report button at the top of the left pane on the Report Screen.

Add Report

Delete Report

To delete a Report of the selected Service select the desired Report in the left pane and use the Delete Report button above it.

Delete Report

Modify Report

To modify an existing Report simply select the desired Report and make the modifications in the window followed by Apply Changes in the lower right corner.

Apply Changes

Report Common Properties

Report Properties

Report Name

The name that identifies the Report in the Report configuration.  This name appears in System Alarms if there is a failure with the Report.

Reports CSV Export and Import

All reports groups can be exported to a CSV file by right clicking on the Local service and select Export CSV.

Note: You cannot have Excel open with the CSV file during the import as Excel will lock the file for exclusive use.  First close the file in Excel, and then proceed with the import.

Report Query String

Use the Query String property or Set Query String with Tag to filter data based on your own criteria.

Manual Report Generation

You can use the Report Viewer application to manually view and create reports. This is found under the program group Open Automation Software.

Reports Programmatic Interface

Use the OPC Systems component in your Visual Studio application to programmatically modify report groups. Refer to the FormConfigureReports Form in the WinForm Example Code example for an example and how to add and modify reports groups.

Refer to the Programmatic Access Reports section in the Programmatic Interface – .NET Programmatic Configuration topic for all of the method syntax.

Frequently Asked Questions – Alarm Notification

How to escalate an alarm notification if not acknowledged within a specified time

Create a new Boolean Tag with the tag name EscalateAlarm.

Enable the Digital Alarm limit in this new Tag with a Time Delay of ? Seconds.

Under the Tags tab of an existing or new Alarm Notification group the property “Set Tag When Alarm Active and Not Acknowledged” to a Boolean Tag with the Data Source of Value.

EscalateAlarm.AlarmStatusDigital can then be used to enable a second Alarm Notification monitoring the same alarms of the first Alarm Notification group with the Activate with Tag property in the second Alarm Notification Group.

Note: Under Configure-Options-Alarms uncheck “Update Alarm Status Immediately Without Alarm Time Delay”.

This will then enable the second alarm notification group when the alarms monitored in the first group.

I am using GMAIL as the sending address.
It is not possible to use a Gmail account to send emails from OAS.
I want to send a text message without the need for a Twillio account.
If the cell phone provider can provide an email address to receive texts setup to send an email. To send a text message to someone on AT&T in the To Address, just enter the 10 digit phone number @txt.att.net. Example 5555551234@txt.att.net.

Videos – Alarm Notification

Alarm Logging and Notification

Alarm Logging to SQL Server, Oracle, MySQL, PostgreSQL, SQLite, and more. Send alarm notifications via Email, SMS, or voice.

Alarm Limits

How to setup alarm limits in real-time tag configuration.

Send Alarm Emails

How to setup Alarm Notification to send emails for specific alarms.

Alarm Escalation

How to escalate alarms over time.