The following is a list of markup attributes that can be added to any HTML element. Each attribute adds a behavior, tied to one or more OAS server Tags. You can combine attributes to generate the behavior you desire. If you prefer more control over behavior and would like to write your own logic, see the Client Script Library Reference.
Text
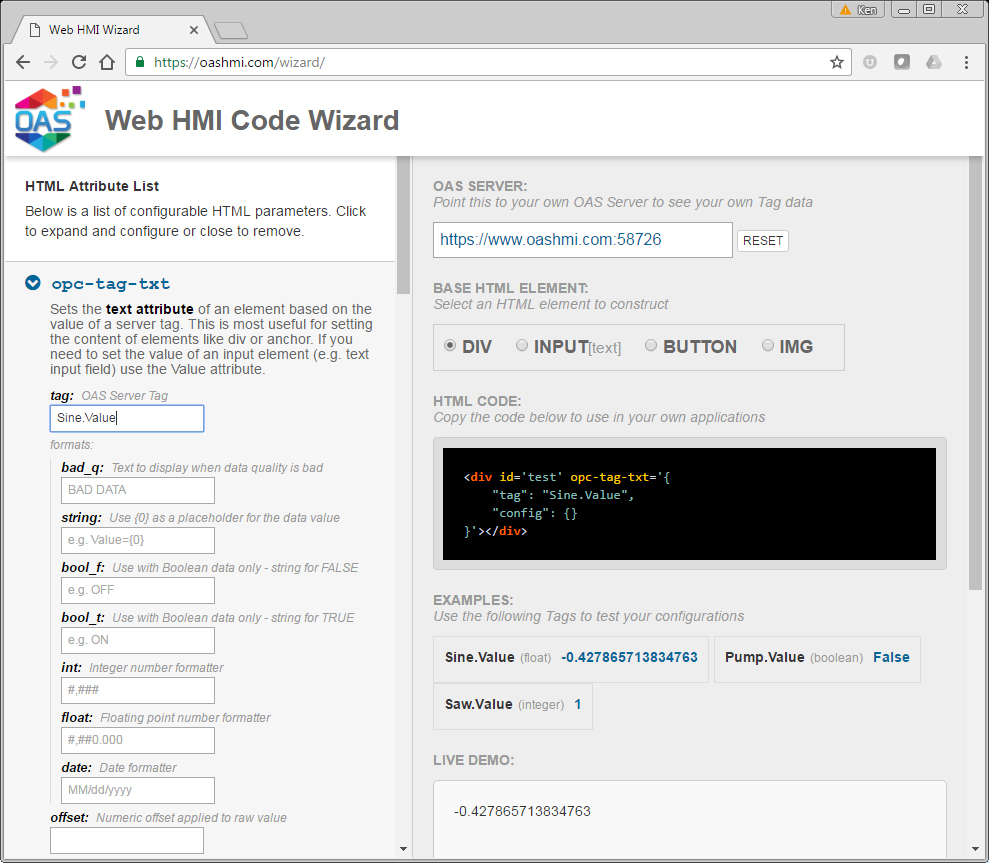
Sets the text attribute of an element based on the value of a server tag. This is most useful for setting the content of elements like div or anchor. If you need to set the value of an input element (e.g. text input field) use the Value attribute.
attribute: oas-tag-txt
type: Tag
- valid config fields:
- formats
examples:
Simple example of live raw data being added to the text of an HTML element
<div id="txt_ex1" oas-tag-txt='{"tag":"Sine.Value"}'></div>
Example of live data being added to the text of an HTML element with string formatting applied, and a default display of ‘????’ when bad data quality is detected.
<div id="txt_ex2" oas-tag-txt='{"tag" : "Sine.Value",
      "config" : {"formats" : {
        "bad_q":"????",
        "string" : "Sine = {0}"}
      }
  }'></div>
Example of both string and numeric formatting applied to limit to 3 decimal places, and a default display of ‘????’ when bad data quality is detected.
<div id="txt_ex3" oas-tag-txt='{"tag" : "Sine.Value",
      "config" : {"formats" : {
        "bad_q":"????",
        "string":"Sine = {0}",
        "float":"0.000"}
      }
  }'></div>
Value :
Sets the value attribute of an element based on the value of a server tag. This is most useful for setting input fields like text boxes and buttons.
attribute: oas-tag-val
type: Tag
- valid config fields:
- formats
examples:
Simple example of live raw data being added to the value of an HTML input element
<input id="val_ex1" type="text" oas-tag-val='{"tag":"Sine.Value"}'/>
Background:
Sets the background style of the element according to the value and quality of one or more server Tags. This allows you to use a single HTML element to represent the state of multiple server values.
attribute: oas-tag-bkg
type: Tag Group
example:
Using a single boolean tag to set the background of a button element between Green(true) and Red(false) or Yellow(bad data)
<button id="bkg_ex1" oas-tag-bkg='{
    "type": "group",
    "all_f": {
      "color": "#f00"
    },
    "bad_q": {
      "color": "#fc0"
    },
    "group": [
      {
        "tag": "RandBool.Value",
        "config": {"color": "#0f0"}
      }
    ]
  }'>BUTTON</button>
Foreground:
Sets the foreground style of the element according to the value and quality of one or more server Tags. This allows you to use a single HTML element to represent the state of multiple server values.
attribute: oas-tag-fg
type: Tag Group
examples:
Using a single boolean tag to set the foreground of a button element between White(true) and Yellow(false) or Red(bad data)
<button id="fg_ex1" oas-tag-fg='{
    "type": "group",
    "all_f": {
      "color": "#fc0"
    },
    "bad_q": {
      "color": "#f00"
    },
    "group": [
      {
        "tag": "RandBool.Value",
        "config": { "color": "#fff"}
      }
    ]
}'>BUTTON</button>
Combining both background and foreground color settings to create a unique style
<button id="fg_ex2" oas-tag-bkg='{
    "type": "group",
    "all_f": {"color": "#f00"},
    "bad_q": {"color": "#fc0"},
    "group": [
      {
        "tag": "RandBool.Value",
        "config": {"color": "#0f0"}
      }
    ]
  }' oas-tag-fg='{
    "type": "group",
    "all_f": {"color": "#fc0"},
    "bad_q": {"color": "#f00"},
    "group": [
      {
        "tag": "RandBool.Value",
        "config": { "color": "#fff"}
      }
    ]
}'>BUTTON</button>
Border :
Sets the border style of the element according to the value and quality of one or more server Tags. This allows you to use a single HTML element to represent the state of multiple server values.
attribute: oas-tag-brd
type: Tag Group
examples:
Using a single boolean tag to set the border color of a button element between White(true) and Yellow(false) or Red(bad data)
<button id="brd_ex1" style="border-width: 2px;" oas-tag-brd='{
    "type": "group",
    "all_f": {"color": "#fc0"},
    "bad_q": {"color": "#f00"},
    "group": [
      {
        "tag": "RandBool.Value",
        "config": { "color": "#fff"}
      }
    ]
}'>BUTTON</button>
Combining background, foreground, and border color settings to create a unique style
<button id="brd_ex2" style="border-width: 2px;" oas-tag-bkg='{
    "type": "group",
    "all_f": {"color": "#f00"},
    "bad_q": {"color": "#fc0"},
    "group": [
      {
        "tag": "RandBool.Value",
        "config": {"color": "#0f0"}
      }
    ]
  }' oas-tag-fg='{
    "type": "group",
    "all_f": {"color": "#fc0"},
    "bad_q": {"color": "#f00"},
    "group": [
      {
        "tag": "RandBool.Value",
        "config": { "color": "#fff"}
      }
    ]
  }' oas-tag-brd='{
    "type": "group",
    "all_f": {"color": "#fc0"},
    "bad_q": {"color": "#f00"},
    "group": [
      {
        "tag": "RandBool.Value",
        "config": { "color": "#fff"}
      }
    ]
}'>BUTTON</button>
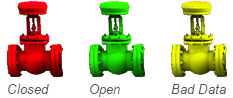
Image Source :
This attribute is designed to be used with an HTML <img> tag. It sets the src attribute of of the image according to the value and quality of one or more server Tags. This allows you to use a single HTML element to represent the state of multiple server values.
attribute: oas-tag-src
type: Tag Group
- config:
- relative or absolute URL of an image
examples:
Using a single boolean tag to set the image to display

<img id="src_ex1" style="width: 55px;" src="https://openautomationsoftware.com/wp-content/uploads/2022/05/Pump-Yellow-Front.png" oas-tag-src='{
    "type": "group",
    "all_f": "https://openautomationsoftware.com/wp-content/uploads/2022/05/Pump-Red-Front.png",
    "bad_q": "https://openautomationsoftware.com/wp-content/uploads/2022/05/Pump-Yellow-Front.png",
    "group": [
      {
        "tag": "RandBool.Value",
        "config": "https://openautomationsoftware.com/wp-content/uploads/2022/05/Pump-Green-Front.png"
      }
    ]
}'/>
Background Flash :
Causes the background of an element to change or alternate as the result of a trigger
attribute: oas-tag-bg-fl
type: Tag
examples:
Using a single boolean tag to flash a background color when true
<button id="bkg_fl" style="border-width: 2px;" oas-tag-bkg-fl='{
    "tag": "RandBool.Value",
    "config": {
      "color": "#f00",
      "trigger": "on_true"
    }
}'>BUTTON</button>
Foreground Flash :
Causes the foreground style of an element to change or alternate as the result of a trigger
attribute: oas-tag-fg-fl
type: Tag
examples:
Using a single boolean tag to flash a background color when true
<button id="fg_fl" style="border-width: 2px;" oas-tag-fg-fl='{
    "tag": "RandBool.Value",
    "config": {
      "color": "#f00",
      "trigger": "on_true"
    }
}'>BUTTON</button>
Border Flash :
Causes the border style of an element to change or alternate as the result of a trigger
attribute: oas-tag-brd-fl
type: Tag
examples:
Using a single boolean tag to flash a border color when true
<button id="brd_fl" style="border-width: 2px;" oas-tag-brd-fl='{
    "tag": "RandBool.Value",
    "config": {
      "color": "#f00",
      "trigger": "on_true"
    }
}'>BUTTON</button>
Tooltip :
Sets the tooltip text of an element based on the value of a server tag. This text is displayed when the user hovers over the element.
attribute: oas-tag-tt
type: Tag
- config:
- formats
examples:
Setting an element’s tooltip value with a tag (hover over button to see value)
NOTE:Not all browsers will display the tooltip, but the title attribute of the element will be set and could still be used for screen readers or other applications
NOTE:Not all browsers will display the tooltip, but the title attribute of the element will be set and could still be used for screen readers or other applications
<button id="tt_ex" style="border-width: 2px;" oas-tag-tt='{"tag": "Sine.Value"}'>BUTTON</button>
Enable :
Enables an element based on a trigger
attribute: oas-tag-en
type: Tag
examples:
Disables an element based on a tag value or data quality
<button id="en_ex" oas-tag-txt='{
  "tag": "RandBool.Value",
  "config": {
    "formats": {
      "bool_f": "Enabled",
      "bool_t": "Disabled"
    }
  }
}' oas-tag-en='{
  "tag": "RandBool.Value",
  "config": {
    "trigger": "on_false"
  }
}'>BUTTON</button>
Visible :
Shows or hides an element based on a trigger
attribute: oas-tag-vis
type: Tag
<button id="vis_ex" oas-tag-vis='{
  "tag": "RandBool.Value",
  "config": {
    "bad_q" : false,
    "trigger": "on_true"
  }
}'>BUTTON</button>
Opacity :
Sets the element’s opacity based on the value of a server tag
attribute: oas-tag-op
type: Tag
<button id="op_ex" oas-tag-op='{
  "tag": "Ramp2.Value",
  "config": {
    "formats" : {
      "bad_q" : 0.25
    },
    "gain" : 2.0
  }
}'>BUTTON</button>
Width :
Sets the element’s width based on the value of a server tag
attribute: oas-tag-wd
type: Tag
<button id="wd_ex" oas-tag-wd='{
  "tag": "Random.Value",
  "config": {
    "formats" : {
      "bad_q" : 200
    },
    "gain" : 1.0,
    "offset" : 100
  }
}'>BUTTON</button>
Height :
Sets the element’s height based on the value of a server tag
attribute: oas-tag-ht
type: Tag
<button id="ht_ex" oas-tag-ht='{
  "tag": "Random.Value",
  "config": {
    "formats" : {
      "bad_q" : 50
    },
    "gain" : 1.0,
    "offset" : 50
  }
}'>BUTTON</button>
Scale-X :
Sets the element’s horizontal scale based on the value of a server tag. The scale is always applied to the original size of the element. For example, if the element is defined on the page as 100px wide, and a server tag value is 2.5, the width will then become 250px. If the server value then changes to 1.0, the element will return to 100px wide.
attribute: oas-tag-sx
type: Tag
<button id="sx_ex" oas-tag-sx='{
  "tag": "Ramp2.Value",
  "config": {
    "formats" : {
      "bad_q" : 1.0
    },
    "gain" : 5.0
  }
}'>BUTTON</button>
Scale-Y :
Sets the element’s vertical scale based on the value of a server tag. This is used the same way as Scale-X.
attribute: oas-tag-sy
type: Tag
<button id="sy_ex" oas-tag-sy='{
  "tag": "Ramp2.Value",
  "config": {
    "formats" : {
      "bad_q" : 1.0
    },
    "gain" : 5.0
  }
}'>BUTTON</button>
Translate-X :
Sets the element’s horizontal position based on the element’s original position. This requires that the element uses absolute positioning.
attribute: oas-tag-tx
type: Tag
<div id="tx_ex" style='width:15px;height:15px;background-color:#c33;' oas-tag-tx='{
  "tag":"Ramp2.Value",
  "config":{
    "formats":{
      "bad_q":10
    },
    "gain":100,
    "offset":10
  }
}'></div>
Translate-Y :
Sets the element’s vertical position based on the element’s original position. This is used the same way as Translate-X.
attribute: oas-tag-ty
type: Tag
<div id="tx_ex" style='width:15px;height:15px;background-color:#c33;' oas-tag-ty='{
  "tag":"Ramp2.Value",
  "config":{
    "formats":{
      "bad_q":10
    },
    "gain":100,
    "offset":10
  }
}'></div>
Set :
Binds a client-side event, and sets a value on the server for a given tag.
attribute: oas-tag-set
type: Tag
example 1 – simple boolean toggle:
{
  "tag":"Pump.Value",
  "config":{
    "evt":"click",
    "set":"toggle"
  }
}
example 2 – toggle with confirmation dialog:
{
  "tag" : "Pump.Value",
  "config" : {
      "evt" : "click",
      "set" : "toggle",
      "set_confirm" : true
  }
}
example 3 – user input:
{
        "tag" : "Pump.Value",
        "config" : {
            "evt" : "click",
            "set" : "input"
        }
}
example 4 – customized input dialog:
{
        "tag" : "Pump.Value",
        "config" : {
            "evt" : "click",
            "set" : "input",
            "set_confirm_msg" : "Please enter a value that will be set for the Pump.Value server tag.",
            "set_confirm_title" : "Set Pump.Value"
        }
}
example 5 – using a value from another field. Use the set_src for the value to be submitted for the tag. This should be the element id holding the new value:
{
        "tag" : "Pump.Value",
        "config" : {
            "evt" : "click",
            "set" : "value",
            "set_src" : "element_id"
        }
}