Element and Data Binding
Element Binding
You can use the OPCWPFContent control to binding live Tag values to other WPF controls.
Data Binding
OPCWPFDashboard controls support Data Biding.
OPCWPF Storyboard
The OPCWPF Storyboard component performs as a storyboard controller to begin, pause, skip to fill and stop Storyboard animations with properties to automatically update from any Open Automation Software Tag Parameter.
To add an OPCWPF Storyboard select the OPCWPFStoryboard component from the ToolBox and place it on any Windows Form of your choice. See Add OPCWPFDashboard Controls Components to Visual Studio.NET to add the OPCWPFStoryboard to the ToolBox.
OPCWPF Storyboard Properties
Refer to OPCWPF help for all properties and members of the OPC WPF components. All properties can be assigned in code; however no programming is required to use the properties.
Enabled

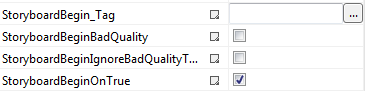
Story Board Begin
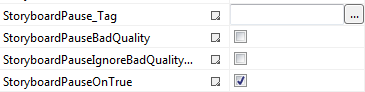
Storyboard Pause
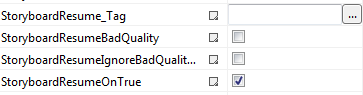
Storyboard Resume
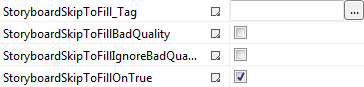
Storyboard Skip to Fill
Storyboard Stop

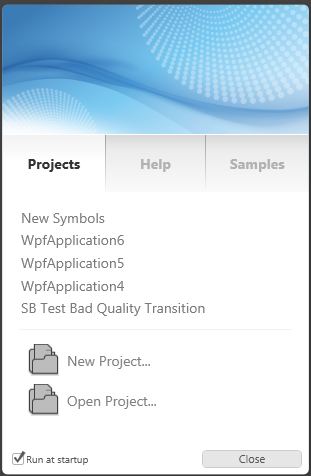
Getting Started – WPF Expression Blend
Step 1
Load the default DemoTags Tag configuration if you have replaced your tag configuration with your own tags.
Start Expression Blend 4.0 and select New Project to create a new C#, or VB.
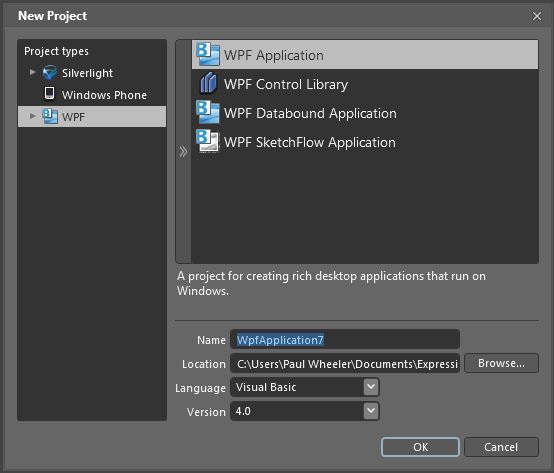
Step 2
Select WPF Application as the project type and Version 3.5 or 4.0
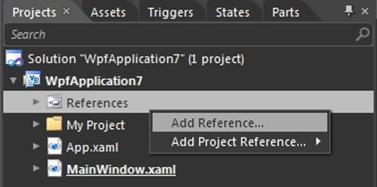
Step 3
From the Assets tab if OPCWPF components are not available, In the Projects Tab right click on References and select Add Reference to the following DLL.
For Version 3.5…
C:\Program Files\Open Automation Software\OAS\Blend3.5OPCWPF.dll
Or if you are using Version 4…
C:\Program Files\Open Automation Software\OAS\Blend4.0OPCWPFDashboard.dll
If it is available go to Step 4.
Step 4
From the Assets Tab add an OPCWPFLabel component onto the Window.
![]()
Choose the Selection Tool and then click on the label.
Select the Content_Tag property and use the browse button at the right to set the Open Automation Software Tag to Ramp.Value.
![]()
Note: If you wish to run this application on remote PCs make sure to include the Network Node or IP Address of the OAS Service source.
Note: All Tag names are case sensitive. Ramp.Value is valid, ramp.value is not.
Note: You can use the DirectOPC interface to connect directly to OPC Server Items is you just need to gain access to the server items without having to create Open Automation Software Tags.
Step 5
Add an OPCWPFButton to the Window.
![]()
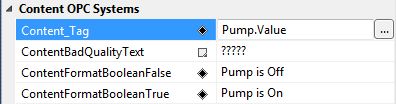
Set the Content_Tag to Pump.Value. If the Pump Tag does not exist create a Boolean Tag using Configure-Tags with the name Pump.
Set the Format fields as defined below…
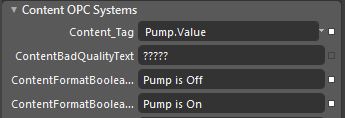
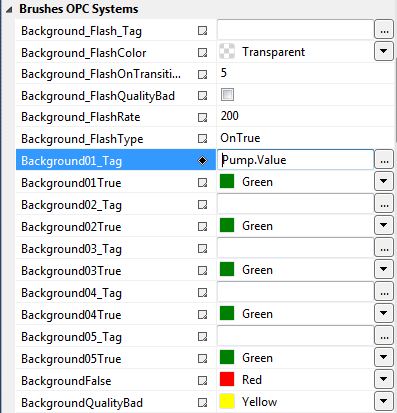
Set the Background01_Tag to Pump.Value.
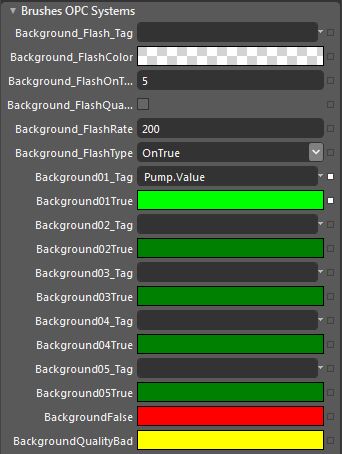
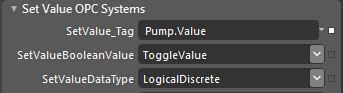
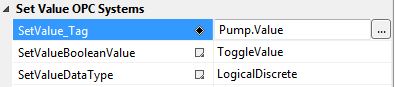
Set the SetValue_Tag to Pump.Value.
Step 6
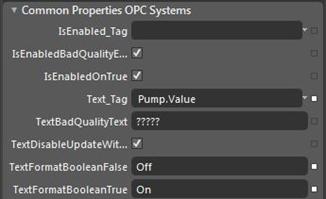
Add an OPCWPFTextBox to the Window.
![]()
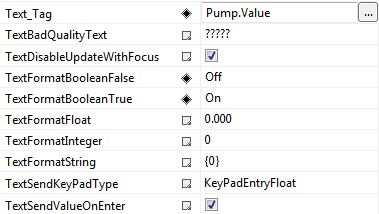
Set the Text_Tag property to Pump.Value. The Format properties for Boolean to Off and On.
Step 7
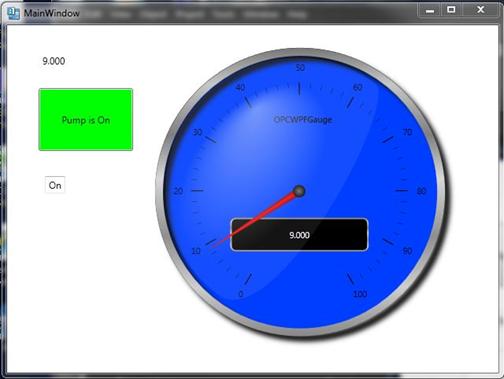
Add an OPCWPFDashboard360Gauge.
![]()
Set the Value_Tag to Ramp.Value.
![]()
Step 8
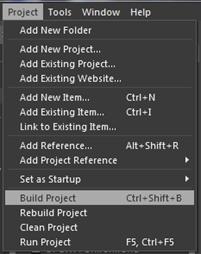
Select Build from the Project Menu to Build the application.
Step 9
Use Windows Explorer to browse for the application located in the binRelease directory and run the application.
Step 10
To deploy the application to remote nodes first make sure the Tags as described in steps 4, 5, and 6 are set to a Network Node or IP Address. Then simply copy the files in the binRelease directory to the target systems or follow the Smart Client deployment section in this help file to deploy your application using Click Once Deployment.
Note: You can also use the OPCWPFNetworkNodes component and assign a network node alias to change all “localhost” tags to the desired remote node. This is done with the AddNetworkNodeAlias method. Refer to the WinForm Example Code on the exact syntax of how to use this method. Notice how all OPC Controls data sources for a particular node can be reassigned to a remote node with one simple call.
Step 11
There are many different properties to each control. In WPF you can convert graphics to an Image Brush. The Image Brush can then be used as a background in most OPCWPF Controls.
The OPC WPF Data component can be used to access data via code with very simple methods. Refer to the Forms FormReadValues and FormWriteValues in the WinForm Example Code.
Refer to the WPF Example application for demonstration example of all properties of all controls.
Expression Blend
Microsoft Blend for Visual Studio (formerly Microsoft Expression Blend) is a user interface design tool developed and sold by Microsoft for creating graphical interfaces for web and desktop applications that blend the features of these two types of applications. It is an interactive, WYSIWYG front-end for designing XAML-based interfaces for Windows Presentation Foundation, Silverlight and UWP applications.
NOTE: If you want to visualize your data in a desktop or mobile browser with zero programming, you may be interested in the OAS Open UIEngine .
The UIEngine is a robust no-code web application and HMI builder for developing rich user interfaces in a browser-based development environment.
See the UIEngine Documentation to learn more.
Learn how to develop OAS Visualizations using Microsoft Blend or Expression Blend.
FAQs – WPF Visual Studio
WPF Properties Edit Ellipses Missing in VS 2022
Visual Studio 2022 design time properties no longer support custom property editors for WPF applications. Use Visual Studio 2019 to develop WPF applications.
The free Community Edition of Visual Studio 2019 can be download from https://visualstudio.microsoft.com/vs/older-downloads/.
WinForm applications are still well supported in Visual Studio 2022.
Bad Data Quality in .NET Application.
Below are some possible reasons your .NET application is not able to read OAS tag values.


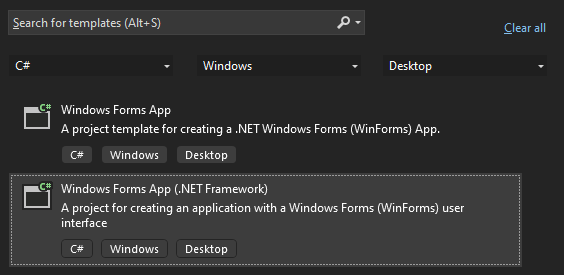 See the correct project type for WinForm above that is listed as Windows Forms App (.NET Framework) while Windows Forms App would not be the correct project type.
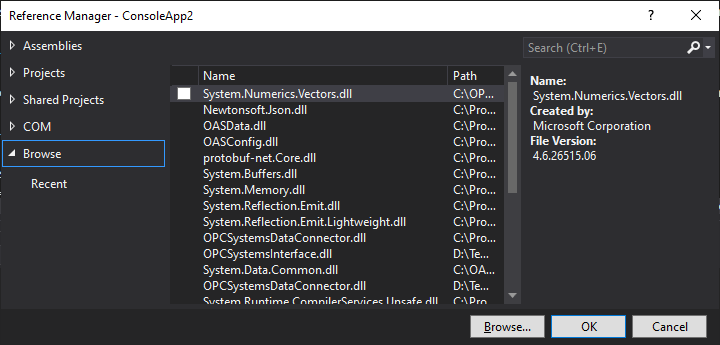
 If the Path does not reference the OAS installation directory remove the reference and select to Add Reference and browse for dll from the respective directory for the specific product feature. For .NET Framework applications include the .dlls located in C:\Program Files\Open Automation Software\OAS\Controls\NetFramework\. The Target Framework set for the VS project must be .NET Framework 4.6.1 or greater. For .NET Standard supporting the following targets include the. dlls located in C:\Program Files\Open Automation Software\OAS\Controls\NetStandard\.
See a list of locations for the correct type in the troubleshooting type After updating to OAS Version 17 the project no longer compiles for a list of correct project reference paths for each type of Visual Studio Project.
If the Path does not reference the OAS installation directory remove the reference and select to Add Reference and browse for dll from the respective directory for the specific product feature. For .NET Framework applications include the .dlls located in C:\Program Files\Open Automation Software\OAS\Controls\NetFramework\. The Target Framework set for the VS project must be .NET Framework 4.6.1 or greater. For .NET Standard supporting the following targets include the. dlls located in C:\Program Files\Open Automation Software\OAS\Controls\NetStandard\.
See a list of locations for the correct type in the troubleshooting type After updating to OAS Version 17 the project no longer compiles for a list of correct project reference paths for each type of Visual Studio Project.
Data Source Quality
Use Configure-Tags to verify that the data quality of the source tags is "Good Quality".
Security
The Default security group on either the local or remote OAS Engine may have Disable All Tags from Reading checked under the Read Tags Tab. See Restrict Tag Access of Security setup to see how read, write, and browse access can be restricted. View how to Implement User Credentials in Client Applications to provide log in method for each user in the .NET application.Network
.NET applications can be defined to communicate to remote OAS Engines. See Network Communications Troubleshooting to verify that port 58727 is allowing both incoming and outgoing traffic through your firewall.Tag Path
The full tag path would include the full tag name including its parent groups and the variable of the Tag.MyGroup.MyTag.ValueTag names are case sensitive and the current value of a tag would be .Value as the most common variable.
If the tag is from a remote OAS Engine see Basic Networking for standard remote tag syntax or Live Data Cloud Networking if the OAS Engine system has a dynamic IP address.
\\192.168.0.1\TagName.Value
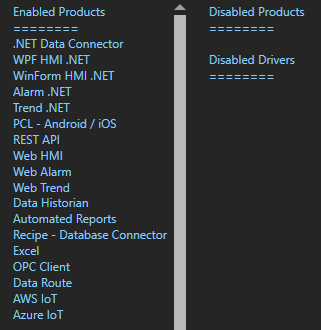
License
Use Configure-License to verify that a product feature .NET Data Connector, WinForm HMI, or WPF HMI is enabled on the data source system where the tags are located.
Target Framework for WPF and WinForm Applications
The project type for WinForm and WPF applications should be set to include (.NET Framework) and target .NET Framework 4.6.1 or greater.
See the correct project type for WinForm above that is listed as Windows Forms App (.NET Framework) while Windows Forms App would not be the correct project type.
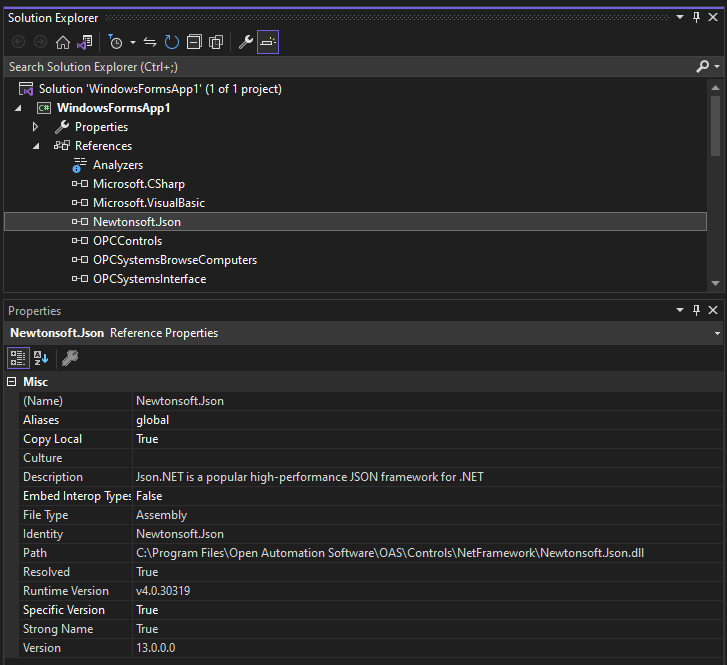
Assembly References
Visual Studio on some operating systems will assign a legacy assembly to the project causing an incompatibility due to an older version of the reference assembly. A common assembly that can be incorrect is Newtonsoft.Json that has been registered in the GAC by another software product. Select Newtonsoft.Json under the Project References to verify the correct path and version as 13.0.0.0.
If the Path does not reference the OAS installation directory remove the reference and select to Add Reference and browse for dll from the respective directory for the specific product feature. For .NET Framework applications include the .dlls located in C:\Program Files\Open Automation Software\OAS\Controls\NetFramework\. The Target Framework set for the VS project must be .NET Framework 4.6.1 or greater. For .NET Standard supporting the following targets include the. dlls located in C:\Program Files\Open Automation Software\OAS\Controls\NetStandard\.
See a list of locations for the correct type in the troubleshooting type After updating to OAS Version 17 the project no longer compiles for a list of correct project reference paths for each type of Visual Studio Project.
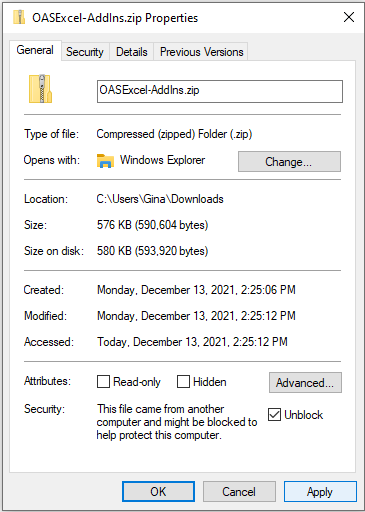
.NET Assembly is Blocked
If you have copied an application or project to another computer you may need to Unblock one or more the .dll files. Right click on the .dll file that you have downloaded. Check the Unblock checkbox for security as shown in the example below, then click Apply or OK.
Legacy .NET Application with OAS Version 17
If the OAS .NET assemblies are from OAS version 16 or less contact support@oasiot.com for compatibility instructions.
Tag Browse in Visual Studio Missing
Microsoft Visual Studio 2022 no longer supports custom property editors to browse for tags.
Use Visual Studio 2019 to develop WPF applications.
The free Community Edition of Visual Studio 2019 can be download from https://visualstudio.microsoft.com/vs/older-downloads/.
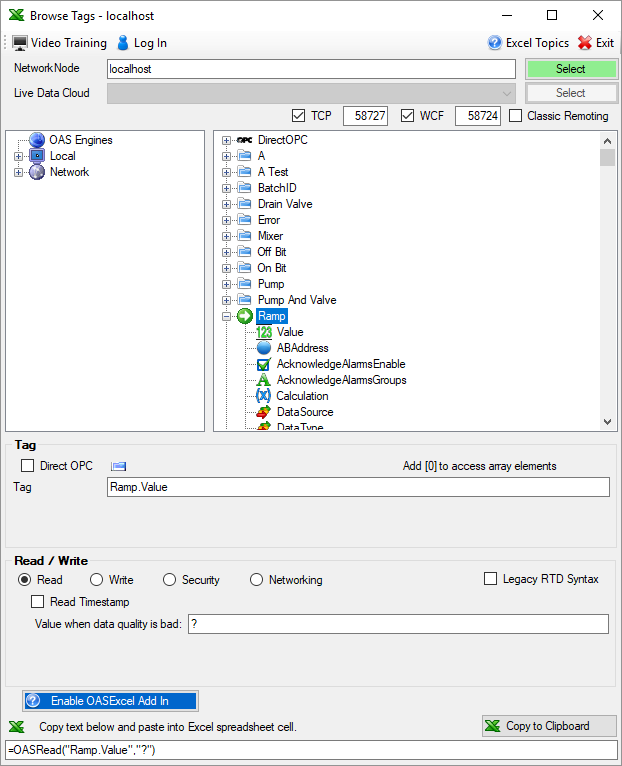
If you prefer Visual Studio 2022 with WPF application development use the OAS Excel Tag browser to browse for the full tag path of a remote or local tag and copy the full tag path from the Tag field and paste into the desired Tag property in Visual Studio.
After updating to OAS Version 17 the project no longer compiles
OAS version 17 implements an improved network interface which requires some additional assemblies.
All dependent .dlls are located in the relative subdirectory of the Controls directory of the OAS installation directory, typically C:\Program Files\Open Automation Software\OAS\Controls\.
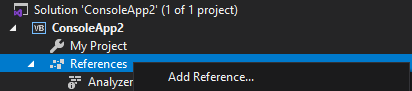
To add a reference to a Visual Studio project right click on References in the Solution Explorer.
Select Browse to browse the directory for each application feature.
Include all .dlls files in the respective directory for the specific product feature.
For .NET Framework applications include the .dlls located in C:\Program Files\Open Automation Software\OAS\Controls\NetFramework\.
The Target Framework set for the VS project must be .NET Framework 4.6.1 or greater.
For .NET Standard supporting the following targets include the. dlls located in C:\Program Files\Open Automation Software\OAS\Controls\NetStandard\.
- .NET 5 or greater
- .NET Core 2.0 or greater
- .NET Framework 4.61 or greater
- Xamarin.iOS 10.14 or greater
- Xamarin.Android 8.0 or greater
- UWP 1.0.0.16299 or greater
WPF HMI Assemblies
- C:\Program Files\Open Automation Software\OAS\Controls\NetFramework\OPCWPFDashboard\
WinForm HMI Assemblies
- C:\Program Files\Open Automation Software\OAS\Controls\NetFramework\OPCControls\
Alarm .NET Assemblies
- C:\Program Files\Open Automation Software\OAS\Controls\NetFramework\OPCAlarmControl\
- C:\Program Files\Open Automation Software\OAS\Controls\NetFramework\OPCAlarmDataOnly\
- C:\Program Files\Open Automation Software\OAS\Controls\NetStandard\OASAlarms\
Trend .NET Assemblies
- C:\Program Files\Open Automation Software\OAS\Controls\NetFramework\OPCTrendControl\
- C:\Program Files\Open Automation Software\OAS\Controls\NetFramework\OPCTrendDataOnly\
- C:\Program Files\Open Automation Software\OAS\Controls\NetStandard\OASTrends\
.NET Data Connector Assemblies
- C:\Program Files\Open Automation Software\OAS\Controls\NetFramework\OPCSystemsDataConnector\
- C:\Program Files\Open Automation Software\OAS\Controls\NetStandard\OASData\
Server Configuration Assemblies
- C:\Program Files\Open Automation Software\OAS\Controls\NetFramework\OPCSystems\
- C:\Program Files\Open Automation Software\OAS\Controls\NetStandard\OASConfig\
Can WPF applications be deployed to remote systems for Internet communications?
Yes, applications communicate using WCF over a standard TCP port which is adjustable. The default port number is 58724.
View the Networking – LAN, WAN, and Internet Videos on how to implement standard communications over the Internet and also the Live Data Cloud networking on how to host your own data without a fixed IP address or registered domain name.
The .NET controls do not appear in the Toolbox after selecting to add them to the Toolbox.
If you right click Toolbox and Choose to Add Items and select the OPCWPFDashboard controls, yet they do not appear in the Toolbox you may have installed Visual Studio after Open Automation Software. If so uninstall Open Automation Software and reinstall it. It will then register correctly with Visual Studio for adding the controls.
After updating Open Automation Software with the incremental update the project no longer compiles or the application no longer works.
Make sure to Unblock the dlls before copying to C:\Program Files\Open Automation Software\OAS\Controls\NetFramework\ or C:\Program Files\Open Automation Software\OAS\Controls\NetStandard\.
To Unblock the files copy to a trusted location for your system, Desktop works well, then right click on the file and select Properties to select Unblock. Then copy from your Desktop to the correct directory in C:\Program Files\Open Automation Software\OAS\Controls\.
My OPCWPFDashboard Button flashes when the user hovers the mouse over the button.
This is default for a WPF Button control, but the behavior can be changed with the following steps using Expression Blend.
- Select the button, and right click on the button, select Edit Template-Edit a Copy. Select OK.
- With the new template selected reset the RenderMouseOver, and RenderPressed property.
- Select Triggers, and delete the IsKeyboardFocused trigger.
- Apply the new template to all buttons. Select the button, right click, and select Edit Template-Apply Resource.
I want to have my HMI application automatically scale in size when the user changes the size of the application or it is run on different PC with different screen resolution.
Use a ViewBox in the Window XAML code.
When you create a WPF application by default the first container in the window is a Grid. Each container has an opening and closing statement in the XAML file.
For example:
<Window x:Class="MainWindow"
xmlns="http://schemas.microsoft.com/winfx/2006/xaml/presentation"
xmlns:x="http://schemas.microsoft.com/winfx/2006/xaml"
Title="MainWindow" Height="350" Width="525">
<Grid>
.....
</Grid>
</Window>
All of your content will be in the grid.
To create a window with resizable content add a ViewBox to the window and put the grid in the ViewBox.
Example:
<Window x:Class="MainWindow"
xmlns="http://schemas.microsoft.com/winfx/2006/xaml/presentation"
xmlns:x="http://schemas.microsoft.com/winfx/2006/xaml"
Title="MainWindow" Height="350" Width="525">
<Viewbox>
<Grid>
....
</Grid>
</Viewbox>
</Window>
Select the view box and set the stretch property the way you want the application to respond. The options are None, Fill, Uniform and Uniform to Fill. The default is uniform.
Does OPCWPFHMI.NET support MVC?
Yes
I get a thread exit message in Visual Studio 2013.
The thread exit message is a bug in Visual Studio 2013.
https://connect.microsoft.com/VisualStudio/feedback/details/812144/vs2013-reports-incorrect-thread-exit-code
Check to see if you have CTP 5 installed for up to date fixes.
https://www.visualstudio.com/news/vs2013-update5
How do I implement Data Binding from an Open Automation Software Tag Value?
Use the OPCWPFContent control. Following is an example:
<Slider Height=""41"" HorizontalAlignment=""Left"" Margin=""70,190,0,0"" Name=""Slider1"" VerticalAlignment=""Top"" Width=""421"" Maximum=""100""
TickPlacement=""BottomRight""
Value=""{Binding Content, ElementName=OPCWPFContent1}"" />

<my:OPCWPFContentControl x:Name=""OPCWPFContent1""  Height=""27"" Margin=""222,104,287,0"" VerticalAlignment=""Top""
ToolTipBadQualityText=""0"" ContentBadQualityText=""0"" Content_Tag=""Ramp.Value""/>
I receive an error stating that the Microsoft.Expression.Drawing.dll and Microsoft.Expression.Effects.dll is missing and not found.
These assemblies are included in the installation directory of Open Automation Software and can be included as a Reference in your project as local copy.
Or you can install the Blend SDK from the following link that also includes these files.
https://www.microsoft.com/downloads/details.aspx?displaylang=en&FamilyID=75e13d71-7c53-4382-9592-6c07c6a00207
What assemblies do I need to deploy with my application?
Include the following in References as Local Copy:
- C1.Win.C1FlexGrid2.dll
- Microsoft.Expression.Drawing.dll
- Microsoft.Expression.Effects.dll
- Microsoft.Expression.Interactions.dll
- Nevron.Chart.dll
- Nevron.Chart.WinForm.dll
- Nevron.GraphicsGL.dll
- Nevron.Presentation.dll
- Nevron.System.dll
- OPCAlarmControl.dll
- OPCSystemsInterface.dll
- OPCTrendControl.dll
- OPCWPFDashboard.dll
Videos – WPF Visual Studio
WPF HMI
Create Windows Presentation Foundation Windows desktop applications with real-time visualization.
WPF HMI .NET
How to use build a Visual Studio WPF .NET application using the OAS WPF HMI .NET product to visualize tag data.

- 00:00 – Introduction
- 00:14 – OAS Download
- 00:40 – Build a visual studio app
- 01:11 – Install OAS
- 01:54 – View Box
- 02:48 – Properties Window
- 03:07 – Demo Tag Configuration
- 03:28 – Tag Refencing Examples
- 03:39 – Value Property
- 03:53 – Add a Button to the window
- 04:05 – Set content tag in the properties window
- 04:34 – Change the color of the button
- 05:06 – Radio gauge
- 05:46 – Control Visualization
- 06:15 – More Information
Expression Blend for WPF
How to use Expression Blend, and review the advantages for creating graphic applications compatible with Visual Studio.
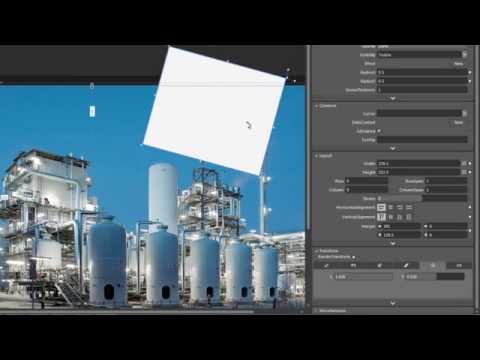
WPF HMI Graphics
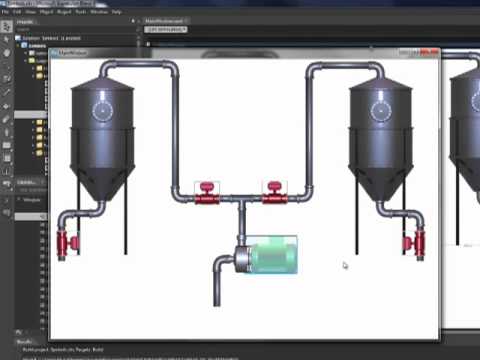
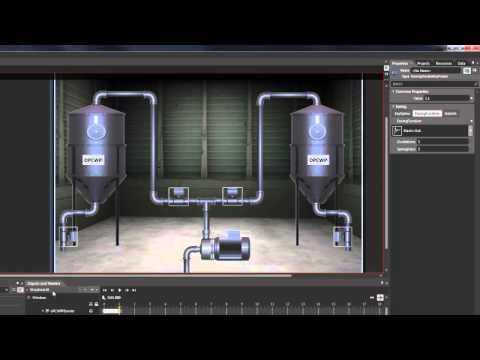
How to create graphic operator interface applications with OPCWPFHMI.NET and Expression Blend.
- 00:00 – WPF HMI Introduction
- 00:16 – Microsoft Expressions Blend
- 00:22 – Advantages to using Blend
- 02:56 – Adding Images
- 07:11 – Adding Linear Gauges
- 12:45 – More Information
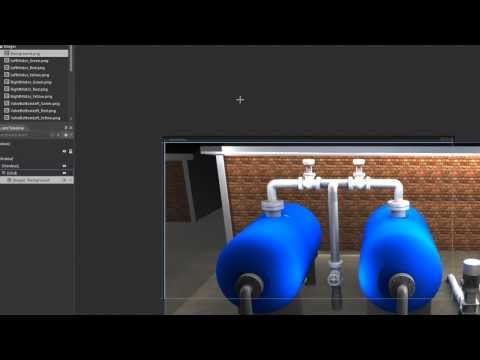
WPF HMI Symbols
How to use symbol library in WPF HMI application.
- 00:00 – HMI Symbols
- 00:11 – Symbols Library
- 01:22 – Build a Sample Application
- 01:41 – Add References
- 02:05 – Add Folders for Graphics
- 02:33 – Add Graphics to Folders
- 02:54 – Change Window Resolution
- 03:10 – Change LayoutRoot
- 03:45 – Add a Grid to LayoutRoot
- 04:09 – Add Image Item
- 08:46 – Adding Images using Button
- 11:08 – Add Images to Buttons
- 14:14 – Change template to Avoid Flashing
- 15:52 – Set Images for the Animation
- 16:39 – Set the Source Tag
- 18:02 – Application Review
- 18:32 – Add a level to the Tanks
- 20:07 – Animate the Tanks
- 21:34 – WPF Border Control
- 24:26 – Background using Blender 3D
- 25:19 – Set Layout Appearance
- 26:25 – More Information
WPF Animation
How to add animation to a WPF HMI application.
- 00:00 – Storyboard Control for WPF 4.0
- 01:14 – Create a Storyboard Animation
- 01:49 – Properties Windows
- 02:02 – Add Easing to the Storyboard
- 02:51 – Triggers Tab
- 02:57 – Objects and Timelines
- 03:09 – Assests Library
- 03:32 – Common Properties
- 04:07 – Run the Application
- 04:41 – Edit Storyboard
- 05:40 – More Information
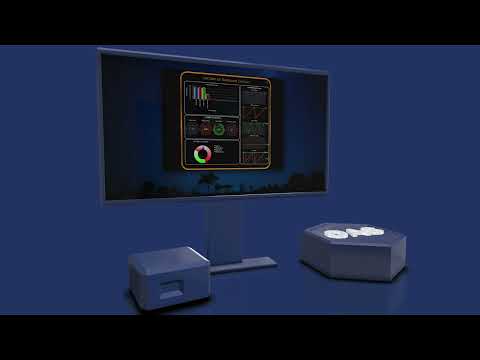
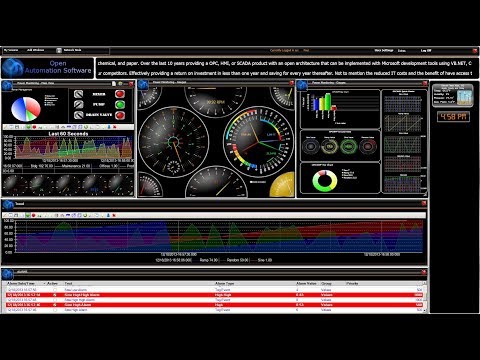
Live Data Dashboard Overview
How to create a WPF Dashboard application using the Live Data Dashboard template. User controlled windows that persist on server for remote recall.
- 00:00 – Introduction
- 00:06 – Dashboard HMI Template
- 01:23 – Install a Template
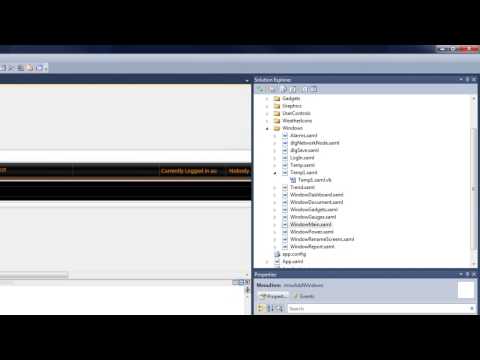
- 01:39 – Create a Project
- 01:58 – Solution Explorer
- 02:37 – Application Demo
- 02:53 – User Login
- 03:05 – Menu System
- 03:16 – Add Windows
- 03:26 – Network Node Control
- 03:41 – User Settings
- 03:58 – Weather and Clock Gadgets
- 04:03 – Adding Screens and Windows
- 05:58 – More Information
Live Data Dashboard Adding Window
How to add a Window to the Live Data Dashboard.
- 00:00 – Introduction
- 00:16 – Add additional Screens to existing Dashboard Application
- 02:03 – Run the Application
- 02:11 – Add Window
- 03:29 – More Information
Live Data Dashboard Reports and Documents
How to add report and document interface options to Live Data Dashboard.

- 00:00 – Introduction
- 00:25 – Visual Studio / Power Window
- 00:40 – Reports and Documents
- 01:10 – Power Window
- 02:16 – XPS File
- 02:34 – Run the Application
- 03:19 – Create reports and documents
- 03:27 – More Information
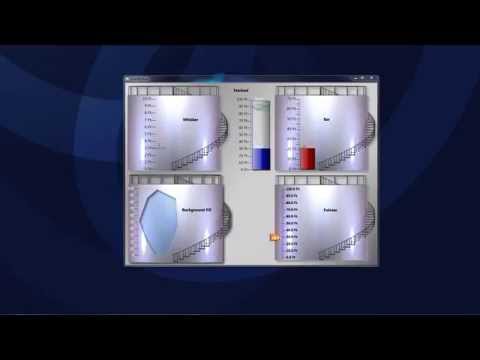
Live Data Dashboard Gadgets
How to add gadgets to the Live Data Dashboard.

- 00:00 – Intro (OPC Systems HMI Dashboard Template)
- 00:31 – Weather Gadget
- 01:05 – Gadgets Controls
- 01:12 – References / Gadget Library
- 01:37 – Gadget Weather Control Visualization
- 02:42 – Weather Icons
- 02:53 – More Information
WPF Page Navigation
How to add page navigation to a WPF application with easy to use OPC WPF HMI Page Navigation controls.

Radial Gauge Demo
Demonstration of WPF Radial Gauge controls in action.

WPF Radial Gauge
How to integrate the radial gauge control into a WPF dashboard application.

WPF Linear Gauge
How to integrate the linear gauge control into a WPF dashboard application.
- 00:00 – OPC WPF Linear Gauge Control
- 00:11 – Linear Gauge Control Use to Create Applications
- 00:26 – Linear Gauge 3 different styles
- 00:43 – Visual Studio/Create a New WPF Project
- 01:48 – Value Format
- 02:07 – More Information
WPF Bar Graph
How to integrate a bar graph into a WPF dashboard application.

WPF Pie Chart
How to integrate live pie chart into a WPF dashboard application.

WPF Circular Data
How to integrate circular data control into a WPF dashboard application.

- 00:00 – Introduction
- 00:08 – WPF Circular Data Control for WPF 4.0
- 00:35 – Properties that can be controlled by Live Data
- 00:47 – Build an Application with OPC WPF Circular Data Control
- 01:09 – Set Up Background
- 01:20 – Set the Content
- 01:37 – Run the Application
- 01:50 – Other Properties of OPC WPF Circular Data Control
- 03:47 – Run the Application
- 03:56 – More Information
WPF Quick Chart
How to add a quick chart into a WPF dashboard application.

- 00:00 – Introduction
- 00:08 – OPC WPF Quick Chart for WPF 4.0
- 01:12 – Create a WPF Application using OPC WPF Quick Chart
- 01:39 – Common Properties
- 02:12 – Appearance OPC Systems
- 02:22 – Brushes OPC Systems
- 02:46 – Content OPC Systems
- 03:01 – Transform OPC Systems
- 03:29 – Text
- 03:40 – Run the Application
- 04:19 – Change the Point Count
- 04:35 – More Information
WPF Lamps and Switches
How to integrate lamps and switches into a WPF dashboard application.
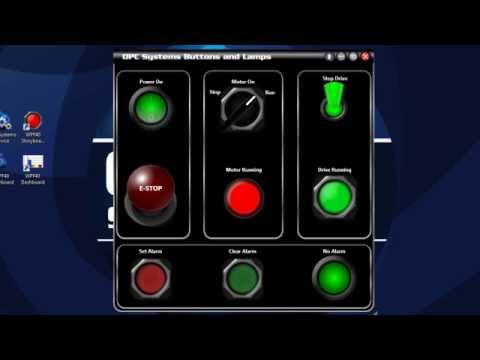
- 00:00 – Introduction
- 00:06 – OPC WPF Lamps and Switch Controls
- 01:07 – Switches
- 01:33 – OPC Properties of the OPC Button
- 02:49 – Content OPC Systems
- 03:10 – Layout Properties
- 03:32 – Set Value OPC Systems Properties
- 04:49 – Lamp Controls
- 05:00 – Background and Border Brush and Foreground
- 05:36 – Content
- 06:01 – Brushes
- 07:05 – Button Control
- 08:41 – Run the Application
- 10:41 – More Information
Add OPCWPF Controls Components to Visual Studio.NET
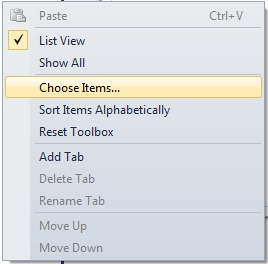
Start Visual Studio 2010 and select View-ToolBox to show the component ToolBox.
Right-Click on the ToolBox and select Choose Items.
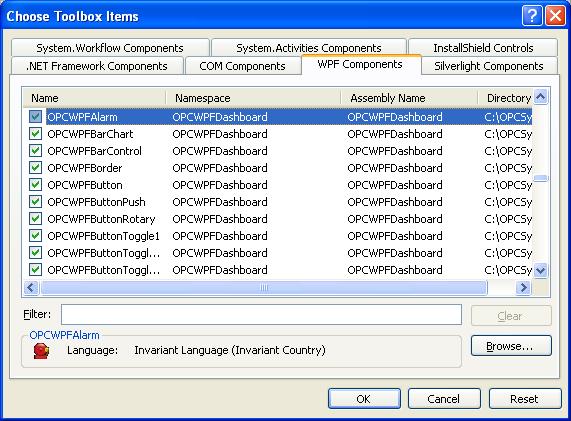
From the WPF Components select all of the OPCWPFDashboard Controls components and then select OK. For 4.0 Framework solutions use OPCWPFDashboard Namespace controls.
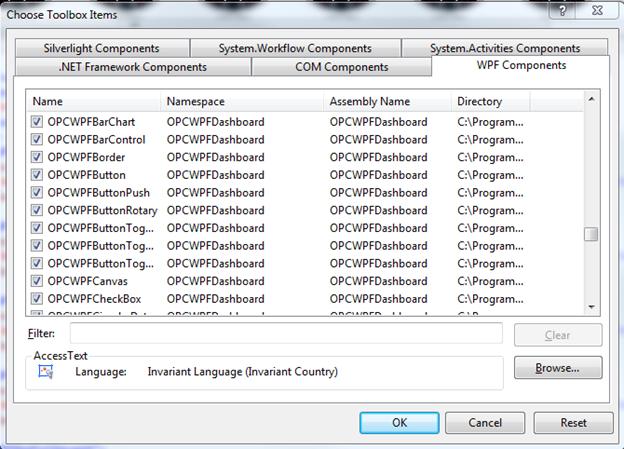
Select OK.
You are now ready to place and use the components on any WPF Window in your Visual Studio.NET environment.
Getting Started – WPF Visual Studio
NOTE: If you want to visualize your data in a desktop or mobile browser with zero programming, you may be interested in the OAS Open UIEngine .
The UIEngine is a robust no-code web application and HMI builder for developing rich user interfaces in a browser-based development environment.
See the UIEngine Documentation to learn more.
The following steps can be used to add visualization to a C#, or Visual Basic.NET application. Refer to the VB.NET example for programmatic interface of using the OPC Controls components. All properties are programmatically accessible.
Note: Visual Studio 2022 design time properties no longer support custom property editors for WPF applications. Use Visual Studio 2019 to develop WPF applications.
If you do not have a copy of Visual Studio 2019 you can download a free version of Visual Studio Community Edition for VB and C# from https://visualstudio.microsoft.com/vs/older-downloads/. If you have no experience with either Visual Basic or C# choose Visual Basic, no programming is required to use WPF HMI .NET or WinForm HMI.
- 00:00 – Introduction
- 00:14 – OAS Download
- 00:40 – Build a visual studio app
- 01:11 – Install OAS
- 01:54 – View Box
- 02:48 – Properties Window
- 03:07 – Demo Tag Configuration
- 03:28 – Tag Refencing Examples
- 03:39 – Value Property
- 03:53 – Add a Button to the window
- 04:05 – Set content tag in the properties window
- 04:34 – Change the color of the button
- 05:06 – Radio gauge
- 05:46 – Control Visualization
- 06:15 – More Information
The following example demonstrates the use of OAS WPF HMI .NET with no code required:
Step 1
Load the default DemoTags Tag configuration if you have replaced your tag configuration with your own tags.
Start Visual Studio and select File->New->Project to create a new C#, or VB.
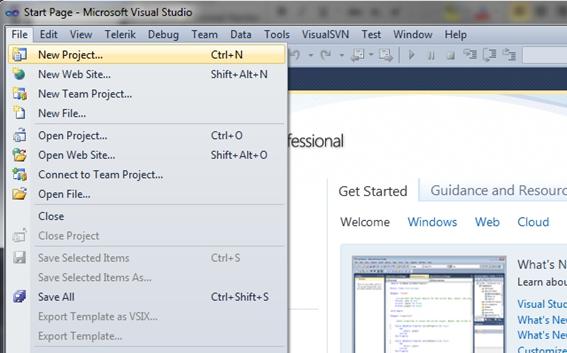
Step 2
Select WPF App (.NET Framework) as the project type.
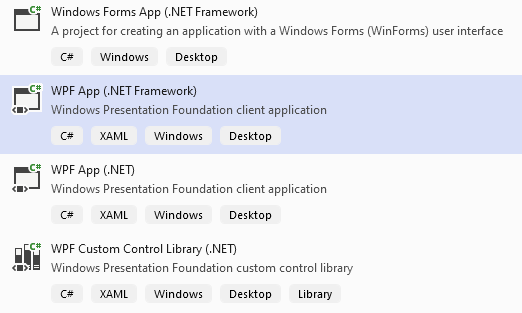
Set the Target Framework to 4.6.1 or greater.
Step 3
If you have installed Open Automation Software after installing Visual Studio you should see the Open Automation Software group in your toolbox. If you see the tools, you can skip this step.
Note: If you have installed Visual Studio after Open Automation Software you can either Browse and include the OPCWPFDashboard.dll assembly from C:\Program Files\Open Automation Software\OAS\Controls\NetFramework\ or uninstall Open Automation Software and reinstall to register the OPCWPFDashboard.dll assembly with Visual Studio.
From the WPF Components select all of the OPCWPFDashboard Controls components and then select OK. For 4.0 Framework solutions use OPCWPFDashboard Namespace controls.
Step 4
If you want to make your Window adjustable for different screen resolutions and a sizeable Window with all controls automatically scaling specify a View Box.
When you create a WPF application by default the first container in the window is a Grid. Each container has an opening and closing statement in the XAML file.
For example:
<Window x:Class="MainWindow"
    xmlns="http://schemas.microsoft.com/winfx/2006/xaml/presentation"
    xmlns:x="http://schemas.microsoft.com/winfx/2006/xaml"
    Title="MainWindow" Height="350" Width="525">
    <Grid>
        .....
    </Grid>
</Window>
All of your content will be in the grid.
To create a window with resizeable content add a ViewBox to the window and put the grid in the ViewBox.
Example:
<Window x:Class="MainWindow"
    xmlns="http://schemas.microsoft.com/winfx/2006/xaml/presentation"
    xmlns:x="http://schemas.microsoft.com/winfx/2006/xaml"
    Title="MainWindow" Height="350" Width="525">
    <Viewbox>
        <Grid>
              ....
        </Grid>
    </Viewbox>
</Window>
Select the view box and set the stretch property the way you want the application to respond. The options are None, Fill, Uniform and Uniform to Fill. The default is Uniform. I find it easiest to develop with it set to None and change it to Uniform when I am done.
Step 5
Add an OPCWPFLabel component onto the Window.

Right click on the OPCWPFLabel and select Properties.
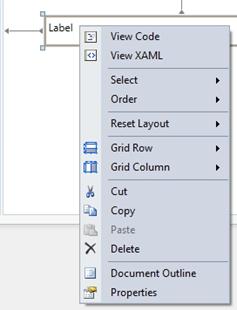
Select the Content_Tag property and use the browse button at the right to set the Open Automation Software Tag to Ramp.Value.

Note: If you wish to run this application on remote PCs make sure to include the Network Node or IP Address of the OAS Engine. Select your Network Node or IP Address in the Browse Tags window.
Value is the most commonly used Variable. See Tag Variables for a complete list of all variables possible.
Local Tag
myGroup.myTag.Value
\\192.168.0.1\myGroup.myTag.Value
Live Data Cloud Networking from local OAS Engine
RemoteSCADAHosting.myLiveDataCloudNode.myGroup.myTag.Value
Live Data Cloud Networking though remote OAS Engine
\\192.168.0.1\RemoteSCADAHosting.myLiveDataCloudNode.myGroup.myTag.Value
The following is an example of accessing an element of an array as a read only variable.
myGroup.myTag.Value[0]
Note: All Tag names are case sensitive. Ramp.Value is valid, ramp.value is not.
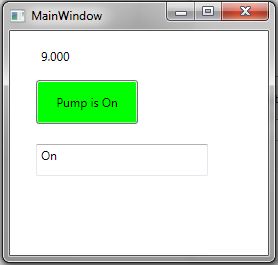
Step 6
Add an OPCWPFButton to the Form.

Set the Content_Tag to Pump.Value. If the Pump Tag does not exist create a Boolean Tag using Configure-Tags with the name Pump.
Set the Format fields as defined below…
Set the Background01_Tag to Pump.Value.
Set the SetValue_Tag to Pump.Value.
Step 7
Add an OPCWPFTextBox to the Form.

Set the Text_Tag property to Pump.Value. The Format properties for Boolean to Off and On.
Step 8
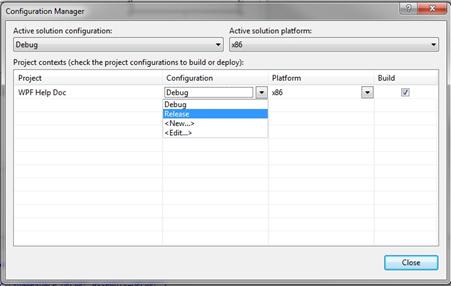
Select the Configuration Manager from the Build Menu.
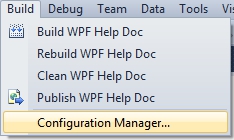
Set the compile mode in the Configuration Manager to Release.
Step 9
Select Build from the VS menu and select to Build the application.

Step 10
Use Windows Explorer to browse for the application located in the bin\Release directory and run the application.
Step 11
To deploy the application to remote nodes first make sure the Tags as described in Steps 4, 5, and 6 are set to a Network Node or IP Address. Then simply copy the files in the bin\Release directory to the target systems or follow the Smart Client deployment section in this help file to deploy your application using Click Once Deployment.
Note: You can also use the OPCWPFNetworkNodes component and assign a network node alias to change all “localhost” tags to the desired remote node. This is done with the AddNetworkNodeAlias method. Refer to the WinForm Example Code on the exact syntax of how to use this method. Notice how all controls data sources for a particular node can be reassigned to a remote node with one simple call.
Step 12
There are many different properties to each control. In WPF you can convert graphics to an Image Brush. The Image Brush can then be used as a background in most OPCWPF and OPCWPFDashboard Controls.
The OPC WPF Data component can be used to access data via code with very simple methods. Refer to the .NET Real Time Data Access Programmatic Interface.
Existing System
To upgrade an existing system you can download and install the full setup.
Full Setup
To use the full setup download either the 32 bit or 64 bit installation from OAS Download
Next uninstall Open Automation Software using Add / Remove Programs from the Control Panel.
Do not delete the installation directory and the license and all configuration data will remain.
Run the new setup and start the 4 OAS Services.