Videos – Allen Bradley

AB IoT Data Connector

Communication driver for OAS IIoT Data Engine

Online One Click Allen Bradley

How to import Allen Bradley variables from a controller to Open Automation Software.

Offline One Click Allen Bradley

How to import Allen Bradley variables from program to Open Automation Software.

ControlLogix Data Logging

Quick demonstration of logging high speed data from an Allen Bradley ControlLogix processor to SQL Server.

Driver Failover

Communications redundancy with automated failover to backup device or interface.

Videos – UDI

Universal Driver Interface

Create your own communication driver interface for Open Automation Software using C# or Visual Basic .NET with the free UDI SDK for cross platform applications to deploy locally or remotely.

UDI Overview

Introduction to Universal Driver Interface with live example to REST API to deploy on cross-platform applications.

UDI Example Code

Complete walk through of code example of Universal Driver Interface.

How To: Deploy UDI on Linux/Raspberry Pi

Prerequisites

  • Develop a UDI Driver targeting .NET Standard or .NET Core 2.0+
  • Create a .NET Core 2.0+ Hosting Application using the UDI Driver
  • Install .NET Core on your Linux device. This can be done with the following command:
    sudo apt-get install libunwind8 libunwind8-dev gettext
  • This tutorial can be tested with the OpenWeatherMap API Driver example found in the OAS installation directory under Universal Drivers/Standard/OpenWeatherMapDriver and consists of a console app and driver projects. Versions for both VB and C# are provided and you can use either one for this tutorial.
  • The OpenWeatherMap API Driver requires an API Key provided by OpenWeatherMap.org. Sign up for a free account to get your API Key which you will need to paste into the configuration screen for the Driver after starting it up.

Deployment

Step 1

Open a Windows console “As Administrator” navigate to the project directory for the host app and execute the following:

dotnet publish -c Release -r linux-arm

A new directory will be created containing the deployable application will be found in your project folder under:

\bin\Release\netcoreapp2.0\linux-arm\publish\


Step 2

Modify the appsettings.json file to point to your OAS server.

Locate the file in the “publish” directory and edit with any text editor or Visual Studio. Change the ServiceNode field to the IP address of your OAS Server and make sure the server firewall allows bidirectional communication on port 58727.

Additionally, you should change the MachineName field to be a unique identifier for your Linux device. This will be added to the driver name within the OAS Configuration app for easily identifying it, especially when deploying multiple instances of the same driver on several devices.


Step 3

Copy the “publish” directory to your Linux device using any transfer method you prefer, for example: FTP, SFTP, USB Drive, etc.


Step 4

Log into your Linux device via SSH and then navigate to the “publish” directory, then set permissions on the compiled app so that it can be executed. Do this by using the chmod command like so:

chmod 755 ./CoreDriverHost

Your app is now marked as an executable within Linux and can be started from the console, which we’ll do in the next step.


Step 5

Test your host app by executing it at the command line:

./CoreDriverHost

Note: this will work from within the directory containing the app. If you are in a different path, you would write the whole path to the executable.

To stop your app, just execute Ctrl-C


Step 6

Once your hosting app is running, you can open the OAS Configuration app to configure the driver and see data flowing.

Be sure to enter your OpenWeatherMap.org API Key into the Driver Configuration screen. In the OAS Configuration app, go to Configure > Drivers, and select the OpenWeatherMap API Driver. Then paste your key into the field marked “API Key” and click Apply Changes. This step will need to be repeated for any installation of your driver including a deployment to a Linux device as described below.


Configure to run as a Linux Service or Daemon

You can now configure your app as a daemon for Debian Linux or Raspberry Pi so it can run when the system starts, and without a logged-in user.

Step 1

Ensure that you have systemd installed on your device by executing:

sudo apt-get install -y systemd

Step 2

Create a user under which the app will execute (choose a username and password):

sudo useradd -m username -p userpass

You can use an existing user, but keeping it separate from existing login accounts is advised, as you will be able to manage application permissions separate from any users on the system.


Step 3

Create a configuration file for the app with the filename “oas-driver-host.service”.
This filename can be anything you choose, but it will also be the name of the daemon, so choose a unique name. The configuration file should contain the following text. You can modify the “Description” and “SyslogIdentifier”, making sure the SyslogIdentifier matches the filename you choose. This configuration file can be created elsewhere and uploaded to the Linux device at the location /etc/systemd/system:

[Unit]
Description=.NET Core Driver Host

[Service]
ExecStart=/home/pi/publish/CoreDriverHost
WorkingDirectory=/home/pi/publish
User=oasuser
Group=oasuser
Restart=on-failure
SyslogIdentifier=oas-driver-host
PrivateTmp=true

[Install]
WantedBy=multi-user.target

Step 4

Navigate to /etc/systemd/system and register the daemon:

sudo systemctl daemon-reload
sudo systemctl enable oas-driver-host.service

Step 5

Manually start the daemon using the systemctl command:

sudo systemctl start oas-driver-host.service

You can also start the daemon using the service command:

sudo service oas-driver-host start

Stopping the daemon is accomplished using the same commands, but replacing “start” with “stop”.


Step 6

Tail the log to see the console output in real time.
You can log in with a separate console and execute:

journalctl --unit oas-driver-host --follow

This command will continue running until you hit Ctrl-C and continually display any console messages from the daemon. This is useful for debugging.


Step 7

You can confirm communications to your OAS Server by opening up the OAS Configuration app.

Go to Configure > Drivers and locate the connected driver in the left-hand pane. You should see it listed as “OpenWeatherMap API Driver – YourMachineName” where YourMachineName is the MachineName identifier you chose in the appsettings.json file.

Create a Hosting Application

Once you have compiled the custom Driver assembly, your next step will be to Create a Hosting Application that will load the assembly and run it. This application can be any .NET app, but for most deployments, you will be creating a .NET Windows Service or a Console Application. Services are perfect for deployment on a Windows platform, and Console Applications, when written using .NET Core, can be hosted on non-Windows operating systems like Linux and Mac. Additionally, you can create an Android or iOS app using the Xamarin development tools within Visual Studio.

In this example we will be creating a .NET Windows Service that will use the Driver Assembly created in the previous tutorial Creating a Universal Driver Interface.  If you have not reviewed this tutorial, please go back and review it before proceeding with the steps below.

The Hosting Application Architecture

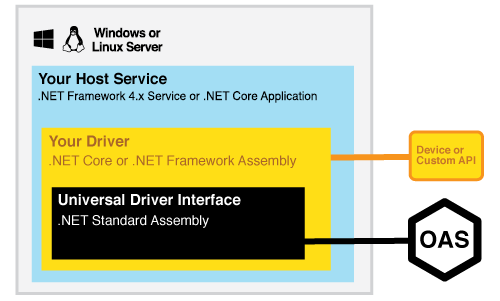
The previous example results in a .NET assembly that uses the OAS Universal Driver Interface to read and write data and configurations within the OAS Platform. This assembly is designed to be hosted by an application that will load it in memory and communicate with a designated OAS Server.
Prerequisites

You will need to be running Open Automation Software Version 11 or greater to support Universal Drivers.  You can download the latest version at /download/

You will also need Microsoft Visual Studio to work with any of these examples and to compile your custom driver. If you do not currently have Visual Studio installed, you can try out Visual Studio Community which is a fully functional, free version of the IDE.


Step 1
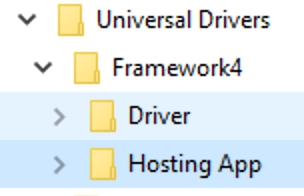
Copy the C# or VB Hosting App Code from the OAS installation path, typically C:\Program Files\Open Automation Software\OAS\Universal Drivers\Framework4\Hosting App\. Locate the Windows Service directory and copy to a location of your choosing, then open the project in Visual Studio. We suggest copying to a directory near the Driver source code you created in the previous tutorial as you will be referencing it.


Step 2
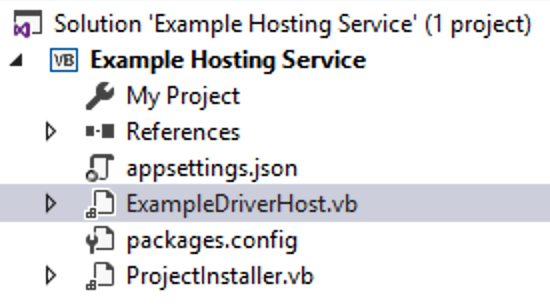
Open up your choice of VB or C# example code, preferably matching the language chosen for your driver. It is not necessary for them to be written in the same language, but is easier to debug when they are consistent.

The main hosting code exists in the ExampleDriverHost file (.vb or .cs depending on the language).

Application configurations are located in the appsettings.js file.

The ProjectInstaller file is used for installation of the Windows service once the project has been compiled.


Step 3

Reference the Driver and ensure startup code is bound to it properly.

First, expand the project references and locate the ExampleDriver assembly. Right-click and remove this reference. This is the pre-compiled Driver that you will be replacing with your own.

Next right-click on the References and select Add Reference, navigating next to the location of your compiled Driver assembly. In the Reference Manager dialog, select Browse and then locate the compiled assembly. This will be below the bin directory in your Driver project. The assembly itself will be in the bin\Release folder or bin\Debug folder depending on the mode you used to compile the Driver. Either version will work. Select the assembly that matches the name of the assembly set in Step 2 of the Create a Universal Driver Interface tutorial. If you set this to ExampleDriver, locate and select ExampleDriver.dll.

The example Service assumes you have not changed the namespace or class names of the example Driver. If your Driver namespace was changed, you’ll see an error like the one below. Just change all reference to ExampleDriver to match your namespace.


Step 4

Edit the appsettings.json file to configure your deployment.

The appsettings file does not get compiled but it is distributed with the Windows service. This file holds configuration settings that can be altered based on how you wish the deployment to operate at runtime. The default settings are as follows:

{
    "ServiceNode": "127.0.0.1",
    "LiveDataCloudNode": "",
    "PortNumber": 58727,
    "MachineName": "LocalMachineName",
    "StoreAndForward": false,
    "UserName": "",
    "Password": ""
}
  • ServiceNode
    This is the IP Address of the OAS Server that the Driver will connect to and transmit data
  • LiveDataCloudNode
    The optional name of the configured Live Data Cloud node if you are connecting to a remote host via another OAS Server
  • PortNumber
    The port on which to communicate with the OAS Server. This defaults to 58727, but may be configured on the remote OAS Server for TCP communications
  • MachineName
    This is the local identifier for the machine housing the Driver. This will be displayed in the Configure Drivers screen on the destination OAS Server’s Configuration application and useful for identifying Drivers if multiples of the same type are deployed on several devices
  • StoreAndForward
    A boolean indicating whether to cache data when a connection cannot be made to the OAS Server, forwarding when a connection is reestablished
  • UserName/Password
    The credential used to connect to the remote OAS Server if a credential is required

Step 5

Configure the ServiceInstaller to set up the Service runtime settings.

Within the Visual Studio Solution Explorer, click on the ProjectInstaller(.vb or .cs) and you should see a “Designer” that displays a reference to ServiceInstaller1. Click on ServiceInstaller1 and in the properties pane you should see the settings pictured here.

These settings determine the way your service will behave when you install it. The properties to consider are:

  • DisplayName
    This is what you will see in the list of services when you open your Service Control Panel.
  • Service Name
    The unique name for the service which is used behind the scenes
  • StartType
    How the service is configured to start. Manual means the service must be started by a user and it will not start when the server reboots. Automatic will attempt to start the service when the server reboots. This is preferable for infrastructure components such as a Driver.

Fee free to alter any of these and then Build the service project.


Step 6

Install your service using the InstallUtil. Using a command-line window, navigate to the location of the compiled service. This will be within the /bin directory within the directory holding the project source code. As with the driver, the compiled code will be within either a Debug or Release director depending on what mode you selected when building the project.

From within this directory, execute the following command:

  installutil ExampleHostService.exe

If you changed the name of your service’s assembly name, your .exe may have a different name. Just use that name instead. Be sure to include the .exe or the installation will not proceed.

If the service installs correctly, you should see the message below:

If you see any error messages, be sure to close and start your Command Prompt “As Administrator” to ensure you have the permissions to install a service on your machine.

Check that the service installed properly in the Services Control Panel and you should see it listed.

NOTE:
To uninstall the service, make sure the service is stopped and follow the same steps for installation, but instead execute:

  installutil -u ExampleHostService.exe


Step 7
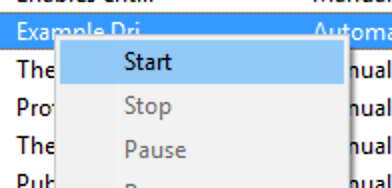
Start the service by selecting it from the Service Control Panel and select Start. If the service functions properly and starts with no issues, you should see “Running” under the Status column.


Step 8
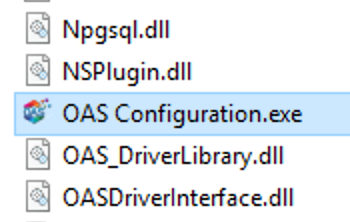
Open OAS Configuration to Configure Drivers and Tags. Within the OAS installation directory, you can find the OAS Configuration.exe application. Execute this application and when the window opens select Configure > Drivers. Then click Select next to the field containing “Localhost“. You should see your new ExampleDriver listed to the left. Select it and you should see the following screen:
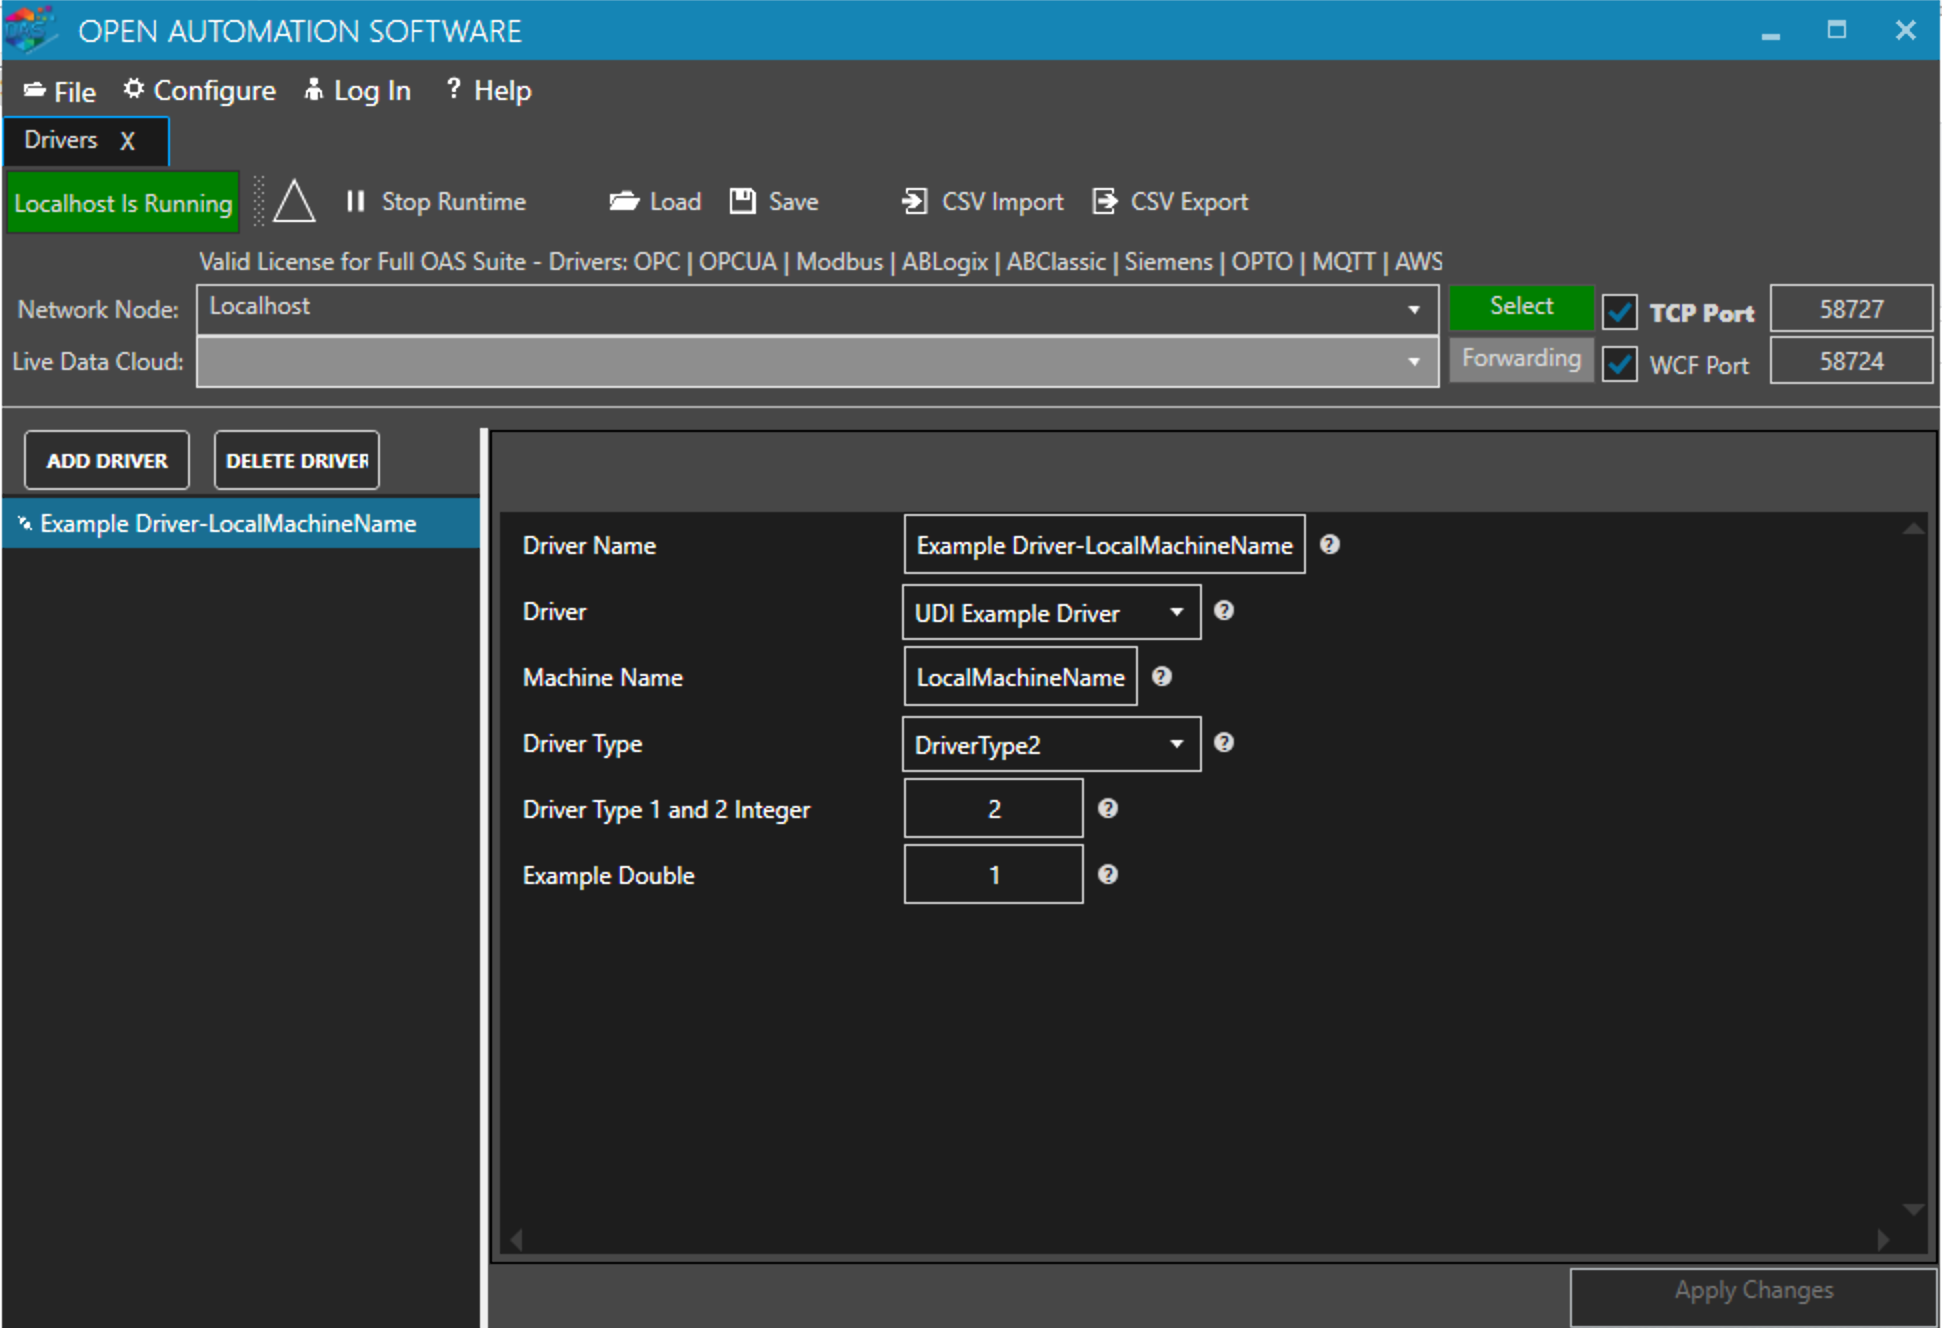
Driver Properties as defined in the code can be seen on the right.

Select Configure > Tags and click Select for Localhost as you did above. In this case you will now see the list of Tags configured on the server. Scroll the Tag list and you will see the tags that were configured automatically by the Driver listed under Example Driver.
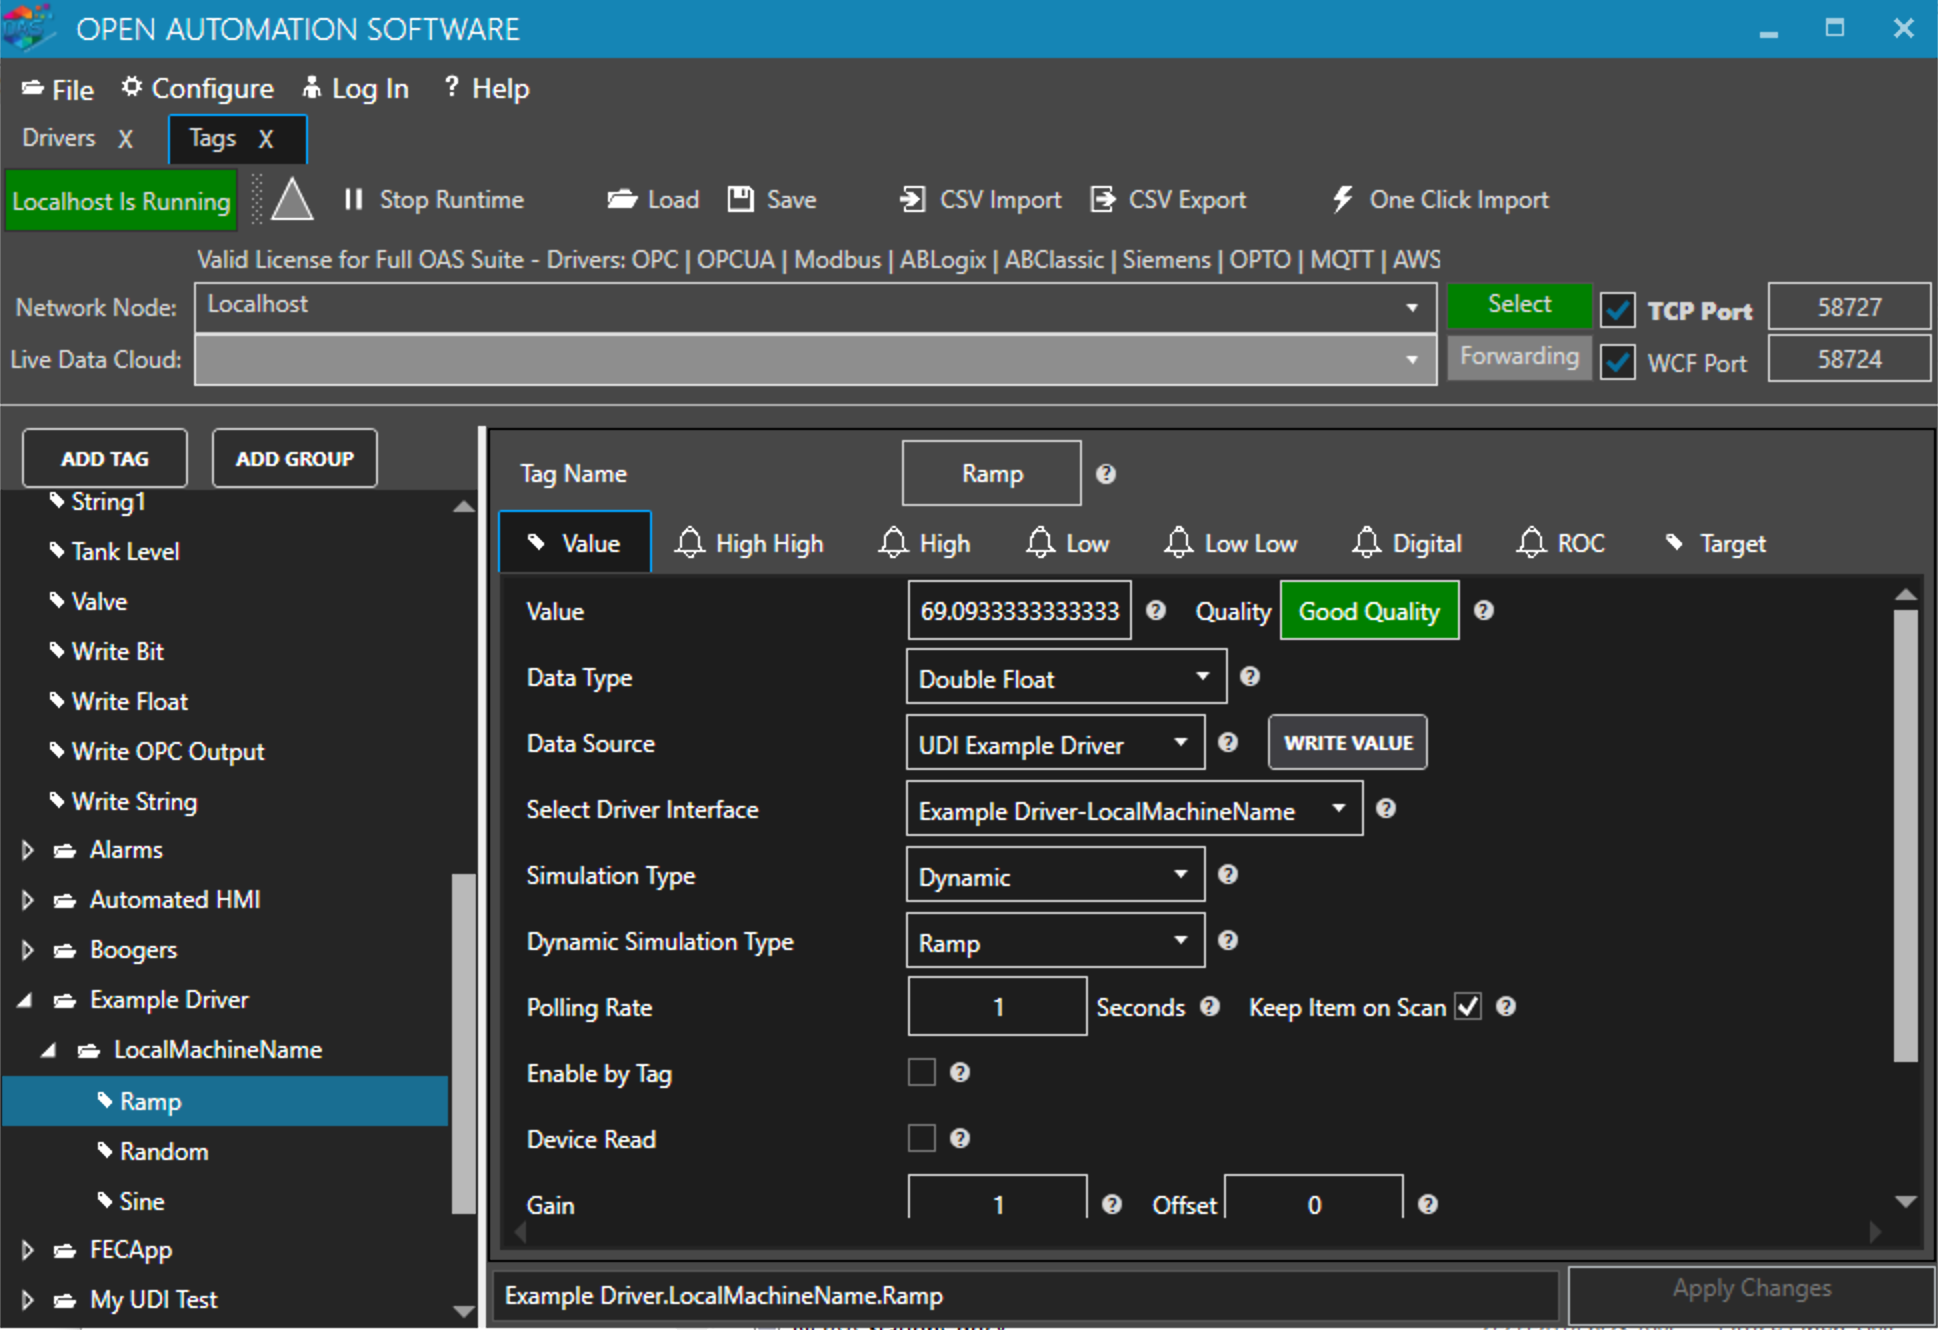
Select any of these Tags and you can see how they are set up to use the custom Driver to feed dynamic data.


FAQs – Universal Driver Interface

Do I need to split up my projects between a Hosting App and a Driver? Can I combine them?
Creating a separate Driver and Hosting App is not required, but doing so gives you the greatest deployment flexibility. By developing a separate Driver assembly, you can reference it from different project types on different platforms, especially if you target either .NET Standard 2.0. Then you can just create a specific simple Hosting App for each deployment scenario without recompiling your driver. If you only have a single deployment target in mind, you can collapse these two projects into a single Hosting App that contains both the Driver code and the runtime host functionality, whether that be a Console Application, Windows Service, etc.
Which version of .NET should my Driver Library target? .NET Framework? .NET Core? .NET Standard?
Choosing the target framework depends on your chosen deployment platform and other required assembly references.
  • If your platform is Windows and you're required to support the full .NET Framework 4.0 or 4.5, your Driver assembly must target the full .NET Framework. Typically this will be .NET 4.0 for wider compatibility.
  • If you choose to deploy the Driver to Linux or other platforms, or if you want to create a Driver assembly that can be used on all platforms including Windows with .NET Framework 4.6.1+, then target the .NET Standard 2.0.
  • However, if you are required to use a 3rd party assembly for interaction with a data source or API, the target framework will be dependent upon the framework that this assembly supports, and may determine other limitations in deployment.
Which Operating Systems or platforms does the Universal Driver Interface support?
Using the .NET Standard 2.0 specification, and .NET Core, you can build communications drivers for OAS that run on Windows, Linux, Mac, Android, and iOS. You can even deploy a driver to run on a Raspberry Pi running the Raspbian OS. Read more about UDI Platform Support for specific OS versions and requirements.

Do I need to split up my projects between a Hosting App and a Driver? Can I combine them?

Creating a separate Driver and Hosting App is not required, but doing so gives you the greatest deployment flexibility. By developing a separate Driver assembly, you can reference it from different project types on different platforms, especially if you target either .NET Standard 2.0. Then you can just create a specific simple Hosting App for each deployment scenario without recompiling your driver. If you only have a single deployment target in mind, you can collapse these two projects into a single Hosting App that contains both the Driver code and the runtime host functionality, whether that be a Console Application, Windows Service, etc.

Which version of .NET should my Driver Library target? .NET Framework? .NET Core? .NET Standard?

Choosing the target framework depends on your chosen deployment platform and other required assembly references.
  • If your platform is Windows and you’re required to support the full .NET Framework 4.0 or 4.5, your Driver assembly must target the full .NET Framework. Typically this will be .NET 4.0 for wider compatibility.
  • If you choose to deploy the Driver to Linux or other platforms, or if you want to create a Driver assembly that can be used on all platforms including Windows with .NET Framework 4.6.1+, then target the .NET Standard 2.0.
  • However, if you are required to use a 3rd party assembly for interaction with a data source or API, the target framework will be dependent upon the framework that this assembly supports, and may determine other limitations in deployment.

UDI Technical Overview

The Universal Driver Interface is built upon the .NET Standard 2.0 Framework, allowing it to be deployed and run on Windows, Mac, Linux, Android, iOS, and even Raspberry Pi* platforms. This opens up unlimited integration scenarios for the OAS Platform, allowing for new edge computing solutions and device connectivity.

OAS Platform Native Drivers

The OAS Platform ships with built-in native drivers for many devices such as Allen Bradley, Siemens, and Modbus PLCs. Connectivity can be configured using the OAS Configuration tool, exposing real time data and control to the Platform. Once connected, each device’s data can be shared over any network between other installations of the OAS Platform, providing a great deal of flexibility in deployment and data aggregation.

OAS Universal Driver (UDI)

The UDI SDK allows developers create new and customized integrations that may not be possible with the built-in device drivers. Using the SDK, a developer writes custom code to read and write data against any external API or protocol, exposing these data points to an OAS Server. The UDI implementation is written in either C# or VB.NET against the .NET Core 2.0 Framework, and depending on the desired deployment target, can be deployed as a Windows Service or application to be run on any other supported platform.

Additionally, the UDI implementation can be deployed either on the same machine as the OAS Server if written as a Windows Service, or it can be deployed remotely on another Windows PC or server. If the UDI implementation is written as a .NET Core application, it can be deployed as a Mac or Linux application and installed as a persistent background process. If desired, a UDI implementation can also be written using Xamarin and deployed as an Android or iOS application.

UDI Application Architecture

The .NET Standard is a cross-platform, baseline version of the .NET libraries. The UDI is built to support the .NET Standard 2.0, allowing for device drivers to be written for any platform supported by the .NET Standard.

Developing Your Driver as a .NET Core or .NET Standard Assembly will allow for the interface to be reused on multiple platforms without the core code being recompiled. A “wrapper” application or service can use the assembly with each deployment target and use case having it’s own custom wrapper. This can be a Windows Service, a console application, or even mobile app.

*While Raspbery Pi is not technically supported as a deployment platform by MS, the Raspbian OS is a variant of Debian, which is a supported target.