How do I programmatically get realtime and historical trend data?

Use the GetTrendDataTable method to return a DataTable object with all trend values.

 DataTable myDataTable;
            myDataTable = opcTrendControl1.GetTrendDataTable();

The following code can be used to programmatically get history data and return the data to a DataTable.

private void button1_Click(object sender, EventArgs e)
        {
            DateTime endTime = DateTime.Now;
            DateTime startTime = endTime.AddMinutes(-20);
            opcTrendControl1.HistorySelect(startTime, endTime);
        }
 
        private void opcTrendControl1_HistoryDataArrived()
        {
            DataTable myDataTable;
            myDataTable = opcTrendControl1.GetTrendDataTable();
            dataGridView1.DataSource = myDataTable;
        }

Frequently Asked Questions – .NET Trend

WPF Properties Edit Ellipses Missing in VS 2022
Visual Studio 2022 design time properties no longer support custom property editors for WPF applications.  Use Visual Studio 2019 to develop WPF applications. The free Community Edition of Visual Studio 2019 can be download from https://visualstudio.microsoft.com/vs/older-downloads/. WinForm applications are still well supported in Visual Studio 2022.
Bad Data Quality in .NET Application.
Below are some possible reasons your .NET application is not able to read OAS tag values.

Data Source Quality

Use Configure-Tags to verify that the data quality of the source tags is "Good Quality". Menu Configure Tags
Quality Good

Security

The Default security group on either the local or remote OAS Engine may have Disable All Tags from Reading checked under the Read Tags Tab.  See Restrict Tag Access of Security setup to see how read, write, and browse access can be restricted. View how to Implement User Credentials in Client Applications to provide log in method for each user in the .NET application.

Network

.NET applications can be defined to communicate to remote OAS Engines.  See Network Communications Troubleshooting to verify that port 58727 is allowing both incoming and outgoing traffic through your firewall.

Tag Path

The full tag path would include the full tag name including its parent groups and the variable of the Tag.
MyGroup.MyTag.Value
Tag names are case sensitive and the current value of a tag would be .Value as the most common variable.
If the tag is from a remote OAS Engine see Basic Networking for standard remote tag syntax or Live Data Cloud Networking if the OAS Engine system has a dynamic IP address.
\\192.168.0.1\TagName.Value

License

Use Configure-License to verify that a product feature .NET Data Connector, WinForm HMI, or WPF HMI is enabled on the data source system where the tags are located. Menu Configure License
Enabled Products

Target Framework for WPF and WinForm Applications

The project type for WinForm and WPF applications should be set to include (.NET Framework) and target .NET Framework 4.6.1 or greater. WinForm Target Framework See the correct project type for WinForm above that is listed as Windows Forms App (.NET Framework) while Windows Forms App would not be the correct project type.

Assembly References

Visual Studio on some operating systems will assign a legacy assembly to the project causing an incompatibility due to an older version of the reference assembly.  A common assembly that can be incorrect is Newtonsoft.Json that has been registered in the GAC by another software product. Select Newtonsoft.Json under the Project References to verify the correct path and version as 13.0.0.0.
Newtonsoft.Json Assembly Reference If the Path does not reference the OAS installation directory remove the reference and select to Add Reference and browse for dll from the respective directory for the specific product feature. For .NET Framework applications include the .dlls located in C:\Program Files\Open Automation Software\OAS\Controls\NetFramework\. The Target Framework set for the VS project must be .NET Framework 4.6.1 or greater. For .NET Standard supporting the following targets include the. dlls located in C:\Program Files\Open Automation Software\OAS\Controls\NetStandard\. See a list of locations for the correct type in the troubleshooting type After updating to OAS Version 17 the project no longer compiles for a list of correct project reference paths for each type of Visual Studio Project.

.NET Assembly is Blocked

If you have copied an application or project to another computer you may need to Unblock one or more the .dll files. Right click on the .dll file that you have downloaded. Check the Unblock checkbox for security as shown in the example below, then click Apply or OK. Excel Add-In

Legacy .NET Application with OAS Version 17

 If the OAS .NET assemblies are from OAS version 16 or less contact support@oasiot.com for compatibility instructions.
After updating to OAS Version 17 the project no longer compiles
OAS version 17 implements an improved network interface which requires some additional assemblies. All dependent .dlls are located in the relative subdirectory of the Controls directory of the OAS installation directory, typically C:\Program Files\Open Automation Software\OAS\Controls\. To add a reference to a Visual Studio project right click on References in the Solution Explorer. Add Reference Select Browse to browse the directory for each application feature. Browse Assemblies Include all .dlls files in the respective directory for the specific product feature. For .NET Framework applications include the .dlls located in C:\Program Files\Open Automation Software\OAS\Controls\NetFramework\. The Target Framework set for the VS project must be .NET Framework 4.6.1 or greater. For .NET Standard supporting the following targets include the. dlls located in C:\Program Files\Open Automation Software\OAS\Controls\NetStandard\.
  • .NET 6
  • .NET 5
  • .NET Core 2.0 or greater
  • .NET Framework 4.61 or greater
  • Xamarin.iOS 10.14 or greater
  • Xamarin.Android 8.0 or greater
  • UWP 1.0.0.16299 or greater
WPF HMI Assemblies
  • C:\Program Files\Open Automation Software\OAS\Controls\NetFramework\OPCWPFDashboard\
WinForm HMI Assemblies
  • C:\Program Files\Open Automation Software\OAS\Controls\NetFramework\OPCControls\
Alarm .NET Assemblies
  • C:\Program Files\Open Automation Software\OAS\Controls\NetFramework\OPCAlarmControl\
  • C:\Program Files\Open Automation Software\OAS\Controls\NetFramework\OPCAlarmDataOnly\
  • C:\Program Files\Open Automation Software\OAS\Controls\NetStandard\OASAlarms\
Trend .NET Assemblies
  • C:\Program Files\Open Automation Software\OAS\Controls\NetFramework\OPCTrendControl\
  • C:\Program Files\Open Automation Software\OAS\Controls\NetFramework\OPCTrendDataOnly\
  • C:\Program Files\Open Automation Software\OAS\Controls\NetStandard\OASTrends\
.NET Data Connector Assemblies
  • C:\Program Files\Open Automation Software\OAS\Controls\NetFramework\OPCSystemsDataConnector\
  • C:\Program Files\Open Automation Software\OAS\Controls\NetStandard\OASData\
Server Configuration Assemblies
  • C:\Program Files\Open Automation Software\OAS\Controls\NetFramework\OPCSystems\
  • C:\Program Files\Open Automation Software\OAS\Controls\NetStandard\OASConfig\
How do I programmatically add pens to a trend window?
The following two (2) examples are for WinForm and WPF applications on how to add pens to a trend window during runtime programmatically.
WinForm:
Dim NewPen As OPCTrendControl.ClassPen
Dim NewPens As OPCTrendControl.ClassPen()
ReDim NewPens(2)
If NetworkPath = """" Then
NewPen = New OPCTrendControl.ClassPen(NetworkPath + ""Ramp.Value"", ""localhost"")
Else
NewPen = New OPCTrendControl.ClassPen(NetworkPath + ""Ramp.Value"", NetworkNode)
End If
NewPen.LineBorderColor = Color.Blue
NewPen.LineFillColor = Color.Blue
NewPen.Description = "Ramp"
NewPen.LineStyle = OPCTrendControl.ClassPen.LineStyleTypes.Ellipsoid
NewPens(0) = NewPen

If NetworkPath = "" Then
NewPen = New OPCTrendControl.ClassPen(NetworkPath + ""Sine.Value"", ""localhost"")
Else
NewPen = New OPCTrendControl.ClassPen(NetworkPath + ""Sine.Value"", NetworkNode)
End If

NewPen.LineBorderColor = Color.Red
NewPen.LineFillColor = Color.Red
NewPen.Description = "Sine"
NewPen.YAxisRangeHigh = 1
NewPen.YAxisRangeLow = -1
NewPen.LineStyle = OPCTrendControl.ClassPen.LineStyleTypes.Tube
NewPens(1) = NewPen

If NetworkPath = "" Then
NewPen = New OPCTrendControl.ClassPen(NetworkPath + ""Random.Value"", ""localhost"")
Else
NewPen = New OPCTrendControl.ClassPen(NetworkPath + ""Random.Value"", NetworkNode)
End If

NewPen.LineBorderColor = Color.Green
NewPen.LineFillColor = Color.Green
NewPen.Description = "Random"
NewPen.MarkerFillColor = Color.Green
NewPen.MarkerStyle = OPCTrendControl.ClassPen.MarkerStyleTypes.Sphere
NewPen.MarkerSize = 20
NewPens(2) = NewPen

frmTrend.OpcTrendControl1.Pens = NewPens

WPF:

VB
Dim Pens As New OPCWPFDashboard.PensList
Dim NewPen As New OPCTrendControl.ClassPen

'Add Ramp Pen
NewPen = New OPCTrendControl.ClassPen("Ramp.Value", "localhost")
NewPen.Units = ""MGD""
NewPen.YAxisRangeHigh = 2
NewPen.LineStyle = OPCTrendControl.ClassPen.LineStyleTypes.Line
NewPen.Description = "Ramp Value"
Pens.Add(NewPen)

'Add Random
NewPen = New OPCTrendControl.ClassPen("Random.Value", "localhost")
NewPen.Units = "NTU"
NewPen.Description = "Random Pen"
Pens.Add(NewPen)
OPCWPFTrend1.Pens = Pens

C#
OPCWPFDashboard.PensList Pens = new OPCWPFDashboard.PensList();
OPCTrendControl.ClassPen NewPen = new OPCTrendControl.ClassPen();

//Add Ramp Pen
NewPen = new OPCTrendControl.ClassPen("Ramp.Value", "localhost");
NewPen.Units = "MGD";
NewPen.YAxisRangeHigh = 2;
NewPen.LineStyle = OPCTrendControl.ClassPen.LineStyleTypes.Line;
NewPen.Description = "Ramp Value";
Pens.Add(NewPen);

//Add Random
NewPen = new OPCTrendControl.ClassPen("Random.Value", "localhost");
NewPen.Units = "NTU";
NewPen.Description = "Random Pen";
Pens.Add(NewPen);
OPCWPFTrend1.Pens = Pens
The database engine language is different than the Regional Language settings of the Data Logging and / Alarm Logging Service. Data Logging updates, Alarm Logging updates, trend history, and / alarm history is not working due to invalid date format.
Go to Configure-Options-History and Enable History Date Format. Examples: yyyy-MM-dd HH:mm:ss MM/dd/yyyy HH:mm:ss
After updating Open Automation Software with the incremental update the project no longer compiles or the application no longer works.
Make sure to Unblock the dlls before copying to C:\Program Files\Open Automation Software\OAS\Controls\NetFramework\.
To Unblock the files copy to a trusted location for your system, Desktop works well, then right click on the file and select Properties to select Unblock. Then copy from your Desktop to the correct directory in C:\Program Files\Open Automation Software\OAS\Controls\.
I want to add annotations to the trend window.
Create a String Tag with the Trend Point property enabled. Add the String Tag to the Trend Window as a new Pen. In one of the other existing pens where you want the annotation to appear on set the property Pen.LabelAnnotationTag to the String Tag. Set the Data Logging Group to the String Tag to a String field you will be updating directly from your application.
I would like to show multiple Y Axis on the trend window.
Set YAxis-ScaleMode to one of the Stacked chart types. Set each Pen’s StackedChartNumber to the desired stacked chart to display the pen.
Does OPCTrend.NET support OPC HDA?
No, OPCTrend.NET is a client/server architecture that does not require DCOM and the communications uses the built in networking to the .NET Framework. This makes it possible for trend clients to view real-time data and historical data with OPCDatabase.NET from anywhere in the world over the Internet. The OAS Service can bring in data values from Data Access OPC Servers, Data Access OPC Clients, databases like SQL Server, Oracle, Access, and mySQL, Microsoft Excel, and .NET applications (web, WinForm, WCF, WPF, and Windows Services). The values can then be cached for unlimited trend clients and logged to databases with OPCDatabase.NET. Trend clients can be running on both Windows Operating systems and non Windows Operating systems like smart phones and the iPads. Visit the Trend .Net Product page for more information and to run a live example.
Trend history is running very slow from the database.
Make sure the date and time span is defined to return a subset of data instead of all of the data. You can also reindex the database in SQL Server to run faster. Reorganizing and Rebuilding Indexes http://msdn.microsoft.com/en-us/library/ms189858.aspx
How do I programmatically get realtime and historical trend data?
Use the GetTrendDataTable method to return a DataTable object with all trend values.
 DataTable myDataTable;
            myDataTable = opcTrendControl1.GetTrendDataTable();
The following code can be used to programmatically get history data and return the data to a DataTable.
private void button1_Click(object sender, EventArgs e)
        {
            DateTime endTime = DateTime.Now;
            DateTime startTime = endTime.AddMinutes(-20);
            opcTrendControl1.HistorySelect(startTime, endTime);
        }
 
        private void opcTrendControl1_HistoryDataArrived()
        {
            DataTable myDataTable;
            myDataTable = opcTrendControl1.GetTrendDataTable();
            dataGridView1.DataSource = myDataTable;
        }

What assemblies do I need to deploy with my application?
Include the following in References as Local Copy:
  • Nevron.Chart.dll
  • Nevron.Chart.WinForm.dll
  • Nevron.GraphicsGL.dll
  • Nevron.Presentation.dll
  • Nevron.System.dll
  • OPCSystemsInterface.dll
  • OPCTrendControl.dll

Videos – .NET Trend

View the following video for a quick introduction to OAS Trend .NET.

Trend .NET

Realtime and historical trending for WPF and WinForm applications with 100% managed component for local and remote deployment.

Trend and Alarm Historian

How to use the Trend and Alarm Historian container.  Pre-built application to run locally and remotely.

.NET Trend Window

How to add a trend window to WPF or WinForm application for local and remote connections.

History and RealTime Compare

How to setup trending for historical and realtime trending in the same window with multiple time axis.

X/Y Plot

How to setup trending for an X/Y plot scale with one value assigned to the X Axis and multiple values to the Y Axis.

OAS Trend .NET Programmatic Methods

OAS Trend .NET Programmatic Methods 16There are several different methods to programmatically access the trend data and call history for the trend OPCTrendControl. Refer to the OPCTrendControl help file for all properties and methods with their description and syntax.

Use the GetTrendDataTable method to return a DataTable of all data in the current view.

Get Trend History Data Programmatically

The following code can be used to programmatically get history data and return the data to a DataTable:

private void button1_Click(object sender, EventArgs e)
        {
            DateTime endTime = DateTime.Now;
            DateTime startTime = endTime.AddMinutes(-20);
            opcTrendControl1.HistorySelect(startTime, endTime);
        }
 
        private void opcTrendControl1_HistoryDataArrived()
        {
            DataTable myDataTable;
            myDataTable = opcTrendControl1.GetTrendDataTable();
            dataGridView1.DataSource = myDataTable;
        }

OAS Trend .NET Toolbars

Modify Properties Button

Modify Properties Button 376Use the Modify Properties button to make on-line changes to all properties of the Trend Window.

Modify Properties Button 377

View Data Grid Button

View Data Grid Button 378Select the View Data Grid button to show a table of all values of the current trend.

Start Runtime Button

Start Runtime Button 379Select the Start Runtime button to put the Trend Window in real-time update mode. This button is useful if the Trend Window was previously stopped using the Stop Runtime button (see below).

Stop Runtime Button

Select the Stop Runtime button to freeze the Trend Window. Stop Runtime Button 380The Data Cursor button is then selectable.

Data Zoom Button

Data Zoom Button 381Select the Data Zoom button to zoom in on a section of the Trend Window. There are many other zoom types also.

Data UnZoom Button

Data UnZoom Button 382Select the Data UnZoom button to return the Trend Window to 100% data zoom if the Data Zoom button was previously used. There are many other zoom types also.

Data Cursor Button

Data Cursor Button 383The Data Cursor button is available with the Trend Window has been stopped with the Stop Runtime button (see above). Select the Data Cursor to bring up the data plane in 3D mode or data line in 2D mode. Use the mouse to move the data plane to see the date/time and values at the position of the data plane.

History Button

History Button 384Use the History button to freeze the Trend Window and select a Date and Time range to retrieve historical data for all Pens that have been logged using OAS Data Log.

Hide Toolbar Button

Hide Toolbar Button 385Select this button to hide the Toolbar. Click on the Trend Window with the Right Mouse button to show the Toolbar again.

Print Trend Window Button

Print Trend Window Button 386Select this button to print up the Print Preview window that can be used to print the current trend.


Print Trend Window Button Warning 387Some printer drivers do not support 3D Window rendering so the application will halt if the printer driver cannot handle the large memory for the print.

2D View Button

2D View Button 388Select this button to view the Trend in just 2 dimensions. Note this selection will not be retentive. Use the View Property to make the change retentive.

3D Perspective View Button

3D Perspective View Button 389Select this button to view the Trend in Perspective View. Note this selection will not be retentive. Use the View Property to make the change retentive.

3D Orthogonal View Button

3D Orthogonal View Button 390Select this button to view the Trend in Orthogonal View. Note this selection will not be retentive. Use the View Property to make the change retentive.

3D Free Rotate Button

3D Free Rotate Button 391Select this button to rotate the Trend Window on all 3 planes. This feature can be used to obtain non standard view perspectives of the data. Note this selection will not be retentive. Use the View Property to make the change retentive.

Predefined Projection Button

Predefined Projection Button 392Select this button to select predefined 2D and 3D views. Note this selection will not be retentive. Use the View Property to make the change retentive.

Predefined Projection Button 393

View Zoom Button

View Zoom Button 394Select this button to enable the mouse to Zoom In and Out by moving the mouse up and down. Note this selection will not be retentive.

Move Trend Button

Move Trend Button 395Select this button to move the Trend. Note this selection will not be retentive.
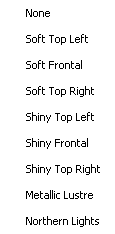
Lighting Button

Predefined Projection Button 392Use this button to select the desired lighting effect. Note this selection will not be retentive. Use the View Property to make the change retentive.

Lighting 396

User Log In

User Log In 397Use this button to Log In to the trend control when security is enabled in the service.

OAS Trend .NET Runtime Distribution

You can distribute the OAS Trend .NET component with your local and remote applications. This component will only connect to licensed OAS Services.

The Microsoft .NET Framework version 2.0 is required on all systems that will use the OPC Trend component. This is automatically included with Windows XP and greater. Only Windows 2000 systems will you need to install the .NET Framework 2.0 to.

The following files are required to be distributed with your applications that are commonly found in the installation directory of Open Automation Software.

  • For .NET Framework 2.0 the installation directory is C:Program FilesOpen Automation SoftwareOPCSystems.NET.
  • OPCTrendControl.dll
  • C1.Win.C1FlexGrid.2.dll
  • OPCSystemsInterface.dll
  • OPCSystemsBrowseComputers.dll
  • Nevron.Chart.dll
  • Nevron.Chart.WinForm.dll
  • Nevron.GraphicsGL.dll
  • Nevron.Presentation.dll
  • Nevron.System.dll

Visual Studio.NET Reference

To add the OAS Trend .NET component to your Visual Studio.NET development systems select View-Toolbox from within Visual Studio.NET.

Visual Studio.NET Reference 373

Right-Click on the Toolbox and select Add/Remove Items.

Visual Studio.NET Reference 374

Select OPCTrendControl for the .NET Framework Components.

Visual Studio.NET Reference 375

You are now ready to add the OAS Trend .NET component to your Visual Studio Forms to develop unlimited numbers of applications for local and remote connections to OAS Services with a valid OAS Trend .NET license.

Use the OAS Trend .NET Properties to setup the Trend Window attributes such as pens, time frames, and colors.

Set the ConfigurationFile property to a proper file path with the extension .alarm if you desire to save on-line changes.  If you leave this property blank the window setup is saved with your application, but on-line changes are not retentive.

Refer to the Windows Trending section for an example of setting up properties of the Trend Window.

OAS Trend .NET Component

The OAS Trend .NET control is .NET component that can be integrated into any .NET component container like Visual Studio.NET. The component is 100% managed code and works with any local and/or remote OAS Service.

No license is needed to use the components. It can connect to any OAS Service that has an OAS Trend .NET license.

Use the OPC Trends and Alarms application to use the OAS Trend .NET component features if you do not wish to develop your own container application.

Refer to OPCTrendControl help for all properties and members of the OAS Trend .NET component.

Refer to the Windows Trending section for an example of setting up properties of the Trend Window.